Introduction
Adding subtitles to MKV files can greatly enhance the viewing experience, allowing viewers to understand the dialogue and fully immerse themselves in the content. Whether you’re watching a foreign film, a TV series, or a video with poor audio quality, having subtitles can make all the difference. Thankfully, there are several methods available to add subtitles to MKV files, ranging from using media players to specialized software.
In this article, we will explore various options for adding subtitles to MKV files. We will discuss how to use popular media players like VLC Media Player, as well as dedicated software like HandBrake, MKVToolNix, and Aegisub. Each option caters to different user preferences and skill levels, so you can choose the method that works best for you.
Before we dive into the specific methods, it’s important to note that adding subtitles generally requires the subtitle file to be in the same folder and have the same name as the MKV video file. Additionally, the subtitle file should be in a compatible subtitle format, such as SubRip (.srt), or Matroska (.mkv). With these basics in mind, let’s explore the various options for adding subtitles to MKV files.
Why Add Subtitles to MKV?
Adding subtitles to MKV files offers a plethora of benefits for viewers. Here are the key reasons why you should consider adding subtitles:
- Improved comprehension: Subtitles allow viewers to better understand the dialogue, especially when watching content in a foreign language or when the audio quality is poor. By providing a textual representation of the spoken words, subtitles enhance comprehension and prevent any misunderstandings.
- Accessibility: Subtitles make videos accessible to individuals who are hearing impaired or have difficulties with spoken language. By providing visual text, subtitles ensure that everyone can enjoy the content and follow the storyline without relying solely on audio cues.
- Language learning: Subtitles can be a valuable tool for language learners. Watching videos with both audio and subtitle tracks allows learners to associate the written words with the spoken language, enhancing their language skills and vocabulary.
- Noisy or distracting environments: In noisy or distracting environments, subtitles can help viewers follow the dialogue without missing any important information. Whether it’s watching videos on public transportation or in a crowded room, subtitles provide a way to enjoy the content without relying solely on audio.
- Cultural context: Subtitles can also convey cultural nuances and context that may be lost in translation. Translated subtitles can help viewers grasp the full meaning of dialogues, jokes, and references that are specific to the original language. This enriches the viewing experience and ensures that nothing gets lost in translation.
These are just a few reasons why adding subtitles to MKV files can greatly enhance the overall viewing experience. Whether it’s for better comprehension, accessibility, language learning, or thriving in noisy environments, subtitles truly offer a world of benefits.
Option 1: Using VLC Media Player
VLC Media Player, a popular and versatile media player, offers a straightforward method for adding subtitles to MKV files. Here’s how you can do it:
- First, make sure you have both the MKV video file and the subtitle file in the same folder.
- Open VLC Media Player and navigate to ‘Media’ in the top menu.
- Select ‘Open File’ and browse to the location where your MKV file is stored.
- Click ‘Open’ to load the MKV file into VLC.
- Navigate to ‘Subtitle’ in the top menu and select ‘Add Subtitle File’.
- Locate the subtitle file in the folder and click ‘Open’ to load it into VLC.
- The subtitles should now appear when you play the MKV file using VLC Media Player.
VLC Media Player offers various customization options for subtitles, including the ability to adjust the subtitle size, font, color, and position on the screen. You can access these options by navigating to ‘Tools’ in the top menu, selecting ‘Preferences’, and then choosing the ‘Subtitles/OSD’ category.
Using VLC Media Player ensures a straightforward and user-friendly approach to adding subtitles to MKV files. It is a great option for both beginners and experienced users, providing flexibility and control over subtitle customization.
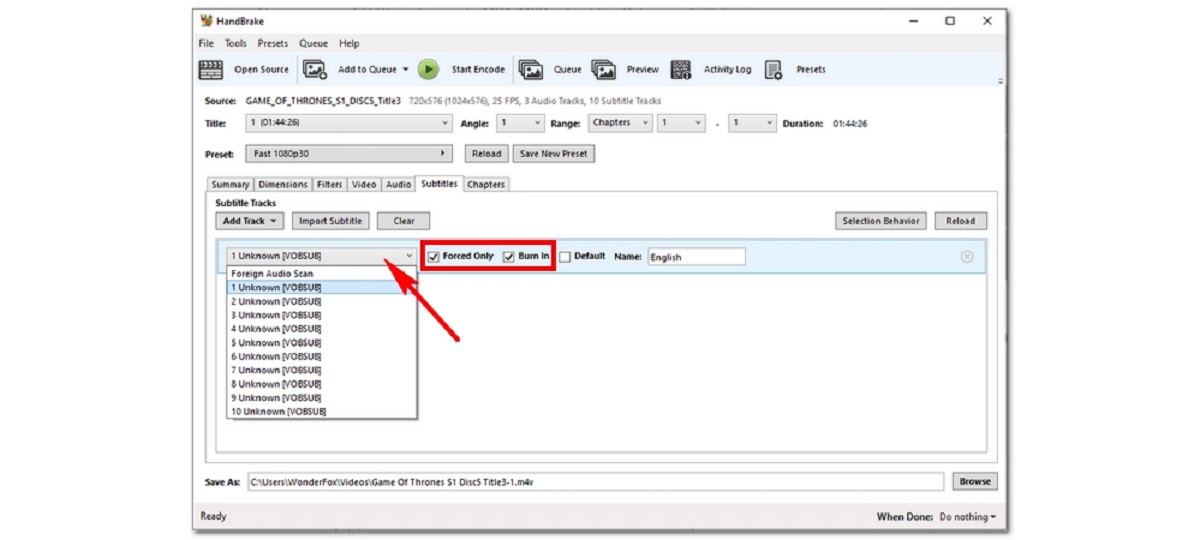
Option 2: Using HandBrake
HandBrake is a powerful open-source video transcoder that can also be used to add subtitles to MKV files. Here’s how you can use HandBrake to accomplish this:
- Start by downloading and installing HandBrake on your computer from the official website (https://handbrake.fr/).
- Launch HandBrake and click on the ‘Open Source’ button to select the MKV file you want to add subtitles to.
- Once the MKV file is loaded, navigate to the ‘Subtitles’ tab in the HandBrake interface.
- Enable the ‘Import SRT’ option and click on the ‘Browse’ button to locate the subtitle file (.srt) you want to add.
- Select the subtitle file and click ‘Open’ to import it into HandBrake.
- Specify the output file format and destination by choosing a preset or manually adjusting the settings.
- Click on the ‘Start’ button to begin the conversion process. HandBrake will generate a new MKV file with the added subtitles.
Once the conversion is complete, you can play the newly created MKV file using any media player, and the subtitles will be displayed along with the video.
HandBrake offers advanced options for subtitle customization, such as adjusting font size, style, and color. You can access these options by clicking on the ‘Subtitles’ tab and exploring the settings provided.
Using HandBrake provides a more involved approach to adding subtitles to MKV files, but it offers additional flexibility and control over the output format and subtitle customization options. It is a great choice for users who require more advanced features and customization capabilities.
Option 3: Using MKVToolNix
If you are looking for a dedicated tool specifically designed for working with MKV files, MKVToolNix is an excellent choice. Here’s how you can use MKVToolNix to add subtitles to your MKV files:
- Download and install MKVToolNix from the official website (https://mkvtoolnix.download/).
- Launch MKVToolNix and click on the ‘Add Source Files’ button to select the MKV file you want to add subtitles to.
- In the ‘Input Files’ section, you will see the selected MKV file. Click on the ‘Add’ button in the ‘Tracks, chapters, and tags’ column to add a new subtitle track.
- Locate the subtitle file you want to add (.srt or .ass format) and select it.
- Adjust the language and other track properties (if necessary) by selecting the subtitle track and clicking on the ‘Properties’ button.
- Choose the output directory and specify the name for the new MKV file with the added subtitles.
- Click on the ‘Start multiplexing’ button to start the process. MKVToolNix will create a new MKV file with the subtitles embedded.
Once the process is complete, you can play the newly created MKV file using any media player, and the subtitles will be automatically displayed.
MKVToolNix also provides advanced options for subtitle customization, including the ability to adjust the position, style, color, and timing of the subtitles. These options can be accessed by selecting the subtitle track and clicking on the ‘Properties’ button.
Using MKVToolNix gives you precise control over adding subtitles to your MKV files, and it is a great choice for users who want a comprehensive tool specifically tailored for working with MKV files.
Option 4: Using Aegisub
Aegisub is a powerful and feature-rich subtitle editing software that can also be used to add subtitles to MKV files. Here’s a step-by-step guide on how to use Aegisub:
- Download and install Aegisub from the official website (https://www.aegisub.org/).
- Launch Aegisub and go to ‘File’ in the top menu, then select ‘Open’ to load the MKV file you want to add subtitles to.
- Once the video is loaded, go to ‘Subtitles’ in the top menu and select ‘Open Subtitle’ to load the subtitle file (.srt or .ass format).
- The subtitles will be displayed in the Aegisub interface, and you can make any necessary adjustments, such as editing the text, timing, or style of the subtitles.
- After finalizing the subtitle edits, go to ‘File’ and select ‘Export’ to save the subtitles as an .ass file.
- Now, open MKVToolNix (if you have it installed), select ‘Add Source Files,’ choose the MKV file, and add the .ass subtitle file you just exported from Aegisub to embed the subtitles in the MKV file.
- Choose the output directory and specify the name for the new MKV file.
- Click on the ‘Start multiplexing’ button to start the process. MKVToolNix will create a new MKV file with the added subtitles.
Once the process is complete, you can play the newly created MKV file using any media player, and the subtitles will be automatically displayed according to the adjustments made in Aegisub.
Aegisub offers extensive features for subtitle editing, including advanced styling options, timing adjustments, and more. It is a powerful tool for those who want precise control over the subtitle creation and customization process.
Using Aegisub may require a bit more familiarity with subtitle editing compared to other methods, but it offers a comprehensive solution for creating and adding subtitles to MKV files with maximum customization options and flexibility.
Conclusion
Adding subtitles to MKV files can greatly enhance the viewing experience, and there are various options available to accomplish this task. Whether you prefer using media players like VLC Media Player, dedicated software like HandBrake and MKVToolNix, or specialized tools like Aegisub, each method offers its own set of advantages and customization options.
VLC Media Player provides a user-friendly approach and allows for easy customization of subtitle settings. It is a great choice for beginners and users who want a straightforward method for adding subtitles.
HandBrake, on the other hand, offers more advanced features and customization options for those who require greater control over the output format and subtitle settings.
If you prefer dedicated software specifically designed for working with MKV files, MKVToolNix is an excellent option. It offers comprehensive tools for subtitle manipulation and provides precise control over the subtitle track.
Aegisub is a powerful subtitle editing software for users who want to create and customize subtitles in addition to adding them to MKV files. It provides extensive features for editing text, timing, and styling, making it suitable for advanced users.
Ultimately, the choice of method depends on your specific needs, preferences, and level of expertise. Whether you’re a beginner or an advanced user, adding subtitles to MKV files is a manageable task with the options discussed in this article.
By incorporating subtitles, you can improve comprehension, enhance accessibility, and even aid in language learning. So, go ahead and choose the method that suits you best to start enjoying your MKV files with subtitles.