Introduction
Subtitles can greatly enhance the viewing experience of movies or videos, especially when it comes to foreign language films or videos with poor audio quality. If you have an MKV (Matroska) video file that you want to convert to MP4 (MPEG-4) format and include subtitles, Handbrake is a powerful and user-friendly tool that can help you achieve this. Handbrake is a free, open-source software available for Windows, Mac, and Linux systems, and provides a wide range of features for video encoding and conversion.
In this tutorial, we will guide you through the process of converting an MKV file to MP4 format using Handbrake, while also adding subtitles. We will explore how to download and install Handbrake, open the software, select the MKV file, choose the output format, add subtitles, adjust subtitle settings, select the destination folder, and start the conversion process. By following these steps, you will be able to convert your MKV video file to MP4 format with subtitles, making it compatible with various devices and platforms.
Whether you want to watch a favorite foreign film with subtitles or need to convert a video for a presentation with added captions, Handbrake offers a straightforward solution. So, let’s get started with the step-by-step instructions and convert those MKV files to MP4 format with subtitles using Handbrake.
Downloading and Installing Handbrake
The first step to converting an MKV file to MP4 format with subtitles using Handbrake is to download and install the software. Handbrake is available for free on its official website and supports multiple operating systems, including Windows, Mac, and Linux. Follow the instructions below to download and install Handbrake:
- Open your preferred web browser and navigate to the official Handbrake website at https://handbrake.fr/.
- On the Handbrake homepage, click on the “Download” button. This will take you to the downloads page.
- Scroll down the downloads page and select the version of Handbrake that is compatible with your operating system. Click on the download link to initiate the download.
- Once the download is complete, locate the installation file in your system’s downloads folder or the specified destination you chose for the download. Double-click on the file to start the installation process.
- Follow the on-screen instructions to install Handbrake on your computer. Make sure to carefully read and accept the software’s terms and conditions.
- Once the installation is complete, you will have Handbrake installed and ready to use on your computer.
Now that Handbrake is successfully downloaded and installed, you can proceed to the next step: opening the software and beginning the MKV to MP4 conversion process with subtitles.
Opening Handbrake
After downloading and installing Handbrake on your computer, it’s time to open the software and get started with converting your MKV file to MP4 format with subtitles. Follow these steps to open Handbrake:
- Locate the Handbrake application on your computer. On Windows, you can find it by clicking on the Start menu and typing “Handbrake” in the search bar. On Mac, it should be available in the Applications folder.
- Click on the Handbrake icon to launch the software.
- Once Handbrake is open, you will see the main interface with various options and settings.
Handbrake provides a user-friendly interface that makes it easy to navigate through the different features and functions. The toolbar at the top of the window contains the main menus, while the main area of the interface displays the settings and options for the conversion process. On the left-hand side, you will find the Source Selection section, allowing you to choose the MKV file you want to convert.
Now that Handbrake is open and you’re familiar with the interface, it’s time to move on to the next step: selecting the MKV file for conversion.
Selecting the MKV File
Once you have Handbrake open, the next step is to select the MKV (Matroska) file that you want to convert to MP4 format with subtitles. Handbrake provides a straightforward process for selecting the input file. Follow these steps:
- In the Handbrake interface, locate the “Source Selection” section on the left-hand side.
- Click on the “Open Source” button. This will open a file dialogue box.
- Navigate to the location where your MKV file is stored, and select it.
- Click “Open” to confirm the selection.
After selecting the MKV file, Handbrake will begin scanning the file and retrieving its details. You will see a progress bar indicating the scanning process. Once the scanning is complete, Handbrake will display information about the MKV file, including its duration, resolution, and audio tracks.
It’s important to note that Handbrake supports a wide range of video and audio codecs. However, in order to ensure a successful conversion process, make sure that the MKV file you have selected is compatible with Handbrake’s supported formats.
Now that you have successfully selected the MKV file, it’s time to move on to the next step: choosing the output format for conversion to MP4.
Choosing the Output Format
After selecting the MKV file in Handbrake, the next step is to choose the output format for the conversion process. Handbrake provides a wide range of output options, but in this case, we want to convert the MKV file to MP4 format. Follow these steps to select the output format:
- In the Handbrake interface, navigate to the “Output Settings” section.
- Click on the “Format” dropdown menu. A list of available output formats will appear.
- Scroll through the list and select “MP4” as the desired format.
By selecting MP4 as the output format, you ensure that the converted file will be compatible with various devices and platforms.
Handbrake also provides advanced options for customizing the output format, such as adjusting the video codec, frame rate, quality, and audio settings. However, if you’re not familiar with these settings, it’s recommended to stick with the default options. Handbrake’s default settings generally provide good quality and compatibility for most conversions.
Once you have chosen the output format, you’re ready to proceed to the next step: adding subtitles to the conversion process.
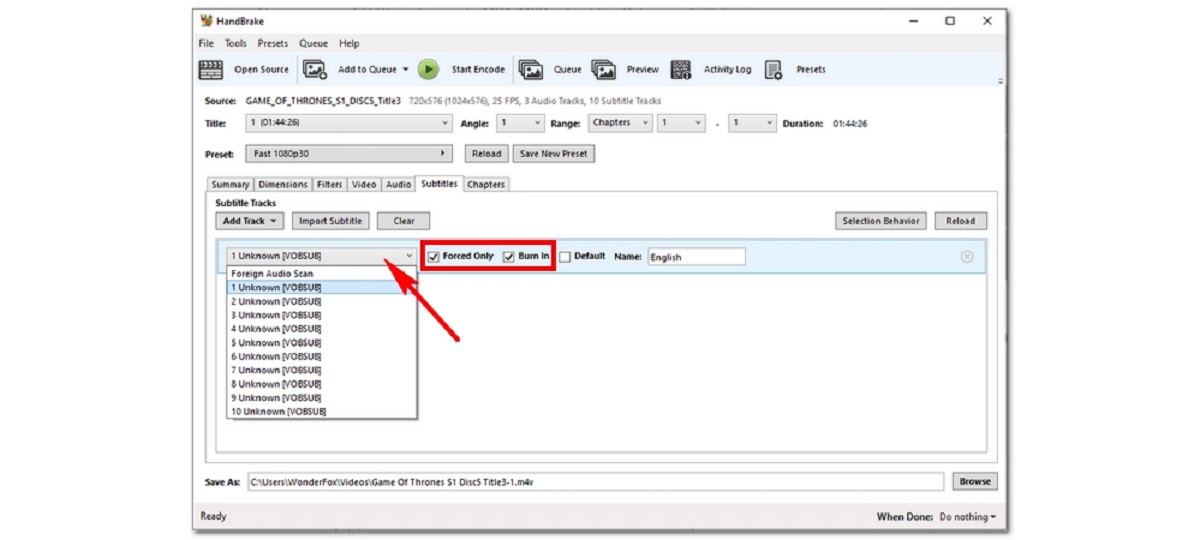
Adding Subtitles
If you want to include subtitles in your converted video, Handbrake allows you to easily add them during the conversion process. Follow these steps to add subtitles:
- In the Handbrake interface, locate the “Subtitle” tab.
- Click on the “Add” button. This will open a file dialogue box.
- Navigate to the location where your subtitle file is stored, and select it.
- Click “Open” to confirm the selection.
Handbrake supports various subtitle file formats, including SRT (SubRip), VTT (WebVTT), SSA (SubStation Alpha), and more. Make sure the subtitle file you are adding is in a compatible format.
After adding the subtitle file, you will see it listed in the Subtitle tab. You can further customize the subtitle settings, such as choosing the default subtitle language, enabling or disabling subtitles, and selecting subtitle tracks if the file contains multiple options.
It’s worth noting that Handbrake also allows you to burn the subtitles into the video, which means they will be hardcoded and cannot be disabled or adjusted in playback. This is useful if you want the subtitles to be permanently visible in the video. If you prefer to have the subtitles as separate files that can be turned on or off during playback, make sure to leave the “Burn In” option unchecked.
Now that you have successfully added the subtitles, it’s time to move on to the next step: adjusting subtitle settings.
Adjusting Subtitle Settings
Once you have added the subtitles to your video in Handbrake, you may want to make some adjustments to the subtitle settings. Handbrake provides several options for customizing the appearance and behavior of the subtitles. Follow these steps to adjust the subtitle settings:
- In the Handbrake interface, locate the “Subtitle” tab.
- Select the subtitle track you want to modify from the drop-down menu, if there are multiple tracks available.
- Under the “Subtitles” section, you can adjust the following settings:
- Subtitle Track Name: Rename the subtitle track for easy identification.
- Forced Subtitles: Enable this option if you want the subtitles to be displayed even when there are no dialogues or translations. This is commonly used for foreign language parts in movies.
- Default: Set the subtitle track as the default option for playback.
- Subtitle Burn-In: If you want to permanently embed the subtitles into the video, check this option. Otherwise, leave it unchecked to keep the subtitles as separate files.
- Additionally, you can adjust the appearance of the subtitles by toggling the “Font”, “Size”, “Color”, “Outline”, and “Position” options. Experiment with these settings to achieve the desired subtitle appearance.
By adjusting the subtitle settings in Handbrake, you can ensure that the subtitles are displayed correctly and customized according to your preferences.
Now that you have fine-tuned the subtitle settings, you are ready to select the destination folder for the converted file and proceed with the conversion process.
Selecting the Destination Folder
After adding the subtitles and adjusting the subtitle settings in Handbrake, the next step is to select the destination folder where the converted MP4 file will be saved. Handbrake makes it easy to choose the desired output location. Follow these steps:
- In the Handbrake interface, locate the “Destination” section.
- Click on the “Browse” button next to the “Destination” field. This will open a file dialogue box.
- Navigate to the location on your computer where you want to save the converted MP4 file.
- Click “Open” or “Save” to confirm the selection.
Make sure to choose a location that is easily accessible and has enough storage space for the converted file. It’s a good practice to create a new folder specifically for the converted files to keep them organized.
Once you have selected the destination folder, double-check the file path in the “Destination” field to ensure it is correct. This will ensure that the converted MP4 file is saved in the desired location.
Now that you have chosen the destination folder, you are ready to start the conversion process and obtain the MP4 file with embedded subtitles.
Starting the Conversion Process
With everything set up in Handbrake, including the MKV file selection, output format, subtitle addition, subtitle settings, and destination folder selection, you are now ready to begin the conversion process. Follow these steps to start converting your MKV file to MP4 format with subtitles:
- Review all the settings and make sure they are configured according to your preferences.
- Click on the “Start” button at the top of the Handbrake interface. This will initiate the conversion process.
- Handbrake will begin encoding and converting the MKV file to the selected MP4 format with the added subtitles.
- You can monitor the progress of the conversion through the progress bar and the details displayed in the Handbrake interface.
- Depending on the size and complexity of the MKV file, as well as the performance of your computer, the conversion process may take some time to complete.
- Once the conversion process is finished, Handbrake will notify you, and the converted MP4 file will be saved in the destination folder you selected.
It is important to note that during the conversion process, Handbrake utilizes your computer’s resources, such as CPU and memory, to perform the encoding. Therefore, it is recommended not to have resource-intensive tasks running simultaneously to ensure smooth and efficient conversion.
Now that you have started the conversion process, you can sit back and wait for Handbrake to complete the conversion. Once finished, you will have an MP4 file that includes the subtitles, ready for playback on various devices and platforms.
Conclusion
Converting an MKV file to MP4 format with subtitles using Handbrake is a simple and effective way to make your videos more accessible and enjoyable. With the step-by-step instructions provided in this tutorial, you can easily navigate through the process and achieve the desired results.
We started by downloading and installing Handbrake, a powerful and user-friendly software for video conversion and encoding. With Handbrake open, we then selected the MKV file we wanted to convert, and chose the output format as MP4. We also learned how to add subtitles to the video and adjust various subtitle settings to customize their appearance and behavior.
Once we had all the settings in place, we selected the destination folder where the converted MP4 file would be saved, and finally, we initiated the conversion process. Handbrake encoded the MKV file, incorporating the subtitles into the MP4 format. Upon completion, the converted file was ready for playback on different devices and platforms.
Handbrake’s versatility and flexibility make it a popular choice for video conversion. It supports a wide range of video codecs and provides advanced options for fine-tuning the output. Whether you want to watch foreign films with subtitles, add captions to presentations, or customize your videos, Handbrake offers a seamless solution.
Now that you have learned how to convert MKV to MP4 with subtitles using Handbrake, you can embark on your own video conversion journey. Enjoy the enhanced viewing experience and share your videos with subtitles effortlessly.