Introduction
Subtitles are valuable additions to video files, as they provide text representation of spoken dialogue, making it easier for viewers to understand and follow along, especially for those who are deaf or hard of hearing or for non-native speakers of the language being spoken in the video. Adding subtitles to an MP4 file can greatly enhance its accessibility and reach a wider audience.
There are several methods available to add subtitles to an MP4 file, ranging from using media players to specialized software programs. In this article, we will explore some of the most popular and user-friendly methods to accomplish this task.
Whether you are looking to add subtitles to a movie, a TV series, or a personal video, the process can be straightforward once you understand the steps involved and have the right tools at your disposal. In the following sections, we will walk you through different methods that cater to various skill levels and software preferences.
Before we proceed, it’s important to note that you will need the subtitle file in the appropriate format (typically .srt or .sub) for adding subtitles to an MP4 file. If you don’t have the subtitles yet, you can search for them online or create your own using subtitle creation software.
Now, let’s dive into the step-by-step instructions for adding subtitles to an MP4 file using different methods, including VLC Media Player, HandBrake, FFmpeg, and Subtitle Edit.
Why Add Subtitles to an MP4 File?
Adding subtitles to an MP4 file offers numerous benefits, both for the creator of the video and for the viewers. Here are some key reasons why you may want to consider adding subtitles to your MP4 files:
- Improved Accessibility: Subtitles make your videos accessible to a wider audience, including those who are deaf or hard of hearing. By providing a text representation of the spoken dialogue, subtitles ensure that everyone can understand and enjoy your content.
- Enhanced Comprehension: Even for viewers who are not deaf or hard of hearing, subtitles can greatly enhance comprehension, especially when watching content in a foreign language. Subtitles help viewers follow along with the dialogue, making it easier to grasp the nuances and details of the video.
- Language Learning: Subtitles can be incredibly helpful for language learners. By seeing the text alongside the spoken words, learners can better recognize and associate words with their meanings. This not only aids in vocabulary acquisition but also improves listening and pronunciation skills.
- Noise-Free Playback: Have you ever found yourself struggling to understand dialogue in a video due to background noise or poor audio quality? Subtitles can alleviate this issue by providing a clear text version of the dialogue, ensuring that nothing gets lost in translation.
- Content Localization: If you wish to expand your video’s reach to an international audience, adding subtitles in different languages becomes essential. By providing multilingual subtitles, you can break down language barriers and make your content accessible to a global viewership.
By adding subtitles to your MP4 files, you enhance the overall viewing experience and improve the engagement level of your audience. Whether it is for the purpose of accessibility, language learning, or increased comprehension, subtitles truly have the power to make your videos more inclusive and widely appreciated.
Now that we understand the significance of adding subtitles to MP4 files, let’s explore some of the methods you can use to accomplish this task.
How to Add Subtitles to an MP4 File Using VLC Media Player
VLC Media Player is a popular and versatile media player that not only supports a wide range of audio and video formats but also offers the ability to add subtitles to your videos. Follow these steps to add subtitles to an MP4 file using VLC Media Player:
- First, make sure you have VLC Media Player installed on your computer. If you don’t have it, you can download it for free from the official VLC website and install it.
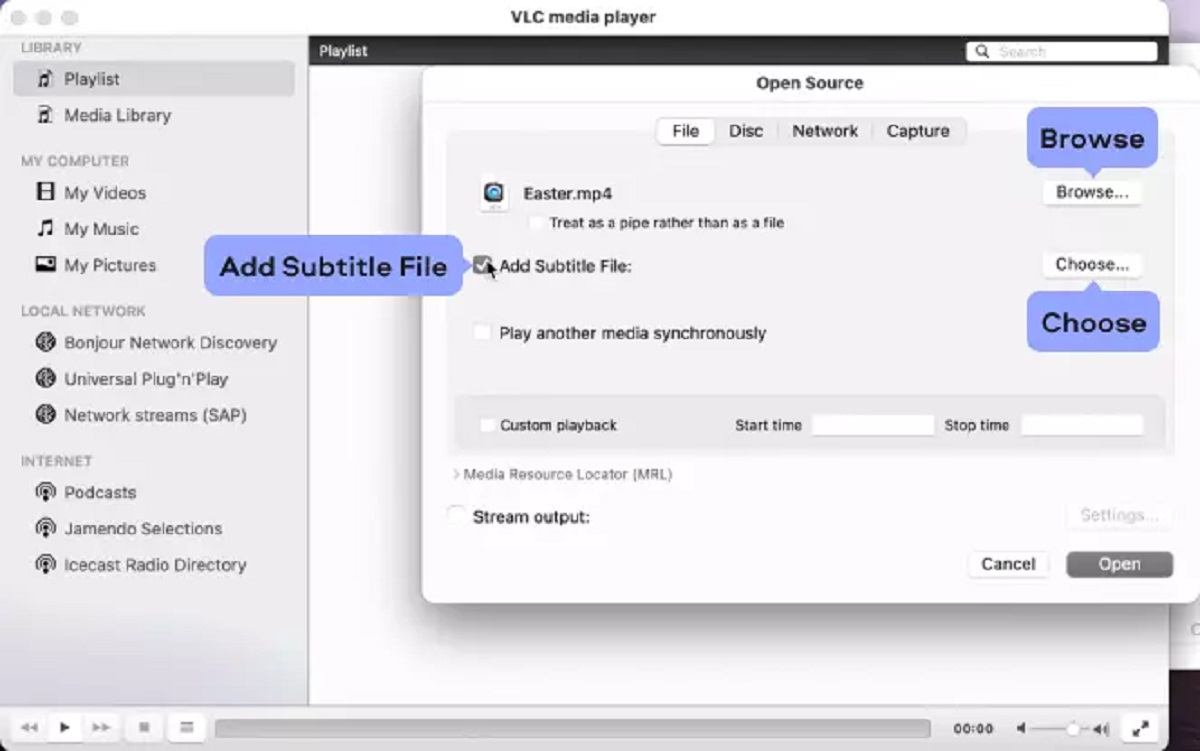
- Launch VLC Media Player and open the MP4 file to which you want to add subtitles. To do this, click on the “Media” tab in the menu bar, select “Open File,” and browse for the desired MP4 file.
- Once the video is playing, click on the “Subtitle” tab in the menu bar and select “Add Subtitle File.” A file selection window will appear.
- In the file selection window, locate and select the subtitle file (.srt or .sub) that you want to add to the MP4 file. Click “Open” to import the subtitle file.
- The subtitles will now be added to your MP4 video, and you can see them displayed on the screen.
- You can customize the appearance of the subtitles by adjusting settings such as font, size, color, and position. To do this, go to the “Subtitle” tab in the menu bar, select “Subtitle Track,” and choose “Track Settings.”
- Once you have made any desired changes, the subtitle settings will be applied to the video.
- If you want to disable or remove the subtitles, you can do so by going to the “Subtitle” tab, selecting “Subtitle Track,” and choosing “Disable.”
VLC Media Player provides a straightforward method for adding subtitles to your MP4 files. It allows you to easily import subtitle files and customize their appearance to suit your preferences. Whether you have the subtitles ready or need to download them separately, VLC Media Player simplifies the process of adding subtitles and enhances your video-watching experience.
Now that you know how to add subtitles using VLC Media Player, let’s explore another method – using HandBrake – for adding subtitles to your MP4 files.
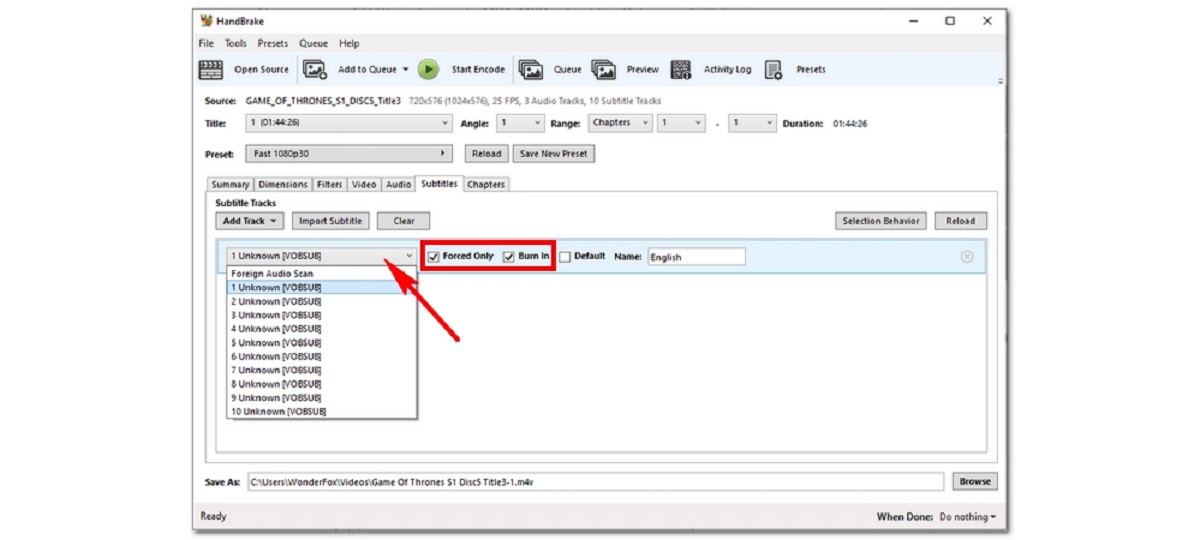
How to Add Subtitles to an MP4 File Using HandBrake
HandBrake is a popular open-source video transcoder that not only allows you to convert videos to different formats but also provides the capability to add subtitles. Follow these steps to add subtitles to an MP4 file using HandBrake:
- Ensure that you have HandBrake installed on your computer. If you don’t have it, you can download it for free from the official HandBrake website and install it.
- Launch HandBrake and click on the “Source” button to import the MP4 file you want to add subtitles to. You can either select the file from your computer or drag and drop it into the HandBrake window.
- Once the MP4 file is loaded into HandBrake, click on the “Subtitles” tab located in the top center of the application window.
- Click on the “Import SRT” button to select the subtitle file (.srt format) that you want to add to the MP4 file. HandBrake will automatically load the subtitle file.
- Next, choose the language and subtitle track you want to use from the dropdown menu if your subtitle file contains multiple tracks.
- After selecting the desired subtitle track, you can customize options such as font, size, color, and position by clicking on the “Subtitles Defaults” button.
- Once you have set the subtitle options to your preference, choose the output format for the MP4 file. HandBrake supports a wide range of formats, so select the one that suits your needs.
- Specify the output destination and file name for the saved MP4 file by clicking on the “Browse” button.
- Finally, click on the “Start Encode” button to begin the conversion process, during which the subtitles will be added to the MP4 file.
- Once the conversion is completed, you will have a new MP4 file with the subtitles embedded in it.
HandBrake provides a simple and efficient method to add subtitles to your MP4 files. It allows you to import and customize subtitle files and provides a wide range of output format options. By using HandBrake, you can easily create MP4 files with embedded subtitles that can be played on various devices and platforms.
Now that you know how to add subtitles using HandBrake, let’s move on to the next method – using FFmpeg – for adding subtitles to MP4 files.
How to Add Subtitles to an MP4 File Using FFmpeg
FFmpeg is a powerful and versatile command-line tool that allows you to perform various multimedia tasks, including adding subtitles to MP4 files. While FFmpeg might be more technical compared to other methods, it offers advanced options and flexibility. Follow these steps to add subtitles to an MP4 file using FFmpeg:
- Make sure you have FFmpeg installed on your computer. If you don’t have it, you can download it from the official FFmpeg website and follow the installation instructions for your operating system.
- Open a command prompt or terminal window on your computer, depending on your operating system.
- Navigate to the folder where FFmpeg is installed or, if you have added it to your system’s PATH, you can run the FFmpeg command from any location.
- Enter the following command to add the subtitles to the MP4 file:
ffmpeg -i input.mp4 -vf "subtitles=subtitle.srt" output.mp4
Replaceinput.mp4with the path and filename of your original MP4 file, andsubtitle.srtwith the path and filename of the subtitle file (.srt format) you want to add. Lastly, specify the desired output filename with theoutput.mp4parameter. - Press Enter to execute the command. FFmpeg will start adding the subtitles to your MP4 file. The process might take some time, depending on the size of the video file.
- Once the process is complete, you will have a new MP4 file with the subtitles embedded in it.
Using FFmpeg to add subtitles to an MP4 file provides you with extensive control and flexibility. You can customize the position, font, and other subtitle parameters by modifying the command accordingly. However, keep in mind that working with FFmpeg requires some familiarity with command-line tools and basic syntax.
Now that you know how to add subtitles using FFmpeg, let’s move on to the next method – using Subtitle Edit – for adding subtitles to MP4 files.
How to Add Subtitles to an MP4 File Using Subtitle Edit
Subtitle Edit is a popular software program specifically designed for creating and editing subtitles. While it may require a separate download and installation, Subtitle Edit offers a user-friendly interface and a wide range of features for adding subtitles to MP4 files. Follow these steps to add subtitles using Subtitle Edit:
- Download and install Subtitle Edit from the official website, following the instructions provided for your operating system.
- Launch Subtitle Edit and click on the “Open” button to import your MP4 file. Alternatively, you can drag and drop the MP4 file into the Subtitle Edit window.
- Once the video is loaded, go to the “Subtitle” tab in the menu bar and select “Add Subtitle.” A dialog box will appear.
- In the dialog box, select the subtitle file you want to add to the MP4 file. Subtitle Edit supports various subtitle formats, including .srt, .sub, .ssa, and more.
- The subtitles will be added to the timeline, and you can see them displayed alongside the video.
- Now, you can make any necessary adjustments to the subtitles, such as syncing them with the video, editing the text, setting timing, and more. Subtitle Edit provides a range of tools and features for precise subtitle editing.
- Once you have made the desired changes, go to the “File” tab in the menu bar and select “Save” or “Save As” to save the MP4 file with the embedded subtitles.
- Choose the output format and specify the save location and file name for the MP4 file.
- Click “Save” to save the MP4 file with the embedded subtitles.
Subtitle Edit offers a comprehensive and user-friendly interface for adding and editing subtitles. With its wide range of features, you can easily customize and synchronize subtitles to create a seamless viewing experience for your MP4 files. Whether you need to modify existing subtitles or create new ones, Subtitle Edit provides the tools you need to get the job done efficiently.
Now that you know how to add subtitles using Subtitle Edit, you can choose the method that best suits your preferences and requirements. By adding subtitles to your MP4 files, you can enhance accessibility, improve comprehension, and cater to a wider audience with your videos.
Conclusion
Adding subtitles to an MP4 file can greatly enhance its accessibility and audience reach. Whether you are looking to improve comprehension, cater to a diverse viewership, or make your content more inclusive, there are various methods available to add subtitles to your MP4 files.
In this article, we explored four popular methods for adding subtitles to MP4 files: using VLC Media Player, HandBrake, FFmpeg, and Subtitle Edit. VLC Media Player provides a user-friendly interface and allows you to easily import and customize subtitles during playback. HandBrake offers advanced options for adding and modifying subtitles while converting videos to different formats. FFmpeg, although more technical, provides extensive control and flexibility through command-line functionality. Subtitle Edit, a specialized software program, offers a wide range of features for creating and editing subtitles with precision.
Regardless of the method you choose, adding subtitles to MP4 files can improve accessibility, enhance comprehension, and make your content more engaging. Whether you’re making videos for educational purposes, reaching an international audience, or simply enhancing the viewing experience for your viewers, subtitles play a vital role in delivering your message effectively.
Remember to have the subtitle file in the appropriate format (.srt, .sub, etc.) and follow the step-by-step instructions outlined in each method. Experiment with different methods to find the one that best suits your needs and preferences.
By adding subtitles to your MP4 files, you ensure that your videos are accessible to a wider audience, improve comprehension, and provide a better viewing experience for all viewers. Start adding subtitles to your MP4 files today and make your videos more inclusive and widely appreciated.