Introduction
VLC Media Player is a versatile and popular media player that supports various audio and video formats. One of its most useful features is the ability to add and display subtitles while playing a video file. Adding subtitles can be helpful when watching foreign-language films, or for those who are hearing-impaired. Subtitles can also enhance the viewing experience by providing a written translation or transcription of the dialogue on screen.
In this guide, we will walk you through the process of hardcoding subtitles with VLC Media Player. Hardcoding subtitles means permanently embedding the subtitles into the video file, so they will be displayed regardless of the media player being used. This is especially useful if you want to share the video file with others who may not have the same subtitle file.
You may wonder why not just use external subtitle files that are easily available on the internet. While external subtitles are convenient for temporary viewing, they require the subtitle file to be present in the same folder as the video file, and both files must have exactly the same name. Hardcoding subtitles eliminates these requirements, making it easier to share and play videos without the need for separate subtitle files.
Whether you’re a film enthusiast, a language learner, or simply want to enhance your video watching experience, learning how to hardcode subtitles with VLC Media Player will be a useful skill to have. So, let’s dive in and discover how to add subtitles to your video files, allowing you to enjoy your favorite movies, TV shows, and videos with ease and convenience.
Step 1: Download and Install VLC Media Player
Before you can start hardcoding subtitles with VLC Media Player, you need to make sure that you have the software installed on your computer. VLC Media Player is a free and open-source media player that is available for Windows, Mac, and Linux operating systems. Here’s how you can download and install VLC Media Player:
- Open your preferred web browser and go to the official VLC Media Player website at https://www.videolan.org/vlc/.
- On the website, you will see different download options for different operating systems. Click on the appropriate download link for your operating system.
- The download will start automatically. Once the download is complete, locate the downloaded file on your computer.
- Double-click on the downloaded file to begin the installation process.
- Follow the on-screen instructions to install VLC Media Player on your computer. The installation process may vary slightly depending on your operating system.
- Once the installation is complete, you can launch VLC Media Player by locating the program in your computer’s applications or programs folder.
After successfully installing VLC Media Player, you are now ready to proceed to the next step and start adding subtitles to your video files. VLC Media Player provides a user-friendly interface and powerful features that make the subtitle hardcoding process easy and efficient.
Step 2: Open the Video File in VLC Media Player
Now that you have VLC Media Player installed on your computer, it’s time to open the video file that you want to add subtitles to. Here’s how you can do it:
- Launch VLC Media Player by locating the program in your computer’s applications or programs folder.
- Once VLC Media Player is open, click on the “Media” tab in the top menu bar.
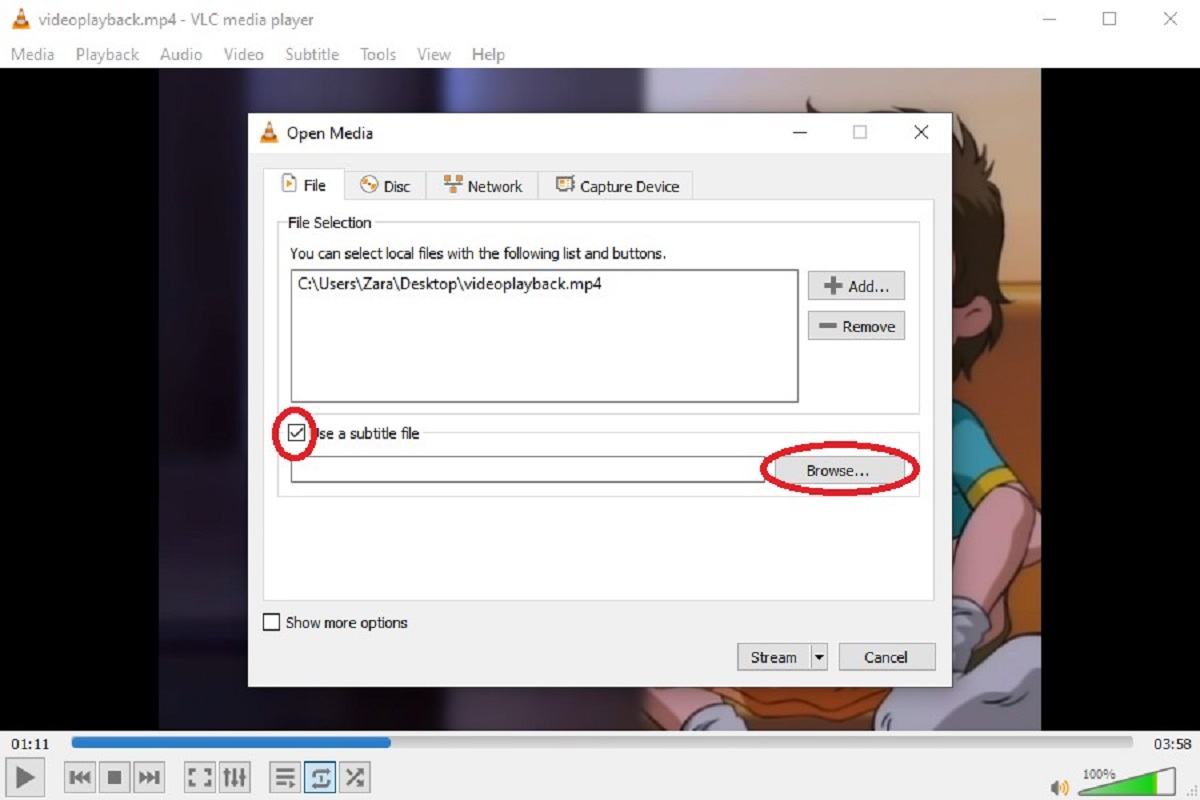
- In the dropdown menu, select “Open File” or press the shortcut key combination “Ctrl + O” on your keyboard.
- A file selection window will appear. Navigate to the location where your video file is stored.
- Select the video file and click on the “Open” button.
VLC Media Player will now start playing the selected video file. You can use VLC Media Player’s built-in controls to pause, play, rewind, fast forward, and adjust the volume of the video. Take a moment to familiarize yourself with the playback controls, as you will be using them throughout the process of hardcoding subtitles.
By opening the video file in VLC Media Player, you are now ready to proceed to the next step and download the subtitles that you want to add to the video. VLC Media Player provides a convenient platform for managing and displaying subtitles, making the integration process seamless and efficient.
Step 3: Download Subtitles for the Video
In order to hardcode subtitles into your video using VLC Media Player, you need to have the subtitle file available. Subtitle files come in various formats such as SRT, SUB, ASS, and others. These files contain timed text that corresponds to the dialogues and captions in the video.
To download subtitles for your video file, follow these steps:
- Open your web browser and search for the movie or TV show title along with the language and the word “subtitles.”
- You will find several websites that offer subtitle downloads. Choose a reliable and reputable website that provides subtitles in your desired language.
- Enter the name of the video file or browse through the available options to find the correct subtitle file for your video.
- Make sure to download the subtitle file in a format compatible with VLC Media Player, such as SRT.
- Once you have found the appropriate subtitle file, click on the download link. The file will be saved to your computer.
It is important to ensure that the subtitle file matches the video file in terms of language and version. Subtitle files can be available in multiple versions, so be sure to select the correct one that syncs with your video’s content.
By downloading the appropriate subtitles for your video, you are now ready to proceed to the next step and rename the subtitle file to match the video file’s name.
Step 4: Rename the Subtitles File to Match the Video File
To ensure that VLC Media Player recognizes and displays the subtitles correctly, it is important to rename the subtitle file so that it matches the name of the video file. Here’s how you can rename the subtitle file:
- Locate the downloaded subtitle file on your computer. It is usually saved in your Downloads folder or the folder where you saved it.
- Right-click on the subtitle file and select the “Rename” option from the context menu.
- Edit the filename to match the name of the video file exactly. For example, if your video file is named “movie.mp4,” rename the subtitle file to “movie.srt” if it is in SRT format.
- Press Enter or click outside the renamed file to save the changes.
By renaming the subtitle file to match the video file, VLC Media Player will be able to associate and display the subtitles properly while playing the video. This is an important step in ensuring that the subtitles are synced with the video and appear at the right moments.
Now that you have renamed the subtitle file, you can move on to the next step and place the subtitle file in the same location as the video file.
Step 5: Move the Subtitles File to the Same Location as the Video File
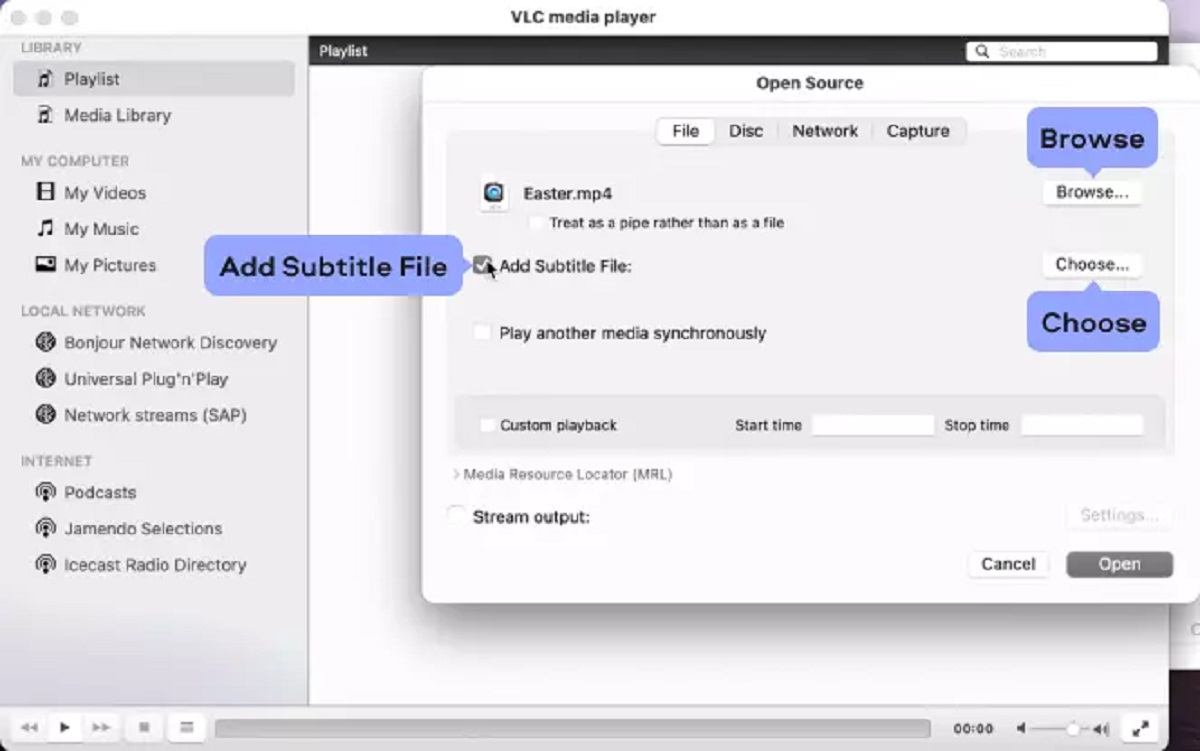
In order for VLC Media Player to automatically detect and display the subtitles while playing the video, you need to place the subtitle file in the same folder as the video file. By doing so, VLC Media Player will be able to locate and load the subtitles without any issues. Here’s how you can move the subtitle file to the same location as the video file:
- Open the folder where your video file is stored. This could be a specific folder on your computer or an external storage device.
- Locate the subtitle file that you renamed in the previous step. It should be saved in a different location, such as your Downloads folder.
- Drag and drop the subtitle file from its current location into the folder where the video file is located. Alternatively, you can use the copy-paste function to move the subtitle file.
Once you have moved the subtitle file to the same location as the video file, VLC Media Player will be able to access and display the subtitles while playing the video. This step ensures that the subtitle file is easily accessible and properly synced with the video content.
Now that you have successfully placed the subtitle file in the same folder as the video file, you can proceed to the next step and enable the subtitle track in VLC Media Player to start displaying the subtitles.
Step 6: Enable Subtitle Track in VLC Media Player
With the subtitle file in the same location as the video file, you are now ready to enable the subtitle track in VLC Media Player. Enabling the subtitle track will ensure that the subtitles are displayed on the screen while playing the video. Here’s how you can do it:
- Open VLC Media Player if it is not already open.
- Click on the “Subtitle” tab in the top menu bar.
- In the dropdown menu, navigate to the “Subtitle Track” option.
- You will see a list of available subtitle tracks. If you have correctly placed the subtitle file in the same location as the video file, you should see the subtitle file listed.
- Select the subtitle track that matches the language or version of the subtitles you want to display. If there is only one subtitle track listed, select it.
Once you have enabled the subtitle track, VLC Media Player will automatically start displaying the subtitles while playing the video. The subtitles will be synced with the dialogue and captions in the video, enhancing your viewing experience and understanding of the content.
VLC Media Player offers additional options to customize the appearance and behavior of the subtitles. You can adjust the position, size, font, and color of the subtitles to suit your preferences. These customization options can be accessed in the “Subtitle” tab of VLC Media Player’s menu.
Now that you have enabled the subtitle track, you can proceed to the next step and make adjustments to the subtitle position, size, font, and color if desired.
Step 7: Adjust Subtitle Position, Size, Font, and Color
VLC Media Player allows you to customize the appearance of subtitles according to your preferences. You can adjust the position, size, font, and color of the subtitles to ensure optimal readability and visual appeal. Here’s how you can make these adjustments in VLC Media Player:
- Open VLC Media Player and ensure that the video with subtitles is playing.
- Click on the “Tools” tab in the top menu bar.
- In the dropdown menu, navigate to the “Preferences” option.
- A new window will open. In the left-hand side panel, click on the “Subtitles & OSD” category.
- In the “Subtitle track synchronization” section, you can fine-tune the synchronization of the subtitle track with the video if needed. Adjust the “Subtitle track delay” according to your preference.
- Under the “Text rendering module” section, you can modify the appearance of the subtitles. Adjust the “Text position” to change the vertical and horizontal positioning of the subtitles on the screen.
- You can also customize the “Font”, “Font size”, “Font color”, and “Background color” of the subtitles by selecting options from the respective dropdown menus.
- Click the “Save” button to apply the changes.
By adjusting the subtitle position, size, font, and color, you can ensure that the subtitles are displayed in a way that is comfortable for you to read and enhances your overall viewing experience. These customization options allow you to personalize your subtitle viewing experience and make it more visually appealing.
Now that you have made the necessary adjustments to the subtitle appearance, you can proceed to the next step and synchronize the subtitles with the video playback if needed.
Step 8: Synchronize Subtitles with Video
Sometimes, the timing of the subtitles may not be perfectly synchronized with the video playback. In such cases, you can easily adjust the subtitle timing in VLC Media Player to ensure that the subtitles are displayed at the right moments during the video. Here’s how you can synchronize the subtitles with the video:
- Make sure the video with subtitles is playing in VLC Media Player.
- Click on the “Tools” tab in the top menu bar.
- In the dropdown menu, navigate to the “Track Synchronization” option.
- A new window will open with various synchronization options.
- Under the “Subtitles/Video” section, you can adjust the subtitle delay by entering a positive (to delay subtitles) or negative (to advance subtitles) value in the “Subtitle Track Synchronization” field.
- Keep adjusting the delay value until the subtitles are perfectly synchronized with the video.
- Click the “Close” button to apply the synchronization changes.
By synchronizing the subtitles with the video, you can ensure that the text appears at the right time, aligning accurately with the dialogue and actions on screen. This step is particularly useful when the subtitle file is slightly out of sync with the video, guaranteeing a seamless and enjoyable viewing experience.
Now that you have synchronized the subtitles with the video, you can proceed to the final step and save the subtitle settings in VLC Media Player for future use.
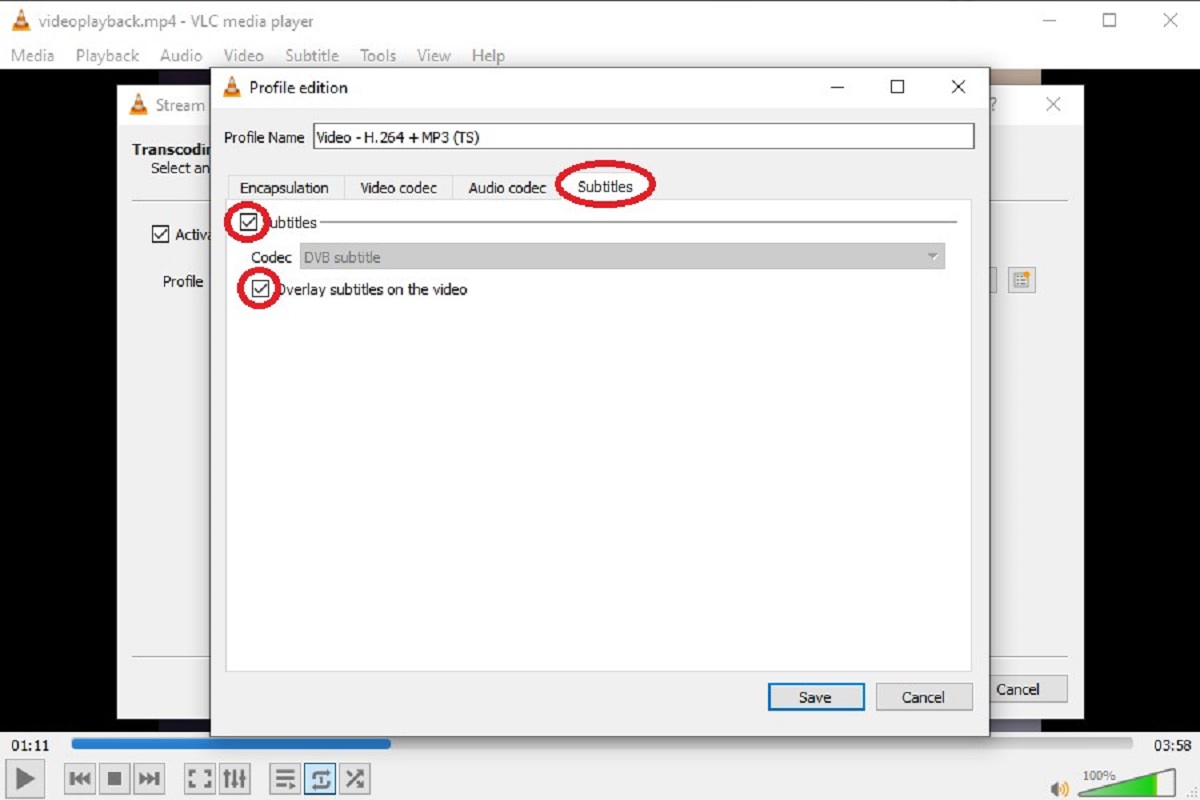
Step 9: Save Subtitle Settings for Future Use
If you’ve customized the subtitle settings in VLC Media Player and would like to use the same settings for future videos, you can save them as a profile. This allows you to quickly apply the desired subtitle settings without having to manually adjust them each time. Here’s how you can save the subtitle settings as a profile:
- Make sure VLC Media Player is open and the video with subtitles is playing.
- Click on the “Tools” tab in the top menu bar.
- In the dropdown menu, navigate to the “Preferences” option.
- A new window will open. In the left-hand side panel, click on the “Subtitles & OSD” category.
- Make sure the subtitle settings are configured according to your preferences (e.g., position, size, font, color).
- Click on the “Save” button next to “Profile” at the bottom of the window.
- Enter a name for the profile (e.g., “Custom Subtitles”) and click the “Save” button.
- Close the preferences window.
By saving the subtitle settings as a profile, you can easily load them for future use. To load the saved profile, simply repeat the first four steps mentioned above and select the saved profile from the “Profile” dropdown menu. This will apply your customized subtitle settings to the current video, ensuring a consistent viewing experience across different videos.
Saving subtitle settings as a profile in VLC Media Player provides convenience and efficiency, as you can quickly access and apply your preferred settings without manually configuring them each time. This feature is especially beneficial if you frequently watch videos with subtitles and prefer a specific subtitle appearance and layout.
Congratulations! You have successfully learned how to hardcode subtitles with VLC Media Player. By following these steps, you can now enhance your video watching experience by permanently embedding subtitles into your video files. Enjoy your favorite movies, TV shows, and videos with perfectly synchronized and customized subtitles!
Conclusion
Adding subtitles to video files can greatly enhance the viewing experience, and VLC Media Player provides a straightforward method to achieve this. By following the steps outlined in this guide, you have learned how to hardcode subtitles with VLC Media Player, ensuring that the subtitles are permanently embedded in the video file.
Starting with downloading and installing VLC Media Player, you have learned how to open a video file, download corresponding subtitles, rename the subtitle file to match the video file, and move the subtitle file to the same location as the video file. You then enabled the subtitle track in VLC Media Player, adjusted the position, size, font, and color of the subtitles, synchronized the subtitles with the video playback, and saved the subtitle settings for future use.
By following these steps, you can enjoy watching videos with accurate and personalized subtitles without the need for external subtitle files. Hardcoding subtitles not only eliminates the requirement of maintaining separate subtitle files but also ensures that the subtitles are displayed correctly regardless of the media player being used.
VLC Media Player offers a user-friendly interface and powerful features that make the process of hardcoding subtitles easy and efficient. Whether you are watching foreign-language films, learning a new language, or simply prefer to have subtitles for better comprehension, VLC Media Player has you covered.
Now that you have mastered the art of hardcoding subtitles, you can dive into a variety of videos and enjoy them with perfectly synchronized and customized subtitles. So go ahead, grab your favorite movies, TV shows, and videos, and start adding subtitles to create a more immersive and inclusive viewing experience.