Introduction
Welcome to the world of Instagram Stories! In today’s social media-driven society, Instagram Stories have become an essential part of sharing moments and connecting with friends and followers. With its vast array of editing tools, Instagram offers a platform for users to showcase their creativity and personality through captivating visual content.
Editing your Instagram Stories can take them from ordinary to extraordinary, allowing you to add personal touches and make them stand out from the crowd. Whether you want to enhance your photos with filters, add text or stickers, or even incorporate music, Instagram offers a wide range of features to elevate your Stories.
In this article, we will guide you through the process of editing your Instagram Story, from accessing the editing tools to sharing your final creation. We will explore various editing options such as adding text, using stickers and GIFs, applying filters and effects, editing layouts, adding music or sound, cropping and resizing, drawing and doodling, and utilizing hashtags and location stickers. So, let’s dive in and discover how to create amazing Instagram Stories!
How to Access the Instagram Story Editing Tools
Before we jump into the editing process, let’s first learn how to access the Instagram Story editing tools. To begin editing your Story, open the Instagram app on your smartphone and tap on your profile picture at the top left corner of the home screen. Alternatively, you can swipe right from the main screen to instantly access the camera function.
Once you’re in the camera mode, you’ll find a variety of icons at the bottom of the screen. To access the editing tools, swipe up or tap on the square smiley face icon at the top of the screen. This will open up a range of creative options to enhance your Story.
Within the editing tools menu, you’ll find several options that allow you to customize your Story. These include adding text, stickers, GIFs, filters, music, and more. Each of these features can be accessed by tapping on the corresponding icons at the bottom of the screen.
It’s important to mention that Instagram regularly updates its app and adds new features, so the placement and availability of the editing tools may vary slightly. However, the general process to access them remains the same- through the camera mode and the icons at the bottom of the screen.
Now that you know how to access the Story editing tools, let’s explore each of them in detail to transform your ordinary photos and videos into captivating visual masterpieces.
Adding Text to Your Instagram Story
Adding text to your Instagram Story is a great way to express yourself, convey a message, or provide context to your visuals. To add text, follow these simple steps:
- After accessing the editing tools, tap on the “Aa” icon to open the text options.
- You can now choose from different text styles, fonts, and colors by tapping on the respective icons at the bottom of the screen.
- Tap on the screen where you want the text to appear and start typing. You can also use the handles on the text box to resize, rotate, or reposition the text according to your preference.
- Make your text more engaging by using emojis or special characters. To access emojis, tap on the smiley face icon on your keyboard.
- Experiment with different text effects like highlighting, shadowing, or changing the background color by swiping left or right on the text box.
- Feel free to add multiple text boxes to your Story by tapping on the “Aa” icon again and following the same steps.
Once you’ve added your desired text, you can further customize it by stretching, rotating, or adjusting the size and position to achieve the perfect look for your Story.
Remember, less is often more when it comes to text on Instagram Stories. Keep your text concise, readable, and aesthetically pleasing to ensure that it complements your visuals without overwhelming them. Additionally, consider using different text styles and colors to create contrast and add visual interest to your Story.
Adding text to your Instagram Story allows you to engage your audience, convey your message effectively, and make your content more memorable. So, let your creativity flow and take advantage of this feature to elevate your Stories to the next level!
Using Stickers and GIFs in Your Instagram Story
Stickers and GIFs are fun and creative ways to add personality and flair to your Instagram Story. They can help you express emotions, make your content more engaging, and capture the attention of your viewers. Here’s how you can use stickers and GIFs in your Instagram Story:
- Access the editing tools by tapping on your profile picture or swiping right on the home screen to open the camera mode.
- Once in the camera mode, tap on the square smiley face icon at the top of the screen to access the stickers and GIFs menu.
- Explore the wide range of stickers available. You can find stickers for various themes, holidays, moods, and more. To browse different sticker options, swipe left or right on the sticker menu.
- To add a sticker, simply tap on the sticker you want to use and it will appear on your Story. You can then use your fingers to resize, rotate, or reposition the sticker on your photo or video.
- If you want to add a GIF to your Story, tap on the GIF icon at the top of the sticker menu. You can search for specific GIFs or browse through popular categories to find the perfect one.
- Similar to stickers, you can also resize, rotate, or reposition the GIF on your Story to fit your desired look.
- Get creative and combine stickers and GIFs to make your Story more dynamic and visually appealing. Experiment with layering, placement, and different combinations to achieve the desired effect.
Stickers and GIFs can be placed on photos or videos in your Instagram Story. They bring life to your content and allow you to engage with your audience in a more interactive and expressive way.
Remember to use stickers and GIFs in moderation, as too many can clutter your Story and distract from the main focus of your content. Select stickers and GIFs that align with the style and mood of your Story, and have fun exploring the plethora of options available to enhance your Instagram Story.
Adding Filters and Effects to Your Instagram Story
Filters and effects are powerful tools that can dramatically transform the look and feel of your Instagram Story. They allow you to enhance colors, add mood, and create a cohesive aesthetic for your content. Here’s how you can add filters and effects to your Instagram Story:
- Access the editing tools by opening the camera mode in the Instagram app.
- Swipe left or right on the screen to navigate through the different filters available. Each filter applies a unique combination of adjustments, such as brightness, contrast, saturation, and color tones.
- Tap on the filter you want to apply to your Story and see how it transforms your photo or video in real-time.
- If you want to adjust the strength of the filter, tap on the filter icon again and use the slider that appears to increase or decrease the intensity.
- Not only can you apply filters, but you can also experiment with additional effects. Tap on the smiley face icon at the bottom right to access the effects menu.
- Browse through the available effects and try them on your Story by tapping on them. These effects can range from subtle enhancements like adding a vignette or blur, to more playful options like boomerang or superzoom.
- Combine filters and effects to create a unique and captivating look for your Instagram Story. Don’t be afraid to experiment with different combinations to find the perfect style that represents your content.
Adding filters and effects can greatly enhance the visual appeal of your Instagram Story and help you establish a consistent and recognizable aesthetic. They can also set the tone and mood of your content, whether you want to create a warm and cozy atmosphere or a vibrant and energetic vibe.
Keep in mind that while filters and effects can be enticing, it’s important to exercise moderation and choose options that enhance your content without overpowering it. Aim for a balance that complements your photos or videos and aligns with your overall storytelling style.
So, don’t be shy to experiment and get creative with filters and effects. Use them to make your Instagram Stories visually captivating and leave a lasting impression on your audience.
Editing the Layout of Your Instagram Story
Editing the layout of your Instagram Story allows you to create visually appealing collages and montages by arranging multiple photos or videos in a single frame. This feature is perfect for showcasing different aspects of a moment or telling a story through a combination of visuals. Here’s how you can edit the layout of your Instagram Story:
- Access the editing tools by opening the camera mode in the Instagram app.
- Take or select the photos or videos you want to include in your Story. You can choose multiple files from your camera roll or capture them directly using the in-app camera.
- Once you have your content ready, tap on the square icon appearing at the top left corner of the screen to change the layout.
- Swipe left or right to browse through the available layout options. Each layout design allows you to arrange your photos or videos differently, from simple grids to more complex combinations.
- If you want to adjust the size or position of a specific photo or video within the layout, tap on it and use your fingers to resize, rotate, or reposition it as desired.
- After arranging the layout and positioning the content, you can further enhance it by applying filters, adding text, stickers, or other editing features we have previously discussed.
Editing the layout of your Instagram Story gives you the freedom to present your content in a dynamic and visually appealing way. It allows you to tell a story or highlight different aspects of a moment by combining multiple photos or videos into a cohesive composition.
When selecting a layout, consider the number and orientation of the photos or videos you want to include, as well as the overall visual balance you wish to achieve. Experiment with different layouts to find the one that best suits your content and conveys your intended message.
Remember that the design possibilities are vast, so let your creativity soar. Play with different arrangements, sizes, and visual elements to craft captivating and engaging Instagram Stories that will leave a lasting impression on your audience.
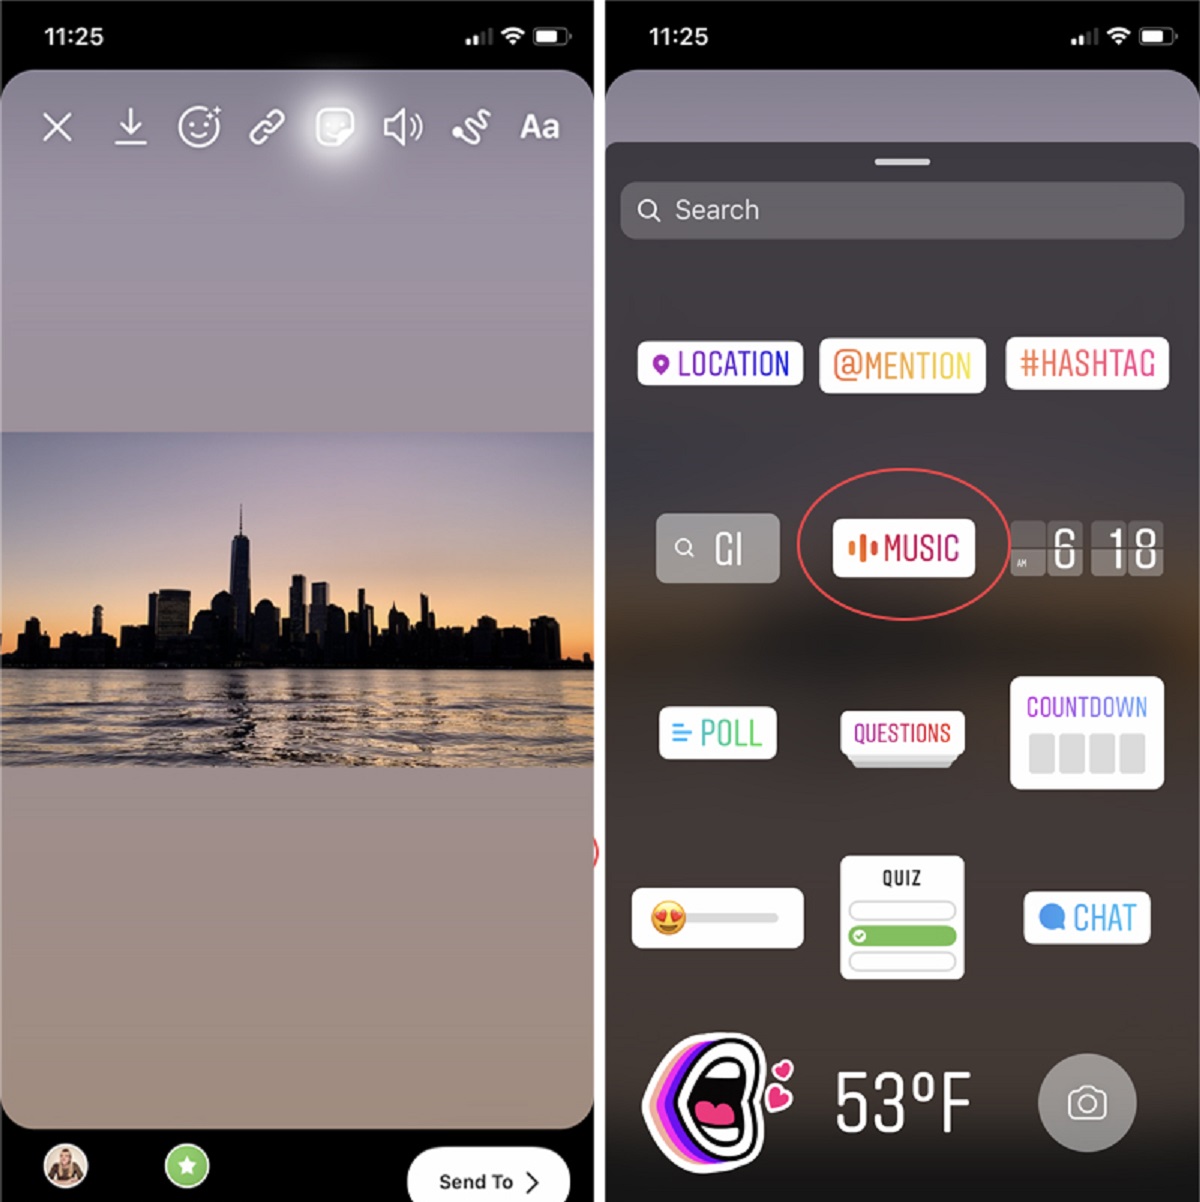
Adding Music or Sound to Your Instagram Story
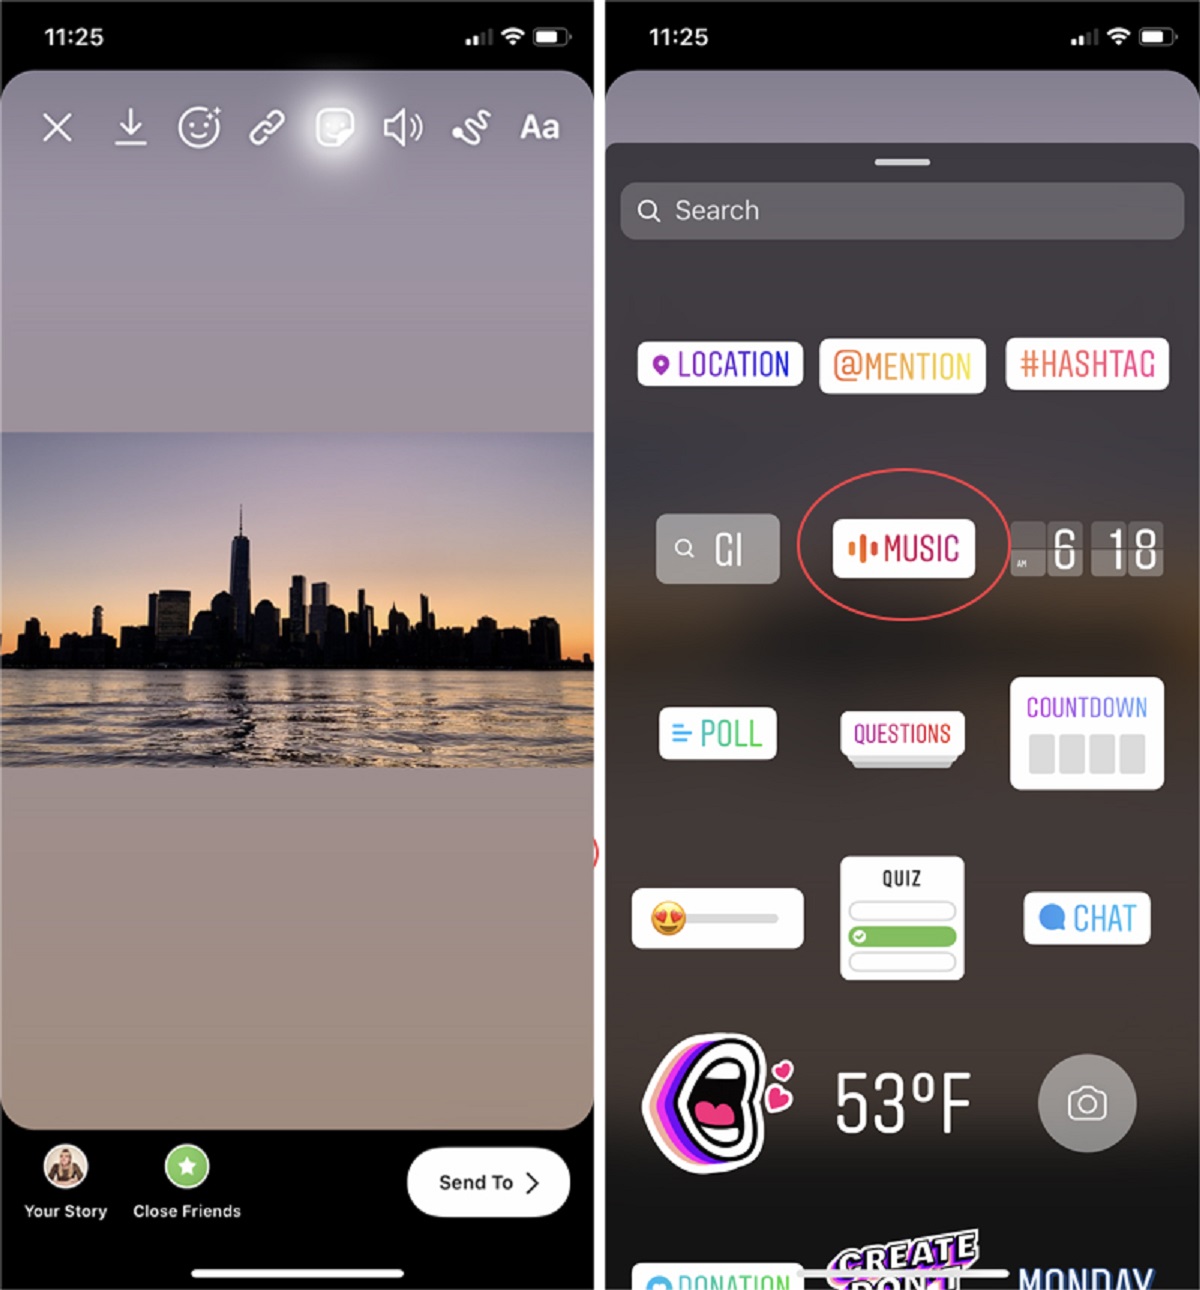
Adding music or sound to your Instagram Story can elevate the viewer’s experience and set the mood for your content. Whether you want to add a catchy song, a sound effect, or a voiceover, Instagram offers various options to enhance your Stories with audio. Here’s how you can add music or sound to your Instagram Story:
- Access the editing tools by opening the camera mode in the Instagram app.
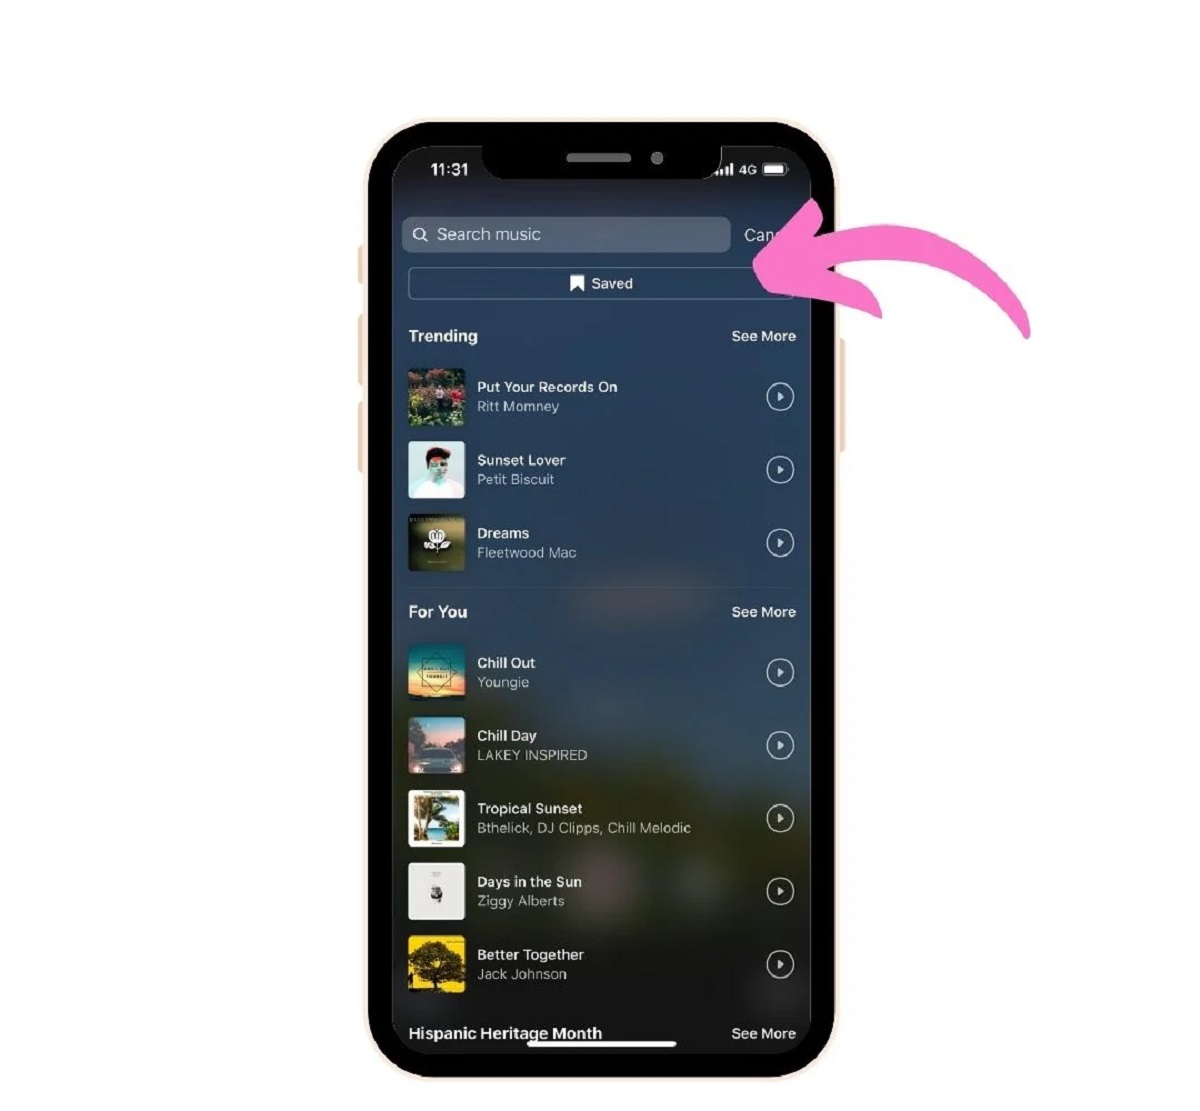
- If you want to add music to your Story, swipe up or tap on the music note icon. This will open up the music library, where you can browse through different genres, moods, or popular songs.
- Once you find the perfect song, you can preview it by tapping on it. If you’re satisfied, tap on the song to add it to your Story. You can also drag the slider to select a specific part of the song.
- If you prefer to add your own recorded voice or other sounds, swipe right on the editing tools menu to access the sound options. Here, you can choose from various sound effects, such as applause, laughter, or nature sounds. Alternatively, you can tap on the microphone icon to record your own voiceover.
- Adjust the volume of the music or sound by using the slider that appears at the top of the screen. You can also mute the original video’s sound if you only want the added audio to be heard.
- Once you’re satisfied with the audio addition, you can further customize your Story by applying filters, adding text, stickers, or other available editing features.
By adding music or sound to your Instagram Story, you can enhance the storytelling aspect and create a more immersive experience for your viewers. The choice of music or sound should align with the mood and message you want to convey, whether it’s a upbeat track to liven up your content or a calm melody for a relaxing atmosphere.
Remember that you should only use copyright-free or properly licensed music in your Instagram Stories to avoid any copyright issues. Instagram provides a wide selection of licensed music within its music library, making it easy for you to find the perfect soundtrack for your Story.
So, let your creativity shine and experiment with different music or sound options to add an extra layer of engagement and entertainment to your Instagram Stories.
Cropping, Resizing, and Flipping Your Instagram Story
When it comes to creating visually appealing Instagram Stories, cropping, resizing, and flipping your content can make a significant difference. These editing options allow you to refine the composition, focus on specific details, or add a unique twist to your visuals. Here’s how you can crop, resize, and flip your Instagram Story:
- Access the editing tools by opening the camera mode in the Instagram app.
- If you want to crop your photo or video, tap on the image thumbnail at the bottom left corner of the screen. You can then use your fingers to pinch or expand the content and adjust the crop accordingly. Tap on the checkmark icon to confirm.
- To resize your content, tap on the thumbnail image again and look for the resize icon. You can now drag the corners of the content to make it larger or smaller. This is particularly useful if you want to emphasize certain elements or fit your content within the Instagram Story framework.
- Flipping your content can create a distinct visual effect or add an element of surprise. To flip your photo or video horizontally, tap on the thumbnail image and look for the flip icon. Tap on it to flip your content, and tap again to revert to the original orientation.
- You can combine these editing options by cropping, resizing, and flipping your content in different ways. Get creative and experiment with various compositions to achieve the desired look and feel for your Instagram Story.
Cropping, resizing, and flipping your Instagram Story give you the flexibility to create unique and eye-catching visuals. These editing options enable you to fine-tune the composition, highlight specific details, or even add a surprising twist to engage your audience.
When using these editing features, consider the overall balance and visual appeal of your Story. Be mindful of the focal points, ensure that the content remains clear and understandable, and maintain a consistent aesthetic throughout your Story.
So, don’t hesitate to explore cropping, resizing, and flipping as creative techniques to make your Instagram Stories stand out and leave a lasting impression on your viewers.
Drawing and Doodling on Your Instagram Story
Drawing and doodling on your Instagram Story adds a personal and creative touch to your visuals, allowing you to showcase your artistic skills or simply have fun with your content. Whether you want to highlight specific details, add custom designs, or unleash your inner artist, Instagram provides a range of drawing tools to help you express yourself. Here’s how you can draw and doodle on your Instagram Story:
- Access the editing tools by opening the camera mode in the Instagram app.
- Take a photo or record a video for your Story, or select one from your camera roll. Once you have your content ready, tap on the drawing pen icon at the top right corner of the screen. This will allow you to access the drawing tools.
- Choose your preferred drawing tool by tapping on the pen icon at the top of the screen. You’ll find options like a pen, marker, highlighter, and more. You can also select the eraser tool to remove any unwanted drawings.
- Select the desired color for your brush by tapping on the color palette icon, which appears at the bottom of the screen. Swipe left or right to explore different color options, or tap and hold on a color to reveal a wider range of shades.
- Once you’ve selected your tool and color, you can start drawing on your Story. Use your finger or a stylus to create lines, shapes, patterns, or anything else you desire. You can adjust the size of the brush by choosing the appropriate thickness option.
- Let your creativity flow as you draw and doodle on your Story. Experiment with different designs, colors, and styles to add a personal touch and make your content more engaging and unique.
- If you make a mistake or want to remove a specific drawing, you can use the eraser tool to selectively erase parts of your drawing while leaving the rest intact.
Drawing and doodling on your Instagram Story presents endless possibilities for customization and self-expression. You can use this feature to annotate images, add captions, create custom illustrations, or jot down thoughts and ideas.
Remember to strike a balance between your drawings and the underlying content of your Story. Make sure the drawings enhance and complement your visuals without overpowering them. Additionally, be mindful of readability and legibility, especially if you’re adding text or annotations.
So, let your imagination take flight and bring your Instagram Stories to life with your unique creative touch. Embrace the drawing tools and have fun adding personal flair to your content.
Adding Hashtags and Location Stickers to Your Instagram Story
Adding hashtags and location stickers to your Instagram Story can significantly increase its visibility and reach a wider audience. These features allow you to connect with users who are interested in specific topics or are located in a particular area. Here’s how you can add hashtags and location stickers to your Instagram Story:
- Access the editing tools by opening the camera mode in the Instagram app.
- Take a photo or record a video for your Story, or select one from your camera roll. Once you have your content ready, tap on the sticker icon at the top of the screen.
- In the stickers menu, you’ll find options for adding hashtags and location stickers. To add a hashtag, select the hashtag sticker and type the desired keyword or phrase. Instagram will suggest popular hashtags related to your input, or you can enter your own custom hashtag. You can add multiple hashtags to your Story, but remember to keep them relevant and concise.
- If you want to add a location sticker, select the location sticker option, and either search for a specific location or choose from the suggested locations based on your current location. This will help your Story appear in location-specific feeds and attract local users.
- Once you’ve added a hashtag or location sticker, you can resize, rotate, or reposition it on your Story by using your fingers. You can also customize the appearance by tapping on the sticker and selecting a different style or color.
- Feel free to get creative with your placement of hashtags and location stickers. They can be added to the background, overlaid on an image or video, or even incorporated into your overall design aesthetic.
- Remember that excessive use of hashtags can make your Story appear cluttered. Use them strategically and sparingly to maintain a clean and visually appealing Story.
By adding hashtags and location stickers to your Instagram Story, you can increase its discoverability and engage with a broader community. Hashtags help users find content related to their interests, while location stickers connect you with people in specific locations.
Make sure to use relevant hashtags that accurately represent the content of your Story. Research popular and trending hashtags in your niche or industry to maximize your reach and engagement. With location stickers, consider adding them when you want to draw attention to a specific event, place, or local experience.
So, leverage the power of hashtags and location stickers to expand your audience, gain more exposure, and connect with like-minded individuals and local communities on Instagram.
Saving and Sharing Your Edited Instagram Story
Once you’ve finished editing your Instagram Story, it’s time to save and share your creation with your followers and beyond. Instagram provides several options for saving and sharing your edited Story. Here’s how you can do it:
- After you’ve completed editing your Story, tap on the “Your Story” button at the bottom left corner of the screen. This will add your Story to your feed and make it visible to your followers.
- If you want to save your edited Story to your phone’s camera roll, tap on the download arrow icon at the bottom left corner of the screen. This will save a copy of your Story to your device for future use or sharing outside of Instagram.
- If you’d like to share your Story directly with specific individuals or groups, tap on the arrow icon at the bottom right corner of the screen. This will open a list of options for sharing, allowing you to choose from different platforms, including Instagram Direct, Facebook, WhatsApp, and more.
- Additionally, you can share your Story to other social media platforms by tapping on the ellipsis icon (…) at the bottom right corner of the screen. This will provide you with additional sharing options, such as sharing to Facebook, Twitter, or sending it as a direct message on other messaging apps.
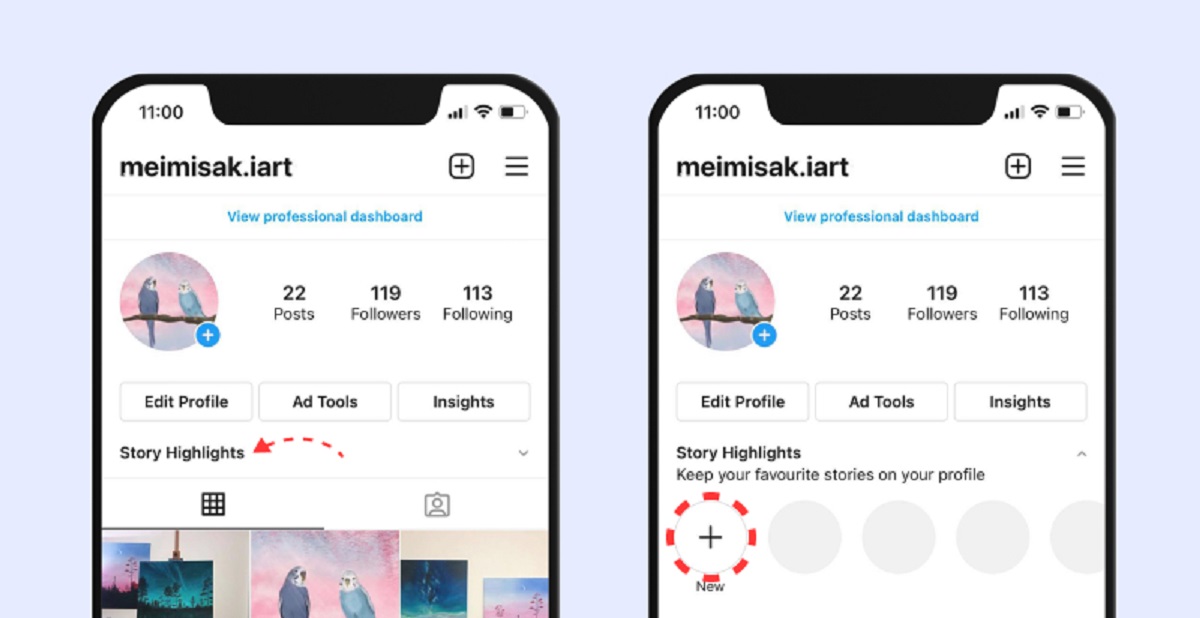
- Instagram also gives you the ability to highlight your Stories, which allows you to save them as permanent collections on your profile. To do this, tap on the “New” button on your profile and select the Stories you want to highlight. Give your highlight a name and cover image, and it will appear as a prominent section on your profile for others to view even after the story disappears after 24 hours.
Saving and sharing your edited Instagram Story enables you to reach a wider audience and engage with your followers and beyond. By saving it to your phone’s camera roll, you have the flexibility to share it on other platforms or access it for future use. Sharing it directly with specific individuals or groups allows you to connect on a more personal level with targeted audiences.
Remember to carefully consider the privacy settings of your Story and ensure that you’re sharing it with the intended audience. If you want your Story to reach as many people as possible, consider utilizing sharing options that will reach a larger network, such as sharing it to Facebook or other social media platforms.
So, once you’re satisfied with your edited Story, don’t forget to save it and share it with your followers or wider audience to maximize its impact and engagement.
Conclusion
Editing your Instagram Story allows you to unleash your creativity, enhance your visuals, and engage with your audience on a deeper level. From adding text and stickers to applying filters and effects, each editing feature allows you to personalize and elevate your Stories.
By accessing the various editing tools Instagram provides, you can transform your ordinary photos and videos into captivating visual masterpieces. Whether you want to highlight specific details, convey a message, or simply have fun with your content, the editing options enable you to create compelling and memorable Stories.
Through this article, we’ve explored the process of accessing the editing tools and delved into the various editing features available. You’ve learned how to add text, stickers, and GIFs to enhance your Story, as well as apply filters and effects to create a cohesive aesthetic. We also covered cropping, resizing, flipping, drawing, and adding hashtags and location stickers to customize your Stories. Finally, we discussed saving and sharing your edited Stories to reach your audience and beyond.
Remember, the key to successful storytelling on Instagram lies in finding the right balance between engaging content and thoughtful editing techniques. Allow your unique voice and style to shine through in your Stories, while also ensuring that they are visually appealing and easy to consume.
So, embrace your creativity, experiment with different editing features, and make your Instagram Stories stand out. Connect with your audience, express yourself, and enjoy the journey of creating amazing Stories that leave a lasting impression.