Introduction
Putting a song on your Instagram Story is a great way to express your mood, share your favorite tunes, or simply add some background music to your visual content. Instagram offers various features that allow you to customize and enhance your stories, and adding a song can take your storytelling to the next level.
In this article, we will guide you through the process of putting a song on your Instagram Story. Whether you want to share a catchy tune that’s stuck in your head or add a meaningful track to complement your visuals, we’ve got you covered.
Before we dive into the steps, it’s important to note that adding music to your Instagram Story requires a few prerequisites. First and foremost, you need to have an active Instagram account. If you’re new to Instagram, make sure to create an account and log in to get started.
Secondly, ensure that you have the latest version of the Instagram app installed on your mobile device. While the steps may vary slightly based on the specific device and operating system you’re using, the overall process remains largely the same across platforms.
Lastly, keep in mind that some features, including the ability to add music to your Story, may not be available in certain regions due to legal restrictions or licensing agreements. If you’re unable to access the music feature, it’s recommended to check if your location is supported or explore other methods to add music to your Story.
Now that you’re equipped with the necessary prerequisites let’s dive into the step-by-step process of putting a song on your Instagram Story. Whether you’re an avid music lover or simply looking to add a little extra flair to your content, this guide will help you create engaging and captivating stories with the perfect soundtrack.
Requirements
Before you begin the process of adding a song to your Instagram Story, there are a few requirements you need to meet:
1. Stable Internet Connection: Ensure that you have a stable internet connection on your mobile device. This will allow you to download the necessary apps and access the music feature on Instagram without interruptions.
2. Updated Instagram App: Make sure that you have the latest version of the Instagram app installed on your device. If you’re not sure if your app is up to date, head to your device’s app store and check for any available updates.
3. Active Instagram Account: You need to have an active Instagram account to create stories. If you don’t have an account, you can easily create one by downloading the Instagram app and following the sign-up instructions.
4. Mobile Device: You can add songs to your Instagram Story using a mobile device, such as a smartphone or a tablet. The process may vary slightly depending on the operating system you’re using, but the general steps remain the same.
5. Music Editing App: To edit and customize the song before adding it to your Instagram Story, you’ll need a music editing app. There are numerous apps available for both iOS and Android that allow you to trim, adjust volume, apply effects, and more.
6. Compatible Music Files: Ensure that the song you want to add to your Instagram Story is in a compatible file format. Instagram supports common audio file formats, such as MP3 and M4A. If your song is in a different format, you may need to convert it before proceeding.
By meeting these requirements, you’ll be ready to go through the step-by-step process of putting a song on your Instagram Story. With the right tools and preparation, you can add a personalized touch to your stories and engage your audience with captivating music.
Step 1: Choose the Song
The first step in putting a song on your Instagram Story is selecting the perfect track that aligns with the mood or theme you want to convey. Here’s how you can choose the ideal song:
1. Consider the Purpose: Think about the purpose of adding a song to your story. Are you looking to express a particular emotion, share a favorite song, or enhance the atmosphere of your content? Understanding the purpose will help you narrow down your options.
2. Reflect Your Personality: Choose a song that reflects your personality or resonates with your interests and style. Whether you’re into upbeat, energetic tracks or prefer slow and melodic tunes, select a song that represents you and your unique vibe.
3. Check the Genre: Consider the genre of music that aligns with your preferences and the overall message you want to convey. From rock and pop to hip-hop and classical, there’s a wide range of genres to choose from. Pick one that best suits your desired mood.
4. Pay Attention to Lyrics: If you’re adding a song with lyrics to your Instagram Story, make sure the lyrics align with your artistic vision and resonate with your audience. Consider the meaning and relevance of the lyrics to ensure they contribute positively to your story.
5. Keep it Relevant: Choose a song that is relevant not only to you but also to the content of your story. Whether it’s a travel adventure, a workout session, or a heartfelt moment, the song should complement and enhance the overall experience for your viewers.
6. Duration: Keep in mind the duration of your Instagram Story. If you have a short story, select a song with a shorter duration to ensure it fits seamlessly within the time limit. Alternatively, if you have a longer story, choose a song that can be enjoyed in its entirety.
By following these tips, you’ll be able to choose a song that perfectly matches your desired mood, reflects your personality, and elevates your Instagram Story to new heights. Once you’ve decided on the song, you’re ready to move on to the next step of the process.
Step 2: Download a Music Editing App
To edit and customize the song before adding it to your Instagram Story, you’ll need to download a music editing app. These apps provide various features and tools that allow you to trim, adjust volume, apply effects, and more. Here’s how you can download a music editing app:
1. App Store/Play Store: Go to your device’s app store, whether it’s the App Store for iOS devices or the Google Play Store for Android devices.
2. Search for Music Editing Apps: In the app store’s search bar, type in keywords such as “music editing,” “audio editing,” or “song editor” to find relevant apps. Some popular options include GarageBand, Audacity, FL Studio, Adobe Audition, and many more.
3. Read Reviews and Ratings: Before downloading any app, take a moment to read user reviews and ratings. This will give you an idea of the app’s functionality, ease of use, and overall user satisfaction.
4. Select the App: Choose the music editing app that best suits your needs and preferences. Consider factors such as user-friendly interface, available features, and compatibility with your device.
5. Download and Install: Once you’ve made your selection, tap on the app to view its details and click on the “Download” or “Install” button. The app will then be downloaded and installed on your device.
6. Open the App: Once the app is installed, locate it on your device’s app screen or home screen and tap on its icon to open it. Some apps may require you to create an account or provide certain permissions before you can start using them.
By downloading a music editing app, you gain the ability to customize the song to your liking, ensuring it fits perfectly with your Instagram Story. These apps offer a range of tools and features that enable you to edit, enhance, and personalize your chosen song before sharing it with your followers.
With the music editing app installed on your device, you’re now ready to move on to the next step – importing the song into the app and getting it ready for your Instagram Story.
Step 3: Import the Song into the App
Once you have downloaded a music editing app, the next step is to import the song you want to add to your Instagram Story. Follow these steps to import the song into the app:
1. Open the Music Editing App: Locate the music editing app on your device’s app screen or home screen and tap on its icon to open it.
2. Browse for the Song: Look for an option or icon within the app that allows you to import or browse for audio files. This could be a plus sign (+), an “Import” button, or a folder icon.
3. Select the Song: Tap on the appropriate option to browse for the song you want to add to your Instagram Story. The app will usually provide access to your device’s storage, allowing you to select music files from your music library.
4. Choose the Song File: Navigate to the location where your desired song is stored, whether it’s in your music library or a specific folder on your device. Tap on the song file to select it.
5. Import the Song: Once you have selected the song file, tap on the “Import” or “Open” button. The app will now import the song into its interface, ready for you to edit and customize.
6. Wait for the Song to Load: Depending on the size of the song file and your device’s performance, it may take a few moments for the app to load and process the song. Be patient and wait for the app to complete the import process.
Once the song has been successfully imported into the music editing app, you can proceed to the next step – editing the song to suit your preferences and requirements.
Importing the song into the app ensures that you have access to the audio file for editing purposes. Once the song is imported, you can trim, adjust volume, add effects, or perform any other modifications to make it perfect for your Instagram Story.
Step 4: Edit the Song
Now that you have imported the song into the music editing app, it’s time to tailor it to your liking. Editing the song allows you to make adjustments, such as trimming the length, adjusting the volume, adding effects, or applying any other modifications that enhance your Instagram Story. Follow these steps to edit the song:
1. Trim the Song: If you want to include only a specific portion of the song in your Instagram Story, look for a trim or cut option in the music editing app. Use this feature to select the desired start and end points of the song, effectively trimming it to the desired length.
2. Adjust the Volume: In some cases, you may want to increase or decrease the volume of the song to ensure optimal balance with your Instagram Story. Most music editing apps offer volume adjustment options that allow you to control the audio levels and make necessary adjustments.
3. Apply Effects: Get creative and experiment with various effects available in the music editing app. You can add echoes, reverb, equalization, or other effects to give the song a unique and personalized touch. However, be mindful not to overdo the effects, as they should enhance the song without overpowering it.
4. Add Crossfades: Crossfading is a technique that smooths the transition between two audio clips. If you wish to add multiple songs to your Instagram Story, look for the crossfade feature in the music editing app. Adjust the duration of the crossfade to create seamless transitions between the songs.
5. Preview and Fine-tune: After making the desired edits, take the time to preview the modified song within the music editing app. Listen carefully to ensure the edits are in line with your expectations. If needed, make any additional adjustments or fine-tuning until you are satisfied with the final result.
6. Save the Edited Song: Once you are happy with the edits, look for a “Save” or “Export” option in the music editing app. This will allow you to save the edited song as a separate audio file that you can later add to your Instagram Story.
By editing the song, you can customize it to fit the specific requirements of your Instagram Story. Whether it’s trimming the length, adjusting the volume, or applying creative effects, these editing options provide you with the flexibility to make the song truly yours.
With the song now edited to perfection, you’re ready for the next step – saving the edited song in preparation for adding it to your Instagram Story.
Step 5: Save the Edited Song
After you have successfully edited the song to your liking in the music editing app, the next step is to save the edited version. Saving the edited song ensures that you have a separate audio file that you can easily access and add to your Instagram Story. Follow these steps to save the edited song:
1. Look for the Save or Export Option: In the music editing app, navigate to the options or menu where you can save or export the edited song. This option is typically represented by an icon or a menu item.
2. Choose the Save Format: Depending on the music editing app, you may have the option to choose the format in which you want to save the edited song. Common formats include MP3 and M4A. Select the format that is compatible with Instagram.
3. Select the Save Location: Once you have chosen the format, the app will prompt you to select the location where you want to save the edited song. You can choose the default location provided by the app or specify a specific folder on your device.
4. Name the Edited Song: Give a meaningful name to the edited song, ensuring that it is easily recognizable and distinct from the original version. This step is especially useful if you plan to edit multiple songs and want to keep them organized.
5. Save the Edited Song: Once you have specified the format, location, and name, tap on the Save or Export button. The music editing app will then process the edited song, save it to the designated location, and create a separate audio file.
6. Confirm the Save: After the save process is complete, the music editing app will usually display a confirmation message or notification. Make sure to check that the edited song has been successfully saved to the specified location.
By saving the edited song, you have now preserved the changes made to the original track and have a separate file ready to be added to your Instagram Story. This ensures that you can easily access and upload the song without needing to repeat the editing process.
With the edited song saved and ready, it’s time to move on to the next step of the process – opening Instagram and creating a new Story for your song.
Step 6: Open Instagram and Create a Story
Now that you have the edited song saved and ready, it’s time to open Instagram and create a new Story. Follow these steps to get started:
1. Launch Instagram: Open the Instagram app on your mobile device. Ensure that you have the latest version of the app installed. If you’re not logged in, enter your login credentials to access your account.
2. Access the Story Feature: On the Instagram home screen, look for the camera icon at the top-left or bottom-center of the screen. Tap on it to access the Story feature. Alternatively, you can swipe right from the home screen to directly access the Story camera.
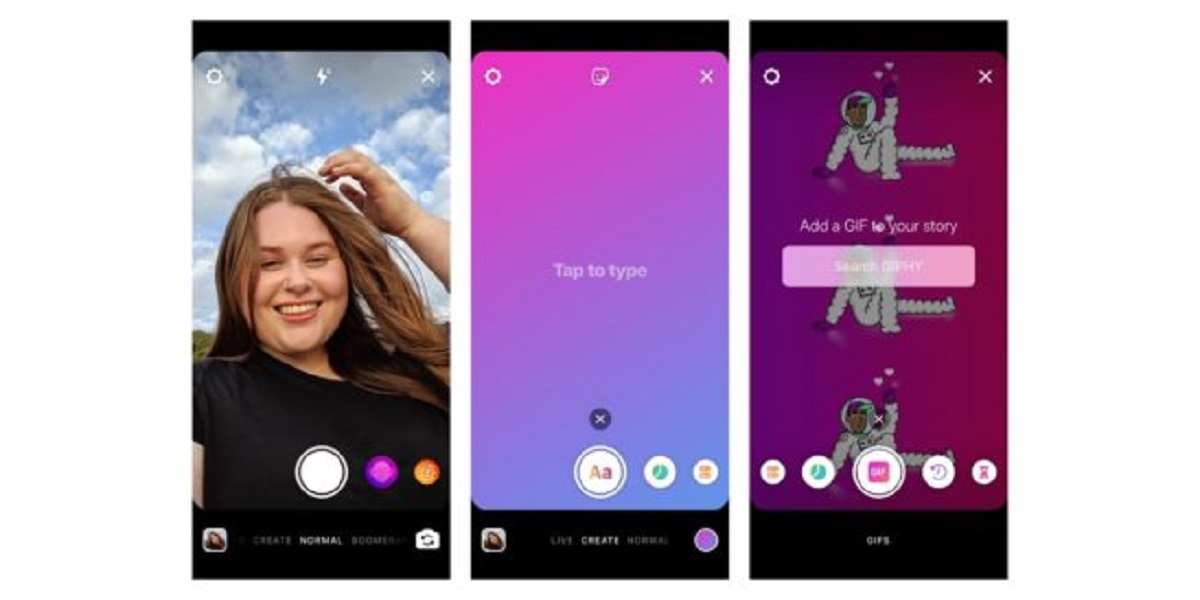
3. Choose a Creating Option: Once you’re in the Story camera, you’ll have several options for creating your Story. You can take a photo or record a video in real-time, or swipe up to access your camera roll and select a pre-recorded video or photo to upload as your Story background.
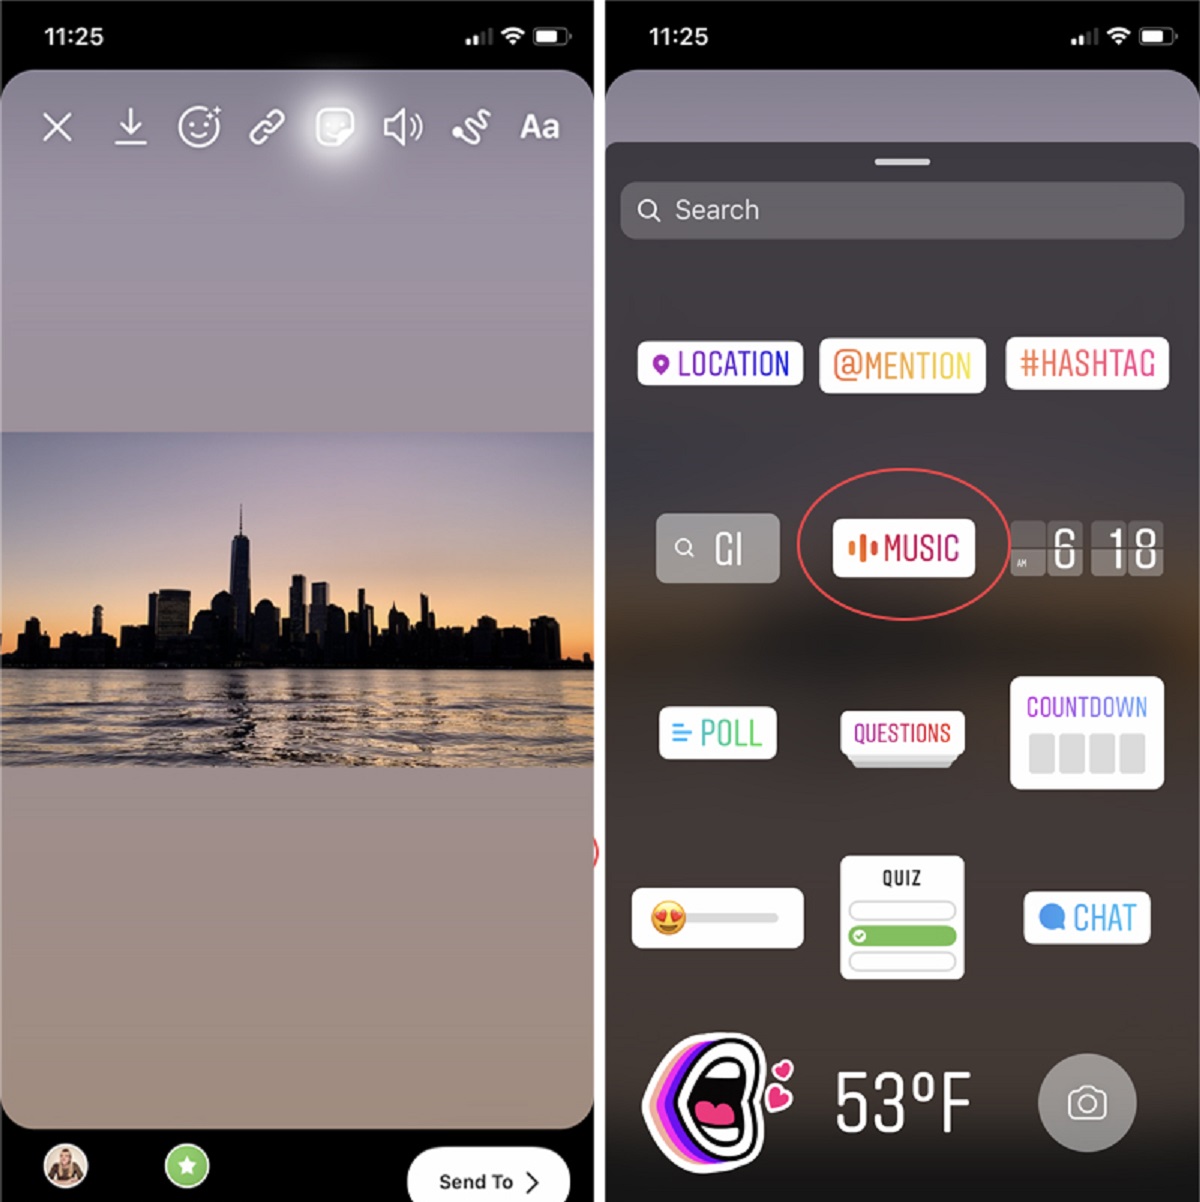
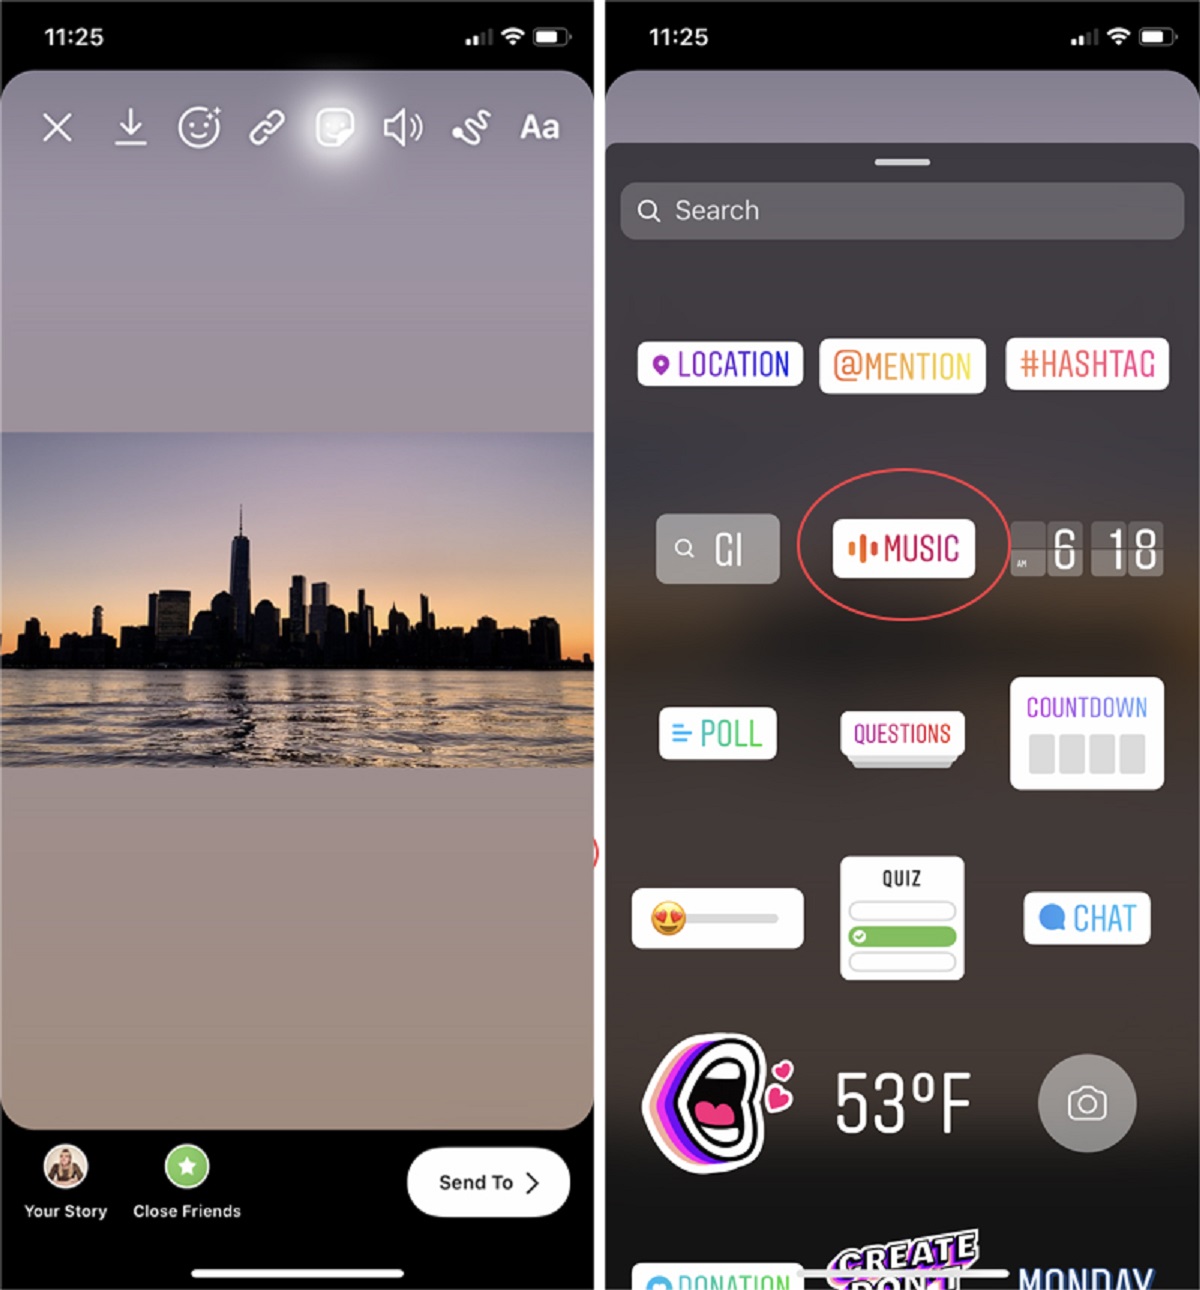
4. Select the Edited Song: If you wish to include the edited song you saved earlier, swipe up or tap on the sticker icon to access the sticker options. Look for the music sticker, labeled with a music note icon, and tap on it to proceed.
5. Find the Edited Song: In the music sticker library, navigate to the location where you saved the edited song. If you named the file, it should be easy to locate. Tap on the edited song to select it.
6. Customize the Song Display: Instagram offers options to customize how the edited song will be displayed in your Story. You can choose to display the song as a sticker, with a small music icon in one of the corners, or as a full-screen display with the song title and a background image.
7. Add Other Content: If you want to add additional content to your Story, such as text, stickers, filters, or other interactive features, you can do so before or after adding the edited song. Customize your Story to your liking.
8. Preview and Adjust: Once you have added the edited song and any other desired elements to your Story, preview it to see how it looks and sounds. If necessary, you can make adjustments, resize or reposition the song sticker, or make any other modifications to achieve the desired visual and audio result.
9. Publish Your Story: When you’re satisfied with your Story, tap on the “Your Story” button or the Send to button to publish it. Your Story will now be available to your followers for the next 24 hours.
By opening Instagram and creating a new Story, you have successfully set the stage for adding the edited song to your visual content. With the song incorporated into your Story, you can captivate your audience with a perfect blend of audio and visuals.
Next, we’ll cover how to adjust the song settings to ensure it complements your Instagram Story seamlessly.
Step 7: Add the Edited Song to Your Story
With your Instagram Story ready, it’s time to add the edited song that you previously selected to complement your visuals. Follow these steps to seamlessly incorporate the edited song into your Story:
1. Access Stickers: While creating or editing your Story, look for the sticker icon located at the top or bottom of the screen. Tap on it to open the sticker options panel.
2. Locate the Music Sticker: In the sticker options panel, scroll through the available stickers until you find the music sticker. It is usually represented by a music note icon.
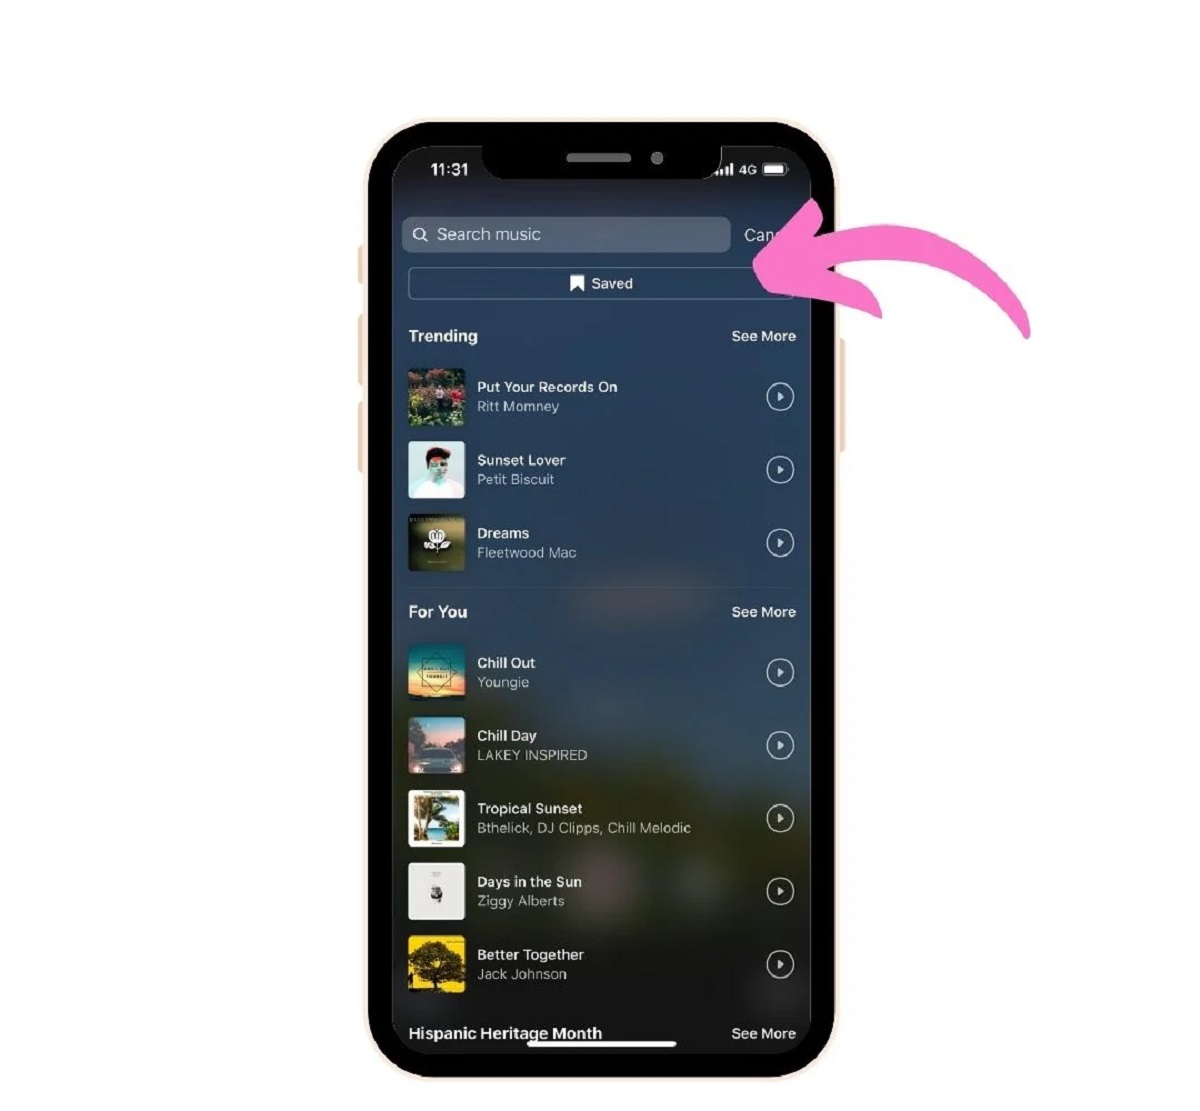
3. Search for the Edited Song: When the music sticker library opens, you’ll have various options to browse and search for the edited song you saved earlier. Use the search bar or navigate through the available categories to locate the song.
4. Select the Edited Song: Tap on the edited song to select it. You may have the option to adjust the duration or select a specific part of the song to play in your Story.
5. Customize the Song Sticker: Once the edited song is added as a sticker, you can customize its appearance in your Story. Resize, reposition, or rotate the sticker to suit your desired placement on the screen. Instagram provides intuitive controls to make these adjustments.
6. Style the Song Sticker: Instagram also offers additional styling options for the song sticker. You can choose different designs, fonts, or colors to make it visually appealing and consistent with the overall aesthetic of your Story.
7. Add Additional Stickers or Text: If desired, you can enhance your Story further by combining the edited song sticker with other stickers or text. This allows you to create a more interactive and engaging Story experience for your viewers.
8. Preview and Fine-tune: Before sharing your Story, preview it to ensure that the edited song is playing smoothly and harmoniously with your visuals. Listen carefully to the audio mix to ensure that the song is not overpowering other sound elements in your Story.
9. Share Your Story: When you are satisfied with how the edited song integrates into your Story, it’s time to share it with your audience. Tap on the “Your Story” button or the Send to button to publish your Story.
By following these steps, you can seamlessly add the edited song to your Instagram Story, complementing your visual content and immersing your audience in a captivating audio-visual experience. Stay tuned for the next step, where we’ll explore how to adjust the song settings to ensure optimal playback and impact.
Step 8: Adjust the Song Settings
Once you have added the edited song to your Instagram Story, it’s important to adjust the song settings to ensure it complements your Story seamlessly and provides the desired impact. Here’s how you can make the necessary adjustments:
1. Volume Control: Instagram allows you to control the volume of the song within your Story. Tap on the volume icon or the speaker icon that appears on the screen when the song sticker is selected. Adjust the volume slider to set the desired audio level for the song.
2. Song Duration: If the selected portion of the edited song is too long for your Story, you can trim it further to fit the desired duration. Tap on the song sticker, then on the three-dot menu icon that appears. Look for the option to trim the song, and adjust the start and end points accordingly.
3. Looping: Depending on your preference, you can choose whether the song plays once or continuously loops throughout your Story. To enable looping, tap on the song sticker, then on the three-dot menu icon. Look for the looping option and select it if available.
4. Music Icon Display: By default, Instagram displays a small music icon on the top left corner of the screen to indicate that a song is playing. If you prefer to hide this icon and have the song play discreetly in the background, you can disable the music icon display. Look for this option within the song sticker settings.
5. Song Title and Artist Attribution: Instagram automatically detects and displays the song title and artist name for some songs. If available, this information will be shown on the screen along with the song sticker. You can customize the display of this information or choose to hide it altogether from the song sticker settings.
6. Preview and Fine-tune: After making the necessary adjustments to the song settings, preview your Story once again to ensure that the song integrates seamlessly with your visual content and that the volume and duration are appropriate. Make any further changes if needed.
7. Save or Discard Changes: If you are satisfied with the adjustments made to the song settings, save your changes by tapping on the “Save” button or the relevant option within the song sticker settings. If you are not happy with the modifications, you can discard the changes and revert to the default settings.
By adjusting the song settings, you have the flexibility to fine-tune the audio experience in your Instagram Story. These adjustments allow you to control the volume, loop the song, customize the display, and ensure that the song is tailored to your desired specifications.
With the song settings adjusted to perfection, your Instagram Story is now ready to be shared with your audience. Hold on for the next step, where we’ll explore how to share your song on your Instagram Story.
Step 9: Share Your Song on Instagram Story
Now that you have added the edited song to your Instagram Story and adjusted the settings, it’s time to share it with your followers. Follow these steps to successfully share your song on your Instagram Story:
1. Review Your Story: Before sharing, take a moment to review your entire Story to ensure that everything is in order. Check the visuals, captions, stickers, and most importantly, the song integration to make sure it aligns with your vision.
2. Determine Your Audience: Choose who you want to share your Story with. You can either share it with all your followers or create a specific close friends list. This allows you to control who can view your Story.
3. Tap on ‘Your Story’ or ‘Send To’: Once you’re ready to share your Story, tap on the ‘Your Story’ button, which will publish it for all your followers to see. Alternatively, you can select ‘Send To’ and choose specific individuals or groups to share your Story with.
4. Add to Highlights (optional): If the song or the Story itself holds significant importance and you’d like to keep it accessible on your profile beyond the 24-hour lifespan of a Story, you can add it to your Story Highlights. Create a new Highlight or add it to an existing one to curate your best moments.
5. Engage with Your Viewers: After sharing your Story, be sure to engage with your viewers by responding to comments or direct messages, allowing them to share their thoughts or reactions to your story and the music you’ve chosen.
6. Explore Additional Sharing Options: If you want to further expand the reach of your Story and the song you’ve added, consider sharing it on other social media platforms. You can save the Story to your device and post it on platforms such as Facebook, Twitter, or even create a TikTok video.
By following these steps, you can effectively share your song-infused Instagram Story with your followers. This not only allows you to express your creativity but also provides an opportunity to connect with your audience on a deeper level through music and visual storytelling.
As you continue to share your stories and incorporate songs into your content, don’t forget to explore new songs and variations to keep your Instagram Stories fresh and engaging for your audience.
Conclusion
Adding a song to your Instagram Story can be a powerful way to enhance your storytelling and engage your followers. By following the step-by-step process outlined in this guide, you can easily put a song on your Instagram Story and create captivating audio-visual experiences.
Starting with choosing the perfect song that aligns with your mood and purpose, you then download a music editing app to customize and edit the song. Importing the song into the app allows you to trim, adjust volume, apply effects, and make any other modifications to make it perfect for your Story. After saving the edited song, you open Instagram and create a new Story, adding the song to it using the music sticker feature. Adjusting the song settings ensures that it fits seamlessly within your Story and provides the desired impact. Finally, you share your story with your audience and engage with them.
As you continue to explore the world of adding songs to your Instagram Stories, remember to keep your content authentic, unique, and aligned with your personal style. Showcasing your creativity through music can help you connect with your audience on a deeper level and leave a lasting impression.
It’s worth noting that Instagram’s features and guidelines may change over time, so it’s important to stay updated with the latest updates and adjustments. Additionally, always ensure that you have the necessary rights and permissions to use the songs you add to your Instagram Stories to avoid any copyright infringement.
Now that you’re equipped with the knowledge and steps to put a song on your Instagram Story, it’s time to let your creativity shine. So go ahead, choose that perfect song, create a captivating Story, and share it with the world!