Introduction
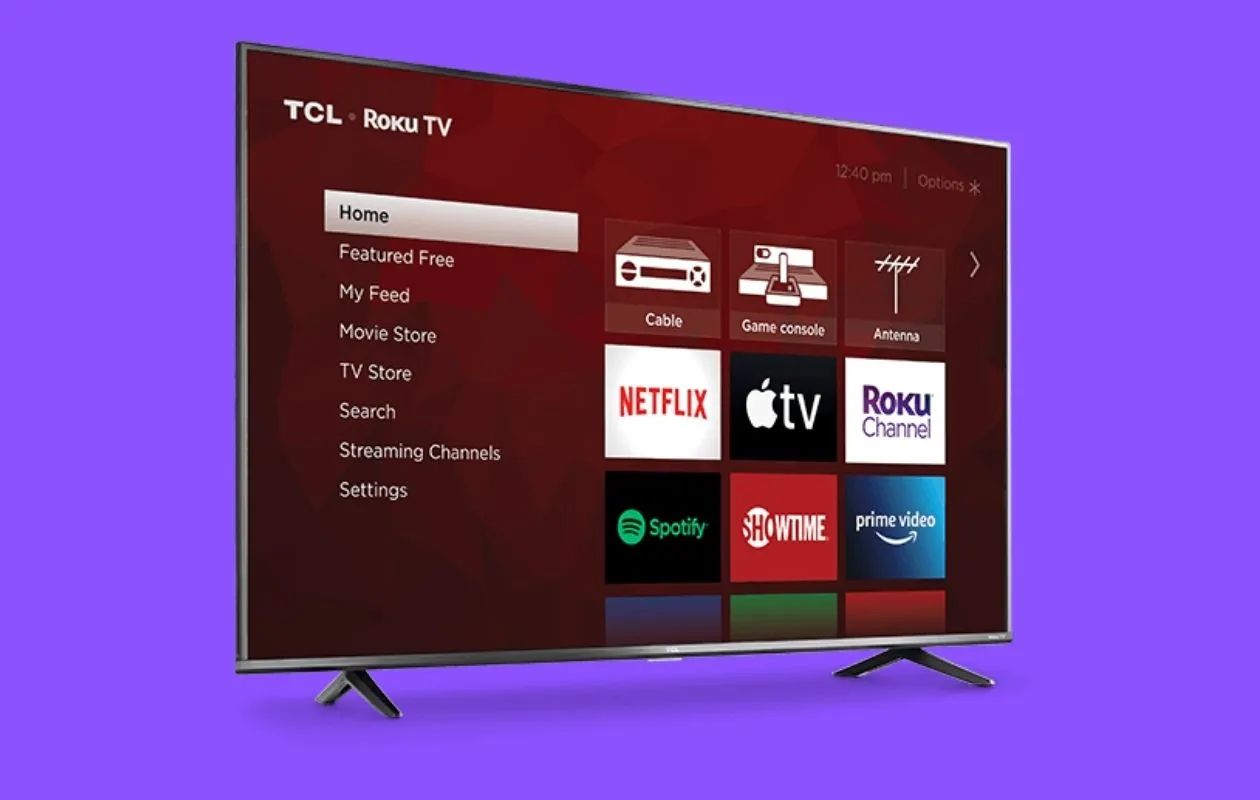
Welcome to the world of Roku Smart TV! With its intuitive interface and vast selection of apps, Roku Smart TV is a fantastic entertainment hub that allows you to stream your favorite movies, TV shows, music, and more, right on your television.
In this guide, we’ll walk you through the process of downloading and installing apps on your Roku Smart TV, so you can personalize your viewing experience and access a wide range of content.
Whether you’re a movie buff, a sports enthusiast, or a fan of binge-watching TV series, Roku Smart TV has you covered. It offers a plethora of apps and channels that cater to every interest and genre, ensuring that there’s always something new and exciting to watch.
Setting up your Roku Smart TV is a breeze. Simply connect it to your Wi-Fi network, follow the on-screen instructions, and you’ll be up and running in no time. Once your Roku Smart TV is set up and connected, you can start exploring the extensive library of apps available through the Roku Channel Store.
The Roku Channel Store is where you’ll find all the apps and channels compatible with your Roku Smart TV. It’s your gateway to a world of entertainment and allows you to discover a variety of free and paid apps. From popular streaming services like Netflix and Hulu to specialized channels for sports, news, music, and even cooking, the Roku Channel Store has something for everyone.
Browsing and selecting apps is a straightforward process. You can use the Roku remote control to navigate through the Channel Store, or if you prefer, you can browse and select apps using the Roku mobile app on your smartphone or tablet. The Channel Store is organized into various categories, making it easy to find the apps that align with your interests and preferences.
Once you’ve found an app that catches your eye, it’s time to install it on your Roku Smart TV. The installation process is quick and seamless, and within minutes, you’ll have the app ready to use. If you’re no longer interested in an app or you need to free up space, you can easily remove it from your Roku Smart TV.
In the following sections, we’ll go into more detail on each step of the process, from accessing the Roku Channel Store to troubleshooting any potential installation issues. So let’s dive in and make the most of your Roku Smart TV experience!
Setting up Roku Smart TV
Setting up your Roku Smart TV is a simple and straightforward process that can be done in just a few easy steps. Here’s a step-by-step guide on how to get started:
- Unbox your Roku Smart TV and place it in the desired location. Make sure it’s within reach of a power outlet and has proper ventilation.
- Connect the power cord to your Roku Smart TV and plug it into a power outlet.
- Turn on your Roku Smart TV by pressing the power button on the TV or using the power button on the included remote control.
- Follow the on-screen instructions to select your preferred language, set up your internet connection, and configure other basic settings.
- If prompted, sign in or create a Roku account. A Roku account allows you to manage your device, add channels, and access other Roku features.
- Once your Roku Smart TV is successfully set up, it will automatically check for and install any available software updates. This ensures that you have the latest features and improvements.
- After the software update process is complete, your Roku Smart TV will display the home screen, where you can start exploring the world of entertainment.
It’s important to note that during the initial setup process, you’ll be prompted to connect your Roku Smart TV to the internet. You can choose between a wired Ethernet connection or a wireless Wi-Fi connection. For a seamless streaming experience, we recommend using a high-speed internet connection.
In the event that you encounter any issues during the setup process, Roku provides detailed troubleshooting instructions on their website. You can also reach out to their customer support for assistance.
Once your Roku Smart TV is set up, you’ll have access to a wide range of apps and channels through the Roku Channel Store. So let’s move on to the next section to learn how to access and browse the Roku Channel Store.
Accessing the Roku Channel Store
The Roku Channel Store is your gateway to a world of entertainment on your Roku Smart TV. It’s where you can find and access a wide variety of apps and channels to enhance your viewing experience. Here’s how to access the Roku Channel Store:
1. Start by turning on your Roku Smart TV and ensure that it is connected to the internet. The home screen will appear once your TV is ready.
2. Using the Roku remote control, navigate to the left side of the screen to access the menu.
3. Scroll down and select “Streaming Channels” to open the Roku Channel Store. Press the OK button on your remote to confirm your selection.
4. The Roku Channel Store will now open, displaying various categories and options for you to explore.
Alternatively, if you prefer to search for a specific app or channel, you can use the search function on the home screen. Simply navigate to the top right corner of the screen and select the magnifying glass icon. Enter the name of the app or channel you’re looking for using the on-screen keyboard, and the search results will appear.
Within the Roku Channel Store, you’ll find a wide range of categories to browse, including popular apps, new releases, free apps, paid apps, and more. You can also explore specific genres such as movies, TV shows, sports, news, kids, and lifestyle.
As you navigate through the Roku Channel Store, you’ll see featured apps and channels, as well as recommendations based on your viewing preferences and history. This personalized approach makes it easier to find content that aligns with your interests.
It’s worth noting that the Roku Channel Store continuously adds new apps and channels, providing you with an ever-expanding selection of entertainment options. It’s always a good idea to explore the store regularly and discover new content to enjoy.
Next, we’ll delve into how to browse and select apps within the Roku Channel Store. So let’s move on to the next section to learn more.
Browsing and selecting apps
Once you’ve accessed the Roku Channel Store on your Roku Smart TV, it’s time to start browsing and selecting the apps and channels that pique your interest. Here’s how to do it:
1. Use the Roku remote control to navigate through the Roku Channel Store. You can move up, down, left, and right using the arrow buttons on the remote.
2. The Roku Channel Store is organized into categories to help you find apps and channels that align with your interests. Browse through categories such as movies, TV shows, sports, news, kids, and more. Navigate to the desired category and press the OK button to view the available options.
3. Within each category, you’ll find a selection of featured apps and channels. These are curated recommendations that showcase popular and noteworthy content. Scroll through the list and press the OK button on the remote to learn more about an app or channel.
4. If you’re looking for something specific, you can use the search function. Navigate to the top right corner of the screen and select the magnifying glass icon. Enter the name of the app or channel you’re searching for using the on-screen keyboard, and the search results will appear.
5. As you browse through the Roku Channel Store, you’ll find detailed information about each app or channel. This includes a description of the content and features, user reviews and ratings, and any additional information provided by the app developers. Take the time to read through this information to ensure that the app or channel meets your expectations.
6. To select a specific app or channel, highlight it on the screen and press the OK button on your remote. This will open the app or channel page, where you can find more details, screenshots, and even preview some content.
7. If you decide to install the app or channel, select the “Add Channel” button or a similar option listed on the page. The app or channel will then be added to your Roku Smart TV, and you can access it from the home screen or the Roku Channel Store.
By browsing and selecting apps in the Roku Channel Store, you can discover a wide range of entertainment options that cater to your preferences. Take your time to explore different categories, read reviews, and discover new content that you might not have known about before.
In the next section, we’ll guide you through the process of installing apps on your Roku Smart TV. So let’s continue on to the next step!
Installing Apps on Roku Smart TV
Once you’ve found an app or channel that you want to add to your Roku Smart TV, the installation process is quick and straightforward. Here’s how to install apps on your Roku Smart TV:
1. On the app or channel page in the Roku Channel Store, select the “Add Channel” button or a similar option. This will initiate the installation process.
2. A confirmation screen will appear, providing you with information about the app or channel and its access to your Roku account. Review this information and select “Add Channel” to proceed.
3. The installation process will begin, and a progress bar will appear on the screen. Depending on the size of the app or channel, it may take a few moments or a couple of minutes to complete the installation.
4. Once the installation is finished, you’ll see a notification on the screen confirming that the app or channel has been successfully added to your Roku Smart TV.
5. You can now access the newly installed app or channel from the home screen or the Roku Channel Store. Navigate to the app or channel using the Roku remote control and press the OK button to launch it.
It’s important to note that some apps or channels may require additional steps for activation or sign-in. This is common for subscription-based services such as Netflix or Hulu. In such cases, follow the on-screen instructions to activate the app or channel using your existing account or to sign up for a new account.
Furthermore, if you have multiple Roku devices linked to your Roku account, the app or channel will be installed on all of your devices. This allows you to enjoy your favorite content seamlessly across different Roku devices.
Installing apps on your Roku Smart TV gives you access to an endless array of entertainment options. From streaming services to specialized channels for sports, news, music, and more, you can customize your Roku experience to suit your preferences.
In the next section, we’ll discuss how you can manage the apps and channels installed on your Roku Smart TV. So let’s move on to the next step!
Managing Installed Apps
As you continue to explore and install apps on your Roku Smart TV, you may find it beneficial to manage your installed apps to keep your home screen organized and easily accessible. Here are some ways to manage the apps on your Roku Smart TV:
1. Rearrange apps: If you want to change the order in which your apps appear on the home screen, you can easily rearrange them. Navigate to the app you want to move, press the options button on your remote (usually indicated by a star or three lines), and select “Move Channel.” Then, use the arrow buttons to place the app in your desired position, and press the OK button to confirm.
2. Create app shortcuts: You can create shortcuts to your favorite apps, making it even more convenient to access them. Navigate to the app you want to create a shortcut for, press the options button on your remote, and select “Create Channel Shortcut.” The app will appear as a shortcut on the home screen, allowing you to access it with just a few clicks.
3. Remove apps: If you no longer want a particular app on your Roku Smart TV, you can remove it. Navigate to the app you want to remove, press the options button on your remote, and select “Remove Channel.” Confirm the removal, and the app will be uninstalled from your Roku Smart TV. Removing the app does not delete your account or subscription; it simply removes the app from your device.
4. Hide apps: If there are apps that you rarely use and want to declutter your home screen, you can hide them. Navigate to the app you want to hide, press the options button on your remote, and select “Hide Channel.” The app will no longer appear on the home screen, but you can still access it by going to “Settings” > “Home Screen” > “My Channels” and selecting it from the list.
It’s important to note that removing or hiding an app does not cancel any subscriptions associated with that app. If you want to cancel a subscription, you’ll need to do so through the respective app or channel’s account settings.
By managing your installed apps on your Roku Smart TV, you can customize your home screen and optimize your viewing experience. Organize your apps in a way that suits your preferences and makes it easier for you to navigate through your favorite content.
In the next section, we’ll discuss how to keep your apps up to date with the latest versions. So let’s move on to the next step!
Updating Apps on Roku Smart TV
Keeping your apps up to date is essential to ensure that you have access to the latest features, improvements, and bug fixes. Fortunately, updating apps on your Roku Smart TV is a straightforward process. Here’s how to do it:
1. From the home screen of your Roku Smart TV, navigate to the app you want to update.
2. Press the options button on your remote control (usually indicated by a star or three lines).
3. Select “Check for updates” from the menu that appears.
4. The Roku Smart TV will now check for any available updates for the selected app.
5. If an update is available, a prompt will appear on the screen with the option to download and install the update.
6. Select “Update” to begin the update process. The update may take a few moments to complete, depending on the size of the update and your internet connection speed.
7. Once the update is finished, you’ll receive a notification confirming that the app has been successfully updated.
It’s worth noting that some apps might not require manual updates, as they are set to update automatically by default. However, if you want to ensure that all your apps are up to date, it’s a good practice to periodically check for updates.
If you have multiple apps that require updates, you can save time by selecting “Update all” instead of individually updating each app. This option will update all the apps that have available updates, saving you the hassle of going through each app separately.
Updating your apps on your Roku Smart TV ensures that you have the most recent versions of your favorite apps, providing you with an optimal viewing experience and access to new features.
In the next section, we’ll discuss how to remove apps from your Roku Smart TV, so you can free up space or eliminate apps that you no longer use. Let’s move on to the next step!
Removing Apps from Roku Smart TV
If you want to free up space on your Roku Smart TV or remove apps that you no longer use, you can easily uninstall them using a few simple steps. Here’s how to remove apps from your Roku Smart TV:
1. Start by navigating to the home screen of your Roku Smart TV.
2. Using the Roku remote control, scroll through the apps until you find the one you want to remove.
3. Once you have selected the app, press the options button on your remote control (typically indicated by a star or three lines).
4. From the menu that appears, select “Remove Channel” and confirm the removal.
5. The app will be uninstalled from your Roku Smart TV, and you’ll no longer see it on your home screen.
Removing an app from your Roku Smart TV does not cancel any subscriptions associated with that app. If you want to cancel a subscription, you’ll need to do so through the respective app or channel’s account settings.
It’s important to note that removing an app does not permanently delete it. If you decide to reinstall the app in the future, you can easily do so through the Roku Channel Store.
If you have multiple Roku devices linked to your Roku account, keep in mind that removing an app from one device will not remove it from others. You’ll need to uninstall the app separately from each device if desired.
Regularly removing apps that you no longer use can help declutter your home screen and free up storage space on your Roku Smart TV. This allows you to maintain a clean and organized interface and ensures that you have sufficient space for new apps and updates.
In the next section, we’ll cover some troubleshooting tips for common app installation issues on Roku Smart TV. So let’s move on to the next step!
Troubleshooting App Installation Issues
While installing apps on your Roku Smart TV is generally a smooth process, you may encounter occasional issues that prevent successful installations. Here are some troubleshooting tips to help resolve common app installation issues:
1. Check your internet connection: Ensure that your Roku Smart TV is connected to a stable internet connection. Poor or unstable connectivity can interfere with app installations. You can try restarting your router or moving the Roku device closer to the router for a stronger signal.
2. Restart your Roku Smart TV: Sometimes, a simple restart can resolve installation issues. Go to the Settings menu on your Roku Smart TV, select “System,” and then choose “System restart.” Allow your Roku device to restart, and then retry installing the app.
3. Clear cache or data: If an app installation repeatedly fails, you can try clearing the cache or data for the Roku Channel Store. Go to the Settings menu, select “System,” followed by “Advanced system settings,” and choose “Clear cache” or “Clear data.” This can help resolve any issues related to temporary files or stored data.
4. Remove and reinstall: If an app continues to fail during installation, you can try removing the app completely from your Roku device. Navigate to the app on your home screen, press the options button on your remote, and select “Remove Channel.” Afterward, go to the Roku Channel Store and try reinstalling the app from scratch.
5. Check for system updates: Make sure that your Roku Smart TV has the latest firmware installed. Outdated software can cause compatibility issues with certain apps. Navigate to the Settings menu, select “System,” followed by “System update” to check for any available updates. If an update is available, install it and then retry the app installation.
6. Contact app support: If you have followed the steps above and continue to encounter issues with a specific app, reach out to the app developer’s support team. They may be able to provide specific troubleshooting tips or insights to resolve the problem.
By applying these troubleshooting tips, you should be able to overcome most app installation issues on your Roku Smart TV. However, if you are still unable to install the app, it’s recommended to reach out to Roku’s customer support for further assistance.
In the next section, we’ll wrap up this guide with a summary of the key points covered. So let’s move on!
Conclusion
Congratulations! You’ve learned how to download and install apps on your Roku Smart TV, making it a powerful entertainment hub tailored to your preferences. By accessing the Roku Channel Store, you can explore a vast selection of apps and channels, ranging from popular streaming services to specialized content providers.
Setting up your Roku Smart TV was a breeze, and accessing the Roku Channel Store allowed you to browse and select apps that caught your interest. Installing apps was a seamless process, and managing your installed apps gave you control over your home screen layout.
Don’t forget to keep your apps up to date to benefit from the latest features and bug fixes. Removing any unused apps or troubleshooting installation issues will further enhance your Roku Smart TV experience.
With your Roku Smart TV, you have a world of entertainment at your fingertips. Explore movies, TV shows, sports, news, and more, all conveniently accessible from the comfort of your living room.
We hope this guide has been helpful in unlocking the full potential of your Roku Smart TV. Enjoy your favorite content and have a fantastic time using your Roku Smart TV!


