Introduction
Welcome to our guide on how to connect a Roku to a non-smart TV! Streaming devices like the Roku have revolutionized the way we consume media, providing access to a wide range of streaming services and content. But what do you do if you have a non-smart TV and still want to enjoy the benefits of streaming? Don’t worry, we’ve got you covered.
Roku devices are designed to transform any television into a smart TV, allowing you to stream your favorite shows, movies, and music directly to your TV screen. Whether you have an older TV without smart capabilities or simply want to enhance your existing smart TV experience, connecting a Roku is a straightforward process that can be done with just a few simple steps.
In this guide, we will walk you through the process of connecting a Roku to a non-smart TV and getting it set up so you can start enjoying all the great content that Roku has to offer. We will cover everything from determining your Roku model to creating a Roku account and installing channels. By the end of this guide, you’ll be ready to stream all your favorite movies and TV shows on your non-smart TV with ease.
So, if you’re ready to unlock the full potential of your non-smart TV and enter the world of streaming, let’s get started!
Determine Your Roku Model
Before you begin connecting a Roku to your non-smart TV, it’s important to determine which Roku model you have. Roku offers different models with varying features and capabilities, so identifying your model will ensure you have the right equipment and know which steps to follow for setup.
To determine your Roku model, you can look for the model number on the device itself or check the packaging or documentation that came with it. The model number is usually located on the bottom or back of the Roku device, and it typically starts with the letter “R” followed by a series of numbers.
If you can’t find the model number on the Roku device or its packaging, you can also navigate to the Roku home screen and go to “Settings.” From there, select “System” and then “About” to find the model number listed.
Once you have identified your Roku model, you can visit the Roku website or consult the user manual to learn more about the specific features and capabilities of your device. This information will be useful throughout the setup process and can help you make the most of your Roku streaming experience.
It’s important to note that newer Roku models may offer additional features such as 4K Ultra HD support or voice control capabilities. Understanding your model will ensure you have the appropriate equipment and know which settings to adjust during setup.
With your Roku model identified, you’re now ready to gather the necessary equipment and begin connecting your Roku to your non-smart TV. Stay tuned for the next section of our guide, where we’ll walk you through the equipment needed for the setup process.
Gather Your Equipment
Now that you know the model of your Roku device, it’s time to gather the necessary equipment to connect it to your non-smart TV. Don’t worry; the equipment needed is minimal, and you may already have most of it on hand.
Here’s what you’ll need:
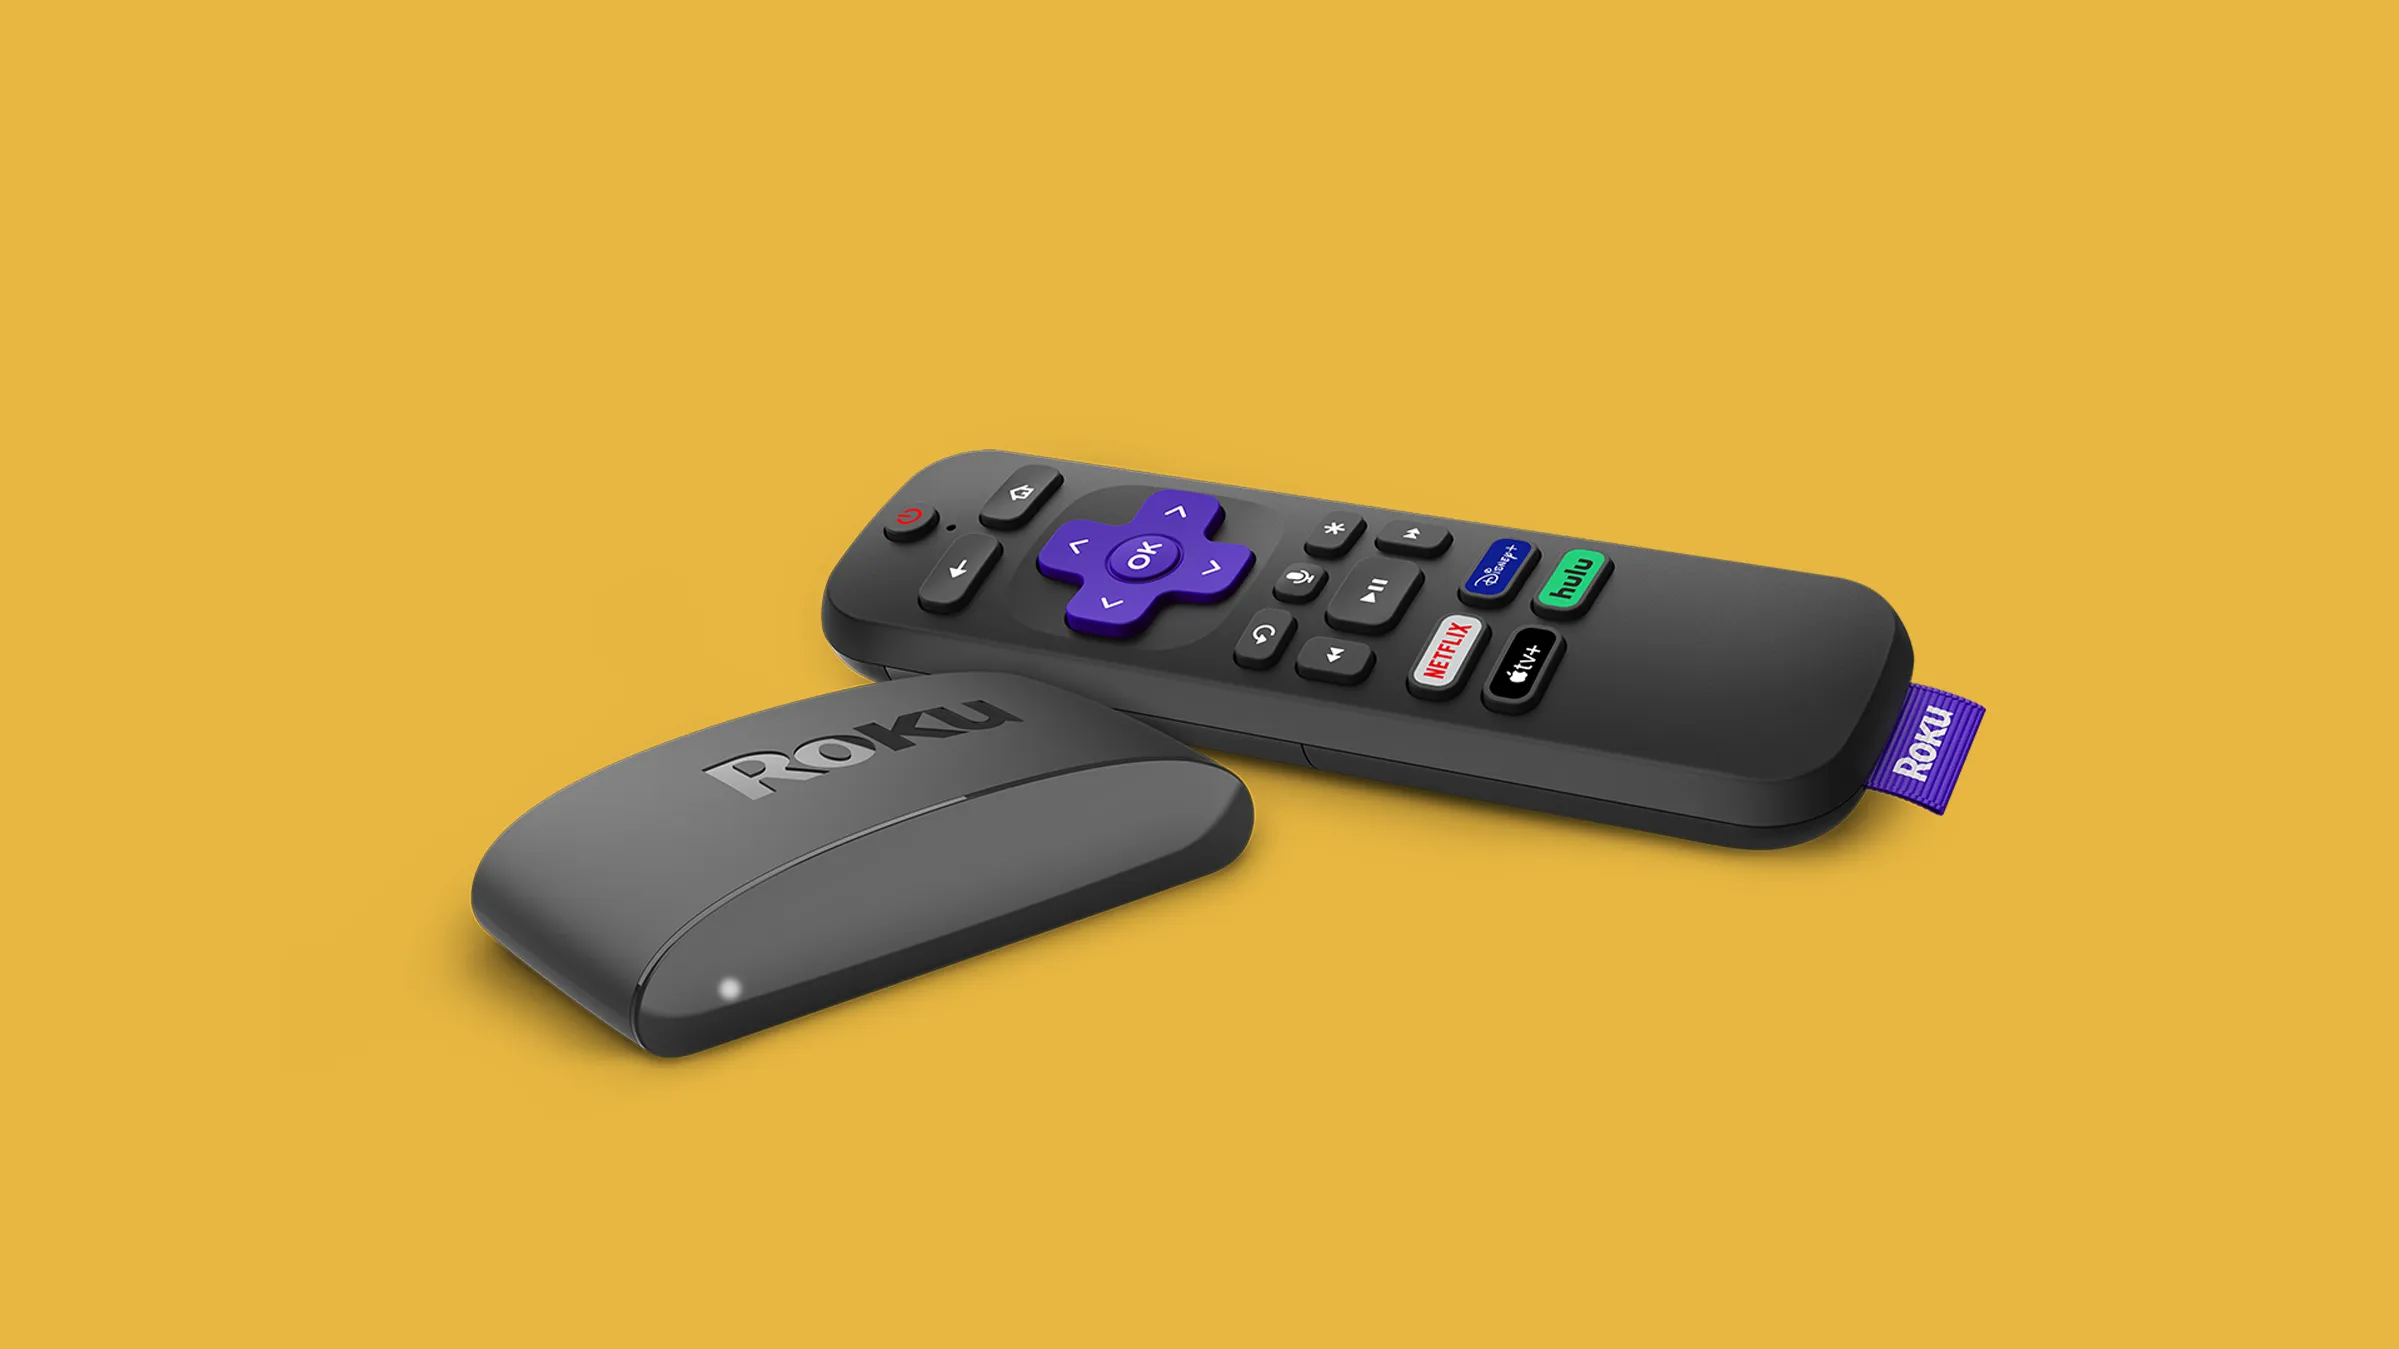
- Roku device: The Roku streaming player is the main component of your setup. Depending on your Roku model, it may be a small box that connects to your TV via HDMI or a stick that plugs directly into the HDMI port.
- HDMI cable: Most Roku devices require an HDMI cable to connect to your TV. Check if your TV has an HDMI port and make sure to have an HDMI cable of the appropriate length. If your non-smart TV doesn’t have an HDMI port, don’t worry; we’ll cover alternative connection options later in the guide.
- Power adapter and cable: Your Roku device will need to be powered, so make sure you have a power adapter and the accompanying cable that is compatible with your Roku model.
- Wi-Fi network: To connect your Roku device to the internet, you’ll need access to a Wi-Fi network. Make sure you have the necessary credentials, such as the Wi-Fi network name and password, readily available.
- Smartphone or computer: During the setup process, you will need a smartphone, tablet, or computer to download the Roku app or visit the Roku website. This will help you navigate through the setup steps and configure your Roku device.
Once you have gathered all the necessary equipment, you’re ready to connect your Roku device to your non-smart TV. In the next section, we will walk you through the step-by-step process of connecting the Roku to your TV. Get ready to enjoy a whole new world of streaming entertainment right on your non-smart TV!
Connect the Roku to the TV
Now that you have all the required equipment, it’s time to connect the Roku device to your non-smart TV. Follow these step-by-step instructions to get started:
- Locate the HDMI port: Check the back or side of your TV to find the HDMI port. It’s usually labeled as “HDMI” and should correspond to the HDMI number on your Roku device.
- Insert the HDMI cable: Take one end of the HDMI cable and insert it into the HDMI port on your TV. Then, connect the other end of the cable to the HDMI port on your Roku device.
- Plugin the power adapter: Connect the power adapter to your Roku device and plug it into a power outlet. Ensure that the Roku device is receiving power.
- Turn on your TV: Power on your non-smart TV and use the input or source button on your TV remote to select the HDMI input where you connected your Roku device.
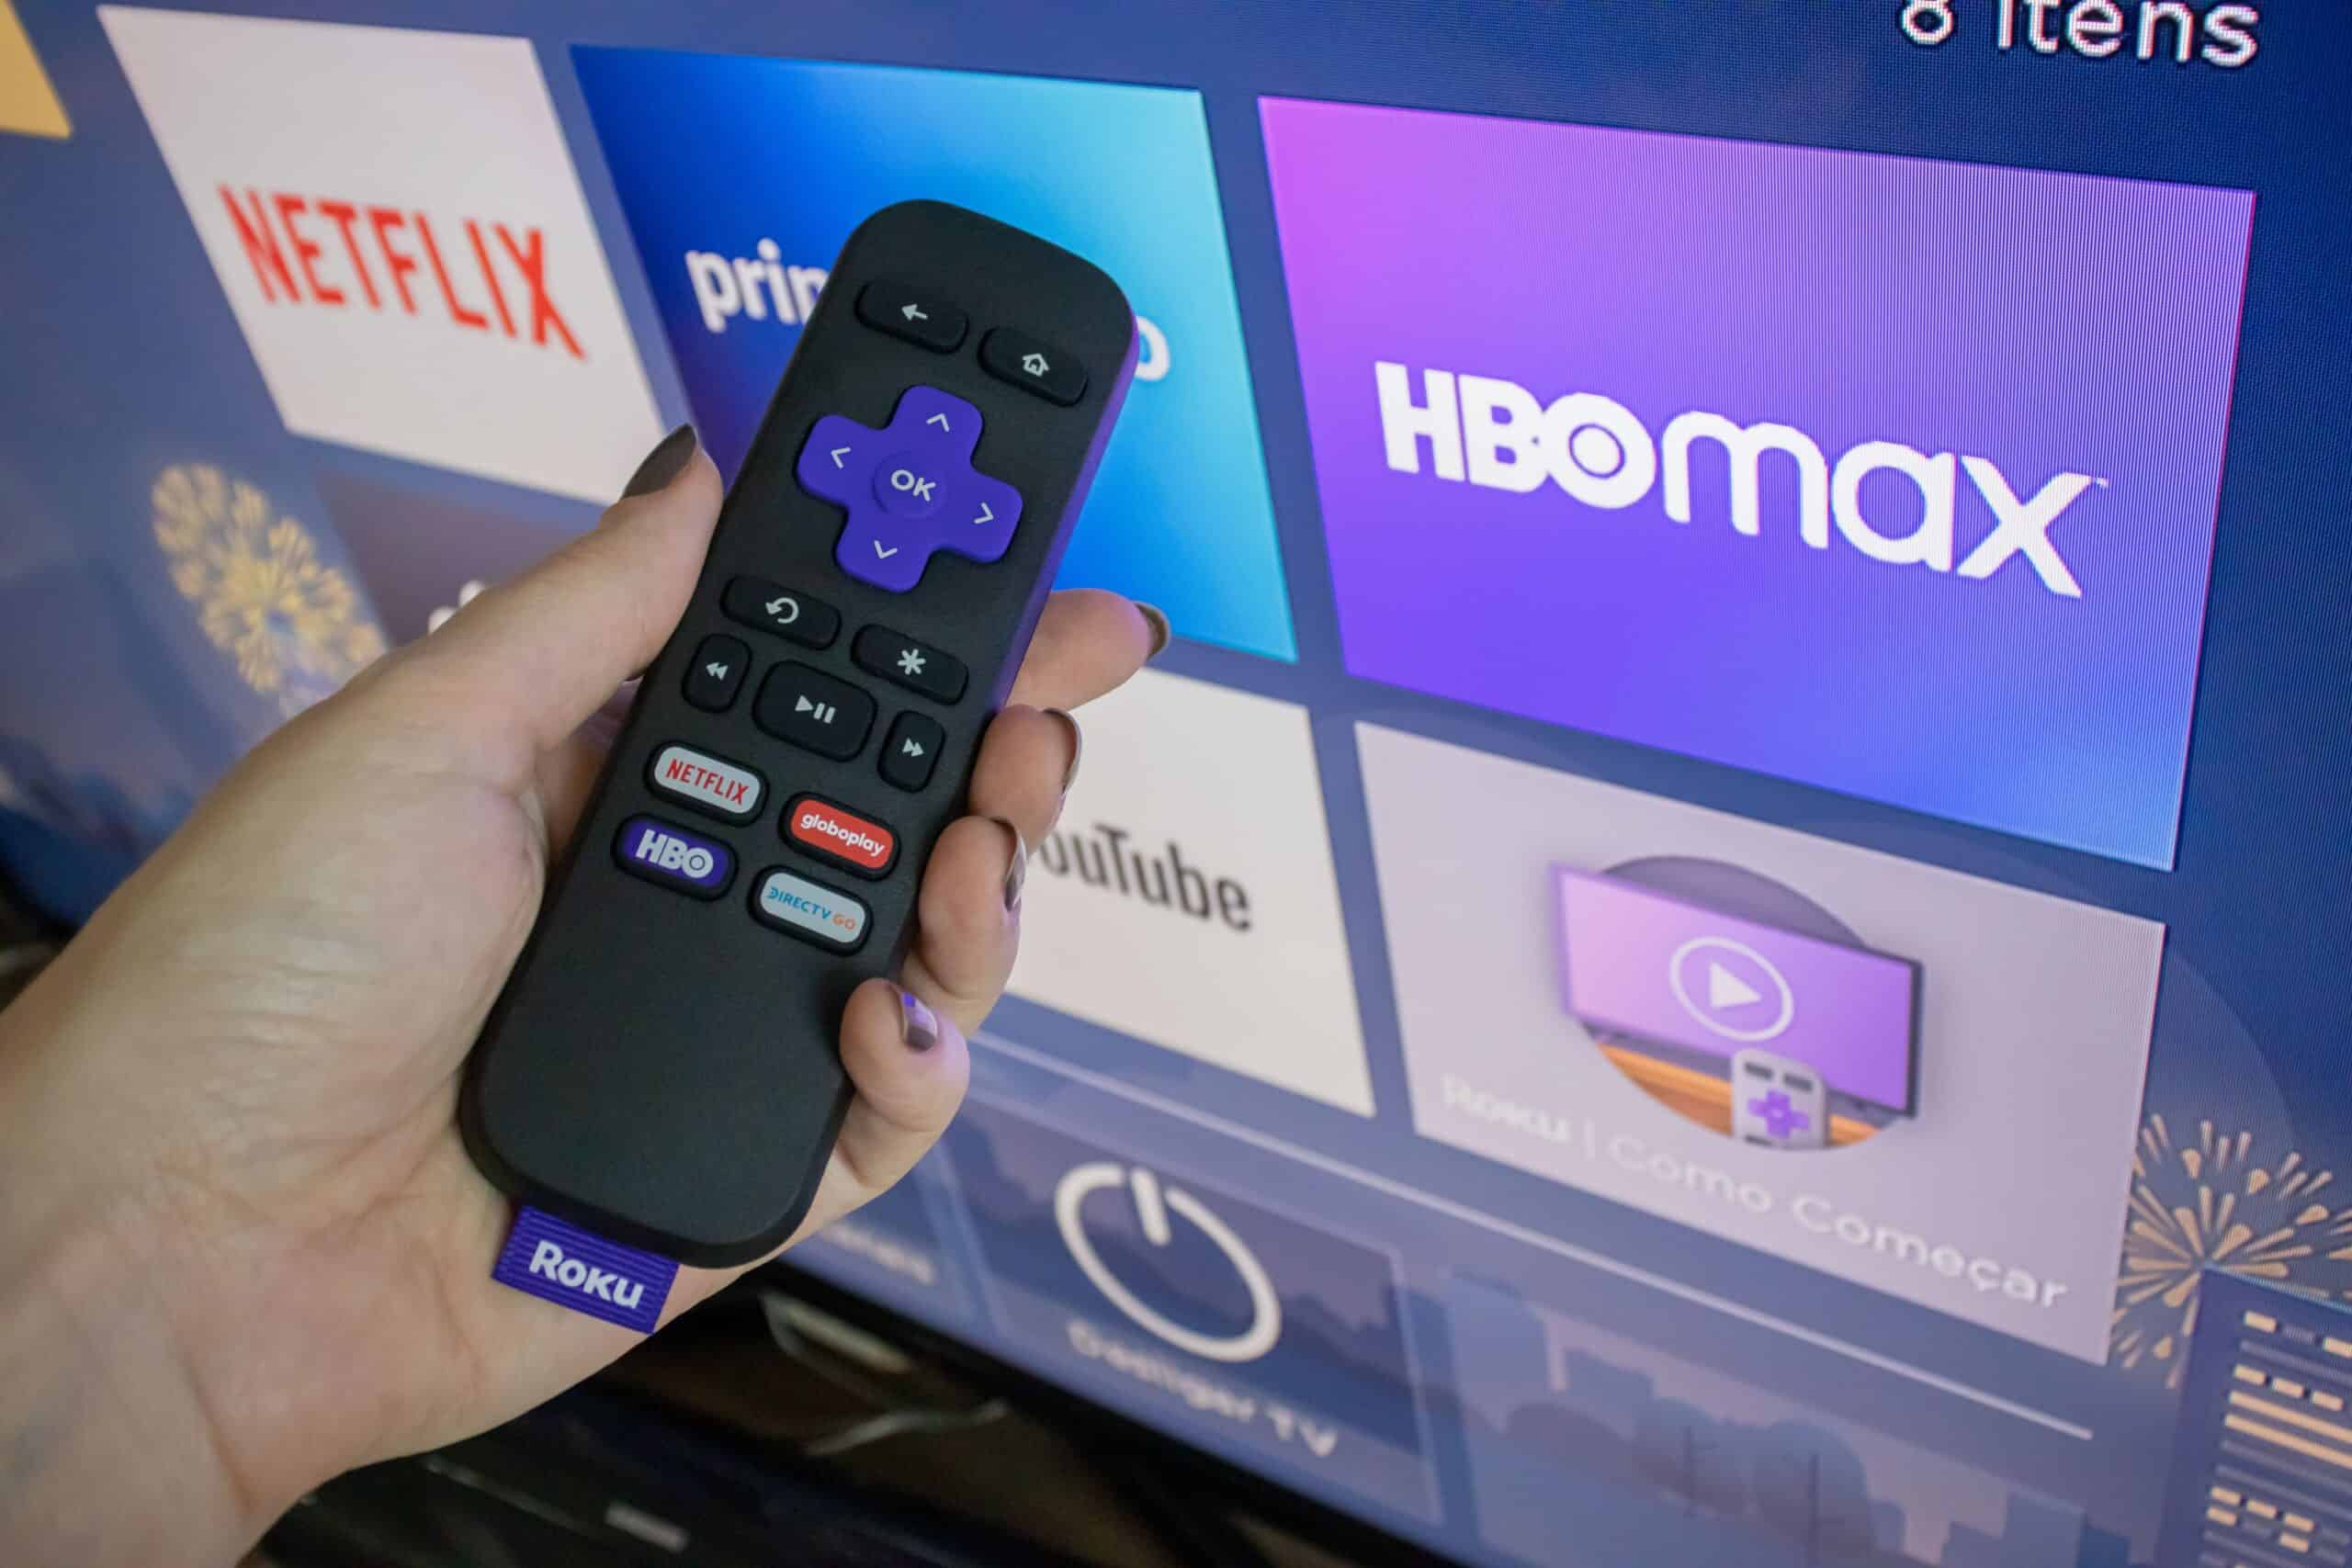
- Grab the Roku remote: Locate the Roku remote that came with your device. Insert batteries if necessary and make sure it’s in working condition.
- Pair the remote: If your Roku device and remote are not already paired, follow the on-screen instructions to pair and set up your remote. This step may vary depending on your Roku model.
- Follow the on-screen instructions: Once your remote is paired, follow the prompts on your TV screen to complete the initial setup and configuration of your Roku device. This may include selecting your language, connecting to a Wi-Fi network, and downloading any necessary updates.
- Wait for the setup to finish: Allow your Roku device to complete the setup process. It may restart or update during this time, so be patient and let it finish before proceeding to the next steps.
Once the setup process is complete, your Roku device should be successfully connected to your non-smart TV. You can now proceed to the next steps, which include connecting to Wi-Fi and creating a Roku account. Stay tuned for the upcoming sections of our guide to continue the setup process.
Set Up the Roku
Now that your Roku device is connected to your non-smart TV, it’s time to set it up and get it ready for streaming. Follow these steps to complete the setup process:
- Select the language: On your TV screen, you will be prompted to choose your preferred language. Use the Roku remote to navigate and select your desired language.
- Connect to Wi-Fi: Next, you’ll need to connect your Roku device to your Wi-Fi network. Select your network from the list of available options and enter the necessary credentials, such as the Wi-Fi password, if prompted.
- Download software updates: After connecting to Wi-Fi, your Roku device may automatically check for software updates. If updates are available, allow them to download and install. It’s important to keep your Roku device up to date for optimal performance and access to the latest features.
- Set display type: Once the software updates are complete, you will be prompted to set the display type. Choose the resolution that matches your TV’s capabilities. If you’re unsure, select “Auto detect” to let the Roku device determine the best display settings for your TV.
- Create a Roku account: To proceed with the setup, you will need to create a Roku account. Use your smartphone, tablet, or computer to visit the Roku website and follow the instructions to create your account. Alternatively, you can also use the Roku app on your mobile device to create an account.
- Link your Roku device: Once you have created a Roku account, you will need to link your Roku device to your account. Follow the on-screen instructions to enter the provided link code on the Roku website or app. This will associate your Roku device with your account.
- Review settings: Before completing the setup process, take some time to review the various settings available on your Roku device. You can customize options such as video, audio, and display settings based on your preferences. Explore the settings menu to make any necessary adjustments.
- Finish setup: Once you have reviewed and adjusted the settings, you have successfully set up your Roku device. Follow the on-screen instructions to complete the setup process. Your Roku device will restart, and you will be taken to the Roku home screen.
Congratulations! Your Roku device is now fully set up and ready to use. In the next sections of our guide, we will walk you through the process of connecting to the Roku account, activating your device, and installing channels. Stay tuned to continue enjoying streaming on your non-smart TV with Roku!
Connect to Wi-Fi
One of the key steps in setting up your Roku device is connecting it to a Wi-Fi network. This step is crucial as it allows your Roku device to access the internet and stream your favorite content. Follow these steps to connect your Roku device to Wi-Fi:
- On the Roku home screen, use the Roku remote to navigate to “Settings”.
- Select “Network” from the settings menu.
- Choose “Wireless” if you want to connect your Roku device to a wireless network. If you prefer a wired connection, select “Wired” and follow the instructions to connect an Ethernet cable to your Roku device and router.
- If you selected “Wireless,” your Roku device will scan for available Wi-Fi networks. Choose your Wi-Fi network from the list.
- Enter your Wi-Fi network password if prompted. Use the Roku remote to navigate the on-screen keyboard and enter the password.
- Once you have entered the password, select “Connect” to establish a connection between your Roku device and the Wi-Fi network.
- Your Roku device will now attempt to connect to the Wi-Fi network. If the connection is successful, you will see a confirmation message on your TV screen.
- After connecting to Wi-Fi, your Roku device may check for software updates. If updates are available, follow the on-screen prompts to download and install them. Keeping your Roku device up to date ensures access to the latest features and improvements.
- Once the software updates have been completed, you can proceed with the remaining setup steps.
That’s it! You have successfully connected your Roku device to your Wi-Fi network. Now, your Roku device can access the internet for streaming and downloading content. In the next sections, we will guide you through the process of creating a Roku account, activating your device, and installing channels. Stay tuned for more instructions on how to make the most out of your Roku streaming experience!
Create a Roku Account
In order to activate and fully utilize your Roku device, you will need to create a Roku account. This account will allow you to personalize your streaming experience, add channels, and manage your preferences. Follow these steps to create your Roku account:
- Using your smartphone, tablet, or computer, visit the Roku website at www.roku.com.
- Click on the “Sign In” button, located at the top right corner of the page.
- On the sign-in page, click on “Create account” to begin the account creation process.
- Fill in the required information, including your first name, last name, email address, and password. Ensure that you choose a strong password to protect your account.
- Read and accept the terms and conditions, as well as the privacy policy of Roku.
- Complete any additional steps that may be required, such as email verification or providing payment information for channel purchases.
- Once your account has been successfully created, you will be redirected to the Roku website, where you can manage your account settings and preferences.
Now that you have a Roku account, you can proceed with activating your Roku device and linking it to your account. This ensures that you have access to all the features and benefits associated with your account, such as syncing channels across devices and receiving personalized recommendations.
In the upcoming sections, we will guide you through the activation process and show you how to install channels on your Roku device. Get ready to enhance your streaming experience with the power of a Roku account!
Activate the Roku
After creating your Roku account, the next step is to activate your Roku device. Activation is a simple process that links your Roku device to your account, allowing you to access the Roku Channel Store and start installing channels. Follow these steps to activate your Roku:
- Ensure that your Roku device is properly connected to your TV and powered on.
- On the Roku home screen, you’ll see a message with a unique activation code. Keep this code visible on your TV screen as you will need it to complete the activation process.
- Using a computer, smartphone, or tablet, open a web browser and visit my.roku.com/link.
- Enter the activation code displayed on your TV screen into the provided text box on the Roku activation page.
- Click on the “Submit” button to proceed with the activation process.
- On the next screen, you may be prompted to sign in to your Roku account if you haven’t already done so.
- Complete any additional steps that may be required, such as verifying your email address or providing payment information for channel purchases.
- Once the activation process is complete, your Roku device will automatically refresh, and you will be able to access the Roku Channel Store and begin adding channels.
Activating your Roku device ensures that it is linked to your Roku account and ready for streaming. It also enables features such as syncing channels across devices and personalized recommendations based on your viewing preferences.
In the next section, we will guide you through the process of installing channels on your Roku device to expand your streaming options and access your favorite content. Get ready to enjoy a wide range of entertainment right at your fingertips!
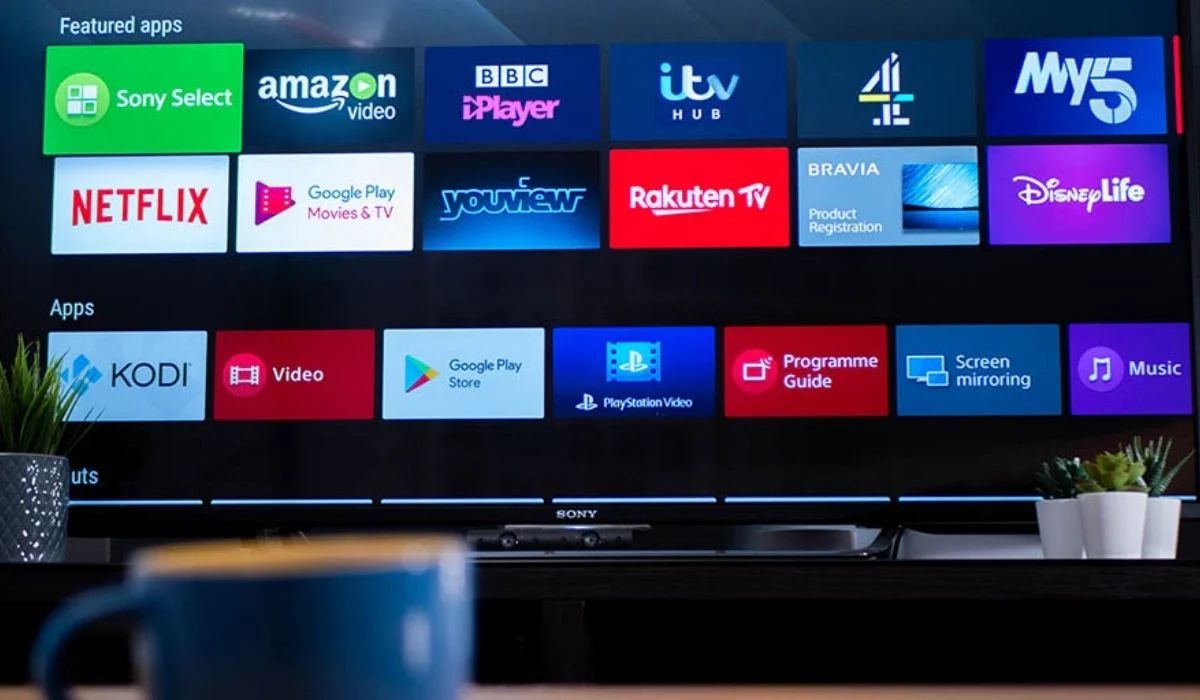
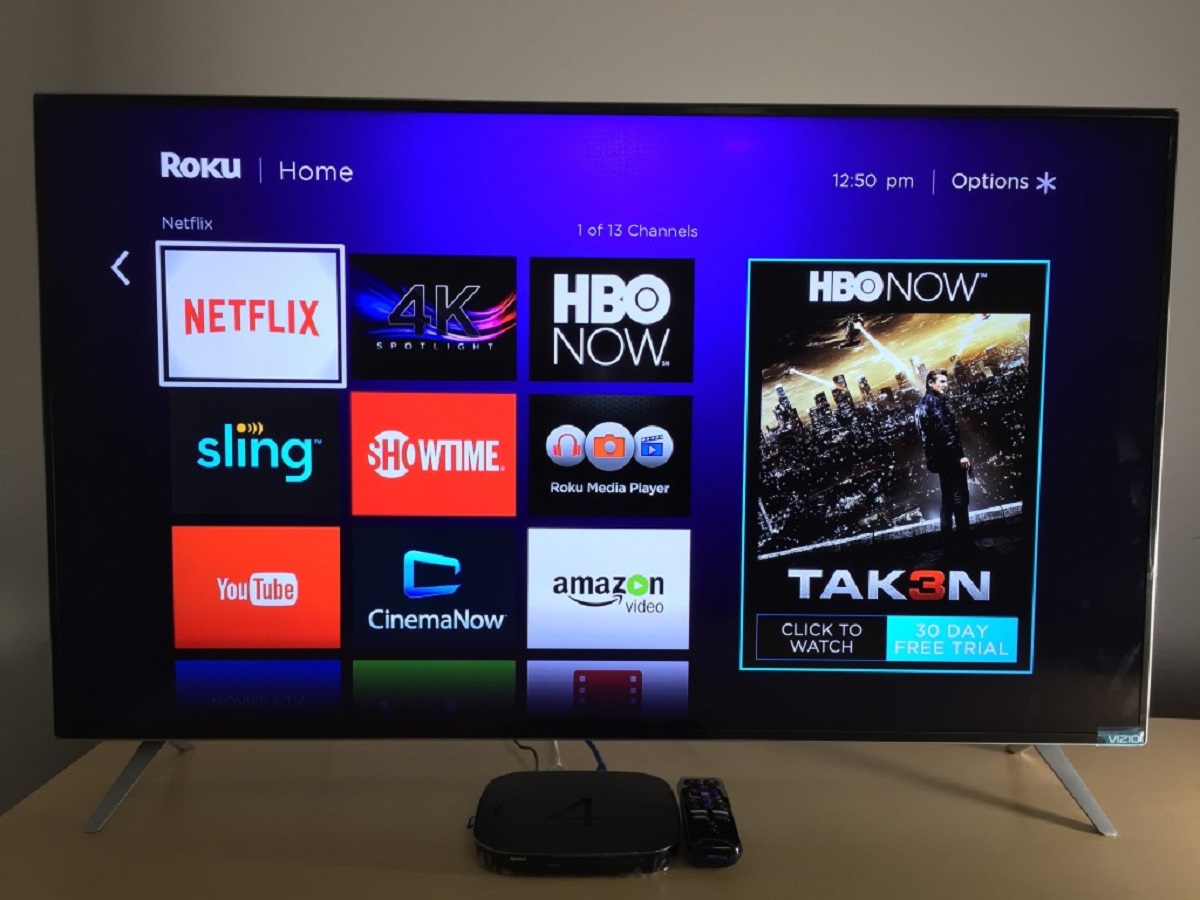
Install Channels
Now that your Roku device is activated and linked to your Roku account, it’s time to start installing channels. Channels on Roku are essentially apps that provide access to different streaming services, such as Netflix, Hulu, and Disney+. Follow these steps to install channels on your Roku:
- From the Roku home screen, navigate to the Roku Channel Store by scrolling up or down with your Roku remote.
- Browse through the featured channels or use the search function to find specific channels you want to install. You can search for channels by name, category, or genre.
- Select the desired channel to view more details and information.
- Click on the “Add Channel” or “Buy” button to download and install the channel onto your Roku device. Some channels may require a subscription or one-time payment for access.
- Wait for the channel to download and install. The process may take a few moments, depending on the channel size and your internet connection speed.
- Once the channel is installed, it will appear on your Roku home screen. You can access it by selecting the channel icon using your Roku remote.
- Repeat the above steps to install additional channels based on your preferences.
- Arrange and customize your channel lineup by highlighting a channel on the Roku home screen and pressing the “Options” or “Star” button on your Roku remote. Choose the desired option to move, remove, or rename channels.
With a wide selection of channels available on the Roku Channel Store, you can find and install channels that cater to your specific interests and entertainment preferences. Whether you’re into movies, TV shows, sports, news, or music, there’s a channel for everyone.
Remember to explore free channels as well as premium subscription-based channels to discover a variety of content options. You can also find and install private channels using special codes provided by third-party developers.
By installing channels on your Roku device, you expand your streaming options and gain access to a wealth of content. Enjoy exploring and discovering new shows, movies, and more from the comfort of your non-smart TV!
Enjoy Streaming on Your Non Smart TV with Roku
Congratulations! You have successfully connected, set up, and activated your Roku device on your non-smart TV. Now, it’s time to sit back, relax, and enjoy streaming your favorite movies, TV shows, and more. With Roku, you can transform your non-smart TV into a powerful streaming device.
Here are some key benefits and features that you can take advantage of while streaming on your non-smart TV with Roku:
- Wide range of streaming options: With access to thousands of channels, including popular streaming services like Netflix, Hulu, Amazon Prime Video, and more, you’ll never run out of content to watch. Explore different genres, libraries, and exclusive shows to find something for everyone in your household.
- User-friendly interface: Roku provides a simple and intuitive user interface, making it easy to navigate through channels, search for specific titles, and discover new content. The remote control makes it effortless to browse and control your streaming experience.
- Customization and personalization: Tailor your Roku experience to your preferences by creating multiple user profiles, organizing your favorite channels, and receiving personalized recommendations based on your viewing history.
- Powerful search functionality: Roku’s search feature allows you to search for movies, TV shows, actors, directors, and even specific genres across multiple channels. This saves you time and effort by providing comprehensive results in one place.
- Streaming in high-quality: Many Roku devices support HD, 4K, and even HDR content. If your non-smart TV is compatible, you can enjoy stunning visuals and immersive audio to enhance your streaming experience.
- Additional features and apps: Beyond streaming channels, Roku offers various additional features and apps to further enhance your entertainment experience. This includes screen mirroring, gaming, weather updates, and more.
Remember to regularly check for channel updates and explore newly released channels to ensure you have access to the latest content and features. Stay up-to-date with new releases, trending shows, and highly-rated movies by exploring Roku’s extensive channel offerings.
So, grab your remote, kick back on your couch, and enjoy all the incredible streaming options that Roku brings to your non-smart TV. Happy streaming!