Introduction
Dedicating RAM to a graphics card is a crucial aspect of optimizing a computer’s performance for graphics-intensive tasks. Whether you are a gamer, video editor, or graphic designer, having sufficient RAM allocated to your graphics card can significantly enhance your system’s graphics processing capabilities.
Graphics cards, also known as video cards or GPUs (Graphics Processing Units), play a vital role in rendering high-quality images, videos, and 3D graphics on your computer screen. They offload the burden of graphics processing from the CPU to deliver smoother and more visually appealing experiences.
In this article, we will delve into the concept of dedicating RAM to a graphics card and explore the benefits and drawbacks of doing so. We will also discuss the different methods through which you can allocate RAM to your graphics card, and the hardware requirements you should consider before making any changes.
Before we dive into the details, it’s important to note that dedicating RAM to a graphics card is not a task to be undertaken lightly. It involves adjusting system settings, and if done incorrectly, it can lead to stability issues or even cause your computer to crash. Therefore, it’s crucial to understand the steps involved and ensure that your system meets the necessary requirements.
Now, let’s explore the concept of RAM dedication to a graphics card and understand why it is beneficial for your system’s overall performance.
What is RAM dedication to a graphics card?
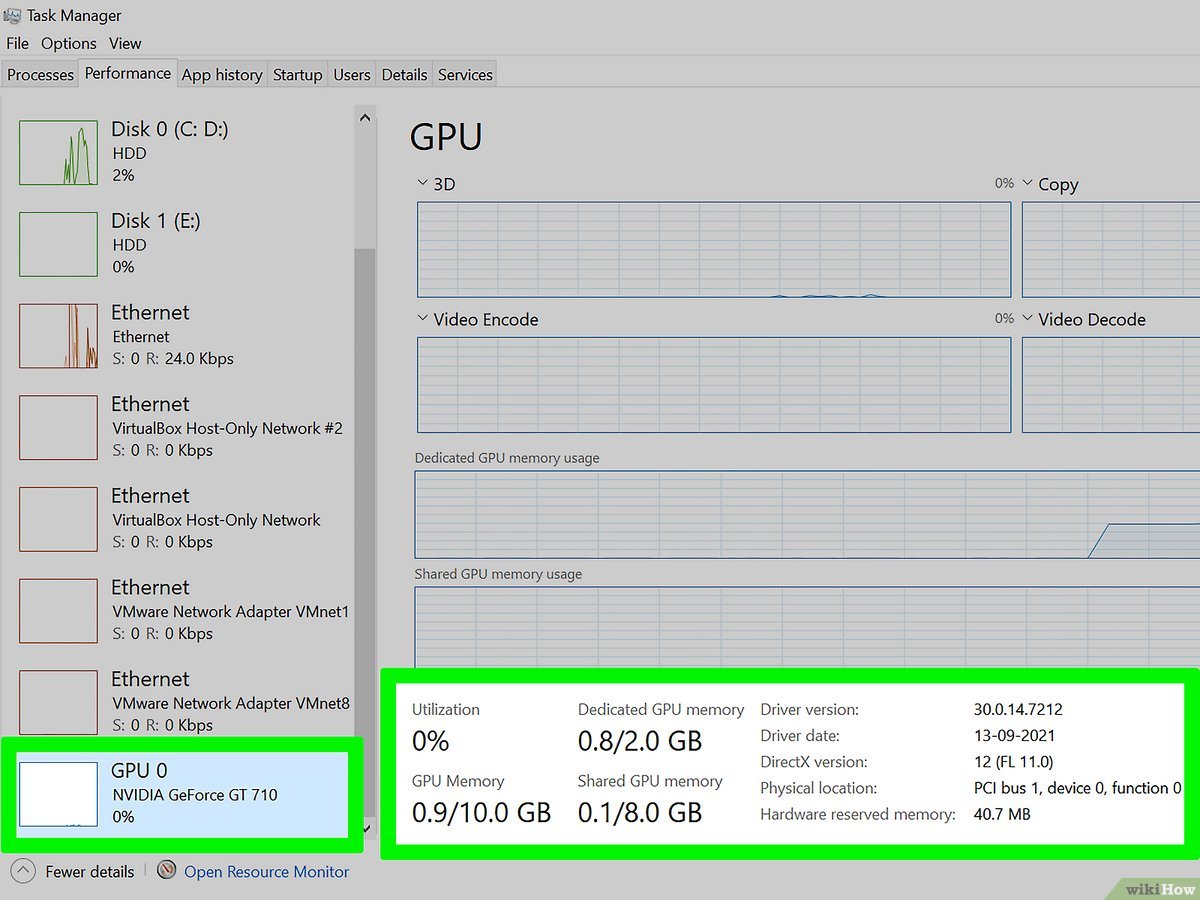
RAM dedication to a graphics card refers to the process of allocating a portion of your computer’s RAM specifically for the use of the graphics card. This reserved RAM, known as Video RAM (VRAM) or Graphics RAM (GRAM), allows the graphics card to store and access the data it needs to render high-quality images, videos, and 3D graphics on your screen.
When you run graphically demanding applications such as games, video editing software, or 3D modeling programs, the graphics card requires a significant amount of memory to handle the complex calculations and data processing involved in rendering the visuals. The more RAM dedicated to the graphics card, the smoother and faster it can perform these tasks.
Graphics cards generally have their own dedicated VRAM, which is separate from the computer’s system RAM. However, some integrated graphics cards or lower-end models may rely on shared system memory, where a portion of the computer’s RAM is dynamically allocated for graphics processing. This shared memory setup can often result in performance limitations, as the system RAM needs to cater to both the graphics card and other processes running on the computer.
By dedicating a specific amount of RAM solely for the use of the graphics card, you can ensure that the graphics-intensive tasks are not hindered by limited system resources. This can lead to improved performance, reduced lag, and smoother frame rates, particularly when running resource-intensive applications or playing graphic-intensive games.
It’s worth noting that the RAM dedicated to the graphics card is separate from the RAM used by the CPU and other system processes. This means that even if you allocate a significant amount of RAM to your graphics card, it will not impact the available memory for other applications and processes on your computer.
In the next section, we will look at the reasons why dedicating RAM to a graphics card can be beneficial and explore the hardware requirements you need to consider before making any changes.
Why dedicate RAM to a graphics card?
Dedicating RAM to a graphics card offers several benefits that can greatly improve your computer’s performance, especially when it comes to graphics-intensive tasks. Here are some reasons why you should consider allocating RAM specifically for your graphics card:
- Enhanced Graphics Performance: One of the primary advantages of dedicating RAM to a graphics card is that it allows for better graphics performance. By allocating more memory to the graphics card, it can store and access data more efficiently, resulting in smoother rendering, faster load times, and improved overall visual quality.
- Higher Frame Rates: For gamers, dedicating RAM to the graphics card can lead to higher frame rates, which are essential for a smooth and enjoyable gaming experience. With more memory available, the graphics card can process the game’s visual elements more quickly, resulting in faster frame rendering and reduced lag.
- Improved Video Editing and Rendering: Video editing software relies heavily on the graphics card for rendering videos and applying visual effects. Allocating dedicated RAM to the graphics card can significantly speed up the editing process by providing the necessary resources for smooth and seamless video playback, real-time previews, and faster rendering times.
- Better 3D Graphics Performance: If you are a 3D artist or work with 3D modeling and animation software, dedicating RAM to the graphics card is crucial. 3D applications heavily rely on the graphics card’s resources to handle complex calculations and render detailed 3D scenes. Having more dedicated RAM ensures a smoother workflow, quicker rendering, and the ability to handle larger and more intricate 3D models.
- Optimized Resource Allocation: By dedicating a specific portion of your RAM to the graphics card, you can ensure that there are enough resources available for graphics-intensive tasks without impacting the performance of other applications. This allows for better resource management and avoids scenarios where the graphics card competes for system memory, resulting in slower performance for both the graphics card and other processes running on your computer.
It’s important to note that the benefits of dedicating RAM to a graphics card may vary depending on the specific hardware configuration of your computer. It is recommended to review your system’s specifications and requirements before making any changes to ensure compatibility and optimal performance.
Now that we understand the benefits of dedicating RAM to a graphics card, let’s explore the hardware requirements you should consider before proceeding with the allocation process.
Checking the Hardware Requirements
Before dedicating RAM to a graphics card, it is essential to ensure that your computer meets the necessary hardware requirements. Here are a few key factors to consider:
- Graphics Card: Check your graphics card specifications to determine the maximum amount of VRAM it supports. Some entry-level or integrated graphics cards may have fixed VRAM allocations and cannot be adjusted.
- System RAM: Take note of the total amount of RAM installed on your computer. Allocating RAM to the graphics card means that there will be less available for your operating system and other applications. Ensure that you have enough system RAM to handle your regular computing tasks while leaving sufficient RAM for the graphics card’s dedicated allocation.
- Operating System: Verify that your operating system supports the allocation of dedicated RAM to a graphics card. Most modern operating systems, including Windows and macOS, have built-in support for this feature. However, it’s always a good idea to check the documentation or the manufacturer’s website for any specific requirements or compatibility issues.
- BIOS or UEFI: Access your computer’s BIOS or UEFI settings to check if there are any options related to allocating RAM to the graphics card. Some systems allow you to adjust the VRAM allocation through these settings. However, not all BIOS or UEFI interfaces offer this feature, so it’s essential to check if your system provides this option.
- Power Supply: Ensure that your power supply unit (PSU) can handle the increased power demands of the graphics card when you dedicate more RAM to it. High-performance graphics cards can be power-hungry, so having a suitable PSU ensures stability and prevents any potential issues.
Checking these hardware requirements will help you determine whether your system is compatible with allocating dedicated RAM to a graphics card. If your system meets the necessary criteria, you can proceed with the steps to dedicate RAM, which we will discuss in the upcoming sections.
It’s crucial to remember that dedicating RAM to a graphics card is a technical process that should be done with caution. If you are unsure about any aspect or lack experience in making such modifications, seek assistance from a knowledgeable person or consult the official documentation provided by your hardware manufacturer.
Once you have confirmed that your system meets the requirements, we can move on to the different methods available to allocate RAM to your graphics card.
Steps to Dedicate RAM to a Graphics Card
Now that you have determined that your system meets the necessary hardware requirements, let’s explore the steps involved in dedicating RAM to a graphics card. There are multiple methods you can use, depending on your specific system configuration. Here are three common approaches:
Method 1: BIOS Settings
1. Restart your computer and access the BIOS settings by pressing a specific key during the startup process (commonly Del, F2, or Esc). The key to enter the BIOS may vary based on your computer’s manufacturer.
2. Navigate through the BIOS menus until you find the Graphics or Advanced settings related to VRAM allocation. Different BIOS interfaces may label this setting differently, so consult your motherboard’s manual or manufacturer’s website for specific instructions.
3. Adjust the VRAM allocation value or select a dedicated option if available. Keep in mind that not all BIOS interfaces provide this option, especially on pre-built systems with integrated graphics cards.
4. Save the changes and exit the BIOS. Your computer will restart, and the allocated VRAM will be available to your graphics card.
Method 2: Dedicated VRAM Software
1. Check if your graphics card manufacturer provides software specifically designed for allocating dedicated VRAM. Some manufacturers, such as NVIDIA and AMD, offer tools like NVIDIA Control Panel and AMD Radeon Settings, respectively.
2. Download and install the appropriate software from the manufacturer’s website.
3. Open the software and navigate to the VRAM allocation settings. The location and options may vary depending on the software and graphics card model.
4. Adjust the allocated VRAM value according to your needs and save the changes.
5. Restart your computer for the changes to take effect.
Method 3: Adjusting Virtual Memory Settings
1. Right-click on the “This PC” or “My Computer” icon on your desktop and select “Properties.”
2. In the System Properties window, click on “Advanced system settings” on the left-hand side.
3. Go to the “Advanced” tab and click on the “Settings” button under the Performance section.
4. In the Performance Options window, go to the “Advanced” tab and click on the “Change” button under the Virtual Memory section.
5. Uncheck the “Automatically manage paging file size for all drives” option.
6. Select the drive where your operating system is installed and choose the “Custom size” option.
7. Enter the desired initial and maximum size values for the paging file. It is recommended to allocate a reasonable amount of space, keeping in mind the total RAM available on your system.
8. Click on “Set” and then “OK” to save the changes.
9. Restart your computer for the changes to take effect.
Remember, the steps above are general guidelines, and the exact process may differ depending on your system and hardware configuration. It is important to follow the specific instructions provided by your graphics card manufacturer or consult the official documentation for accurate and detailed guidance.
By following these steps, you can allocate dedicated RAM to your graphics card, unlocking its full potential and improving its performance for graphics-intensive tasks.
Method 1: BIOS Settings
Adjusting the VRAM allocation through the BIOS settings is a common method used to dedicate RAM to a graphics card. However, please note that not all BIOS interfaces provide this option, especially on pre-built systems with integrated graphics cards. Here are the steps to adjust the VRAM allocation through BIOS:
1. Restart your computer and access the BIOS settings by pressing a specific key during the startup process. The key to enter the BIOS may vary based on your computer’s manufacturer, but commonly used keys include Del, F2, or Esc.
2. Navigate through the BIOS menus until you find the Graphics or Advanced settings related to VRAM allocation. Each BIOS interface is different, so consult your motherboard’s manual or manufacturer’s website for specific instructions.
3. Look for an option that allows you to adjust the VRAM allocation value or select a dedicated VRAM option if available. Keep in mind that not all BIOS interfaces provide this option, especially on systems with integrated graphics cards.
4. Adjust the VRAM allocation value according to your requirements. Keep in mind the total amount of RAM installed on your computer and other memory needs.
5. Save the changes and exit the BIOS. Your computer will restart, and the allocated VRAM will be available to your graphics card.
It’s important to note that adjusting the VRAM allocation through the BIOS requires caution and understanding of the specific BIOS interface. Making incorrect changes or allocating too much VRAM can lead to system instability. Therefore, it is recommended to consult the official documentation provided by your hardware manufacturer or seek assistance from a knowledgeable person if you are unsure about the process.
Once you have successfully adjusted the VRAM allocation through the BIOS settings, your graphics card will have the dedicated RAM available to handle graphics-intensive tasks more efficiently. This can lead to improved performance, smoother gameplay, faster rendering times, and better overall visual quality.
Remember to periodically check for BIOS updates from your motherboard or computer manufacturer, as updates may provide additional features or improvements related to VRAM allocation and overall system performance.
Now that you are familiar with adjusting the VRAM allocation through the BIOS settings, let’s explore another method – using dedicated VRAM software – in the next section.
Method 2: Dedicated VRAM Software
Another approach to allocating dedicated RAM to a graphics card is through the use of dedicated VRAM software. Certain graphics card manufacturers provide software tools that allow users to adjust the VRAM allocation. Here are the steps to allocate dedicated VRAM using dedicated software:
1. Check if your graphics card manufacturer offers dedicated software for adjusting VRAM allocation. Major manufacturers such as NVIDIA and AMD provide software tools like NVIDIA Control Panel and AMD Radeon Settings, respectively.
2. Visit the official website of your graphics card manufacturer and download and install the appropriate software for your graphics card model and operating system.
3. Once the software is installed, open it, and navigate to the VRAM or graphics card settings. The location and options may vary depending on the software and graphics card model.
4. Look for the VRAM allocation settings within the software. Depending on the software, you may have the option to adjust the VRAM size using a slider or by entering a specific value.
5. Adjust the VRAM allocation according to your requirements. Keep in mind the total amount of RAM installed on your computer and other memory needs.
6. Save the changes made within the software.
7. Restart your computer for the changes to take effect.
Using dedicated VRAM software provides a user-friendly interface and an easy way to adjust the VRAM allocation of your graphics card without the need to access the computer’s BIOS settings. However, not all graphics cards or manufacturers provide this software option, so it is essential to check if your graphics card is supported before proceeding.
Allocating dedicated VRAM using software allows you to optimize the performance of your graphics card and enhance its capability to handle graphics-intensive tasks. The increased VRAM allocation can result in smoother gameplay, faster rendering times, and improved visual quality for games, video editing, or graphic design applications.
Keep in mind that while dedicated VRAM software offers convenience, it is still important to monitor the overall system RAM usage to ensure there is sufficient memory available for other applications and processes.
Now that we have covered the use of dedicated VRAM software, let’s explore another method – adjusting virtual memory settings – in the next section.
Method 3: Adjusting Virtual Memory Settings
Another method to allocate dedicated RAM to a graphics card is by adjusting the virtual memory settings on your computer. This method allows you to allocate a portion of your system’s RAM as virtual memory, which can be used by the graphics card for its operations. Here are the steps to adjust virtual memory settings:
1. Right-click on the “This PC” or “My Computer” icon on your desktop and select “Properties.”
2. In the System Properties window, click on the “Advanced system settings” option on the left-hand side.
3. In the System Properties dialog box, go to the “Advanced” tab and click on the “Settings” button under the Performance section.
4. In the Performance Options window, navigate to the “Advanced” tab and click on the “Change” button under the Virtual Memory section.
5. Uncheck the “Automatically manage paging file size for all drives” option.
6. Select the drive where your operating system is installed and choose the “Custom size” option.
7. Enter the desired initial and maximum size values for the paging file. It is recommended to allocate a reasonable amount of space, considering the total RAM available on your system. For dedicated VRAM, ensure that the size entered provides enough memory for the graphics card without affecting the overall system performance.
8. Click on the “Set” button and then click “OK” to save the changes.
9. Restart your computer for the changes to take effect.
By adjusting the virtual memory settings, you allocate a reserved portion of your system’s RAM explicitly for use as virtual memory, which can be utilized by the graphics card when needed. This can provide an additional buffer of memory for the graphics card to store data and improve its performance during graphics-intensive tasks.
It’s important to note that adjusting virtual memory settings affects the overall system performance and the allocation of resources for other applications. Hence, it’s necessary to strike a balance between allocating sufficient virtual memory for the graphics card without depriving the system of memory resources for other tasks.
Remember to monitor the overall system RAM usage and adjust the virtual memory settings accordingly to ensure a smooth and optimal performance for both the graphics card and other processes on your computer.
Now that we have explored the method of adjusting virtual memory settings, let’s move on to discussing the benefits and drawbacks of dedicating RAM to a graphics card in the next section.
Benefits and Drawbacks of Dedicating RAM to a Graphics Card
Dedicating RAM to a graphics card can have several benefits in terms of performance enhancement and improved visuals. However, it’s important to consider both the advantages and potential drawbacks before making the decision. Here are the benefits and drawbacks of dedicating RAM to a graphics card:
Benefits:
- Enhanced Graphics Performance: Allocating dedicated RAM to a graphics card allows it to store and access data more efficiently, resulting in improved graphics performance. This can lead to smoother gameplay, faster rendering times, and better overall visual quality.
- Higher Frame Rates: By providing the graphics card with more memory, dedicated RAM allocation can result in higher frame rates and reduced lag during gaming or graphics-intensive tasks. This leads to a more fluid and immersive experience for gamers.
- Improved Video Editing and Rendering: For video editors and content creators, dedicating RAM to the graphics card can significantly speed up the video editing and rendering process. It allows for smoother playback, real-time previews, and faster rendering times, ultimately increasing productivity.
- Better 3D Graphics Performance: Professionals working with 3D modeling, animation, or design software can benefit from dedicated RAM allocation. It enables the graphics card to handle complex calculations and render high-resolution 3D graphics more efficiently, resulting in faster workflow and improved quality.
- Optimized Resource Allocation: By allocating dedicated RAM to the graphics card, you ensure that there are sufficient resources available for graphics-intensive tasks, without impacting the performance of other applications or processes. This leads to better resource management and reduces conflicts for memory utilization.
Drawbacks:
- System RAM Limitation: Allocating dedicated RAM to the graphics card reduces the available system memory for other applications and processes. If the system has limited overall RAM capacity, dedicating a significant portion to the graphics card may lead to memory constraints for other tasks.
- System Stability: Adjusting VRAM allocation through BIOS settings or dedicated software requires technical knowledge and expertise. If not done correctly, it can affect the stability of the system, leading to crashes, freezes, or compatibility issues. Caution should be exercised, and the process should be thoroughly understood before proceeding.
- Potential Power Consumption Increase: High-performance graphics cards consume more power, especially when allocated with more VRAM. Allocating dedicated RAM to the graphics card increases power consumption, so it’s important to ensure that the power supply unit (PSU) can handle the increased demands.
- Varying Performance Gains: The benefits of dedicating RAM to a graphics card may vary depending on the specific hardware configuration and the nature of the applications being used. Certain applications may not utilize the added VRAM effectively, resulting in minimal performance gains.
Considering the benefits and drawbacks of dedicating RAM to a graphics card, it’s essential to assess your specific requirements, system capabilities, and potential trade-offs before making any changes. It’s recommended to thoroughly research and understand the implications of dedicating RAM to ensure optimal performance and stability for your system.
In the next section, we’ll conclude our discussion and summarize the key points covered throughout this article.
Conclusion
Dedicating RAM to a graphics card can significantly enhance the performance and visual quality of your computer, particularly during graphics-intensive tasks such as gaming, video editing, and 3D modeling. By allocating dedicated memory to the graphics card, you provide it with the necessary resources to handle complex calculations and render high-resolution graphics more efficiently.
In this article, we explored three methods for dedicating RAM to a graphics card. These methods include adjusting settings within the computer’s BIOS, utilizing dedicated VRAM software provided by graphics card manufacturers, or adjusting virtual memory settings on your computer.
Before proceeding with any of these methods, it’s important to ensure that your computer meets the necessary hardware requirements and that you are familiar with the potential benefits and drawbacks of dedicating RAM to the graphics card.
The benefits of dedicating RAM to a graphics card include enhanced graphics performance, higher frame rates, improved video editing and rendering capabilities, better 3D graphics performance, and optimized resource allocation. However, potential drawbacks such as limited system RAM availability, system stability concerns, increased power consumption, and varying performance gains should also be taken into consideration.
Making changes to the VRAM allocation requires careful consideration, understanding of your specific hardware configuration, and technical expertise. It’s always recommended to consult the official documentation provided by your hardware manufacturer or seek assistance from knowledgeable individuals when making these adjustments.
Remember that dedicating RAM to a graphics card is just one aspect of system optimization. It’s important to consider other factors such as CPU performance, storage capabilities, and cooling solutions to ensure a balanced and optimized system for your specific needs.
By taking the necessary precautions, understanding your hardware requirements, and following the appropriate methods, you can optimize your computer’s performance and enjoy smoother gameplay, faster rendering times, and improved visual quality with a dedicated allocation of RAM to your graphics card.