Introduction
Welcome to our guide on how to cut soft tubing for your PC case! Soft tubing is a popular choice among computer enthusiasts for water cooling systems due to its flexibility and ease of use. Whether you are a seasoned PC builder or a newbie looking to customize your rig, learning how to cut soft tubing is an essential skill to ensure a clean and professional-looking installation.
In this article, we will provide you with step-by-step instructions on how to cut soft tubing for your PC case, along with the tools and materials you will need to get the job done. With our guidance, you’ll be able to achieve precise and accurate cuts, resulting in leak-free connections and optimal performance.
Before we dive into the process, it’s important to note that safety should always come first. Ensure that you are working in a well-ventilated area and taking necessary precautions to protect your hands and eyes while handling the tools.
Now, let’s gather the tools and materials you’ll need to get started!
Tools and Materials Needed
Before you begin cutting soft tubing for your PC case, make sure you have the following tools and materials readily available:
- A utility knife or tubing cutter: This will be used to make precise cuts in the soft tubing.
- Measuring tape or ruler: You’ll need this to measure and mark the desired length of the tubing.
- A marker or pen: This will be used to make accurate marks on the tubing for cutting.
- A deburring tool: This tool helps in smoothing out the edges of the cut tubing, ensuring a clean and secure fit.
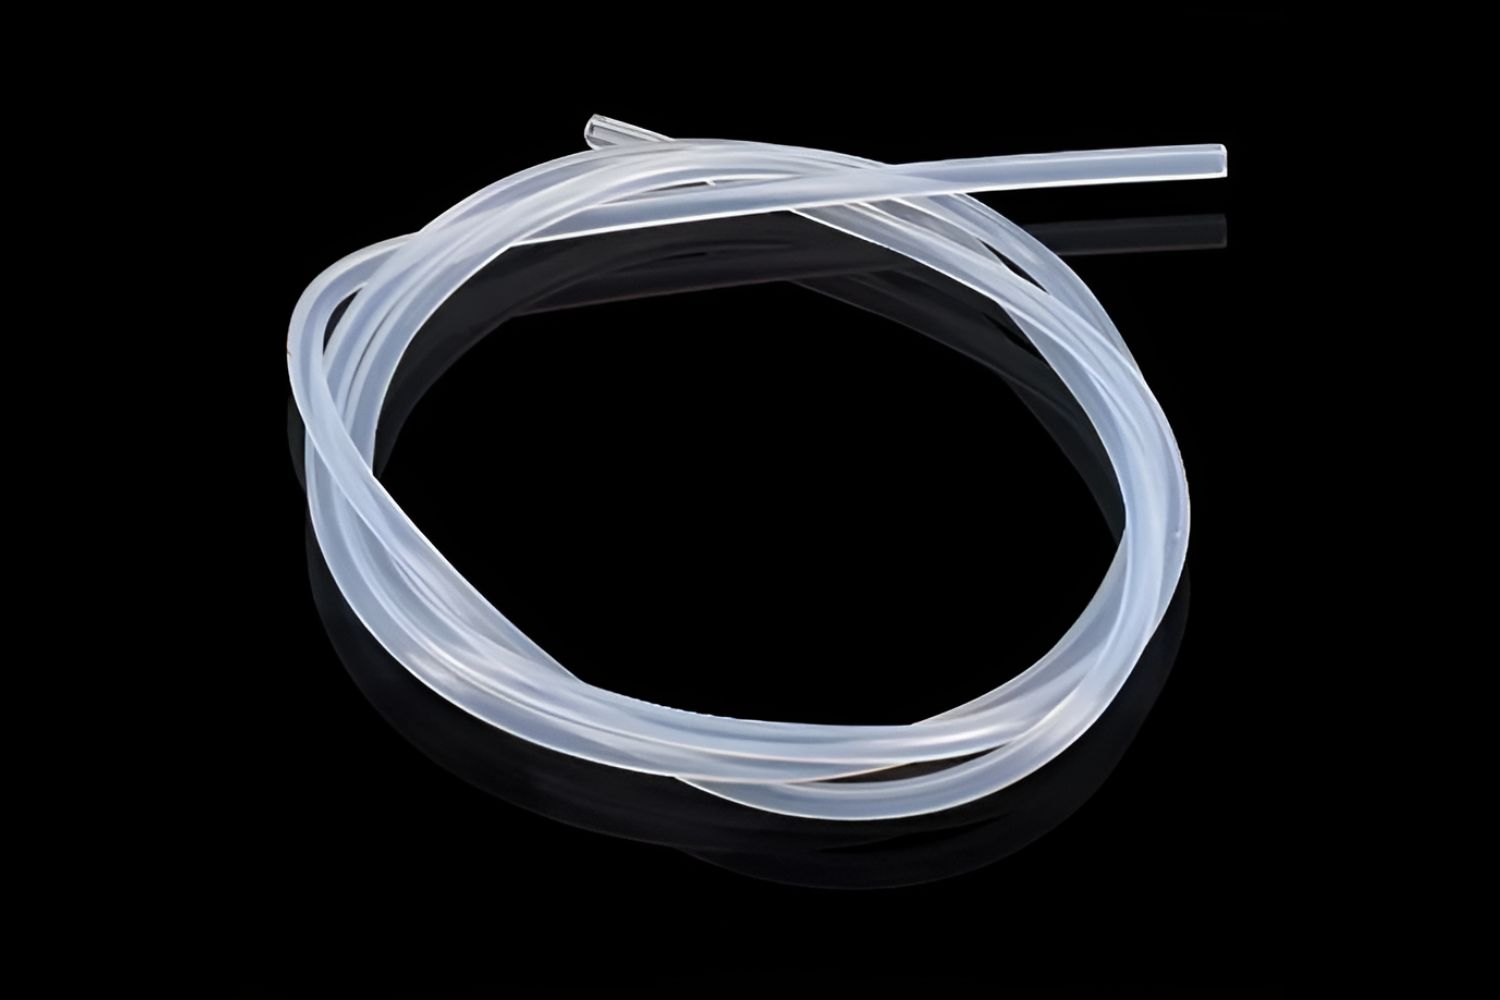
- Soft tubing: Choose a tubing material that is compatible with your water cooling system and suits your aesthetic preferences. Make sure to measure and purchase enough tubing to complete your build.
- Disposable gloves: These are optional but can prevent fingerprints and smudges on the tubing during the cutting process.
It’s important to note that while a utility knife can get the job done, a dedicated tubing cutter is recommended for more accurate and clean cuts. Tubing cutters provide better control and minimize the risk of damaging the tubing during the cutting process.
Additionally, make sure to select soft tubing that is of high quality and specifically designed for PC water cooling applications. It should have good flexibility and be able to withstand the temperatures and pressures of your system.
Once you have gathered all the necessary tools and materials, you are ready to move on to the next step: measuring and marking the tubing.
Step 1: Measure and Mark
The first step in cutting soft tubing for your PC case is to accurately measure and mark the desired length of the tubing. This ensures that your cut will be precise and the tubing will fit snugly in your system.
Here’s how to do it:
- Start by identifying the location where you want to install the tubing in your PC case. Measure the distance between the two points where the tubing will be connected.
- Using a measuring tape or ruler, take the measurements and note down the desired length of the tubing.
- Next, take the soft tubing and place it on a flat surface. Align it with the measuring tape or ruler to ensure accuracy.
- Using a marker or a pen, make a small mark on the tubing at the measured length. Make sure to make the mark on the side of the tubing that will be facing the inside of your PC case.
It’s important to be precise with your measurements to avoid any unnecessary waste or improper fit. Take your time and double-check your measurements before moving on to the next step.
Once you have marked the tubing, you are now ready to prepare it for cutting. In the next step, we will guide you on how to properly prepare the tubing for a clean and accurate cut.
Step 2: Prepare the Tubing
Before you make the actual cut on the soft tubing, it’s essential to properly prepare it to ensure a clean and accurate cut. This step involves securing the tubing and taking precautions to prevent any damage or distortion during the cutting process.
Here’s how to prepare the tubing:
- Place the marked section of the soft tubing securely in a vise or clamp. This will prevent the tubing from slipping or moving while you make the cut.
- Ensure that the section to be cut is positioned outside of the vise jaws, leaving enough room for the blade of your utility knife or tubing cutter to go through the tubing.
- If you are using a utility knife, retract the blade to a safe position to avoid accidental cuts or injuries during the preparation process.
- Wear disposable gloves, if desired, to prevent fingerprints and smudges on the tubing and maintain a clean appearance.
By securing the tubing and taking necessary precautions, you can minimize the risk of the tubing slipping or twisting during the cutting process, resulting in a more accurate and precise cut.
Once you have properly prepared the tubing, it’s time to move on to the next step: cutting the tubing with precision. We’ll guide you through the process in the following section.
Step 3: Cutting the Tubing
With the soft tubing securely prepared, it’s time to make the actual cut. This step requires precision and a steady hand to ensure a clean and accurate cut.
Follow these steps to cut the tubing:
- Hold the utility knife or tubing cutter at a 90-degree angle to the marked section of the tubing.
- Apply gentle pressure and begin cutting through the tubing. If you are using a tubing cutter, rotate it around the tubing as you cut to ensure a smooth and even cut.
- Take your time to ensure that you are cutting straight and along the marked line. Avoid applying excessive force, as it can cause the tubing to deform or buckle.
- Continue cutting until you have completely severed the tubing. If you are using a tubing cutter, you can gradually increase the pressure as you rotate it around the tubing.
Remember to maintain a steady hand and cut at a slow and controlled pace to achieve the best results. Rushing the cutting process can lead to uneven cuts and compromised fitment.
Once you have made the cut, carefully release the tubing from the vise or clamp, and inspect the cut to ensure that it is clean and free of any deformities or burrs.
In the next step, we will guide you on how to deburr the edges of the cut tubing to ensure a smooth and secure fit.
Step 4: Deburr the Edges
After cutting the soft tubing, it’s crucial to deburr the edges to create a smooth and clean surface. Deburring helps to prevent any sharp edges that could potentially damage the tubing or cause leaks when connecting fittings.
Here’s how to deburr the edges of the cut tubing:
- Inspect the cut end of the tubing and look for any rough or jagged edges.
- Using a deburring tool, gently scrape the inside and outside edges of the cut tubing to remove any burrs or imperfections. The deburring tool should be inserted into the tubing and rotated a few times to smooth out the edges.
- Continue deburring until the edges of the cut tubing feel smooth to the touch. Take care not to apply excessive force that could potentially damage the tubing.
- Inspect the tubing once more to ensure that all burrs have been removed, leaving a clean and uniform edge.
Deburring the edges of the cut tubing is essential for a secure and leak-free connection. It helps to create a smooth surface that allows fittings to be properly seated and sealed without any obstructions.
With the edges deburred, you are now ready to move on to the final step: installing fittings and connecting the cut tubing to complete your water cooling system.
Step 5: Install Fittings and Connect Tubing
Now that you have cut and deburred the soft tubing, it’s time to install fittings and connect the tubing to complete your PC’s water cooling system. This step involves precision and attention to detail to ensure a proper and leak-free installation.
Follow these steps to install fittings and connect the tubing:
- Start by selecting the appropriate fittings for your water cooling system. Ensure that they are compatible with the size and type of tubing you are using.
- Gently insert one end of the cut tubing into the fitting, making sure it sits securely and snugly. If required, use a twisting motion while applying slight pressure to ensure a proper seal.
- Repeat the process for the other end of the tubing, connecting it to the corresponding fitting or component in your PC case.
- Once both ends of the tubing are connected, visually inspect the fittings and connections to ensure they are properly aligned and seated.
- With the connections checked, slowly turn on your PC system and monitor for any leaks or drips. If any leaks are detected, turn off your system immediately and fix the issue before proceeding.
- If everything is secure and leak-free, you can now enjoy the benefits of your newly cut and connected soft tubing in your water cooling system.
It’s important to note that during the installation process, you should handle the tubing and fittings with care to avoid any unnecessary stress or strain. Taking your time and being meticulous will help ensure a successful and reliable water cooling setup for your PC.
With the fittings properly installed and the tubing connected, you have successfully completed the process of cutting and connecting soft tubing for your PC case’s water cooling system.
Remember to regularly check the connections and monitor for any signs of leaks or issues to maintain optimal performance and prevent any potential damage to your components.
Conclusion
Learning how to cut soft tubing for your PC case is a valuable skill that allows you to create a customized water cooling system that not only enhances performance but also adds a visually appealing touch to your build. With the right tools, careful measurements, and precise cuts, you can achieve a clean and professional-looking installation.
In this guide, we have taken you through the step-by-step process of cutting and connecting soft tubing for your PC case’s water cooling system. From measuring and marking the tubing to deburring the edges and installing fittings, each step is crucial in ensuring a secure and leak-free setup.
Remember, safety should always be a priority. Take necessary precautions while handling the tools, and work in a well-ventilated area. Disposable gloves can help keep the tubing clean, but they are optional.
By following these steps, you can confidently create precise cuts and seamless connections, resulting in a reliable and efficient water cooling system for your PC. Regularly inspect your connections and monitor for any leaks to maintain optimal performance.
Now that you have the knowledge and skills to cut soft tubing for your PC case, you can dive into the world of custom water cooling and create a unique and efficient cooling solution that showcases your personal style. So, roll up your sleeves, equip yourself with the necessary tools, and let your creativity flow!