Introduction
Connecting your LG TV to a Wi-Fi network opens up a whole new world of entertainment options. With a wireless connection, you can stream your favorite movies and TV shows, browse the internet, and even access smart features on your TV. However, if you’re not familiar with the process, connecting your LG TV to Wi-Fi can seem daunting. But fear not! In this guide, we’ll walk you through easy-to-follow steps to connect your LG TV to Wi-Fi.
Before we dive in, it’s essential to ensure that your LG TV has built-in Wi-Fi capabilities. Most modern LG TVs come equipped with this feature, but it’s always a good idea to double-check your TV’s specifications or user manual to be sure. Once you’ve confirmed Wi-Fi connectivity, you’re ready to get started!
In this guide, we’ll be covering the step-by-step process for connecting your LG TV to Wi-Fi. We’ll show you how to access the settings menu, locate the network connection option, choose the Wi-Fi network, enter your Wi-Fi password, and connect to the network. Finally, we’ll guide you on how to test the connection to ensure a successful setup.
So, whether you want to stream your favorite shows or access online apps on your LG TV, keep reading to discover how to connect your TV to Wi-Fi. Let’s get started with the first step: turning on your LG TV.
Step 1: Turn on your LG TV
The first step to connecting your LG TV to Wi-Fi is to turn on the TV itself. Locate the power button, typically located either on the TV’s front panel or on the remote control. Press the power button to turn on your LG TV.
Once the TV is powered on, you may need to wait a few moments for it to fully boot up. Many LG TVs have a startup screen or logo that will be displayed during this time. It’s important to let the TV complete the startup process before proceeding to the next steps.
It’s worth noting that if your TV is already turned on, you can skip this step and move on to the next one. However, if you’re setting up a new LG TV or if you had previously turned off your TV, make sure you follow this step to ensure a proper start to the connection process.
Now that your LG TV is turned on and ready, we can move on to the next step: accessing the settings menu.
Step 2: Access the Settings menu
Once your LG TV is powered on, the next step is to access the settings menu. The settings menu is where you can customize various options and functionalities of your TV, including the network connection settings.
To access the settings menu, you will need to use the remote control that came with your LG TV. Look for the “Settings” or “Menu” button on the remote. It is usually represented by a gear icon or a series of horizontal lines.
Press the “Settings” or “Menu” button, and this will bring up the settings menu on your TV screen. The settings menu may vary slightly depending on the specific model of your LG TV, but you should be able to find the network connection options within the menu.
Use the directional buttons on the remote control to navigate through the settings menu. Look for options such as “Network” or “Connections”. Once you find the appropriate option, select it by pressing the OK or Enter button on the remote.
Now that you have accessed the settings menu and located the network connection options, you’re ready to move on to the next step: locating the specific network connection option.
Step 3: Locate the Network connection option
After accessing the settings menu on your LG TV, the next step is to locate the network connection option. This is where you will find all the settings related to connecting your TV to a Wi-Fi network.
In the settings menu, look for a section or category that is dedicated to network or Wi-Fi settings. Depending on your TV model, it may be labeled as “Network”, “Network Connection”, “Wireless”, or something similar.
Once you’ve found the network connection option, select it using the remote control’s directional buttons and press the OK or Enter button to proceed.
Inside the network connection menu, you may come across multiple options related to network settings. However, for the purpose of connecting to a Wi-Fi network, look for the specific option that allows you to choose a wireless connection. This option might be labeled as “Wireless connection”, “Wi-Fi”, or “Wireless Networks”.
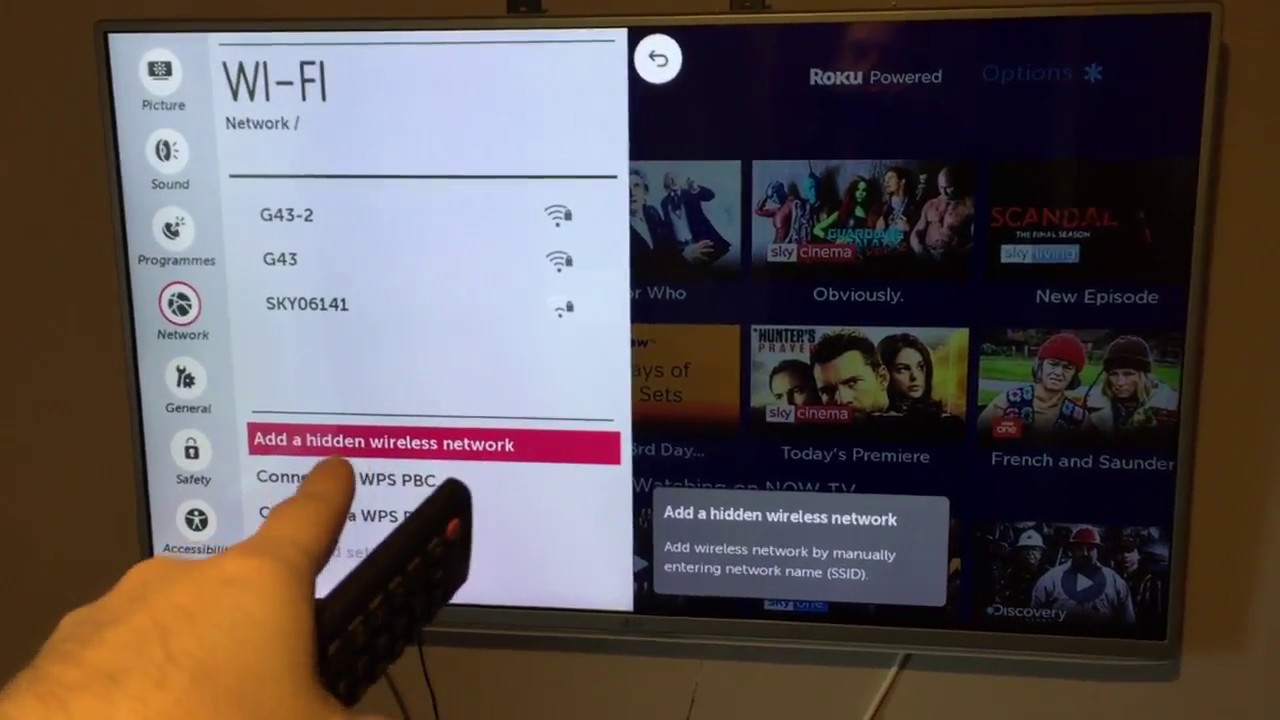
Select the wireless connection option, and this will lead you to a screen that displays available Wi-Fi networks in your vicinity.
Now that you have located the network connection option, you’re one step closer to connecting your LG TV to Wi-Fi. In the next step, we will guide you through the process of choosing the Wi-Fi network to connect to.
Step 4: Choose the Wi-Fi option
Now that you have accessed the network connection menu on your LG TV, it’s time to choose the Wi-Fi option. This step will allow you to select the Wi-Fi network you want your TV to connect to.
Within the network connection menu, look for the list of available Wi-Fi networks. This list may take a moment to populate, as your TV scans for nearby networks.
Using the directional buttons on your remote control, navigate through the list of Wi-Fi networks displayed on the screen. Each network will typically be identified by its name, also known as the SSID (Service Set Identifier).
Locate your home Wi-Fi network in the list and select it by highlighting it and pressing the OK or Enter button on your remote. If you don’t see your network listed, make sure your Wi-Fi router is turned on and within range of your LG TV. You can also try refreshing the list by selecting the “Refresh” or “Scan” option if available.
In some cases, if your Wi-Fi network is hidden, you may need to manually enter the SSID by selecting the “Manual Entry” or “Enter SSID” option. Consult your TV’s user manual for the exact steps required to enter a hidden network.
Once you have selected your Wi-Fi network, the next step is to enter the password associated with your network. In the following step, we will guide you through entering your Wi-Fi password on your LG TV.
Step 5: Select your Wi-Fi network
Having accessed the list of available Wi-Fi networks, the next step is to select your specific Wi-Fi network from the list. This will allow your LG TV to establish a connection to your desired network.
Using the remote control’s directional buttons, navigate through the list of Wi-Fi networks displayed on the screen. Look for your home Wi-Fi network, which should be listed among the available options.
Once you have located your Wi-Fi network, highlight it by selecting it with the directional buttons on the remote control. Typically, the highlighted network will be shown with a different color or an underline.
After selecting your Wi-Fi network, you may need to confirm your selection by pressing the OK or Enter button on the remote control. This step will initiate the connection process between your LG TV and the selected Wi-Fi network.
It’s important to note that if your Wi-Fi network is password-protected, you will be prompted to enter the Wi-Fi password in the following step. In case you don’t have the password or don’t remember it, refer to your router’s documentation or contact your internet service provider for assistance.
With the network selected, you have successfully completed the crucial step of choosing your Wi-Fi network on your LG TV. In the next step, we will guide you through entering the Wi-Fi password associated with your network.
Step 6: Enter your Wi-Fi password
After selecting your Wi-Fi network, the next step is to enter the password associated with your network. This password is required to establish a secure connection between your LG TV and your Wi-Fi network.
Using the on-screen keyboard that appears on your TV screen, use the remote control’s directional buttons to navigate and select the characters needed for your Wi-Fi password. The on-screen keyboard will typically display both letters and numbers.
Take your time to carefully enter the Wi-Fi password, making sure each character is input correctly. Pay attention to uppercase and lowercase letters as passwords are case-sensitive.
If you need to shift between uppercase and lowercase letters, look for an on-screen button labeled “Shift” or “Caps Lock” on the keyboard. Press this button to toggle between uppercase and lowercase characters.
If your Wi-Fi password contains special characters or symbols, such as exclamation marks or asterisks, look for an on-screen button labeled “Symbols” or “Special Characters”. Press this button to access a separate screen where you can select the required special characters.
Once you have entered your Wi-Fi password, double-check it for accuracy. Ensure that you haven’t inadvertently entered any incorrect characters.
When you are confident that the Wi-Fi password is correct, proceed to the next step to initiate the connection process between your LG TV and your Wi-Fi network.
With the Wi-Fi password entered, you have successfully completed the important step of providing the required authentication for your network connection. In the next step, we will guide you through the process of connecting your LG TV to the selected Wi-Fi network.
Step 7: Connect to the Wi-Fi network
Now that you have selected your Wi-Fi network and entered the correct password, it’s time to connect your LG TV to the network. This step will establish a wireless connection between your TV and the Wi-Fi network, allowing you to access online content and smart features on your TV.
After entering the Wi-Fi password, select the “Connect” or “Join” button on the on-screen prompt. This will initiate the connection process between your LG TV and the selected Wi-Fi network.
During the connection process, your LG TV will attempt to establish a connection with the Wi-Fi network using the provided credentials. This may take a few moments, so be patient and await a confirmation message or notification on the screen.
If the connection is successful, you will see a message indicating that your LG TV has successfully connected to the Wi-Fi network. You may also notice a Wi-Fi icon or indicator on the TV screen, indicating a successful connection.
However, if the connection is unsuccessful, double-check the entered Wi-Fi password and verify that your TV is within range of the Wi-Fi network. If the issue persists, you may need to troubleshoot your network connection or seek assistance from your internet service provider.
Once your LG TV is connected to the Wi-Fi network, you can proceed to the final step to ensure that the connection is stable and functioning correctly.
With your LG TV connected to the Wi-Fi network, you have successfully completed the crucial step of establishing the wireless connection. In the next step, we will guide you through testing the connection to ensure a seamless experience.
Step 8: Test the connection
After connecting your LG TV to the Wi-Fi network, it is essential to test the connection to ensure everything is working correctly. This step will help confirm that your TV has a stable and reliable connection to the internet.
Start by accessing the internet browser on your LG TV, which is typically available within the smart features menu. Launch the browser and attempt to load a website that you frequently visit or any website of your choice.
If the website loads successfully and displays the content without any issues, it indicates that your LG TV is properly connected to the internet. You can also try navigating to different websites to confirm that the connection is consistent.
Additionally, you can test the connection by accessing streaming apps or online platforms on your LG TV. Launch popular streaming apps such as Netflix, Hulu, or Amazon Prime Video. Play a video or browse through the content to ensure a smooth streaming experience.
If you encounter any difficulties, such as slow loading times, buffering, or error messages, it could indicate an issue with your internet connection. In such cases, make sure that your internet service is active and functioning correctly.
If you are still experiencing connection issues, you may need to troubleshoot your network or consult with your internet service provider for further assistance.
By testing the connection and ensuring that your LG TV can access the internet and online content seamlessly, you have successfully completed the final step of the setup process.
Congratulations! Your LG TV is now connected to the Wi-Fi network, providing you with a wide range of entertainment options and access to online features. Enjoy streaming your favorite shows, browsing the web, and exploring the smart capabilities of your LG TV!
Conclusion
Connecting your LG TV to Wi-Fi opens up a world of possibilities, allowing you to stream your favorite content, browse the internet, and access smart features directly from your television. By following the step-by-step guide outlined in this article, you can easily connect your LG TV to a Wi-Fi network and enjoy a seamless online experience.
We began by turning on the LG TV and accessing the settings menu, where we located the network connection option. From there, we selected the Wi-Fi option and chose our specific Wi-Fi network from the available list. After entering the Wi-Fi password, we initiated the connection process and verified that our LG TV successfully connected to the network.
Finally, we tested the connection by loading websites and using streaming apps to ensure a stable and reliable internet connection. If any issues were encountered during the testing process, it is advisable to troubleshoot the network or consult with your internet service provider for assistance.
With your LG TV connected to Wi-Fi, you can now enjoy a wide range of entertainment options, including streaming movies and TV shows, accessing online content, and exploring the smart features of your television. Take advantage of this capability to enhance your TV viewing experience and stay connected in the digital world.
We hope this guide has been helpful in guiding you through the process of connecting your LG TV to Wi-Fi. Now, sit back, relax, and enjoy all the exciting content and features available at your fingertips!


