Introduction
Welcome to the world of mini PCs, where compact computing power meets convenience. Mini PCs have gained popularity in recent years due to their small size and flexibility. These miniature wonders have become a preferred choice for various purposes, including home entertainment, productivity, and even gaming.
One key aspect of using a mini PC is connecting it to a monitor. Whether you’re setting up a home office or planning a gaming setup, connecting your mini PC to a monitor is essential for a seamless computing experience. In this guide, we’ll walk you through the steps to connect your mini PC to a monitor.
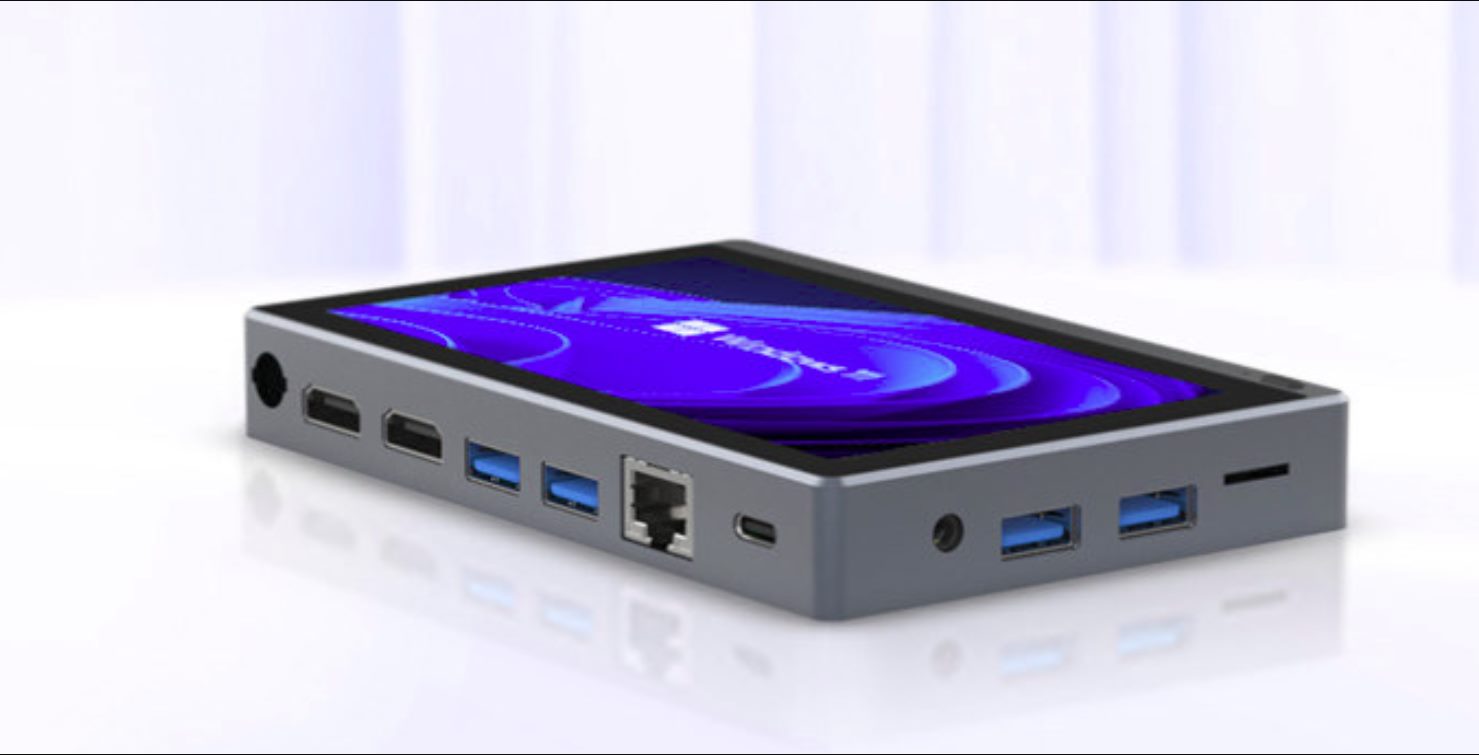
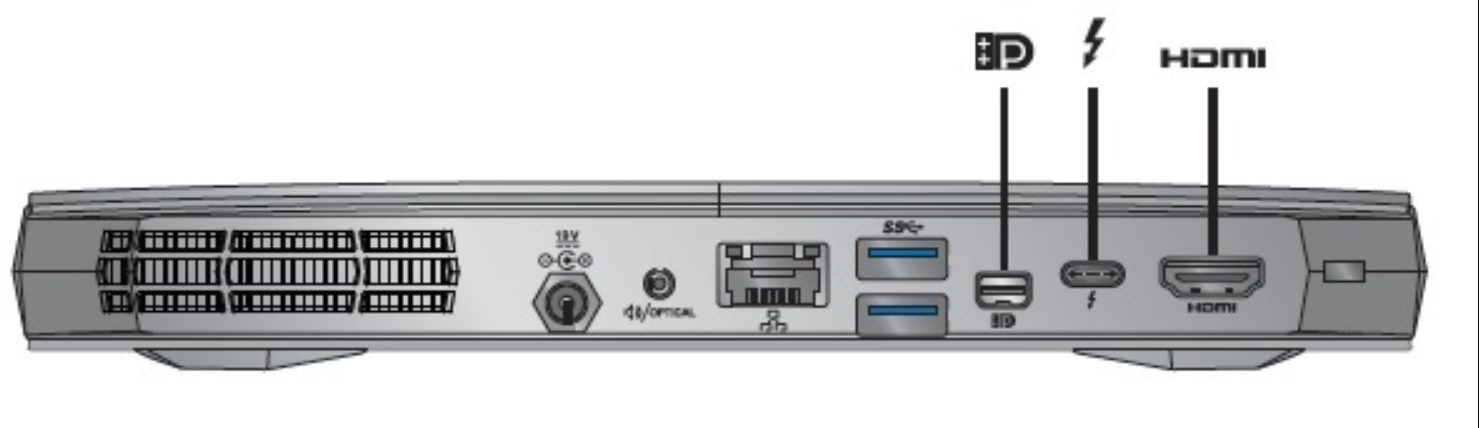
Before we dive into the process, it’s important to check the ports available on your mini PC and monitor. Mini PCs typically come with a variety of output ports, such as HDMI, VGA, DisplayPort, and DVI, while monitors usually offer a standard set of input ports. Understanding the available ports on both devices is key to ensuring a successful connection.
Once you’ve identified the ports, you’ll need to prepare the necessary cables. The type of cable you’ll need to use depends on the ports available on both your mini PC and monitor. Commonly used cables include HDMI, VGA, DisplayPort, and DVI cables.
Now let’s get started with the step-by-step process of connecting your mini PC to a monitor. Whether you’re a tech-savvy enthusiast or a beginner, we’ve got you covered. Follow the instructions carefully, and you’ll soon be enjoying the benefits of a larger screen for all your computing needs.
Step 1: Check the Ports
Before connecting your mini PC to a monitor, it’s important to check the ports available on both devices. This will help you determine the type of cable you’ll need for the connection.
Start by examining the ports on your mini PC. Look for output ports, such as HDMI, VGA, DisplayPort, or DVI ports. These ports are used to transmit audio and video signals from your mini PC to the monitor. Note which ports are available and make a mental note of their location.
Next, examine the ports on your monitor. Look for input ports that correspond to the output ports on your mini PC. Common input ports include HDMI, VGA, DisplayPort, and DVI. Make a note of the available input ports and their location on the monitor.
It’s important to ensure that the output port on your mini PC matches the input port on your monitor. For example, if your mini PC has an HDMI output port, make sure your monitor has an HDMI input port. If you’re unsure about the ports on either device, refer to their user manuals or check the manufacturer’s website for detailed specifications.
Once you’ve identified the output and input ports on both your mini PC and monitor, you’re ready to proceed to the next step of connecting the cables.
Step 2: Prepare the Cables
Now that you’ve checked the ports on your mini PC and monitor, it’s time to gather the necessary cables for the connection. The type of cable you’ll need depends on the output ports on your mini PC and the input ports on your monitor.
If both your mini PC and monitor have HDMI ports, you can use an HDMI cable for the connection. HDMI cables are widely used and support high-definition video and audio transmission. They are a popular choice for connecting devices such as gaming consoles, Blu-ray players, and mini PCs to monitors or TVs.
If your mini PC has a VGA output port and your monitor has a VGA input port, you can use a VGA cable. VGA cables are analog connections that can transmit video signals between devices. However, keep in mind that VGA cables do not transmit audio, so you may need a separate audio cable to connect your mini PC’s audio output to external speakers.
If your mini PC has a DisplayPort output port and your monitor has a DisplayPort input port, you’ll need a DisplayPort cable. DisplayPort cables support high-definition video and audio transmission, similar to HDMI cables. They are commonly used for connecting modern devices to monitors and provide a reliable and high-quality connection.
Lastly, if your mini PC has a DVI output port and your monitor has a DVI input port, you can use a DVI cable for the connection. DVI cables can transmit high-quality video signals but do not carry audio. Similar to VGA connections, you may need additional audio cables to connect your mini PC’s audio output to external speakers.
Depending on your specific setup, you may also need additional audio cables or adapters to ensure audio is correctly routed from your mini PC to your monitor or external speakers.
Now that you have the necessary cables on hand, it’s time to move on to the next step: connecting the cables.
Step 3: Connect the HDMI Cable
If both your mini PC and monitor have HDMI ports, connecting them using an HDMI cable is a straightforward process. HDMI cables are popular for their ability to transmit high-definition video and audio signals, making them an ideal choice for a seamless connectivity experience.
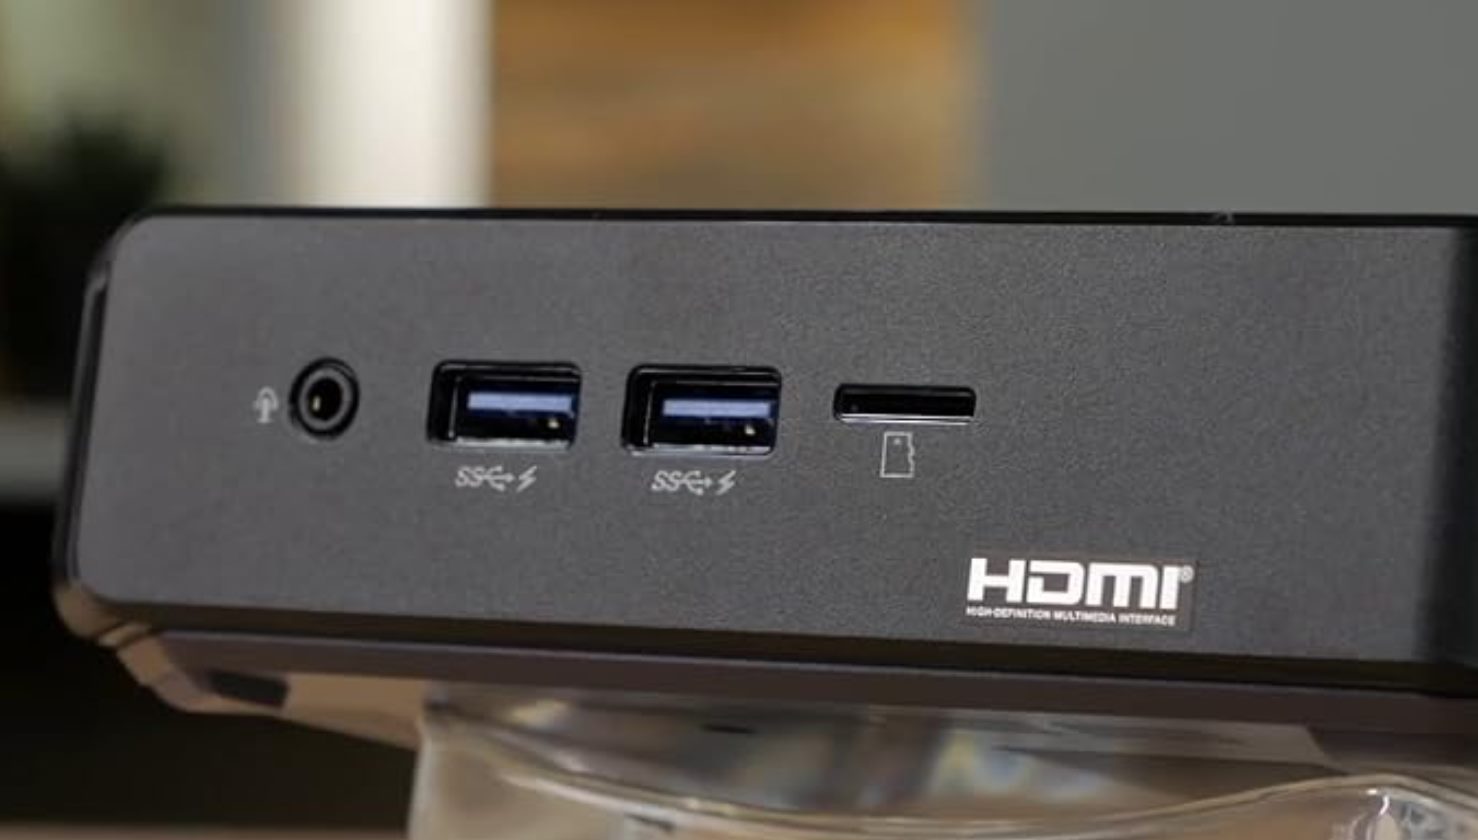
Start by locating the HDMI port on your mini PC. It is usually labeled as “HDMI” and may be located on the back or side of the device. Once you’ve identified the HDMI port, take one end of the HDMI cable and insert it firmly into the HDMI port on your mini PC. Ensure that the connection is secure to prevent any signal loss.
Next, locate the HDMI port on your monitor. It is typically labeled as “HDMI IN” and can be found on the back or side of the monitor. Take the other end of the HDMI cable and insert it into the HDMI input port on your monitor. Like before, make sure the connection is secure.
Once both ends of the HDMI cable are securely connected, power on your mini PC and monitor. The devices should automatically detect each other and establish the connection. If not, you may need to access the display settings on your mini PC or adjust the input source on your monitor to ensure the HDMI connection is recognized.
If your monitor has built-in speakers, the audio will be transmitted through the HDMI cable, eliminating the need for any additional audio cables. However, if your monitor does not have speakers or you prefer using external speakers, you may need to connect the audio output from your mini PC to the audio input of your chosen speakers using a separate audio cable.
With the HDMI cable successfully connected, you should now be able to enjoy high-quality video and audio from your mini PC on your monitor. If you’re not experiencing any display or audio issues, you’re ready to move on to using your mini PC with your monitor.
Step 4: Connect the VGA Cable
If your mini PC has a VGA output port and your monitor has a VGA input port, you can easily connect them using a VGA cable. VGA cables are commonly used to transmit analog video signals between devices and are a reliable option for connecting your mini PC to a monitor.
To start, locate the VGA port on your mini PC. It is usually labeled as “VGA” and may be located on the back or side of the device. Once you’ve located the VGA port, take one end of the VGA cable and insert the blue VGA connector firmly into the VGA port on your mini PC. Ensure that the connection is secure to avoid any signal loss.
Next, locate the VGA input port on your monitor. It is typically labeled as “VGA IN” and can be found on the back or side of the monitor. Take the other end of the VGA cable and insert the blue VGA connector into the VGA input port on your monitor. Again, make sure the connection is secure.
After connecting the VGA cable, you will need to ensure that the audio is correctly routed. VGA cables only transmit video signals and do not carry audio. To have audio accompany your video, you may need to connect a separate audio cable from the audio output port on your mini PC to your monitor’s audio input or external speakers.
With the VGA cable securely connected and the audio routed, power on your mini PC and monitor. The devices should automatically detect each other and establish the connection. If not, you may need to access the display settings on your mini PC or adjust the input source on your monitor to ensure the VGA connection is recognized.
Once the connection is established, you should now see the display from your mini PC on your monitor. Ensure that the monitor is set to the correct input source (e.g., VGA) to view the output from your mini PC. If you’re experiencing any issues with the display or audio, double-check the cable connections and settings on both devices.
Now you’re all set to use your mini PC with your monitor using the VGA connection. Enjoy using your mini PC for work, gaming, or multimedia activities on a larger screen!
Step 5: Connect the DisplayPort Cable
If your mini PC and monitor both have DisplayPort ports, connecting them using a DisplayPort cable is an excellent choice. DisplayPort cables offer high-definition audio and video transmission, making them ideal for connecting your mini PC to a monitor.
To begin, locate the DisplayPort output port on your mini PC. It is typically labeled as “DisplayPort” and can be found on the back or side of the device. Once you’ve identified the DisplayPort port, take one end of the DisplayPort cable and insert it firmly into the port on your mini PC. Make sure the connection is secure, as a loose connection may lead to a loss of signal.
Next, locate the DisplayPort input port on your monitor. It is usually labeled as “DisplayPort IN” and can be found on the back or side of the monitor. Take the other end of the DisplayPort cable and insert it into the DisplayPort input port on your monitor. Again, ensure that the connection is secure.
With the DisplayPort cable connected, power on your mini PC and monitor. The devices should automatically detect each other and establish the connection. In some cases, you may need to adjust the display settings on your mini PC or select the correct input source on your monitor to ensure the DisplayPort connection is recognized.
One of the advantages of using a DisplayPort connection is that it can carry both video and audio signals. This means that if your monitor has built-in speakers, the audio will be transmitted through the DisplayPort cable. However, if your monitor does not have speakers or you prefer using external speakers, you may need to connect the audio output from your mini PC to the audio input of your chosen speakers.
With the DisplayPort cable successfully connected and the audio routed, you should now be able to enjoy high-quality video and audio from your mini PC on your monitor. If you’re not experiencing any display or audio issues, you’re ready to proceed with using your mini PC with your monitor through the DisplayPort connection.
Step 6: Connect the DVI Cable
If your mini PC has a DVI output port and your monitor has a DVI input port, you can easily connect them using a DVI cable. DVI cables are commonly used to transmit high-quality video signals and provide a reliable option for connecting your mini PC to a monitor.
To start, locate the DVI port on your mini PC. It is usually labeled as “DVI” and may be located on the back or side of the device. Once you’ve located the DVI port, take one end of the DVI cable and insert it firmly into the DVI port on your mini PC. Ensure that the connection is secure to avoid any signal loss.
Next, locate the DVI input port on your monitor. It is typically labeled as “DVI IN” and can be found on the back or side of the monitor. Take the other end of the DVI cable and insert it into the DVI input port on your monitor. Like before, make sure the connection is secure.
After connecting the DVI cable, keep in mind that DVI cables only transmit video signals and do not carry audio. If you want audio along with the video, you may need to connect a separate audio cable from the audio output port on your mini PC to your monitor’s audio input or external speakers.
With the DVI cable securely connected and the audio routed, power on your mini PC and monitor. The devices should automatically detect each other and establish the connection. If not, you may need to access the display settings on your mini PC or adjust the input source on your monitor to ensure the DVI connection is recognized.
Once the connection is established, you should now see the display from your mini PC on your monitor. Make sure to set the monitor to the correct input source (e.g., DVI) to view the output from your mini PC. If you’re experiencing any issues with the display or audio, double-check the cable connections and settings on both devices.
Now you’re ready to use your mini PC with your monitor using the DVI connection. Enjoy working, gaming, or watching multimedia content on your larger screen for an enhanced computing experience.
Step 7: Adjust Monitor Settings
Once you have successfully connected your mini PC to the monitor using the appropriate cable, it’s important to adjust the monitor settings to ensure optimal display performance. By tweaking the monitor settings, you can customize the image quality, resolution, and other visual aspects to suit your preferences.
Start by accessing the monitor’s on-screen display (OSD) menu. Most monitors have a dedicated button or a combination of buttons that allow you to navigate through the menu. Check your monitor’s user manual or visit the manufacturer’s website for specific instructions on accessing the OSD menu.
Within the OSD menu, you’ll typically find various settings to adjust, such as brightness, contrast, color temperature, and sharpness. These settings can significantly impact the image quality and overall visual experience. Experiment with different settings to find the balance that suits your needs, ensuring a comfortable viewing experience while maintaining accurate color reproduction.
Additionally, you may want to adjust the screen resolution to match your preferences or the capabilities of your mini PC. In most operating systems, you can access the display settings by right-clicking on the desktop and selecting “Display settings” or a similar option. From there, you can choose the desired screen resolution and adjust other display-related settings as needed.
It’s worth noting that some monitors may have additional advanced settings, such as gamma correction, uniformity compensation, or gaming-specific features. Explore these settings if they are available and adjust them according to your specific requirements or preferences.
Once you have made the necessary adjustments to the monitor settings, take some time to evaluate the changes and ensure that the display meets your expectations. Use various applications, videos, and images to test the color accuracy, sharpness, and overall quality of the display.
If you’re not satisfied with the results or you encounter any issues, you may need to revisit the cable connections, update your graphics drivers, or consult the user manual for further troubleshooting steps specific to your monitor model.
With your monitor settings properly adjusted, you can now enjoy an optimized display experience while using your mini PC for work, gaming, or entertainment purposes.
Conclusion
Connecting your mini PC to a monitor is a simple and essential process that allows you to enjoy a larger screen and improved visual experience. By following the steps outlined in this guide, you can successfully connect your mini PC to a monitor using various cable options such as HDMI, VGA, DisplayPort, and DVI.
Remember to check the available ports on both your mini PC and monitor before choosing the appropriate cable. Prepare the necessary cables and ensure a secure connection for optimal signal transmission. Adjust monitor settings, including brightness, contrast, and resolution, to tailor the display to your preferences and enhance the visual quality.
Whether you’re setting up a home office, creating a gaming setup, or simply expanding your workspace, connecting your mini PC to a monitor opens up a world of possibilities. Enjoy the benefits of a larger screen, improved productivity, and immersive multimedia experiences.
If you encounter any issues during the connection process or with the display quality, refer to the user manuals or consult the manufacturer’s website for additional troubleshooting guidance specific to your devices.
We hope this guide has been helpful in assisting you with connecting your mini PC to a monitor. Now, it’s time to sit back, relax, and experience the power of your mini PC on a bigger screen!