Introduction
Welcome to the era of smart homes and intelligent virtual assistants. Alexa, Amazon’s popular virtual assistant, can do much more than just play music and answer questions. With the right setup, Alexa can also synchronize with your Google Calendar, making it easier than ever to manage your schedule and stay organized.
Connecting Google Calendar to Alexa allows you to seamlessly access your calendar appointments, set reminders, and get updates on upcoming events using just your voice. Whether you’re at home, in the office, or on the go, Alexa can keep you informed and on track.
In this guide, we will take you through the step-by-step process of connecting Google Calendar to Alexa. By following these instructions, you’ll be able to harness the power of both platforms and streamline your daily life.
Before we begin, there are a few prerequisites you need to be aware of:
Prerequisites
1. An active Amazon Alexa device: Ensure you have an Alexa-enabled device, such as an Echo speaker or an Alexa app on your smartphone or tablet.
2. A Google account: You’ll need a Google account to access Google Calendar. If you don’t already have one, you can create a new account for free.
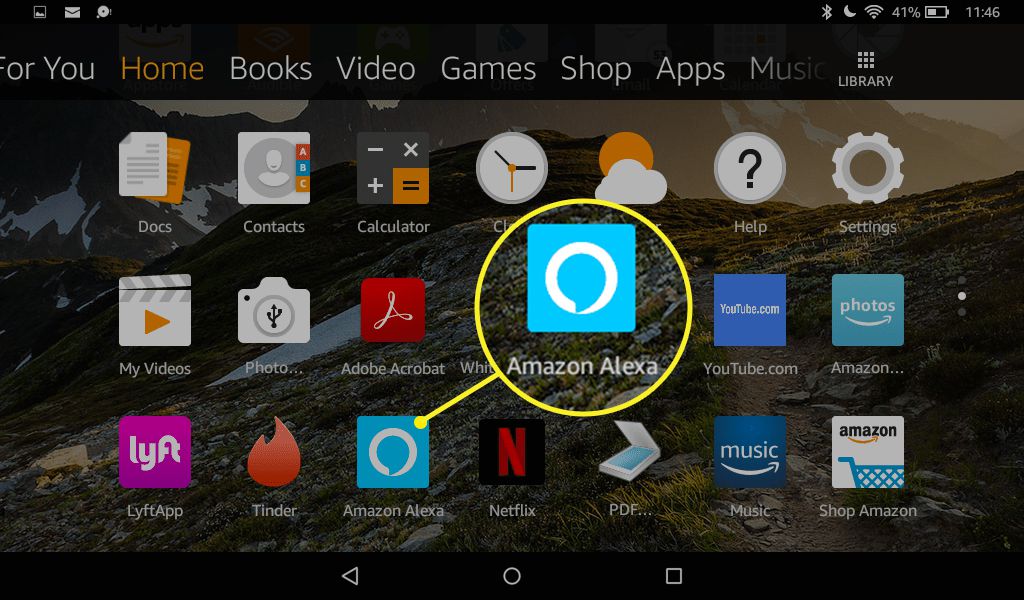
3. The Alexa app: Install the Alexa app on your smartphone or tablet from the App Store or Google Play Store. This app is essential for managing your Alexa devices and connecting them to other services.
Now that you have everything in place, let’s dive into the step-by-step process of connecting Google Calendar to Alexa.
Prerequisites
Prior to connecting Google Calendar to Alexa, there are a few prerequisites that you need to meet in order to ensure a seamless integration. Take note of the following requirements:
1. An active Amazon Alexa device: To connect Google Calendar to Alexa, you will need an Alexa-enabled device. This can be an Echo speaker, an Echo Show, or any other device that supports Alexa. If you don’t have an Alexa device, you can download the Alexa app on your smartphone or tablet.
2. An Amazon account: Ensure that you have an active Amazon account that is linked to your Alexa device. If you do not have an Amazon account, you can easily create one for free on the Amazon website.
3. Access to your Google Calendar: You will need a Google account and have a Google Calendar set up. If you don’t have a Google account, you can create one easily by visiting the Google account creation page. Once you have a Google account, set up your Google Calendar and add any events or appointments that you want to sync with Alexa.
4. Installed Alexa app: Make sure you have the Alexa app installed on your smartphone or tablet. The app is available for both iOS and Android devices and is essential for managing your Alexa devices and connecting them to other services.
5. Stable internet connection: Ensure that you have a reliable internet connection for both your Alexa device and the device on which you have the Alexa app installed. A stable internet connection is necessary for the seamless integration and synchronization between Google Calendar and Alexa.
Once you have fulfilled these prerequisites, you are ready to move on to the step-by-step process of connecting Google Calendar to Alexa. Follow the instructions in the next section to set up the integration and start enjoying the convenience and efficiency of managing your calendar using just your voice.
Step 1: Enable the Google Calendar API
In order to connect Google Calendar to Alexa, you will first need to enable the Google Calendar API. This API allows applications to access and interact with your Google Calendar data.
Follow these steps to enable the Google Calendar API:
- Go to the Google Cloud Platform console by visiting https://console.cloud.google.com.
- Create a new project by clicking on the project drop-down menu at the top of the screen and selecting “New Project”.
- Give your project a name and click on the “Create” button.
- Once the project is created, go to the project dashboard and click on “Enable APIs and Services”.
- In the search bar, type “Google Calendar API” and select it from the results.
- Click on the “Enable” button to enable the API for your project.
That’s it! You have successfully enabled the Google Calendar API for your project. Now we can move on to the next step of creating credentials.
Enabling the Google Calendar API is an important initial step as it grants your project the necessary permissions to access and modify your calendar data. This will allow Alexa to retrieve and update your events and appointments seamlessly.
Once you have completed this step, you are ready to move on to the next step of creating a new project in the Google Cloud Platform.
Step 2: Create a new project in the Google Cloud Platform
After enabling the Google Calendar API, the next step is to create a new project in the Google Cloud Platform. Follow these steps to create the project:
- Go to the Google Cloud Platform console by visiting https://console.cloud.google.com.
- Select the desired project from the project drop-down menu at the top of the screen. If you haven’t created a project yet, you can follow the instructions to create one.
- Click on the “Create” button to start creating a new project.
- Provide a name for your project. Choose a name that is descriptive and easily recognizable.
- Click on the “Create” button to create the project.
Once the project is created, you will be redirected to the project dashboard. From here, you can manage various aspects of your project, such as enabling APIs, configuring settings, and creating credentials.
Creating a new project in the Google Cloud Platform allows you to have a dedicated space to manage your APIs, credentials, and other related resources. This separation ensures that your Google Calendar API integration remains organized and easily manageable.
With your project created, you are now ready to move on to the next step: creating credentials for your project. Credentials are required to authorize the integration between Google Calendar and Alexa, allowing them to communicate and synchronize data.
Step 3: Create credentials for the project
Once you have created a new project in the Google Cloud Platform, the next step is to create credentials. These credentials will authenticate the connection between Google Calendar and Alexa, ensuring secure and authorized access to your calendar data.
Follow these steps to create credentials for your project:
- Go to the Google Cloud Platform console by visiting https://console.cloud.google.com.
- Click on the “Credentials” tab in the left sidebar to access the credentials management page for your project.
- Click on the “Create Credentials” button and select “Service Account” from the drop-down menu.
- Enter a name for your service account and select the desired role from the “Role” drop-down menu. The role determines the level of access the service account will have.
- Click on the “Create” button to create the service account.
- After creating the service account, click on the “Manage Keys” button under the “Actions” column.
- Click on the “Add Key” button and select the key type you prefer. We recommend choosing the JSON key type for compatibility with gcalcli.
- The JSON key file will be downloaded to your device. Keep this file safe, as it contains the credentials needed to authorize the connection.
By creating credentials for your project, you establish the necessary trust between Google Calendar and Alexa. These credentials authenticate the communication and provide the required permissions for manipulating and retrieving your calendar data.
With the credentials in place, you are now ready to proceed to the next step: installing and setting up gcalcli, a command-line tool that will facilitate the integration between Google Calendar and Alexa.
Step 4: Install and set up gcalcli
Now that you have created the necessary credentials, the next step is to install and set up gcalcli. gcalcli is a command-line tool that allows you to interact with Google Calendar from the command line.
Follow these steps to install and set up gcalcli:
- Open a terminal or command prompt on your device.
- Install gcalcli by running the appropriate installation command for your operating system. For example, on a Linux system, you can use the command
sudo pip install gcalcli. - Once the installation is complete, set up gcalcli by running the command
gcalcli --configure. This command will guide you through the initial configuration process. - When prompted, enter the path to the JSON credentials file you downloaded in the previous step. This file contains the credentials needed to authorize gcalcli to access your Google Calendar.
- Follow the on-screen instructions to complete the configuration, such as selecting your time zone and specifying the default calendar to use.
After completing the setup process, gcalcli is ready to be used to interact with your Google Calendar. You can now conveniently manage your calendar events and appointments using gcalcli’s commands.
Installing and setting up gcalcli is an important step as it allows Alexa to communicate with your Google Calendar and retrieve relevant information. gcalcli acts as a bridge between the two platforms, enabling seamless integration and synchronization.
With gcalcli ready, you can proceed to the next step: authorizing gcalcli to access your Google Calendar.
Step 5: Authorize gcalcli to access your Google Calendar
Before gcalcli can access your Google Calendar and interact with it on behalf of Alexa, you need to authorize it by granting it access to your calendar data. This ensures that gcalcli can retrieve, modify, and update your calendar events as needed.
Follow these steps to authorize gcalcli to access your Google Calendar:
- In your terminal or command prompt, run the command
gcalcli --oauth2-authorize. - A URL will be displayed in the terminal. Copy the URL and paste it into a web browser of your choice.
- Follow the on-screen instructions to sign in to your Google account, if prompted.
- After signing in, you will be presented with a consent screen. Review the permissions that gcalcli requires and click on the “Allow” button to grant access.
- Once you have granted access, you will be redirected to a web page that displays a verification code.
- Copy the verification code and go back to your terminal or command prompt.
- Paste the verification code into the terminal or command prompt and press Enter.
By authorizing gcalcli, you give it the necessary permissions to read and modify your Google Calendar data. This authorization step is crucial for gcalcli to communicate with your calendar and retrieve the information that Alexa needs.
With gcalcli successfully authorized, you are now ready to move on to the next step: connecting Alexa to Google Calendar. This final step will establish the integration between the two platforms, allowing you to manage your calendar using voice commands through Alexa.
Step 6: Connect Alexa to Google Calendar
Now that you have gcalcli set up and authorized to access your Google Calendar, it’s time to connect Alexa to Google Calendar. With this connection established, you’ll be able to use Alexa to interact with and manage your calendar seamlessly.
Follow these steps to connect Alexa to Google Calendar:
- Open the Alexa app on your smartphone or tablet.
- Tap on the menu icon in the top-left corner of the screen.
- Select “Settings” from the menu.
- Scroll down and select “Calendar & Email”.
- Choose “Google” as the calendar provider.
- Sign in to your Google account when prompted.
- Review the permissions that Alexa is requesting and click on the “Allow” button to grant access to your Google Calendar.
- Wait for Alexa to establish the connection with your Google Calendar. This may take a few moments.
Once the connection is successfully established, Alexa will be able to access your Google Calendar and provide you with information about your upcoming events and appointments. You can use voice commands to ask Alexa about your schedule, add events, set reminders, and more.
Connecting Alexa to Google Calendar is the final step in integrating the two platforms. This connection enables you to effortlessly manage your calendar using the convenience of voice commands through your Alexa-enabled device.
With Alexa now connected to Google Calendar, you’re ready to move on to the next step: testing the connection to ensure proper functionality.
Step 7: Test the connection
Once you have connected Alexa to Google Calendar, it’s essential to test the connection to ensure that everything is working correctly. By doing a quick test, you can verify that Alexa can retrieve and provide accurate information about your calendar events and appointments.
Follow these steps to test the connection between Alexa and Google Calendar:
- Use a wake word or press the Alexa button on your device to activate Alexa.
- Ask Alexa a question related to your calendar, such as “What’s on my agenda for today?” or “Tell me about my next appointment”.
- Listen to the response from Alexa and verify that the information provided matches your actual calendar events.
- Try adding an event to your calendar using voice commands. For example, say “Add a meeting tomorrow at 2 PM”. Check your Google Calendar to ensure that the event was added successfully.
- Experiment with different voice commands and inquire about upcoming events, search for specific appointments, or set reminders.
By testing the connection, you can confirm that Alexa is properly linked to your Google Calendar and can accurately retrieve and interact with your calendar data. If any issues or discrepancies arise during the testing, you can troubleshoot and address them accordingly.
By successfully testing the connection, you can now fully enjoy the convenience and efficiency of managing your calendar using Alexa. Whether you’re at home, in the office, or on the go, Alexa can keep you updated on your schedule and help you stay organized.
Congratulations, you have successfully connected and tested the integration between Alexa and Google Calendar. You can now rely on the power of voice commands to effortlessly manage your time and stay informed about your upcoming events and appointments.
Conclusion
Connecting Google Calendar to Alexa opens up a world of convenience and efficiency in managing your schedule. By following the step-by-step process outlined in this guide, you have successfully integrated these two powerful platforms to effortlessly stay organized and updated on your upcoming events and appointments.
From enabling the Google Calendar API to creating credentials, installing and setting up gcalcli, authorizing gcalcli to access your Google Calendar, and connecting Alexa to Google Calendar, each step has been carefully outlined to ensure a seamless integration.
By connecting Alexa to Google Calendar, you can now use voice commands to check your schedule, add events, set reminders, and more. The ability to manage your calendar hands-free, whether you’re at home or on the go, adds a new level of convenience to your daily routines.
Remember to periodically test the connection between Alexa and Google Calendar to ensure that everything is functioning as expected. By doing so, you can rely on accurate information and continue to optimize your productivity and time management.
With Alexa and Google Calendar working together, managing your schedule becomes effortless and intuitive. Enjoy the convenience of voice commands and the power of two innovative platforms combining to streamline your daily life.
We hope this guide has been helpful in guiding you through the process of connecting Google Calendar to Alexa. Embrace the possibilities and make the most of this integration to stay organized and in control of your time.