Introduction
Welcome to this guide on how to make Zoom the default video conferencing platform in Google Calendar! With the increasing demand for remote work and online meetings, Zoom has become a popular choice for video conferences due to its user-friendly interface and advanced features. By setting Zoom as the default option in Google Calendar, you can seamlessly schedule and join Zoom meetings for all your events. No more hassle of manually adding the Zoom meeting details every time you create an event!
Google Calendar is a widely used digital calendar that allows you to manage your schedule, create events, and invite participants. By integrating Zoom into Google Calendar, you can streamline your workflow and save time by automatically generating Zoom meeting links and including them in your event invitations.
In this step-by-step tutorial, we will walk you through the process of configuring Google Calendar to make Zoom your default video conferencing platform. We will also troubleshoot any common issues that you may encounter along the way. So, whether you are an individual managing your personal calendar or a team working remotely, this guide will help you optimize your video conferencing experience.
Before we dive into the steps, make sure you have a Zoom account and the necessary permissions to make changes in Google Calendar settings. Let’s get started!
Step 1: Accessing Google Calendar settings
The first step towards making Zoom the default video conferencing platform in Google Calendar is accessing the settings menu. Follow the instructions below to navigate to the settings section:
- Open Google Calendar in your web browser and sign in to your Google account.
- Once signed in, you will be taken to the main calendar view. Look for the gear icon in the upper-right corner and click on it. This will open the settings menu.
- In the settings menu, scroll down and locate the “Settings” option. Click on it to proceed.
- You will now be in the general settings section. Look for the “Event settings” category in the left sidebar and click on it. This will expand the sub-categories related to event settings.
- In the expanded sub-categories, find and click on the “Video conferencing” option. This will open the video conferencing settings in the main panel on the right.
Congratulations! You have successfully navigated to the Google Calendar settings where you can configure the video conferencing options. In the next step, we will explore how to set up Zoom as the default video conferencing platform.
Step 2: Configuring the video conferencing settings
Now that you have accessed the video conferencing settings in Google Calendar, it’s time to configure the options for Zoom. Follow the steps below:
- In the video conferencing settings panel, you will see a list of supported video conferencing platforms. Look for the Zoom option and click on it to select it as your preferred platform.
- Once you have selected Zoom, you will notice additional settings related to Zoom integration appearing. These settings include options to automatically add a Zoom meeting to calendar events, generate and include a Zoom meeting link, and more.
- Review each setting and make sure they align with your preferences. For example, if you want to automatically add a Zoom meeting to every calendar event, ensure that the “Add conferencing” option is enabled.
- Additionally, you can customize the behavior of the Zoom integration by adjusting other settings such as whether to display join details or ask participants to authenticate before joining.
- Once you have made the necessary changes, scroll down to the bottom of the video conferencing settings panel and click on the “Save” button to save your configurations.
Great job! You have successfully configured the video conferencing settings for Zoom in Google Calendar. In the next step, we will explore how to enable Zoom as the default video conferencing platform for all your events.
Step 3: Enabling Zoom as the default video conferencing platform
Now that you have configured the video conferencing settings for Zoom in Google Calendar, it’s time to enable Zoom as the default video conferencing platform for all your events. Follow the steps below:
- Go back to the main calendar view in Google Calendar.
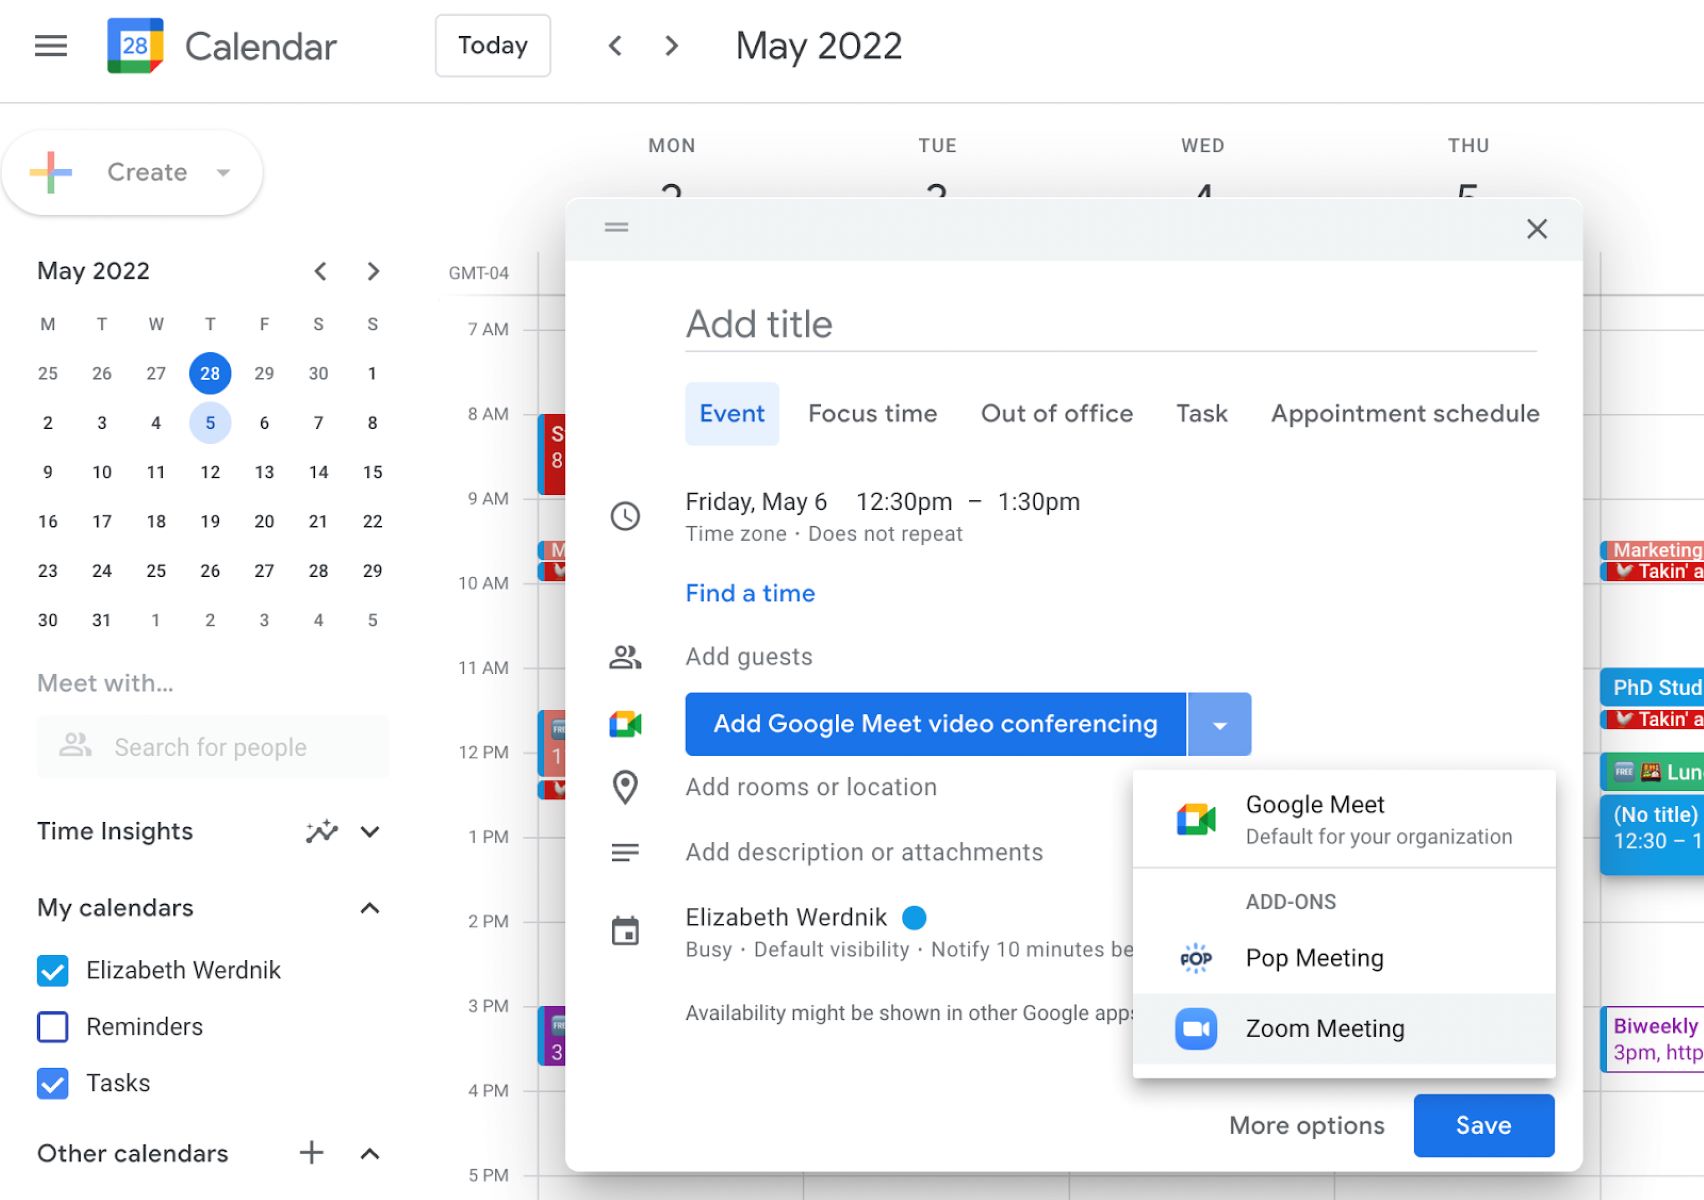
- Create a new event by clicking on a time slot on the calendar or by clicking the “+ Create” button.
- In the event creation window, you will see the video conferencing options. By default, it will be set to “None”.
- Click on the drop-down menu for the video conferencing option and select “Zoom”. This will ensure that all your future events will have Zoom as the default video conferencing platform.
- Optionally, you can also enable the option to automatically add a Zoom meeting link to the event. This will make it easier for participants to join the meeting directly from the event invitation.
- Fill in the rest of the event details such as the title, date, time, and participants.
- Once you have filled in all the necessary information, click on the “Save” button to create the event with Zoom as the default video conferencing platform.
Well done! You have successfully enabled Zoom as the default video conferencing platform in Google Calendar. From now on, every new event you create will automatically have Zoom set as the video conferencing option. In the next step, we will check the Zoom integration in event invitations.
Step 4: Checking the Zoom integration in event invitations
After enabling Zoom as the default video conferencing platform in Google Calendar, it’s important to verify that the Zoom integration is functioning correctly in event invitations. Follow the steps below to check the Zoom integration:
- Create a new event in Google Calendar and include participants as you normally would.
- In the event creation window, you will see the details of the event including the date, time, and location.
- Scroll down to the “Video conferencing” section and you should see that Zoom is selected as the default platform.
- If you had enabled the option to automatically add a Zoom meeting link, you will find that a unique Zoom meeting link has been generated and included in the event invitation.
- Review the event details and ensure that the Zoom meeting details are accurate. If any changes are needed, you can edit the event and update the Zoom meeting settings.
- Once you are satisfied with the event invitation, click on the “Save” button to send the invitation to the participants.
- Participants will now receive the event invitation via email, and they will have all the necessary information to join the Zoom meeting.
Well done! You have successfully checked the Zoom integration in event invitations. It is important to ensure that the Zoom details are accurately included in the event invitations so that participants can easily join the meetings. In the next step, we will cover some common troubleshooting tips that you may find helpful.
Step 5: Troubleshooting common issues
While setting up Zoom as the default video conferencing platform in Google Calendar is a relatively straightforward process, you may still encounter some common issues along the way. Here are some troubleshooting tips to help you resolve these issues:
- No Zoom option: If you do not see Zoom listed as an option in the video conferencing settings, make sure that you have a Zoom account and that it is properly linked to your Google account. You may need to refresh the Google Calendar page or sign out and sign back in to rectify this issue.
- Missing Zoom meeting details: If the Zoom meeting details are not automatically included in the event invitations, double-check that you have enabled the option to automatically add a Zoom meeting link in the video conferencing settings. Also, ensure that you are creating new events after making these settings changes.
- Incorrect Zoom meeting link: If the Zoom meeting link generated in the event invitation is not correct, it could be due to a temporary glitch. Try refreshing the page and creating a new event to see if the issue persists. If the problem continues, double-check your Zoom account settings and ensure that your account is properly linked to Google Calendar.
- Participant access issues: If participants are having trouble accessing the Zoom meeting link from the event invitation, make sure that the link is working correctly. Test the link yourself to ensure that it opens the Zoom meeting on your device. If the link is not working, re-generate a new meeting link and update the event invitation accordingly.
- Compatibility issues: Ensure that you are using the latest version of Google Calendar and the Zoom application to minimize compatibility issues. Check for any available updates and install them if necessary.
By following these troubleshooting tips, you should be able to overcome common issues that may arise while integrating Zoom into Google Calendar. If you continue to experience difficulties, consider reaching out to Zoom support or consulting Google Calendar’s support resources for further assistance.
Conclusion
Congratulations! You have successfully learned how to make Zoom the default video conferencing platform in Google Calendar. By following the steps outlined in this guide, you can streamline your workflow by automatically including Zoom meeting details in your event invitations. This not only saves you time and effort but also ensures a smoother and more efficient video conferencing experience.
Remember, the key steps involved in this process are accessing Google Calendar settings, configuring the video conferencing options, enabling Zoom as the default platform, and checking the Zoom integration in event invitations. By carefully following these steps and troubleshooting any issues that may arise, you can make the most of Google Calendar’s integration with Zoom.
Utilizing Zoom as the default video conferencing platform in Google Calendar provides numerous benefits. It simplifies the process of scheduling and joining online meetings, enhances collaboration among team members, and improves overall productivity. Whether you are managing personal events or coordinating professional meetings, integrating Zoom into Google Calendar is a valuable tool.
Keep in mind that technology is constantly evolving, and updates may be released for both Zoom and Google Calendar in the future. Therefore, it’s important to stay up to date with the latest versions and settings to ensure optimal performance and functionality.
Now that you have the knowledge and understanding of how to make Zoom the default in Google Calendar, go ahead and implement these steps to enhance your video conferencing experience. Embrace the convenience and efficiency of seamlessly integrating Zoom into your daily schedule. Happy conferencing!