Introduction
Are you looking to enjoy over-the-air channels on your Samsung LED TV? One of the simplest and most affordable ways to access live television broadcasts is by connecting an antenna to your TV. With an antenna, you can tune into local channels and enjoy high-definition content without the need for a cable or satellite subscription.
Connecting an antenna to your Samsung LED TV is a straightforward process that can be completed in just a few easy steps. In this guide, we will walk you through the process of connecting your antenna to your Samsung TV, allowing you to access a wide range of free broadcast channels.
Before we begin, it is essential to ensure that you have the necessary equipment for this setup. You will need an antenna, an antenna cable, and of course, your Samsung LED TV. It is also helpful to have a remote control handy and access to the TV’s settings menu.
Once you have gathered all the necessary equipment, you are ready to proceed with the antenna connection process. By following the steps outlined in this guide, you will be enjoying your favorite local channels in no time.
Step 1: Gather the Necessary Equipment
Before you can connect an antenna to your Samsung LED TV, you will need to gather a few essential items. Make sure you have the following equipment ready:
- An antenna: Choose an antenna that best suits your needs and the availability of channels in your area. There are various types of antennas, including indoor and outdoor options. Consider factors such as signal strength, range, and reception capabilities when selecting an antenna.
- An antenna cable: You will need a coaxial cable to connect your antenna to the TV. Ensure that the cable is long enough to reach from the antenna to the TV without any strain or tight bends.
- Your Samsung LED TV: Of course, you will need the TV itself. Make sure it is in proper working condition and that you have access to its remote control.
- A power source: Some outdoor antennas require a power source for built-in amplification. If you are using such an antenna, ensure that you have a power source nearby for it to function correctly.
Once you have gathered all the necessary equipment, you are ready to move on to the next step. Having everything prepared ensures a smooth and hassle-free setup process.
Step 2: Locate the Antenna Input on the TV
Before connecting your antenna to your Samsung LED TV, you need to locate the antenna input on the TV itself. Follow these steps:
- Start by identifying the back panel or side panel of your Samsung LED TV. This is where you will find the various input and output ports.
- Look for a connector labeled “ANT IN” or “RF IN.” This is the designated input port for connecting your antenna.
- The antenna input is usually a coaxial connector, which resembles a threaded cylinder with a center pin. It is commonly found on the back of the TV, but depending on the model, it may also be located on the side.
If you are having trouble locating the antenna input, refer to the TV’s user manual. It provides detailed diagrams and explanations of the various ports and their locations.
Once you have located the antenna input on your Samsung LED TV, you can move on to the next step of connecting the antenna cable.
Step 3: Connect the Antenna Cable to the TV
Now that you have located the antenna input on your Samsung LED TV, it’s time to connect the antenna cable. Follow these steps:
- Take one end of the antenna cable and insert it into the antenna input on the TV. Ensure that it is securely plugged in and tightened to prevent any signal loss.
- If you are using an outdoor antenna, you may need to route the cable through a window or wall to connect it to the TV. Be mindful of any obstacles or interference that could disrupt the signal quality.
- Once the cable is connected, make sure to do a quick visual inspection to ensure there are no frayed wires or loose connections.
- If your antenna requires power, connect the power cable to a nearby power source. This may involve plugging it into an electrical outlet or a power supply unit, as specified by the antenna manufacturer.
Remember, a secure and proper connection is crucial for optimal reception. Loose or faulty connections can lead to signal dropouts or poor picture quality.
With the antenna cable securely connected, you are now ready to set up and scan for channels in the next step.
Step 4: Set Up and Scan Channels
Once you have successfully connected the antenna cable to your Samsung LED TV, it’s time to set up and scan for channels. Follow these steps:
- Turn on your Samsung LED TV by pressing the power button on the remote control or the TV itself.
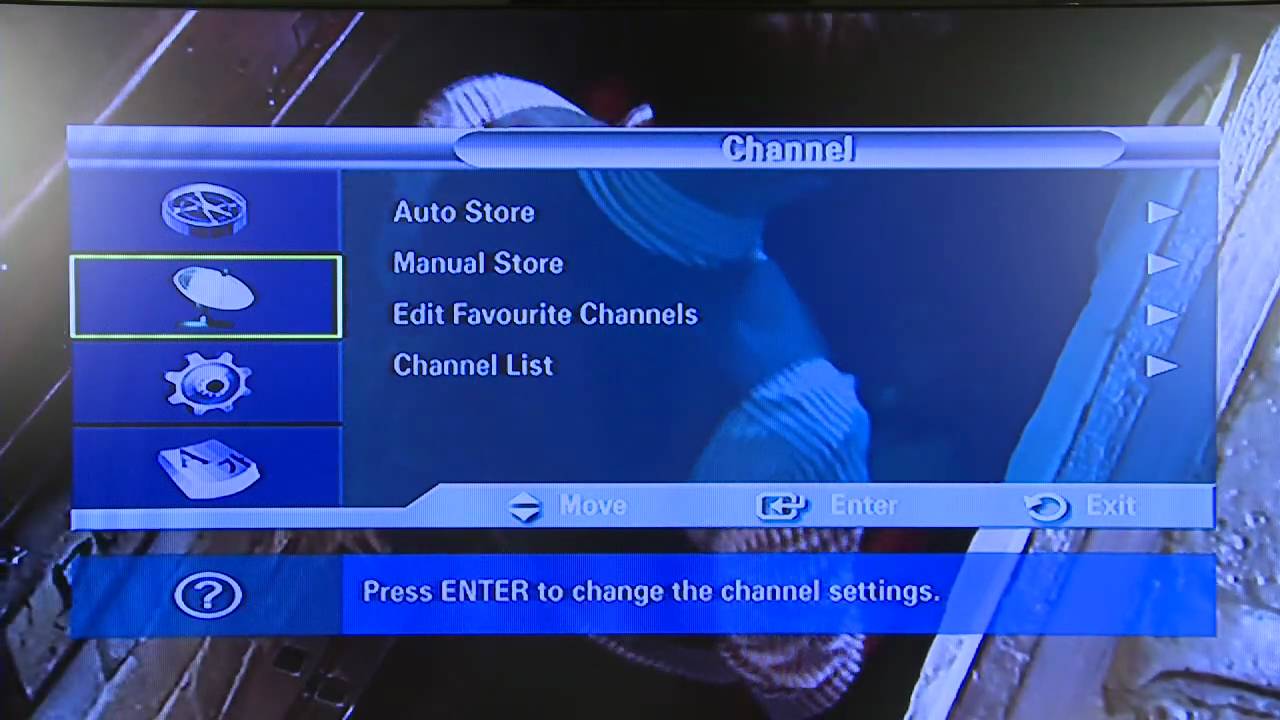
- Using the remote control, navigate to the TV’s settings menu. This is typically accessed by pressing the “Menu” or “Settings” button.
- In the settings menu, look for an option related to “Channels” or “Broadcast.” The exact wording may vary depending on your TV model.
- Select the option to “Scan” or “Search” for channels. This will initiate a scan to detect and save the available channels that your antenna can receive.
- Depending on your TV’s settings, you may be prompted to choose between an “Antenna” or “Cable” scan. Select the “Antenna” option to scan specifically for over-the-air channels.
- Start the channel scan and wait for the TV to complete the process. It will search for available channels based on the signals received by the antenna.
- Once the scan is complete, your Samsung LED TV will display a list of detected channels.
It is important to note that the scanning process may take a few minutes, so be patient. The TV will save the channels it finds, allowing you to easily access them in the future.
After completing the channel scan, you can navigate through the saved channels using the remote control’s channel up and down buttons. Enjoy exploring the assortment of free over-the-air channels available in your area!
Step 5: Fine-Tuning and Troubleshooting
After setting up and scanning for channels on your Samsung LED TV, you may encounter some issues or want to fine-tune your antenna reception. Here are some tips for fine-tuning and troubleshooting:
- If you notice poor signal quality or missing channels, try repositioning your antenna. Experiment with different locations and orientations to find the best signal reception. Higher placements or near windows often yield better results.
- Consider using an antenna signal amplifier or booster if you live in an area with weak signals. This device can enhance the strength of the incoming signals and improve the overall reception.
- Make sure that there are no obstructions or interference near your antenna. Large buildings, trees, or even household appliances can disrupt the signal quality. Adjusting the antenna’s position or using signal filters can help mitigate these issues.
- If you are still experiencing reception issues, try performing a channel rescan. Sometimes, new channels become available, or displaced channels may find their correct frequencies during a rescan.
- Check for software updates for your Samsung LED TV. Manufacturers often release firmware updates that can improve TV performance or address specific issues related to reception and signal quality.
- Consider consulting the user manual or contacting the manufacturer’s customer support for further assistance. They can provide specific troubleshooting steps or offer advice based on your TV model.
By fine-tuning and troubleshooting, you can optimize your antenna reception to enjoy the best possible viewing experience on your Samsung LED TV.
Conclusion
Connecting an antenna to your Samsung LED TV is a simple and cost-effective way to access local channels and enjoy high-definition content without a cable or satellite subscription. By following the steps outlined in this guide, you can set up your antenna and start enjoying a wide range of free over-the-air channels.
To begin, gather the necessary equipment, including an antenna, antenna cable, and your Samsung LED TV. Ensure that you have a power source available if using an outdoor antenna with built-in amplification.
Locate the antenna input on your TV, typically labeled as “ANT IN” or “RF IN.” This is where you will connect the antenna cable securely.
After connecting the antenna cable, proceed to set up and scan for channels by accessing the TV’s settings menu. Initiate a scan specifically for over-the-air channels and wait for the TV to save the detected channels.
If you encounter any issues with reception or missing channels, you can fine-tune and troubleshoot by repositioning the antenna, using signal amplifiers or filters, or performing channel rescans. Checking for software updates or reaching out to customer support can also provide further assistance.
By following these steps and taking the time to optimize your antenna setup, you can enjoy a wide variety of free broadcast channels with excellent picture and sound quality on your Samsung LED TV.
Now that you have successfully connected your antenna, grab some popcorn, sit back, and enjoy the plethora of entertainment available at your fingertips. Happy channel surfing!


