Introduction
Welcome to our guide on how to clear undeposited funds in QuickBooks Online. As a small business owner or accountant, you are likely familiar with the challenge of managing cash flow and ensuring that all incoming payments are properly recorded. Undeposited funds can accumulate when you receive payments from customers but haven’t yet deposited them into your bank account.
Undeposited funds are a convenient feature in QuickBooks Online that allows you to group together multiple payments before recording a bank deposit. This gives you better control over your cash flow and streamlines your bookkeeping process. However, it’s important to regularly clear undeposited funds to ensure that your records are accurate and up to date.
In this guide, we will walk you through the steps to clear undeposited funds in QuickBooks Online. We will explain the concept of undeposited funds and why it is important to clear them. We’ll also provide you with a step-by-step process to help you confidently clear undeposited funds in your QuickBooks Online account.
Whether you are new to QuickBooks Online or looking to optimize your bookkeeping workflow, this guide will equip you with the knowledge and tools to effectively manage and clear undeposited funds. So, let’s dive in and get started on this essential task.
What are Undeposited Funds?
Undeposited funds are a temporary account in QuickBooks Online that acts as a holding account for customer payments received but not yet deposited into your bank account. When you receive a payment from a customer, QuickBooks automatically assigns it to the undeposited funds account, rather than directly to your bank account.
This feature is particularly useful if you receive multiple payments throughout the day or week and want to group them together for a single bank deposit. Instead of creating individual deposits for each payment, undeposited funds allow you to consolidate and record them together in one transaction.
Think of undeposited funds as a virtual cash register or a temporary safe where you store your customer payments until you’re ready to deposit them into your physical bank account. This helps you streamline your bookkeeping process and ensures that all your deposits and payments are accurately recorded.
By utilizing undeposited funds, you have better control over your cash flow and can easily reconcile your bank statements with your QuickBooks records. Additionally, it helps prevent errors, such as duplicate deposits, and provides a clearer picture of your available cash on hand.
It’s important to note that undeposited funds are a feature specific to QuickBooks Online. If you’re using a different accounting software, make sure to check if a similar feature exists or if you need to handle customer payments differently.
Now that we understand what undeposited funds are and why they’re useful, let’s explore why it’s crucial to clear undeposited funds in a timely manner.
Why do you need to clear Undeposited Funds?
Clearing undeposited funds is an important step in your account reconciliation process and maintaining accurate financial records in QuickBooks Online. Let’s explore a few key reasons why it’s necessary to clear undeposited funds regularly:
1. Accuracy of Financial Reports: When you clear undeposited funds, you ensure that your financial reports reflect the true state of your business. By grouping payments and recording them as bank deposits, you accurately reflect your cash inflows, preventing discrepancies between your QuickBooks records and your actual bank transactions.
2. Easy Reconciliation: Clearing undeposited funds makes it easier to reconcile your bank accounts in QuickBooks Online. When you record bank deposits, you can easily match them with the corresponding deposits in your bank statements, ensuring that your records are accurate and up to date.
3. Improved Cash Flow Management: Clearing undeposited funds allows you to have a better understanding of your available cash on hand. By recording your bank deposits in a timely manner, you can accurately track your cash flow and make informed decisions regarding your business’s financial health.
4. Minimize Errors and Duplicates: Leaving payments in undeposited funds for an extended period increases the risk of errors or duplicates. By regularly clearing undeposited funds, you reduce the chances of accidentally depositing the same payment multiple times or missing a deposit altogether.
5. Compliance with Audit Trails: Clearing undeposited funds ensures that you have a clear audit trail of all your financial transactions. This is especially important during tax season or when undergoing an audit, as it provides a transparent record of your income sources and supports accurate financial reporting.
6. Organized Bookkeeping Process: By consistently clearing undeposited funds, you maintain a more organized and efficient bookkeeping system. This allows you to easily track and manage customer payments, deposits, and any discrepancies that may arise.
By understanding the importance of clearing undeposited funds, you can maintain accurate financial records and stay on top of your business’s cash flow. Now, let’s move on to the steps to clear undeposited funds in QuickBooks Online.
How to Clear Undeposited Funds in QuickBooks Online
Clearing undeposited funds in QuickBooks Online is a straightforward process that ensures your customer payments are accurately recorded and deposited into your bank account. Follow these step-by-step instructions to clear undeposited funds:
Step 1: Understand how Undeposited Funds work
Take some time to familiarize yourself with how undeposited funds function in QuickBooks Online. This will provide you with a better understanding of the process and help you make informed decisions when clearing undeposited funds.
Step 2: Review and Organize your transactions
Before creating a new bank deposit, review your undeposited funds account and organize the transactions within it. This step ensures that all the payments you want to clear are accounted for and properly classified.
Step 3: Create a new Bank Deposit
In QuickBooks Online, navigate to the “+ New” option and select “Bank Deposit” from the drop-down menu. This will open the bank deposit form where you can begin the process of clearing undeposited funds.
Step 4: Select the payments to include in the Bank Deposit
In the bank deposit form, you will see a list of all the payments currently stored in your undeposited funds account. Select the payments you want to include in the bank deposit by checking the boxes next to them.
Step 5: Review and finalize the Bank Deposit
Double-check the selected payments and their corresponding amounts to ensure accuracy. Review any additional fields in the bank deposit form, such as payment method or reference numbers, and fill them out as needed. Once you are satisfied with the information, save the bank deposit.
Step 6: Record the Bank Deposit in QuickBooks Online
After saving the bank deposit, QuickBooks Online will create a new transaction that represents the deposit in your bank account. Review the transaction details to ensure accuracy, and make any necessary adjustments or additions. Save the transaction to record the bank deposit successfully.
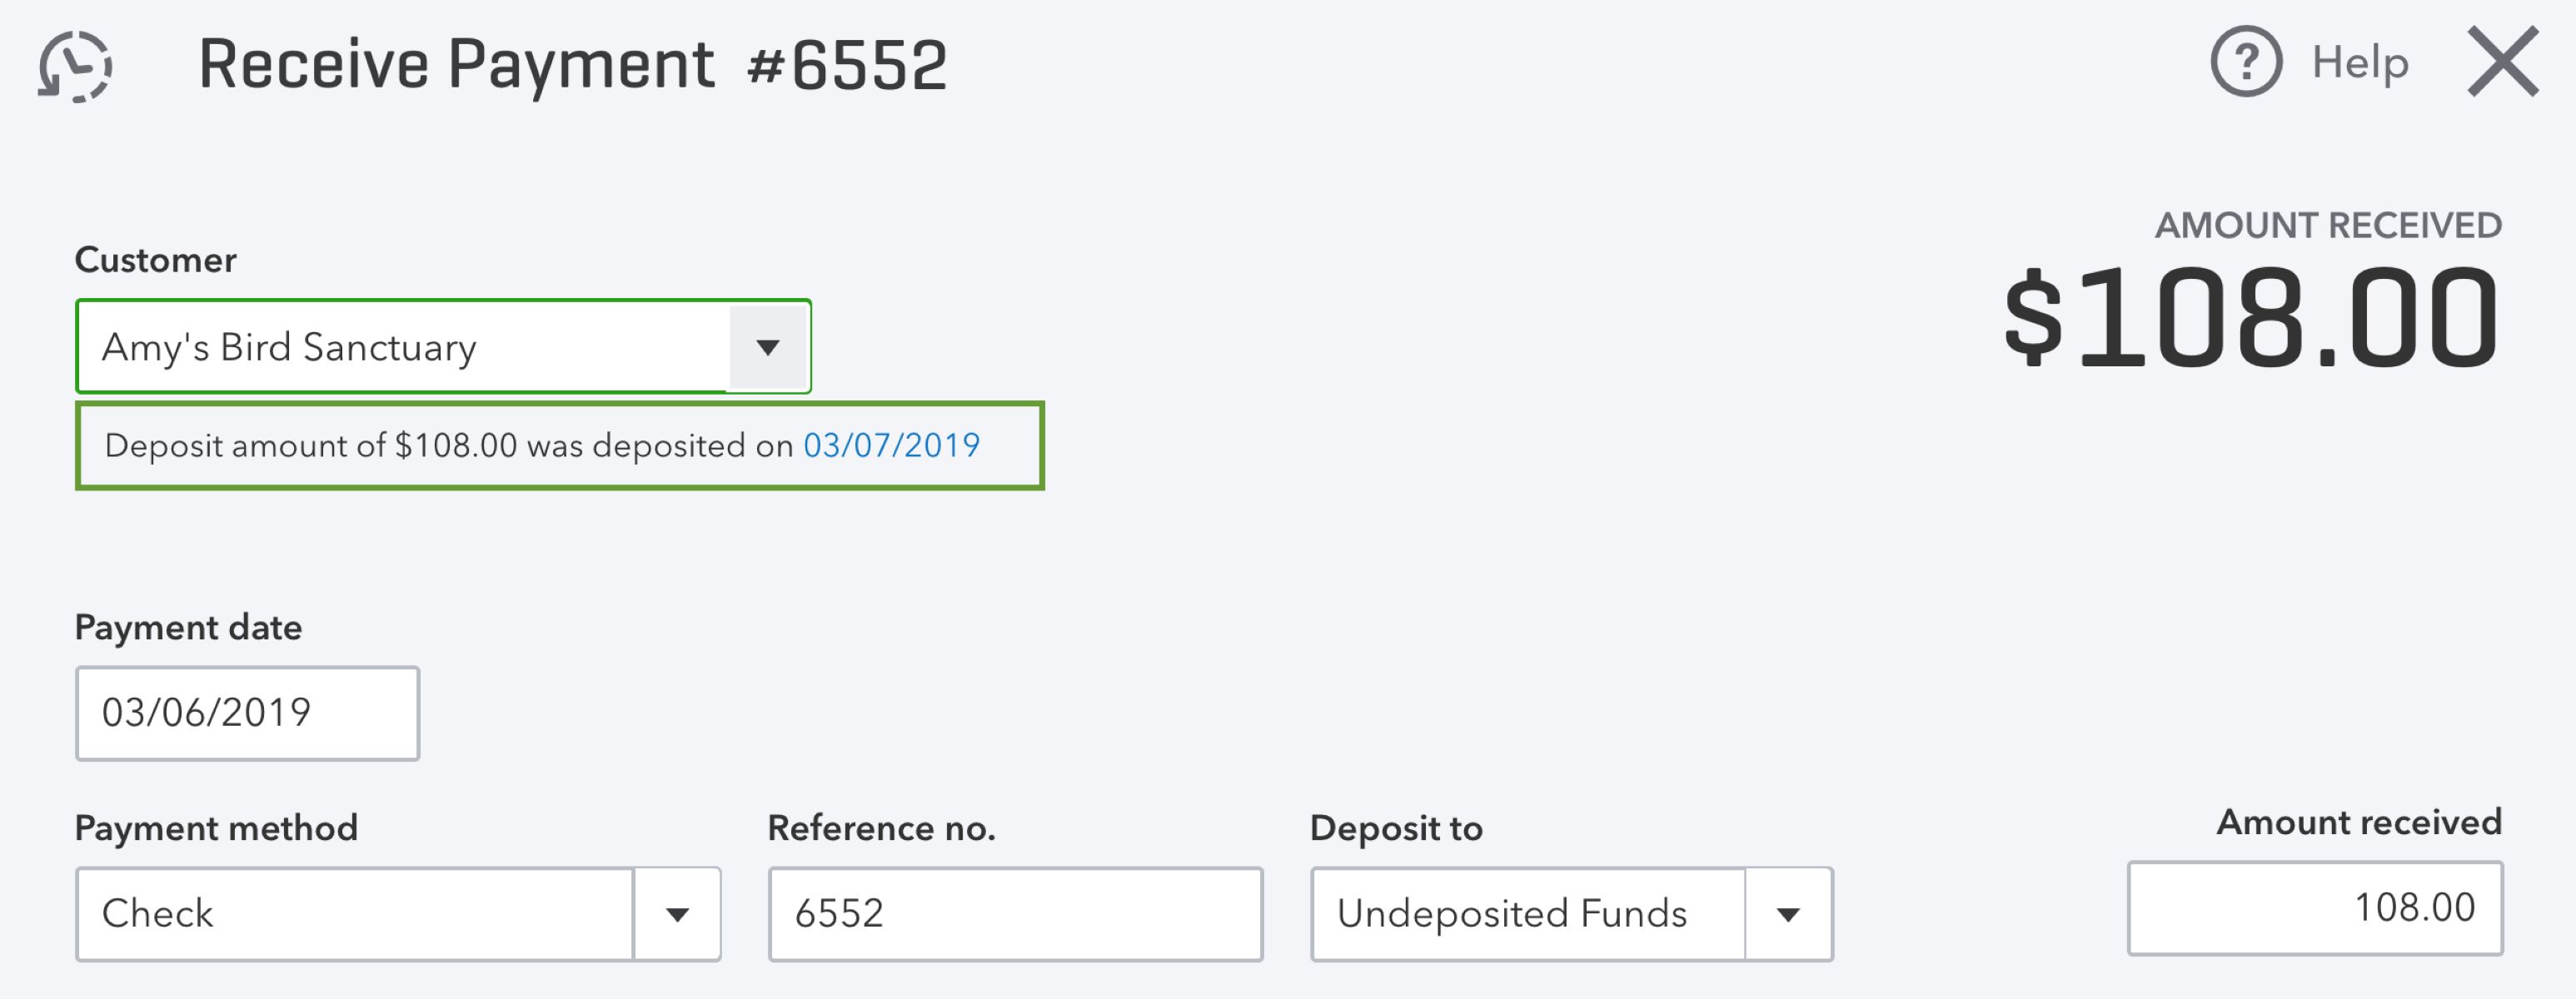
Step 7: Verify that Undeposited Funds have been cleared
After completing the bank deposit, go back to your undeposited funds account to confirm that the cleared payments are no longer there. You should see a zero balance or only the remaining uncleared payments.
Following these steps will enable you to effectively clear undeposited funds in QuickBooks Online, ensuring that your customer payments are properly recorded and deposited into your bank account. Regularly performing this task will keep your financial records accurate and up to date.
Step 1: Understand how Undeposited Funds work
Before you begin clearing undeposited funds in QuickBooks Online, it’s important to have a clear understanding of how this feature works. Undeposited funds serve as a temporary holding account for customer payments received but not yet deposited into your bank account. This feature allows you to group together multiple payments before recording a bank deposit.
When you receive a payment from a customer, QuickBooks Online automatically assigns it to the undeposited funds account instead of directly depositing it into your bank account. This offers you more control over your cash flow and simplifies your bookkeeping process.
Think of the undeposited funds account as a virtual cash register or a temporary safe where you can store customer payments until you’re ready to deposit them. This feature is especially beneficial if you receive multiple payments throughout the day or week and want to combine them into one bank deposit.
By utilizing undeposited funds, you can ensure that all your customer payments are properly recorded and matched with the corresponding bank deposits. This helps to maintain accuracy in your financial records and simplifies the reconciliation process.
When you’re ready to clear undeposited funds, you will create a new bank deposit in QuickBooks Online. This bank deposit transaction will represent the actual deposit you make in your physical bank account, and it will transfer the payments from the undeposited funds account to the appropriate bank account in your books.
Understanding how undeposited funds work in QuickBooks Online is essential to ensure that you correctly handle customer payments and maintain accurate financial records. With this knowledge as a foundation, you can confidently proceed to the next steps in clearing undeposited funds.
Step 2: Review and Organize Your Transactions
Once you have a clear understanding of undeposited funds in QuickBooks Online, the next step in clearing undeposited funds is to review and organize your transactions. This ensures that all the payments you want to clear are accounted for and properly classified before you proceed with creating a bank deposit.
Start by navigating to the undeposited funds account in QuickBooks Online. This account can typically be found in your Chart of Accounts or in the Banking section of your QuickBooks Online account.
Once you’re in the undeposited funds account, you will see a list of the payments that have been recorded but not yet deposited. Check each payment to verify its accuracy and validity. Make sure that all the payments are from customers and that they correspond to actual invoices or sales receipts.
Take this opportunity to also review any additional details associated with each payment, such as the payment method, customer name, or invoice number. This ensures that your records are complete and organized, making it easier to reconcile your accounts in the future.
If you notice any discrepancies or errors in the records, such as duplicate payments or incorrect amounts, take the necessary steps to resolve them. This may involve deleting or correcting transactions, contacting the customer for clarification, or reaching out to your accountant for guidance.
Organize your transactions by grouping them based on common criteria, such as payment dates or customer names. This can help streamline the process of selecting payments in the next step when creating the bank deposit.
By thoroughly reviewing and organizing your transactions in the undeposited funds account, you ensure that you have an accurate and complete record of the payments you intend to clear. This sets the stage for a smooth and accurate clearing process as you move on to the next steps.
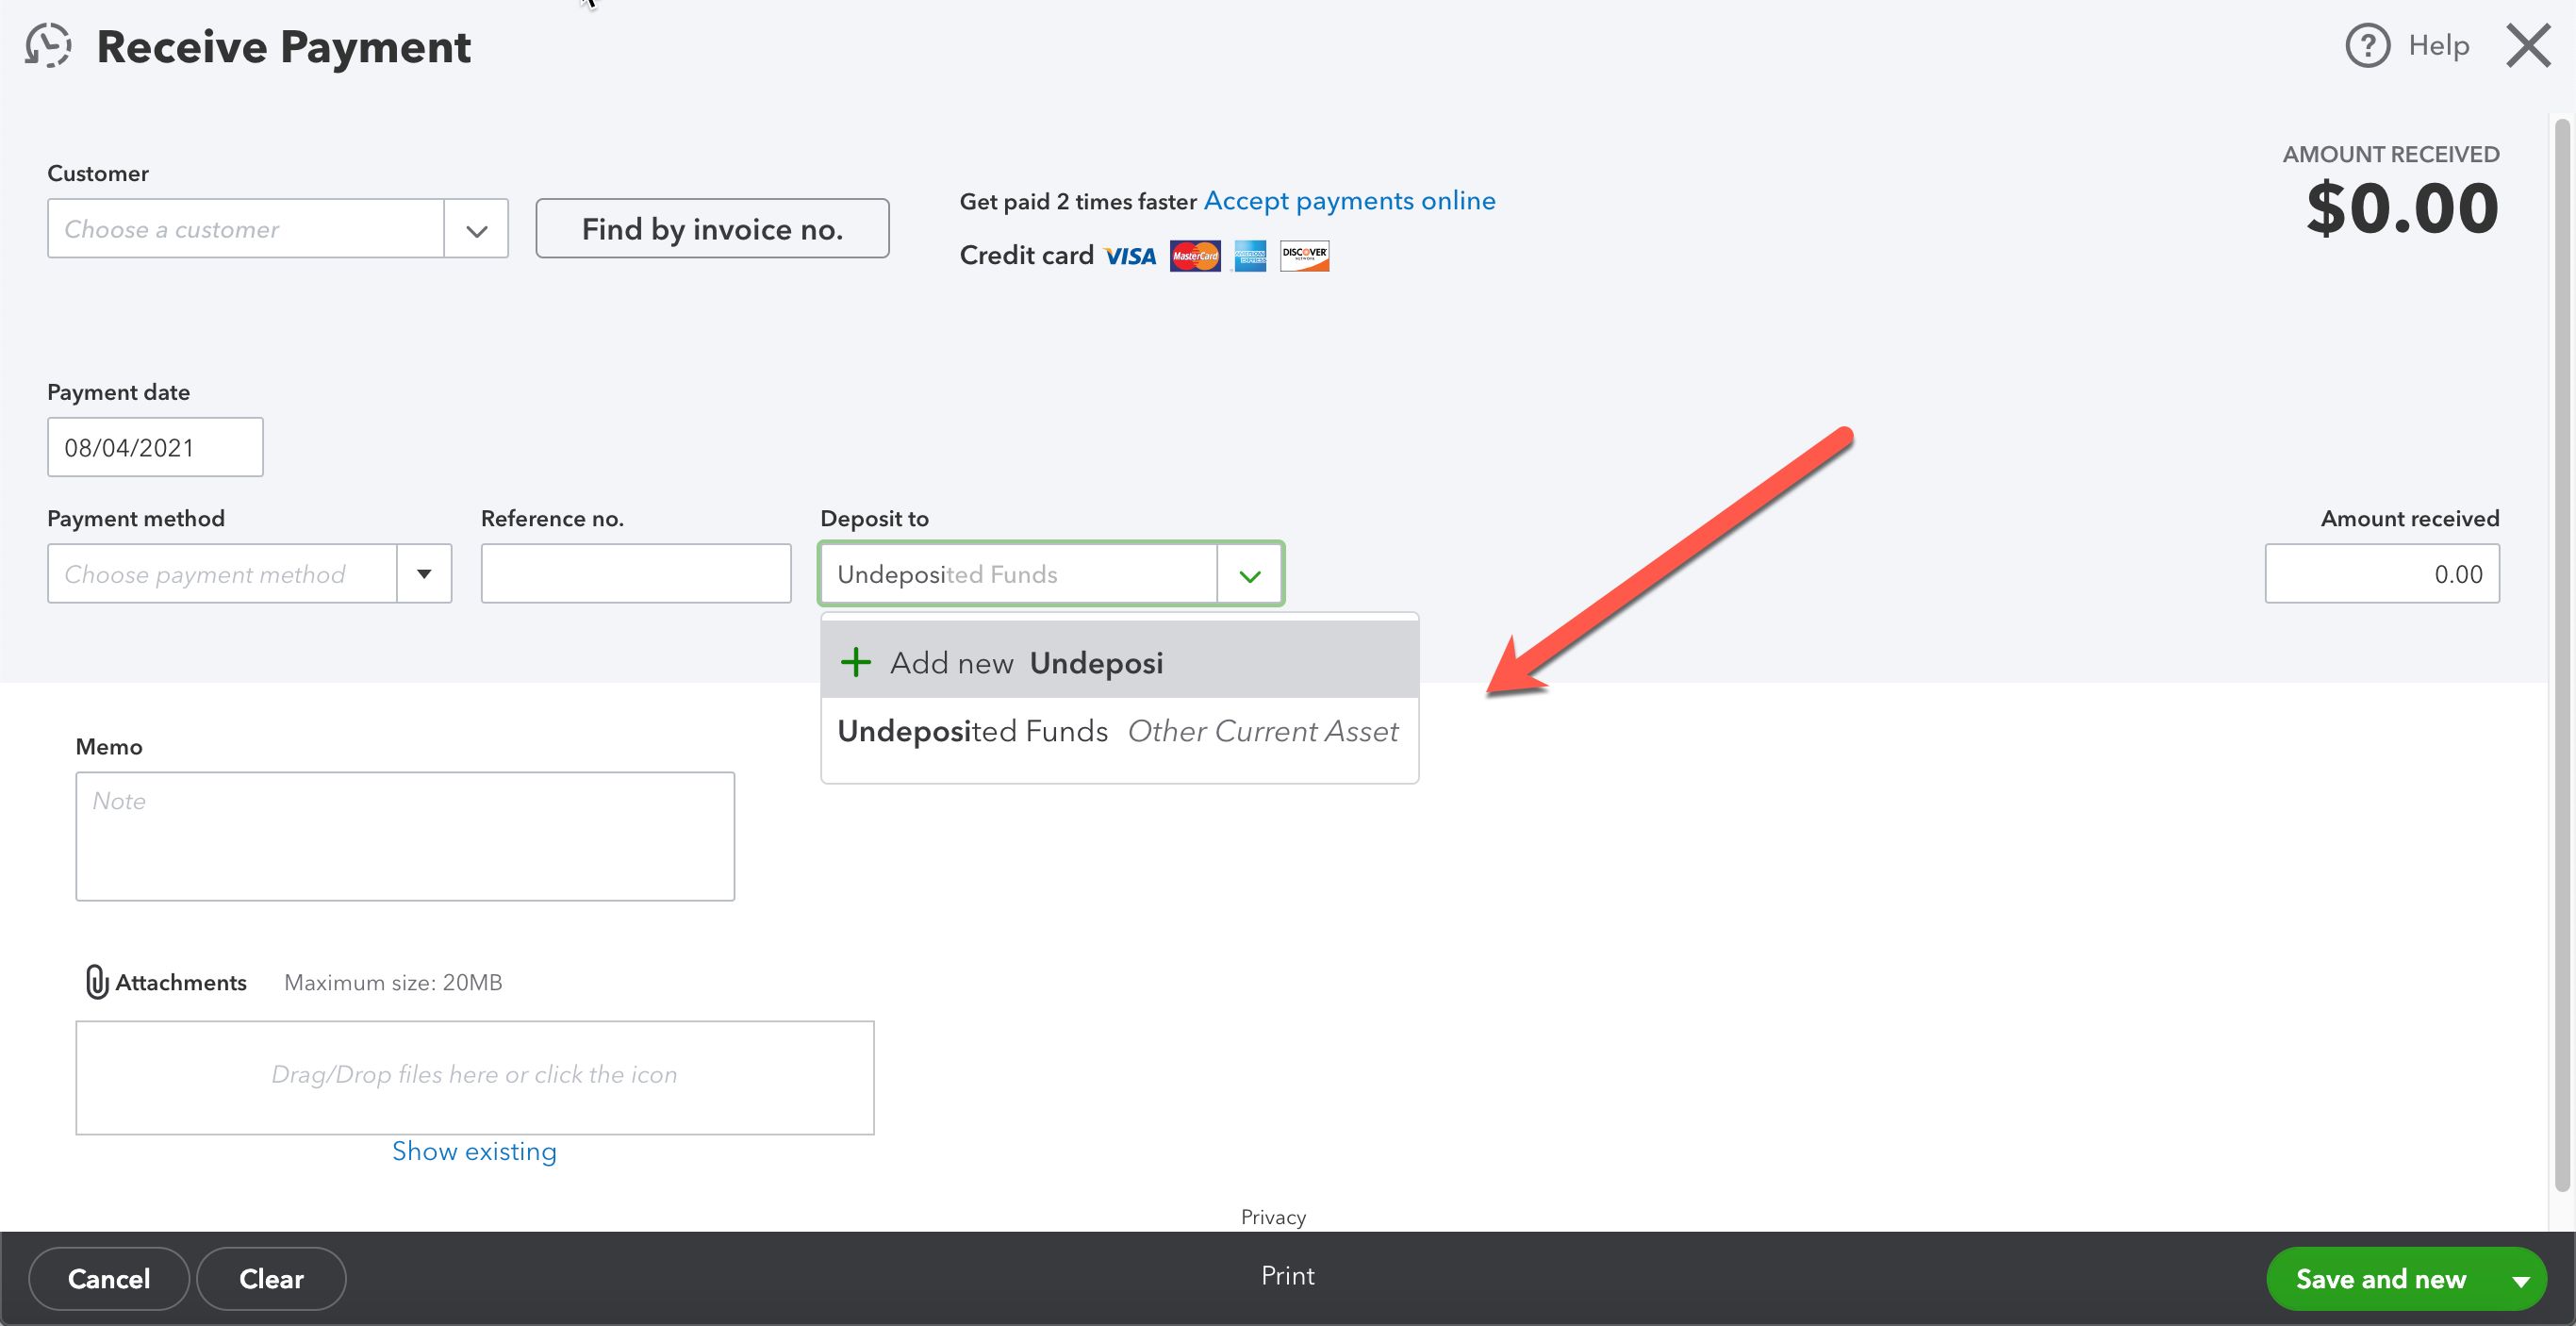
Step 3: Create a new Bank Deposit
Once you have reviewed and organized your transactions in the undeposited funds account, it’s time to create a new bank deposit in QuickBooks Online. This bank deposit serves as the vehicle to clear the undeposited funds and record the actual deposit into your bank account.
To create a new bank deposit, start by navigating to the “+ New” option in QuickBooks Online. From the drop-down menu, select “Bank Deposit.”
This will open the bank deposit form where you can enter the details of your deposit. On this form, you will see fields for the date, deposit to account, payment method, and reference number. Fill in these fields accurately to reflect the specific details of your deposit.
In the “Account” field, select the appropriate bank account where you will eventually deposit the funds. This should be the same account that corresponds to your actual bank statement.
Pro tip: When choosing the date for your bank deposit, select the date that matches the bank statement or the date that the actual deposit occurred. This ensures accurate reconciliation with your bank records.
If you have multiple bank accounts in QuickBooks Online, make sure to select the correct account that aligns with the undeposited funds you are clearing.
Remember, the bank deposit represents the collection of payments that you are moving from the undeposited funds account to your actual bank account, so it’s important to accurately input these details.
Take your time to review the form and double-check that all the information is accurate before moving on to the next step. Making any necessary adjustments at this stage will help avoid complications and errors during reconciliation.
Now that you have created a new bank deposit form, you’re ready to move on to the next step: selecting the payments to include in the deposit.
Step 4: Select the Payments to Include in the Bank Deposit
Now that you have created a new bank deposit form in QuickBooks Online, it’s time to select the payments that you want to include in the deposit. These payments will be moved from the undeposited funds account and recorded in the bank deposit.
In the bank deposit form, you will see a list of the payments currently stored in your undeposited funds account. Take your time to review each payment and select the ones that are ready to be deposited into your bank account.
To select a payment, check the box next to it in the bank deposit form. You can choose one or multiple payments to include in the deposit. If you have organized your transactions in Step 2, this process will be more efficient, as you can easily identify and select groups of payments based on your organization criteria.
If you come across any payments that should not be included in this particular deposit, leave them unchecked for now. These payments will remain in the undeposited funds account until you are ready to include them in a future deposit.
As you select payments, you will see the total amount accumulating at the bottom of the bank deposit form. This provides you with real-time feedback on the total funds that will be moved and recorded in the bank deposit.
If you find any discrepancies or errors in the listed payments, such as incorrect amounts or incorrectly recorded transactions, take a moment to correct them before proceeding. This will ensure that the bank deposit accurately reflects the payments you intend to deposit.
By carefully selecting the payments to include in the bank deposit, you are taking a critical step towards clearing the undeposited funds and ensuring that your funds are correctly recorded in your bank account. Once you have completed the selection process, you are ready to move on to the next step: reviewing and finalizing the bank deposit.
Step 5: Review and Finalize the Bank Deposit
After selecting the payments to include in the bank deposit, it’s crucial to review and finalize the deposit details before proceeding. This step ensures accuracy and reduces the chances of errors or discrepancies in your records.
Begin by carefully reviewing the selected payments in the bank deposit form. Double-check the payment amounts, customer names, and any associated details to verify their accuracy. This is particularly important if you have a large number of payments or if there are any complex transactions involved.
If you notice any errors or discrepancies, take the time to correct them. You can edit the individual payment details within the bank deposit form by clicking on the respective field. Make sure to save your changes after making any adjustments.
In addition to the payment details, review any additional fields in the bank deposit form, such as payment methods, reference numbers, or memo notes. Fill in any missing or relevant information that will contribute to a more comprehensive record of the deposit.
Keep in mind that the bank deposit represents the actual deposit made into your bank account, so it’s crucial to ensure that the information matches the transaction details reflected in your bank statement.
Once you are confident that all the information in the bank deposit form is accurate, you can proceed to finalize the deposit. Take a final moment to review the total deposit amount displayed at the bottom of the form, ensuring that it aligns with the total of the selected payments.
When you are satisfied with the deposit details, save the bank deposit to record it in QuickBooks Online. At this point, the selected payments will be moved from the undeposited funds account and associated with the newly recorded bank deposit transaction.
By carefully reviewing and finalizing the bank deposit, you are ensuring the accuracy and integrity of your financial records. With the deposit finalized, you can now move on to the next step: recording the bank deposit in QuickBooks Online.
Step 6: Record the Bank Deposit in QuickBooks Online
Now that you have reviewed and finalized the bank deposit details, it’s time to record the deposit in QuickBooks Online. This step ensures that the funds are accurately reflected in your bank account and that your financial records are up to date.
Start by navigating to the bank deposit transaction that you just finalized. Locate the “Save” button or a similar option within the form, and click on it to save the bank deposit.
Once the bank deposit is saved, QuickBooks Online will create a new transaction to represent the actual deposit into your bank account. This transaction should reflect the details you entered when creating the bank deposit, such as the date, deposit to account, and amount.
Review the transaction details carefully to ensure their accuracy. Pay close attention to the deposit amount and the account to which it is assigned. Make any necessary adjustments or additions to the transaction to ensure it aligns with your bank statement.
For example, if you need to provide additional information or notes about the deposit, like the source of the funds, you can add those details in the memo or notes section of the transaction.
Double-check that the deposit to account in the transaction matches the appropriate bank account where the funds were actually deposited. This will facilitate accurate reconciliation with your bank records.
If you use account categories or tags in your QuickBooks Online account, make sure to assign the appropriate categories or tags to the transaction to maintain consistency and ease of reporting.
Once you are satisfied with the transaction details, save the transaction to record the bank deposit successfully in QuickBooks Online. This completes the process of moving the selected payments from the undeposited funds account to your bank account within your financial records.
By recording the bank deposit in QuickBooks Online, you are ensuring that your bank balances are accurate, and your financial records reflect the true state of your business. Now that the bank deposit is recorded, you can proceed to the final step: verifying that the undeposited funds have been cleared.
Step 7: Verify that Undeposited Funds have been Cleared
After recording the bank deposit in QuickBooks Online, it’s important to take the final step of verifying that the undeposited funds have been cleared. This ensures that all the selected payments have been appropriately moved from the undeposited funds account to the bank account, and your records are accurate.
To verify the clearance of undeposited funds, navigate back to the undeposited funds account in QuickBooks Online. You will see a list of payments and their corresponding amounts.
If all the payments were successfully included in the bank deposit and cleared, you should observe a zero or near-zero balance in the undeposited funds account.
Review the list to confirm that the payments you selected for the bank deposit no longer appear in the undeposited funds account. This indicates that the payments have been effectively moved to the bank account and are no longer part of the undeposited funds balance.
In some cases, you may encounter a situation where some payments remain uncleared or unmatched. These payments might be the result of errors, duplicates, or intentionally left out of the bank deposit. In such cases, take the necessary time to reconcile and resolve the discrepancies to ensure accurate financial records.
As you verify the clearance of undeposited funds, it’s advisable to cross-reference the cleared payments with your bank statement or transaction history. This ensures that the records in QuickBooks Online align with the actual deposits made in your bank account.
By verifying that the undeposited funds have been cleared, you can have confidence that your financial records in QuickBooks Online accurately reflect the movement of funds from the undeposited funds account to the bank account.
Congratulations! You have successfully cleared undeposited funds in QuickBooks Online, maintaining accurate financial records and streamlining your bookkeeping process. Regularly performing this task will keep your records up to date and contribute to a clear and organized financial picture of your business.
Conclusion
Clearing undeposited funds in QuickBooks Online is a vital task to ensure the accuracy and integrity of your financial records. By understanding how undeposited funds work and following the step-by-step process outlined in this guide, you can confidently manage and clear undeposited funds in your QuickBooks Online account.
We began by explaining what undeposited funds are and why it’s essential to clear them regularly. Undeposited funds act as a temporary holding account for customer payments, providing a streamlined approach to manage cash flow and simplify your bookkeeping process.
The seven steps we covered in this guide walk you through the entire process, from understanding how undeposited funds work to verifying the clearance of undeposited funds:
- Understanding how undeposited funds work: Familiarize yourself with the concept of undeposited funds in QuickBooks Online.
- Reviewing and organizing your transactions: Take the time to review and organize the payments in the undeposited funds account for accurate record-keeping.
- Creating a new bank deposit: Generate a bank deposit form to proceed with clearing undeposited funds.
- Selecting the payments to include in the bank deposit: Carefully choose the payments that you want to clear from the undeposited funds account and include in the bank deposit.
- Reviewing and finalizing the bank deposit: Double-check the details of the bank deposit to ensure accuracy and make any necessary adjustments.
- Recording the bank deposit in QuickBooks Online: Create a new transaction to represent the actual deposit in your bank account.
- Verifying that undeposited funds have been cleared: Confirm that the selected payments are no longer in the undeposited funds account and cross-reference them with your bank statements.
Following these steps will help you maintain accurate financial records, facilitate bank reconciliation, and provide you with a clear overview of your cash flow. Regularly clearing undeposited funds in QuickBooks Online will contribute to efficient and streamlined bookkeeping, saving you time and effort in the long run.
Remember, it’s essential to regularly review, organize, and reconcile your financial records to ensure their accuracy and integrity. If you encounter any discrepancies or have specific questions, consult with a professional accountant or refer to the QuickBooks Online resources for further guidance.
With the knowledge and steps provided in this guide, you are now equipped to confidently clear undeposited funds in QuickBooks Online, giving you peace of mind and a solid foundation for effective financial management in your business.