Introduction
When it comes to browsing the internet, Google Chrome is one of the most popular web browsers available. With its sleek interface, fast performance, and extensive range of features, it has become the go-to choice for millions of users worldwide. However, as you navigate through different websites and interact with various online platforms, your browser accumulates temporary files, cookies, and other data. Over time, this can lead to a buildup of clutter and impact the performance of your browsing experience.
Clearing your browser cache is an essential maintenance task that can help optimize the performance of Google Chrome. By clearing the cache, you remove unnecessary files and data that your browser stores, including images, scripts, and other elements of web pages you have visited. This not only frees up valuable storage space but also ensures that you are accessing the most up-to-date versions of websites you frequent.
Moreover, clearing your cache can also resolve certain issues you may encounter while browsing, such as slow loading times, display errors, or outdated content. It’s like giving your browser a fresh start, enabling it to provide you with a smoother and more efficient online experience.
In this article, we will guide you through the step-by-step process of clearing your browser cache in Google Chrome. Whether you are a seasoned Chrome user or new to the browser, these instructions will help you refresh your cache and keep your browsing experience running smoothly.
Why Clearing Browser Cache is Important
Clearing your browser cache is a crucial task for multiple reasons, as it brings several benefits to your browsing experience. Here are some key reasons why clearing your browser cache in Google Chrome is important:
- Improved Performance: Over time, your browser cache stores a significant amount of temporary files and data from websites you visit. This accumulation can slow down your browsing speed and overall performance. By clearing the cache, you remove this excess data and allow Chrome to operate more efficiently, resulting in faster page loading times.
- Updated Content: Websites frequently update their content, including images, JavaScript files, and CSS stylesheets. When you revisit a website, your browser uses the cached files from your previous visit. Clearing the cache ensures that you are accessing the latest versions of the web pages, guaranteeing that you see all the updated content.
- Fixing Display Errors: Cached files can sometimes become corrupted or outdated, leading to display issues or broken web page elements. Clearing the cache can resolve these problems by forcing the browser to retrieve fresh files from the website, ensuring that everything renders correctly.
- Privacy and Security: Your browser cache can contain sensitive information such as login credentials, personal details, or saved form data. Clearing the cache helps protect your privacy by erasing this data. It also helps prevent unauthorized access, as any stored login information will be removed from the cache.
- Troubleshooting Website Problems: If you encounter issues with a specific website, such as error messages or broken functionalities, clearing the cache is an essential troubleshooting step. Often, these issues stem from outdated or corrupted cached files, and clearing the cache can resolve them, allowing you to access the website without problems.
Overall, regularly clearing your browser cache in Google Chrome is essential for maintaining optimal browser performance, accessing updated content, resolving display errors, protecting your privacy, and troubleshooting website problems. Now that you understand the importance of clearing your cache, let’s move on to the step-by-step process of how to clear your browser cache in Google Chrome.
How to Clear Browser Cache in Google Chrome
Clearing your browser cache in Google Chrome is a simple process and can be done in a few steps. Follow the instructions below to clear your cache:
- Step 1: Open Google Chrome Settings
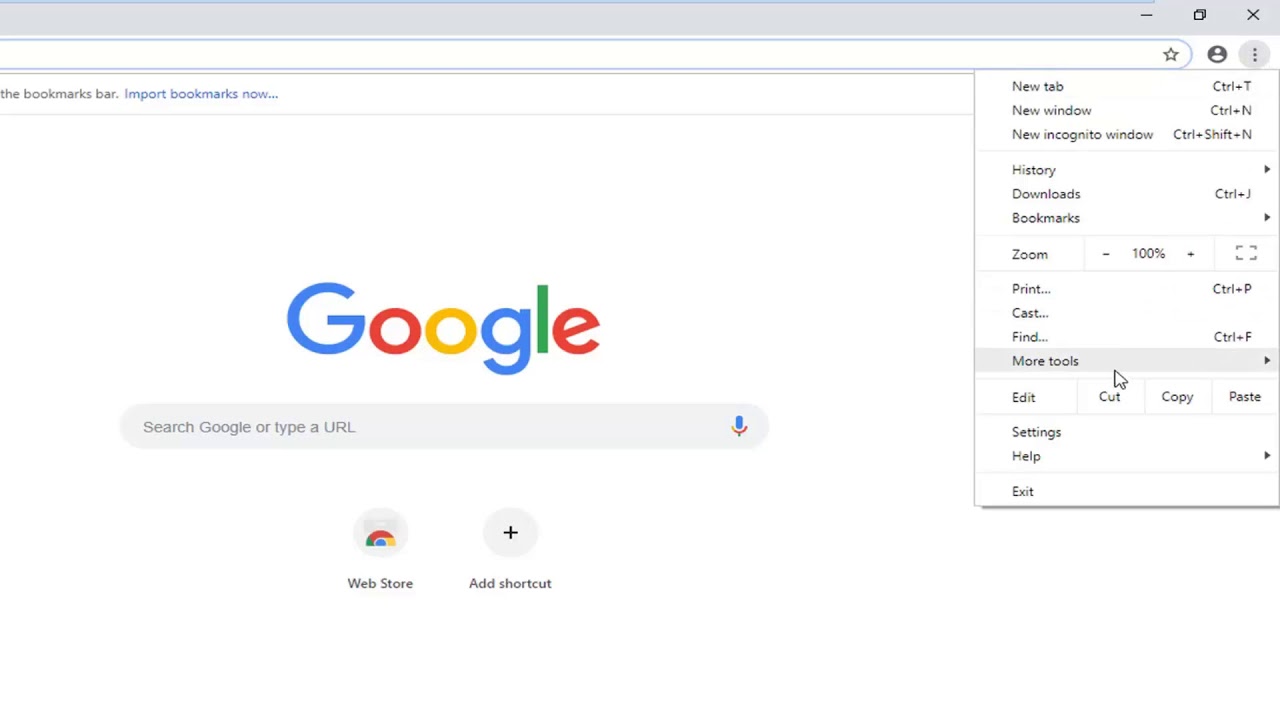
To begin, open Google Chrome on your computer or laptop. In the top-right corner of the browser window, click on the three-dot menu icon. In the dropdown menu, hover over the “Settings” option and click on it. - Step 2: Click on “More Tools”
In the left-hand sidebar of the Settings page, scroll down and click on the “Advanced” dropdown arrow. Then, under the “Privacy and security” section, click on the “Clear browsing data” option. - Step 3: Select “Clear browsing data…”
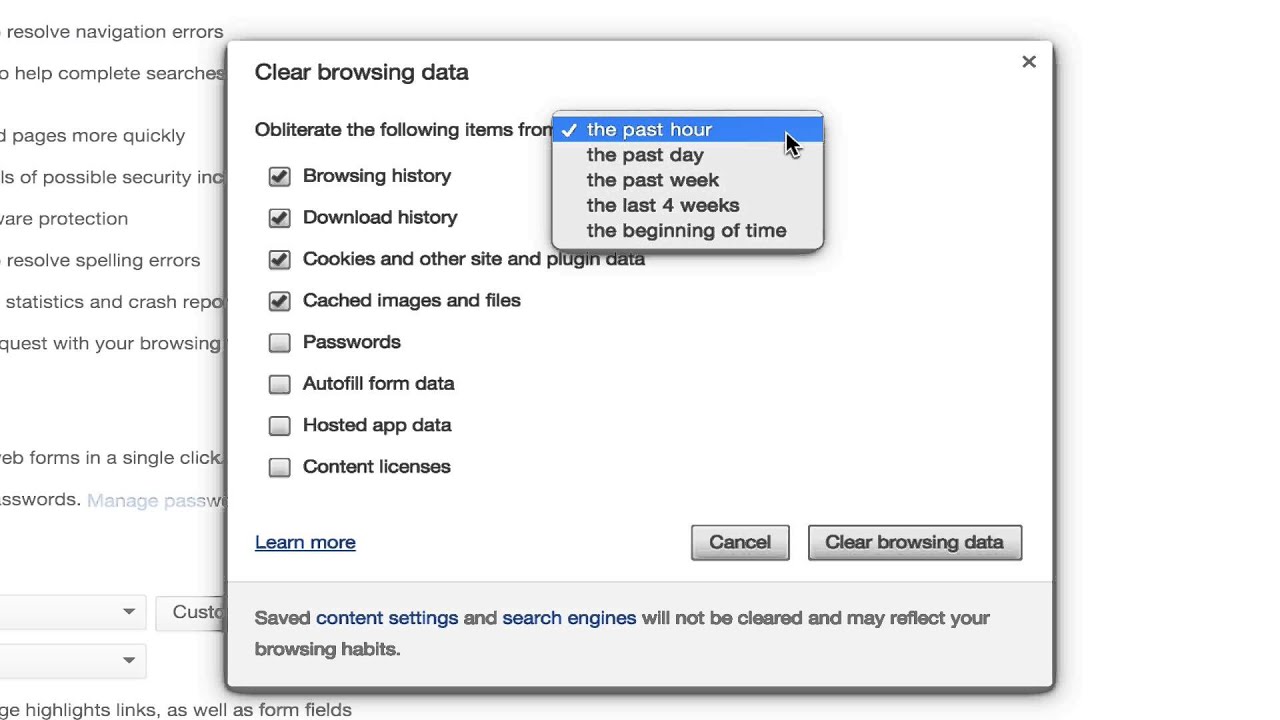
A popup window titled “Clear browsing data” will appear. Here, you can choose what data you want to clear. By default, the “Browsing history,” “Cookies and other site data,” and “Cached images and files” options are selected. If you want to clear additional data, you can check the appropriate boxes. - Step 4: Choose what data to clear
Review the selected options and ensure that you only clear the data you want. If you have any passwords or data that you want to keep, make sure the relevant boxes are unchecked. - Step 5: Click “Clear data”
Once you have reviewed and selected the desired options, click on the blue “Clear data” button at the bottom of the popup window. Chrome will begin clearing your browsing data. The process may take a few moments, depending on the amount of data being cleared.
That’s it! Your browser cache has been cleared, and you can now enjoy a fresher and more optimized browsing experience on Google Chrome.
Note: Clearing the cache will log you out of websites and remove any saved preferences, so be aware of this before proceeding. Additionally, clearing the cache does not clear your browsing history. If you want to delete your history as well, you can select the “Browsing history” option in the “Clear browsing data” window.
Step 1: Open Google Chrome Settings
Before you can clear your browser cache in Google Chrome, you need to access the browser’s settings. Follow these instructions to open the settings:
- Launch Google Chrome on your computer or laptop.
- In the top-right corner of the browser window, you will see three vertical dots arranged in a vertical line. Click on these dots to open the Chrome menu.
- A dropdown menu will appear. At the bottom of this menu, you will find the “Settings” option. Click on it to proceed.
Once you click on “Settings,” a new tab will open in your browser, displaying the Google Chrome settings menu. This menu provides access to various customization options and features of the browser.
Alternatively, you can also open the Chrome settings by typing ‘chrome://settings/’ in the address bar of your browser and pressing Enter. This will directly take you to the settings page.
Opening the Google Chrome settings is the first step towards clearing your browser cache. By accessing the settings, you will be able to navigate through the available options to clear your cache and enhance your browsing experience.
Now that you have successfully opened the settings, let’s move on to the next step, where we will guide you through accessing the necessary tools to clear your cache in Google Chrome.
Step 2: Click on “More Tools”
After opening the Google Chrome settings, the next step in clearing your browser cache is to navigate to the “More Tools” menu. Follow these instructions to proceed:
- Once you are on the Chrome settings page, look for the left-hand sidebar. Scroll down until you see the “Advanced” section.
- Click on the arrow next to “Advanced” to expand the section and reveal additional options.
- Under the “Privacy and security” heading, you will find the “Clear browsing data” option. Click on it to open the necessary tools for clearing your cache.
Upon clicking on “Clear browsing data,” a popup window titled “Clear browsing data” will appear. This window provides you with various options to customize the data that you want to clear from your browser.
Accessing the “More Tools” menu is a crucial step in clearing your browser cache. It is within this menu that you will find the necessary tools and options to remove unwanted data and optimize your browsing experience.
If you prefer using keyboard shortcuts, you can also access the “More Tools” menu by pressing “Ctrl+Shift+Delete” on Windows/Linux or “Command+Shift+Delete” on macOS. This shortcut will directly open the “Clear browsing data” popup.
Now that you have successfully reached the “More Tools” menu, let’s move on to the next step, where we will guide you through selecting the appropriate options to clear your cache in Google Chrome.
Step 3: Select “Clear browsing data…”
Once you have accessed the “More Tools” menu in Google Chrome, the next step in clearing your browser cache is to select the “Clear browsing data” option. Follow these instructions to proceed:
- After clicking on “More Tools,” a dropdown menu will appear. Look for and click on the “Clear browsing data…” option in the dropdown menu.
Upon selecting “Clear browsing data,” a popup window titled “Clear browsing data” will appear. This window allows you to customize the data that you want to clear from your browser cache.
Alternatively, you can also access the “Clear browsing data” popup by using the keyboard shortcut “Ctrl+Shift+Delete” on Windows/Linux or “Command+Shift+Delete” on macOS.
It’s important to note that the specific location of the “Clear browsing data” option may vary depending on the version of Google Chrome you are using. However, it is typically located within the “More Tools” menu, making it easily accessible.
Now that you have successfully selected the “Clear browsing data” option, let’s move on to the next step, where we will guide you through choosing the appropriate data to clear from your browser cache in Google Chrome.
Step 4: Choose what data to clear
After selecting the “Clear browsing data” option in Google Chrome, the next step in clearing your browser cache is to choose what data you want to clear. The “Clear browsing data” popup window provides you with options to customize the data removal process. Follow these instructions to proceed:
- Once the popup window titled “Clear browsing data” appears, you will see a list of options to choose from.
- By default, the options for “Browsing history,” “Cookies and other site data,” and “Cached images and files” are selected.
- If you want to clear additional data, such as cookies, passwords, or autofill form data, you can check the appropriate checkboxes.
- Review the selected options and ensure that you only clear the data you want. If there are any passwords or data that you want to keep, make sure the relevant checkboxes are unchecked.
The specific data you choose to clear depends on your preferences and needs. Keep in mind that clearing your browsing history will remove the record of websites you have visited, while clearing cookies will log you out of websites and remove any saved preferences.
If you want to delete your browsing history only, you can uncheck the options for cookies and cached images and files, and vice versa.
Remember, clearing your cache will log you out of websites and remove any saved preferences. It’s important to consider this before proceeding and ensure that you have any necessary login information and data backed up.
Once you have reviewed and selected the appropriate options, you are ready to proceed to the final step of clearing your browser cache in Google Chrome.
Step 5: Click “Clear data”
After selecting the desired options for clearing your browser cache in Google Chrome, the final step is to click the “Clear data” button. Follow these instructions to complete the process:
- Once you have reviewed and selected the appropriate options in the “Clear browsing data” popup window, locate the blue “Clear data” button at the bottom of the window.
- Click on the “Clear data” button to initiate the clearing process.
- Google Chrome will begin clearing the selected data according to your chosen options. The time it takes to complete this process depends on the amount of data being cleared and the speed of your computer.
- During the clearing process, you may notice a temporary slowdown in browser performance. This is normal and should resolve once the clearing process is complete.
- Once the clearing process is finished, you will see a confirmation message indicating that the data has been successfully cleared from your browser cache.
It’s important to note that clearing your browser cache will log you out of websites and remove any saved preferences. Double-check that you have any necessary login information and data backed up before proceeding.
And that’s it! You have successfully cleared your browser cache in Google Chrome. By doing so, you have freed up storage space and ensured that you are accessing the most up-to-date versions of websites, resulting in a faster and more optimized browsing experience.
Remember that clearing your cache should be done periodically to maintain optimal browser performance. Now you can enjoy a fresh start and continue your online activities with confidence.
Alternative Method: Using Keyboard Shortcuts
In addition to the conventional method of clearing your browser cache in Google Chrome, there is an alternative method that allows you to accomplish the task quickly using keyboard shortcuts. Follow these instructions to clear your cache using keyboard shortcuts:
- Open Google Chrome on your computer or laptop.
- Ensure that the tab you want to clear the cache for is active and in focus.
- Use the following keyboard shortcut based on your operating system:
- Windows/Linux: Press “Ctrl+Shift+Delete”.
- macOS: Press “Command+Shift+Delete”.
- Once you press the appropriate keyboard shortcut, a popup window titled “Clear browsing data” will appear.
- Choose the desired options for clearing your cache, similar to the steps outlined in the previous section.
- Review the selected options and ensure they align with your preferences.
- Click on the “Clear data” button to initiate the clearing process.
- Google Chrome will begin clearing the selected data according to your chosen options, just as it would in the conventional method.
- Once the clearing process is complete, you will receive a confirmation message indicating that the cache has been successfully cleared.
The keyboard shortcut method provides a quick and efficient way to clear your browser cache without having to navigate through menus and settings. It’s particularly useful for those who prefer using shortcuts or want to streamline their browsing tasks.
Remember that clearing your cache using keyboard shortcuts will log you out of websites and remove any saved preferences, similar to the conventional method. Make sure to have any necessary login information and data backed up before proceeding.
Now you can leverage the power of keyboard shortcuts to clear your browser cache in Google Chrome, saving time and optimizing your browsing experience.
Step 1: Open Chrome’s Developer Tools
If you prefer an alternative method to clear your browser cache in Google Chrome, you can utilize Chrome’s Developer Tools. This method allows you to access additional browser tools and features, including the option to clear the cache. Follow these instructions to open Chrome’s Developer Tools:
- Launch Google Chrome on your computer or laptop.
- Open the website or web page for which you want to clear the cache.
- Right-click anywhere on the web page to open the context menu.
- In the context menu, hover over the “Inspect” or “Inspect Element” option, and then click on it.
- Alternatively, you can also access the Developer Tools by using the keyboard shortcut “Ctrl+Shift+I” on Windows/Linux or “Command+Option+I” on macOS.
- Upon clicking or using the keyboard shortcut, Chrome’s Developer Tools will open in a separate panel or window within the browser.
Opening Chrome’s Developer Tools provides access to a range of powerful tools, such as the Elements panel for inspecting and modifying web page elements, the Console for viewing JavaScript messages and errors, and the Network panel for monitoring network activity.
However, for the purpose of clearing the cache, we will focus on utilizing the DevTools to access the necessary option.
Now that you have successfully opened Chrome’s Developer Tools, let’s move on to the next step, where we will guide you through clearing the cache using this method.
Step 2: Right-click the refresh button
After opening Chrome’s Developer Tools, the next step in clearing your browser cache using this method is to right-click the refresh button. Follow these instructions to proceed:
- With the Developer Tools panel open, locate the refresh button in the top-left corner of the browser window. This button is typically represented by a circular arrow.
- Right-click on the refresh button to open a context menu.
Upon right-clicking the refresh button, a context menu will appear, providing you with several options related to reloading and clearing cache.
By right-clicking the refresh button, you are indicating that you want to perform a specialized action related to the refresh functionality, specifically clearing the cache.
Now that you have successfully right-clicked the refresh button, let’s move on to the next step, where we will guide you through selecting the appropriate option to clear the cache using Chrome’s Developer Tools.
Step 3: Select “Empty Cache and Hard Reload”
After right-clicking the refresh button in Chrome’s Developer Tools, the next step in clearing your browser cache using this method is to select the “Empty Cache and Hard Reload” option from the context menu. Follow these instructions to proceed:
- After right-clicking the refresh button, a context menu will appear.
- In the context menu, look for and hover over the option labeled “Empty Cache and Hard Reload.”
- Click on the “Empty Cache and Hard Reload” option to initiate the cache clearing process.
Upon selecting “Empty Cache and Hard Reload,” Chrome will clear your browser cache and reload the web page you are currently on with a fresh copy of all resources, including images, scripts, and stylesheets.
This specialized reload option ensures that the cached versions of files are removed from your browser and all resources are retrieved from the server, providing you with the most up-to-date content.
It’s important to note that this method only clears the cache and reloads the current web page. If you want to clear the cache for multiple web pages or for your entire browsing session, you will need to repeat this process for each page.
Now that you have successfully selected the “Empty Cache and Hard Reload” option, Chrome will clear the cache and refresh the page, ensuring that you are accessing the latest version of the website.
Remember, using Chrome’s Developer Tools provides you with additional flexibility and control over your browsing experience, including the ability to clear the cache on a per-page basis.
Now you can enjoy a cache-free browsing experience using Chrome’s Developer Tools.
Conclusion
Clearing your browser cache in Google Chrome is essential for maintaining optimal performance, accessing updated content, and resolving display errors. Whether you choose to use the conventional method through the browser settings or the alternative method using Chrome’s Developer Tools, the goal remains the same: to remove excess data and provide a fresh start for your browsing experience.
By following the step-by-step instructions outlined in this article, you can easily clear your browser cache in Google Chrome. Opening the settings, accessing the tools, selecting the desired options, and ultimately clicking the “Clear data” button or using keyboard shortcuts are the key steps in the process.
Regularly clearing your cache is recommended to ensure efficient browsing and stay up to date with the latest website content. However, keep in mind that clearing your cache will log you out of websites and remove any saved preferences, so it’s important to have any necessary login information and data backed up before proceeding.
Whether you choose to use the conventional method or the alternative method with Chrome’s Developer Tools, the result will be a cleaner and smoother browsing experience. Enjoy faster loading times, updated content, and a more secure online journey as you clear your browser cache in Google Chrome.
Remember, clearing your cache is just one aspect of maintaining a healthy browser. Regularly updating your browser, using efficient plugins and extensions, and practicing safe browsing habits are also important for a seamless and protected online experience.
Now that you have the knowledge and tools to clear your browser cache in Google Chrome, take a moment to give your browser a refresh and enjoy a faster and more optimized browsing experience.