Introduction
Google Chrome is a versatile and popular web browser known for its speed, simplicity, and user-friendly interface. Whether you're a casual internet user or a seasoned professional, understanding how to clear the cache in Google Chrome on your Mac can significantly enhance your browsing experience.
The cache, a temporary storage location for files such as images and web pages, is designed to speed up the loading of websites you frequently visit. However, over time, this cache can become cluttered with outdated or unnecessary data, potentially leading to performance issues and privacy concerns. Clearing the cache can help resolve these issues, resulting in a smoother and more secure browsing experience.
In this guide, we'll walk you through the step-by-step process of clearing the cache in Google Chrome on your Mac. By following these simple instructions, you can ensure that your browser remains optimized and efficient, allowing you to make the most of your online activities without any unnecessary hindrances. Let's dive in and explore the seamless process of clearing the cache in Google Chrome to keep your browsing experience fresh and hassle-free.
Step 1: Open Google Chrome
To begin the process of clearing the cache in Google Chrome on your Mac, you first need to launch the browser. Here's how you can do it:
-
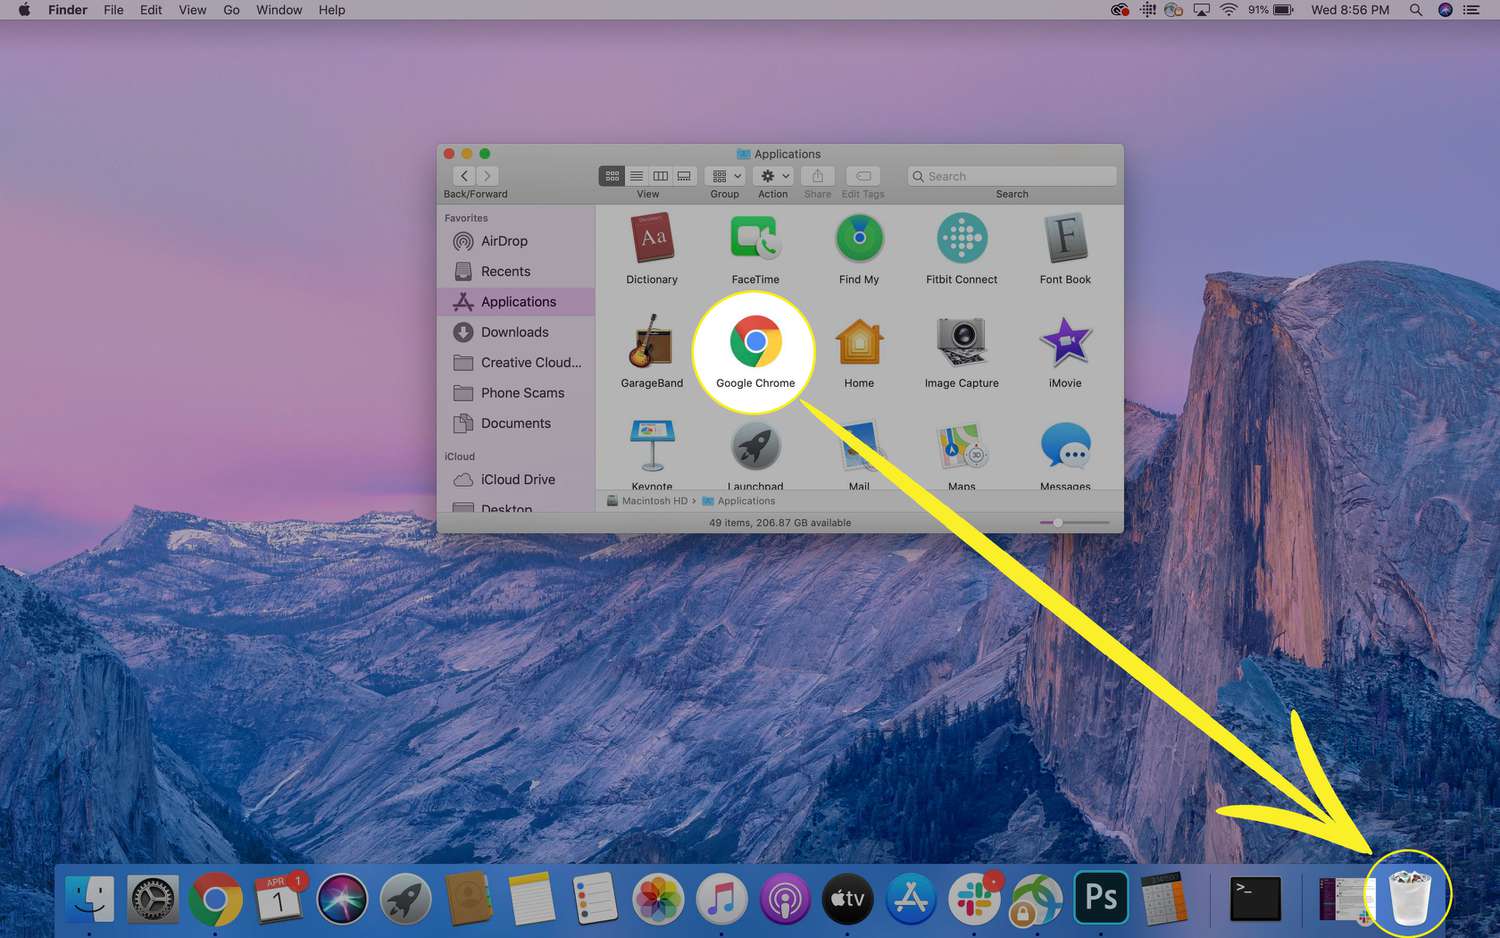
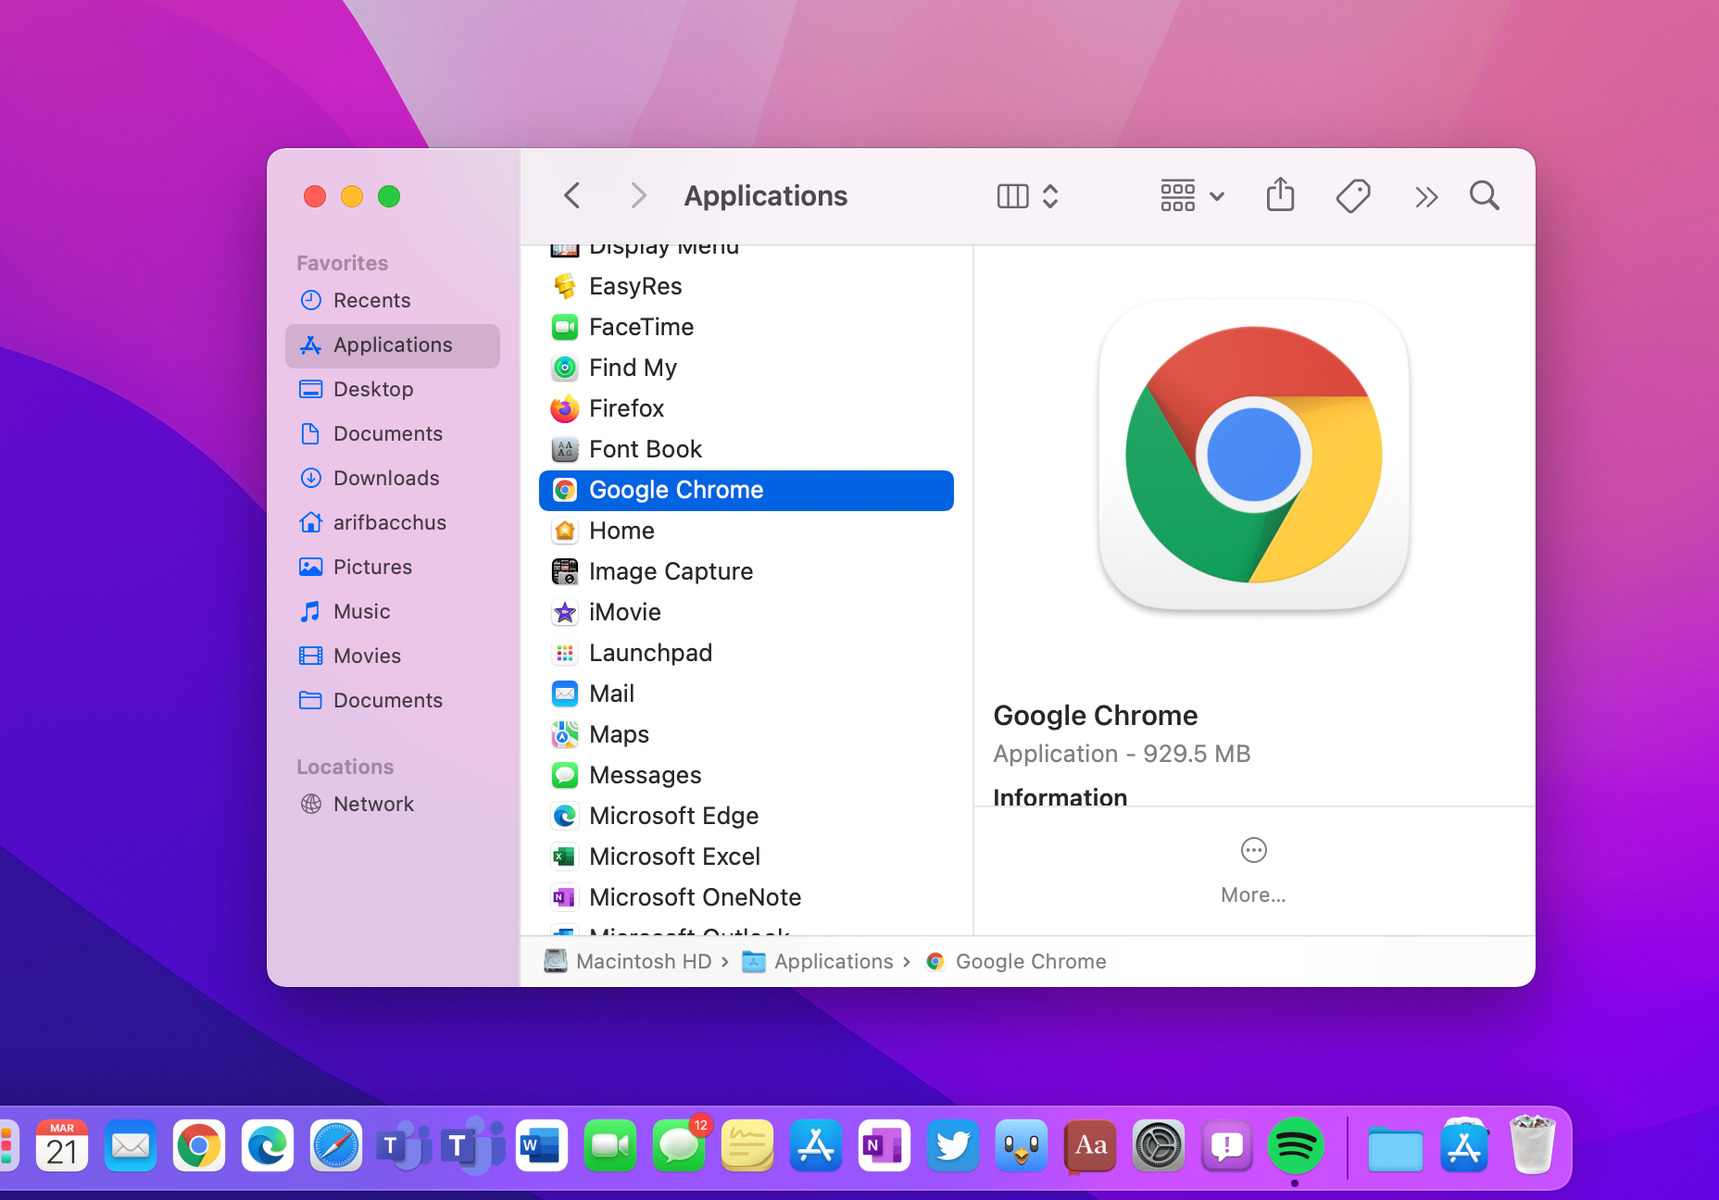
Locate the Google Chrome Icon: Look for the Google Chrome icon on your Mac's desktop, dock, or applications folder. The icon typically features a red, green, yellow, and blue sphere.
-
Click to Open: Once you've located the Google Chrome icon, simply click on it to launch the browser. Alternatively, you can use Spotlight Search by pressing Command + Spacebar, typing "Chrome," and hitting Enter to open the browser.
-
Wait for Chrome to Load: After clicking the icon, Google Chrome will begin to load. Depending on your Mac's speed and the number of extensions or tabs you have open, this process may take a few seconds.
-
Verify the Browser Window: Once Google Chrome has loaded, you should see the browser window appear on your screen. This window typically contains the address bar, tabs, and various navigation and customization options.
By following these simple steps, you can easily open Google Chrome on your Mac and prepare to proceed with the next steps to clear the cache. With the browser now open, you're ready to move on to the next phase of the cache-clearing process, ensuring that your browsing experience remains optimized and efficient.
Step 2: Access the Clear Browsing Data menu
Once you have Google Chrome open on your Mac, the next step is to access the "Clear Browsing Data" menu. This menu allows you to select the specific types of data you want to clear, including the cache. Here's how you can access this menu:
-
Navigate to the Menu Icon: Look for the three vertical dots or "More" icon located in the top-right corner of the browser window. This icon represents the Chrome menu and is the gateway to various browser settings and options.
-
Click on the Menu Icon: Once you've located the menu icon, click on it to reveal a dropdown menu containing a range of options and settings.
-
Select "More Tools": Within the dropdown menu, hover your cursor over the "More Tools" option. This action will reveal a secondary menu with additional tools and features.
-
Choose "Clear Browsing Data": From the "More Tools" menu, select the "Clear Browsing Data" option. This selection will open a new tab or window dedicated to clearing browsing data.
-
Access the Clear Browsing Data Menu: Upon selecting "Clear Browsing Data," a new tab or window will appear, presenting you with various data-clearing options.
-
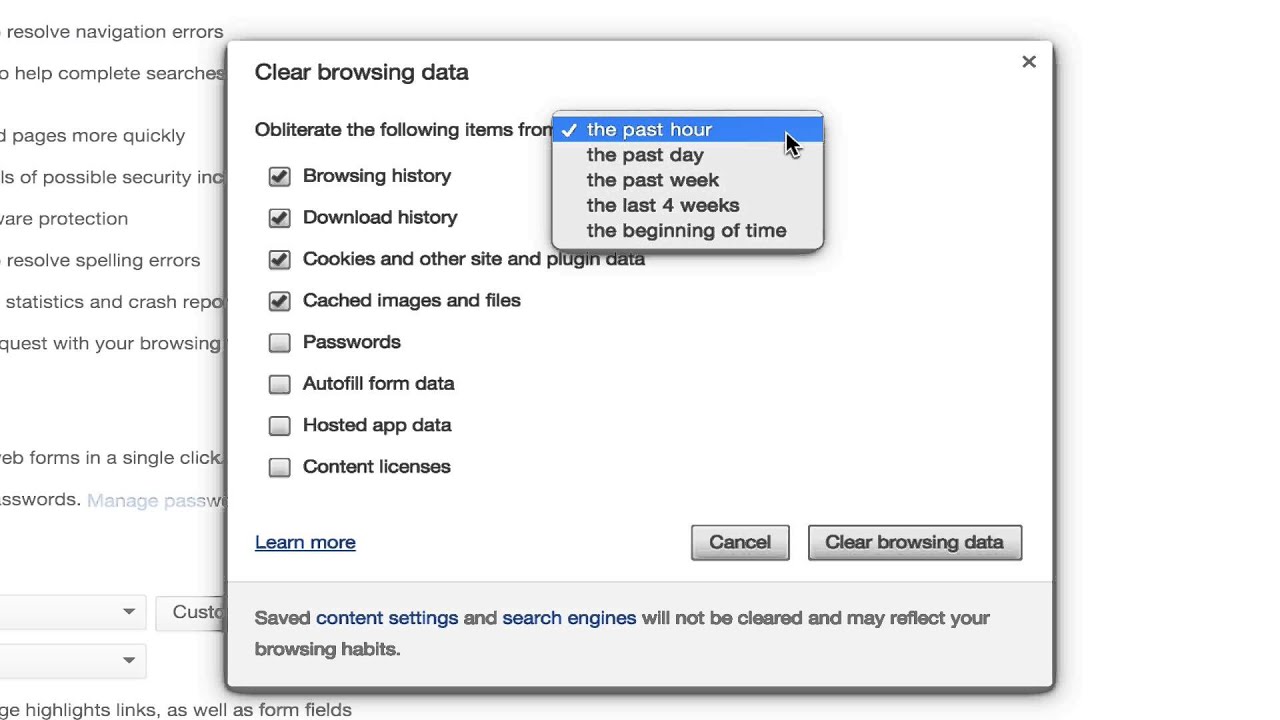
Customize Data Clearing Preferences: Within the "Clear Browsing Data" menu, you can customize your data-clearing preferences. This includes choosing the time range for which you want to clear data and selecting the types of data to be cleared. Ensure that the "Cached images and files" option is checked to clear the cache.
By following these steps, you can easily access the "Clear Browsing Data" menu in Google Chrome on your Mac. This menu provides you with the flexibility to choose the specific data you wish to clear, including the cache. With the menu now accessible, you're ready to proceed to the next step of selecting the data to clear, ensuring that your browsing experience remains optimized and free from unnecessary clutter.
Step 3: Choose the data to clear
Once you have accessed the "Clear Browsing Data" menu in Google Chrome on your Mac, the next crucial step is to choose the specific data you want to clear. This step allows you to customize your data-clearing preferences, ensuring that you can remove the clutter that may be impacting your browsing experience. Here's a detailed walkthrough of how to choose the data to clear:
-
Select the Time Range: Within the "Clear Browsing Data" menu, you will find the option to choose the time range for which you want to clear data. You can select from options such as "Last hour," "Last 24 hours," "Last 7 days," "Last 4 weeks," and "All time." This flexibility enables you to target data from a specific period, catering to your individual browsing habits and needs.
-
Choose the Types of Data: In addition to selecting the time range, you can choose the types of data you wish to clear. These options may include browsing history, download history, cookies and other site data, cached images and files, passwords, and more. To clear the cache, ensure that the "Cached images and files" option is checked. This step allows you to focus on clearing the cache specifically, addressing potential performance and privacy concerns associated with accumulated cached data.
-
Customize Data Clearing Preferences: Google Chrome provides further customization options, allowing you to tailor your data-clearing preferences according to your specific requirements. You can use the checkboxes next to each data type to include or exclude them from the clearing process. This level of control empowers you to maintain essential data while eliminating unnecessary clutter, contributing to a more streamlined and efficient browsing experience.
By carefully choosing the data to clear, you can effectively manage the storage and privacy aspects of your browsing data. This step ensures that you can maintain control over your digital footprint while optimizing the performance of your browser. With the data-clearing preferences customized to your liking, you are now ready to proceed to the final step of clearing the cache, ultimately enhancing your browsing experience on Google Chrome.
Step 4: Clear the cache
With the data-clearing preferences customized to your liking, you are now ready to proceed with clearing the cache in Google Chrome on your Mac. This final step is crucial in ensuring that your browsing experience remains optimized and free from the accumulated clutter that may impact performance and privacy. Here's a detailed guide on how to clear the cache:
-
Select the Cached Images and Files Option: Within the "Clear Browsing Data" menu, ensure that the "Cached images and files" option is checked. This specific selection targets the cache, allowing you to remove the temporary storage of images and web files that may be outdated or unnecessary. By focusing on clearing the cache, you can address potential performance issues and ensure that your browser operates efficiently.
-
Verify Additional Data Clearing Preferences: Before proceeding, take a moment to review your additional data clearing preferences within the menu. Ensure that the selected options align with your intentions, and make any necessary adjustments to cater to your specific needs. This verification step allows you to maintain control over the data clearing process, ensuring that only the desired data is removed.
-
Initiate the Clearing Process: Once you have confirmed the selection of the "Cached images and files" option and reviewed your preferences, you can proceed to initiate the clearing process. Depending on your preferences, you may choose to clear data from a specific time range or opt to clear all cached images and files from the browser's entire history. This flexibility allows you to tailor the clearing process to suit your individual requirements.
-
Wait for the Process to Complete: After initiating the clearing process, Google Chrome will begin removing the selected data, including the cache. The time taken for this process to complete may vary based on the amount of data being cleared and the performance of your Mac. It's essential to allow the browser sufficient time to complete the clearing process to ensure that it is executed thoroughly and effectively.
-
Confirmation and Verification: Once the cache clearing process is complete, you may receive a confirmation message or notice within the browser. This notification serves as a verification that the selected data, including the cache, has been successfully cleared. At this stage, you can proceed with confidence, knowing that your browser's cache is now free from unnecessary clutter, contributing to a more optimized and efficient browsing experience.
By following these steps, you can effectively clear the cache in Google Chrome on your Mac, ensuring that your browser remains optimized and free from the accumulated clutter that may impact performance and privacy. With the cache now cleared, you can enjoy a refreshed browsing experience, knowing that your browser is operating at its best.
Conclusion
In conclusion, mastering the art of clearing the cache in Google Chrome on your Mac is a valuable skill that can significantly enhance your browsing experience. By following the step-by-step process outlined in this guide, you have gained the knowledge and confidence to efficiently manage the cache, ensuring that your browser remains optimized and free from unnecessary clutter.
Clearing the cache not only contributes to the performance and efficiency of Google Chrome but also addresses potential privacy concerns associated with the accumulation of outdated browsing data. By customizing your data-clearing preferences and focusing on clearing the cache, you have taken proactive steps to maintain control over your digital footprint while enjoying a seamless browsing experience.
Furthermore, the flexibility offered by Google Chrome in choosing the time range and types of data to clear empowers you to tailor the clearing process to suit your individual needs. Whether you prefer to clear data from a specific period or opt for a comprehensive clearing of cached images and files, the browser accommodates your preferences, allowing you to maintain essential data while eliminating unnecessary clutter.
As you navigate the digital landscape, the ability to efficiently clear the cache in Google Chrome on your Mac ensures that your browser operates at its best, delivering a smooth and responsive browsing experience. Whether you are conducting research, streaming media, or engaging in online activities, the optimized performance resulting from a cleared cache enables you to make the most of your time online.
In essence, by incorporating the practice of clearing the cache into your browsing routine, you are actively contributing to the longevity and efficiency of your digital interactions. This proactive approach to browser maintenance aligns with the principles of digital well-being, ensuring that your online experiences are characterized by speed, security, and reliability.
By embracing the knowledge and skills acquired in this guide, you are well-equipped to navigate the dynamic digital landscape with confidence, knowing that your browsing experience on Google Chrome is optimized and free from unnecessary clutter. As you continue to explore the vast expanse of the internet, the ability to clear the cache effortlessly on your Mac serves as a testament to your commitment to a streamlined and efficient browsing experience.