Introduction
Clearing the browser cache on your Mac is a simple yet effective way to optimize your browsing experience. Over time, web browsers accumulate temporary files, cookies, and other data that can slow down performance and take up valuable storage space on your device. By regularly clearing the cache, you can ensure that your browser runs smoothly, loads pages faster, and maintains privacy by removing potentially sensitive information.
In this comprehensive guide, we will walk you through the step-by-step process of clearing the cache in popular web browsers such as Safari, Google Chrome, Mozilla Firefox, and Opera. Whether you're experiencing sluggish browsing speeds, encountering website display issues, or simply aiming to declutter your browser, understanding how to clear the cache on your Mac can significantly improve your online experience.
By following the instructions provided for each browser, you'll be equipped with the knowledge to efficiently clear the cache and enjoy a cleaner, more responsive browsing environment. Let's dive into the specifics of clearing the cache in Safari, Google Chrome, Mozilla Firefox, and Opera to optimize your browsing experience on your Mac.
Step 1: Clearing Cache in Safari
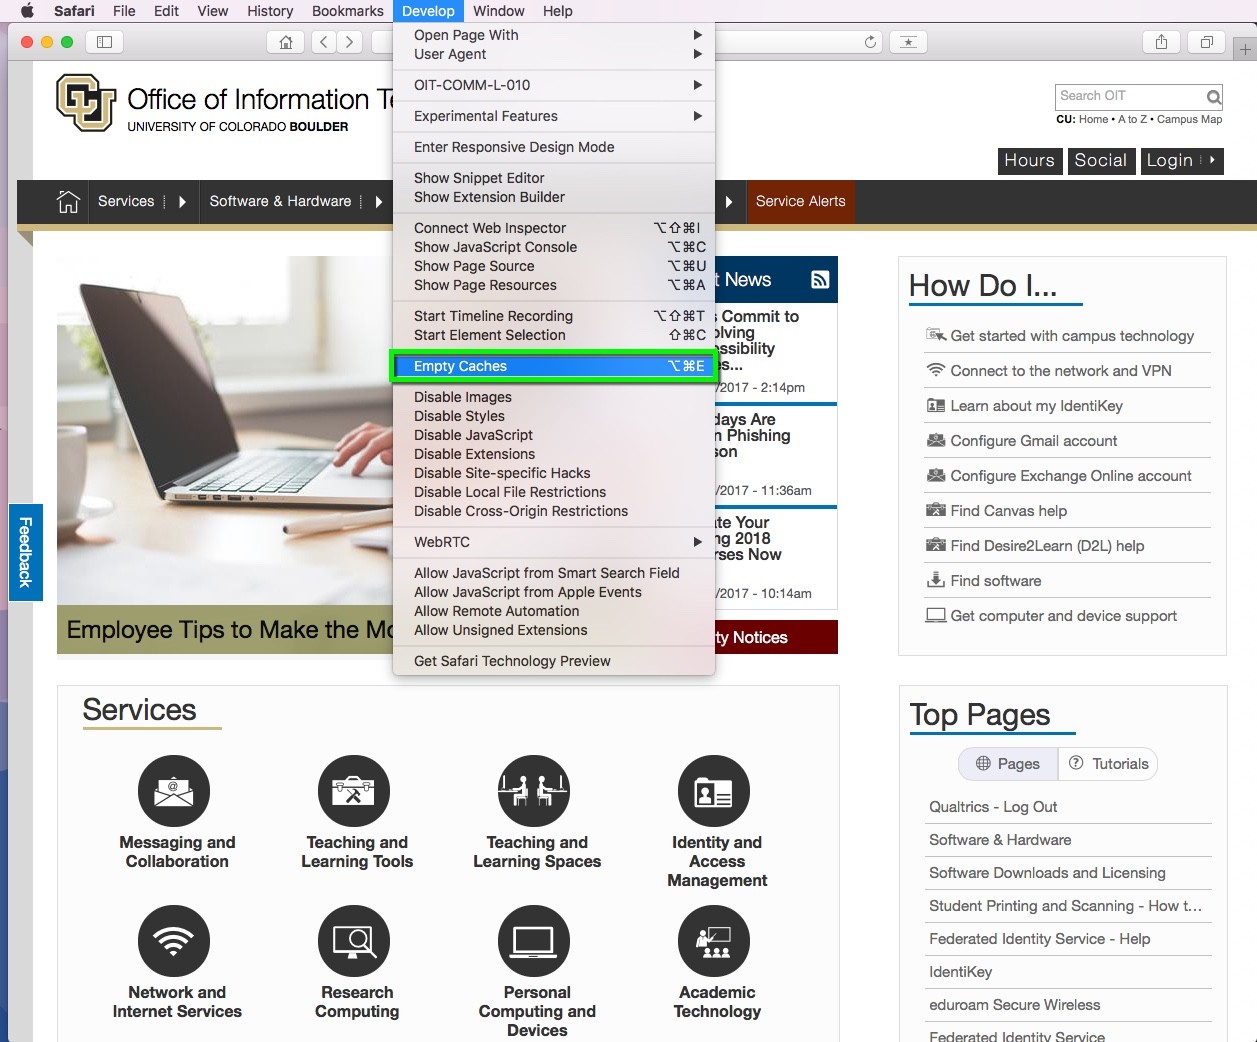
Clearing the cache in Safari is a straightforward process that can help resolve various browsing issues and improve the browser's performance. Here's a detailed guide on how to clear the cache in Safari on your Mac:
-
Open Safari Preferences: Launch the Safari browser on your Mac and click on "Safari" in the top menu bar. From the drop-down menu, select "Preferences."
-
Access the Privacy Tab: In the Preferences window, navigate to the "Privacy" tab, which is represented by a shield icon. Click on this tab to access privacy settings and browsing data options.
-
Manage Website Data: Within the Privacy tab, locate and click on the "Manage Website Data" button. This will open a new window displaying a list of websites that have stored data on your browser.
-
Remove Cached Data: To clear the cache, click on the "Remove All" button at the bottom of the window. Alternatively, if you prefer to selectively remove specific website data, you can scroll through the list and choose individual sites for removal by selecting "Remove" or "Remove All" for each entry.
-
Confirm Clearing Data: After selecting "Remove All" or removing specific website data, a confirmation prompt will appear. Click "Remove Now" to confirm the action. This will initiate the process of clearing the cache in Safari.
-
Completion: Once the cache has been cleared, you can close the Preferences window. The cache in Safari has now been successfully cleared, and you can enjoy a refreshed browsing experience.
By following these simple steps, you can effectively clear the cache in Safari on your Mac, ensuring that your browsing data is up to date and your browser operates at its optimal performance level. Regularly clearing the cache in Safari can help prevent potential browsing issues, enhance privacy, and improve the overall efficiency of your browsing sessions.
Step 2: Clearing Cache in Google Chrome
Clearing the cache in Google Chrome is an essential maintenance task that can help resolve various browsing issues and optimize the browser's performance. Whether you're experiencing slow loading times, encountering display errors on websites, or simply aiming to free up storage space, clearing the cache in Google Chrome on your Mac is a straightforward process. Here's a detailed guide on how to effectively clear the cache in Google Chrome:
-
Open Chrome Settings: Launch Google Chrome on your Mac and click on the three-dot menu icon located in the top-right corner of the browser window. From the drop-down menu, select "Settings" to access the browser's configuration options.
-
Access Clear Browsing Data: Within the Settings menu, scroll down and click on "Privacy and security" in the left-hand sidebar. Under this section, select "Clear browsing data" to open the browsing data management interface.
-
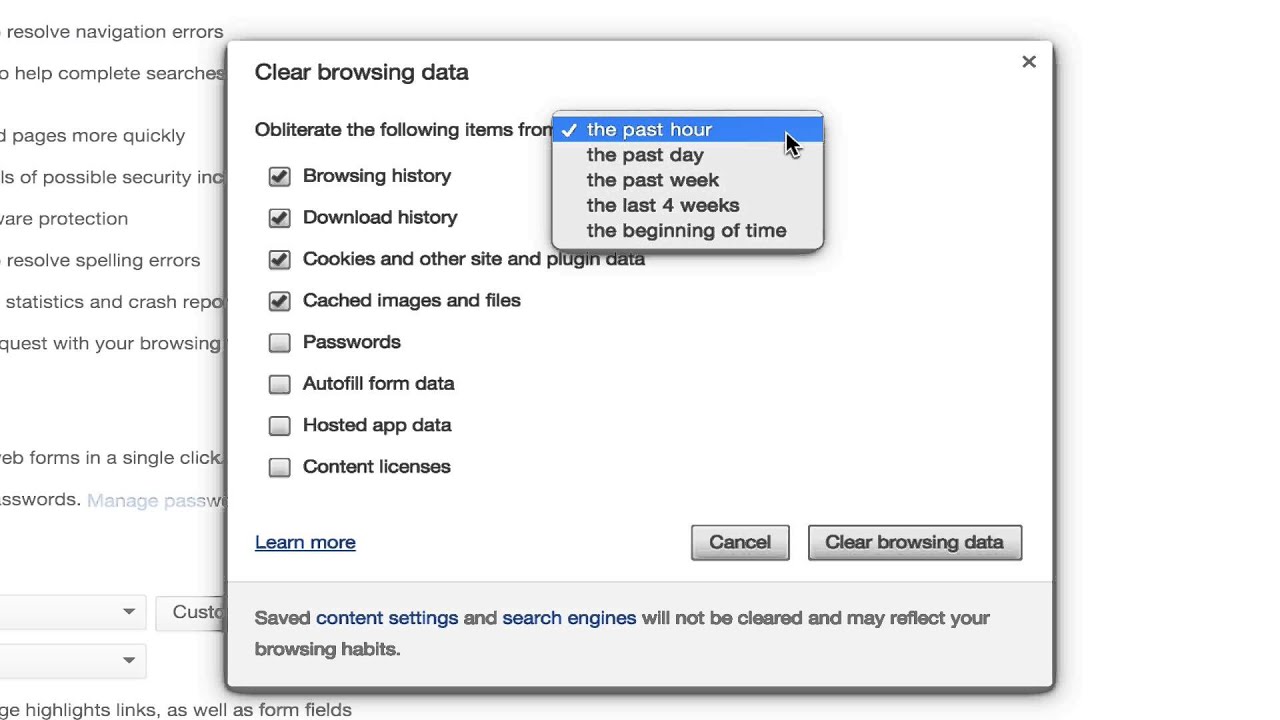
Choose Data to Clear: In the Clear browsing data menu, you can specify the types of data you want to clear. Ensure that the "Cached images and files" option is selected. You can also choose to clear other types of browsing data, such as cookies, browsing history, and download history, based on your preferences.
-
Select Time Range: Chrome allows you to specify the time range for which you want to clear the cached images and files. You can choose to clear data from the past hour, day, week, month, or all time, depending on your requirements.
-
Initiate Clearing Process: Once you've configured the data clearing options, click on the "Clear data" button to initiate the process. Chrome will begin clearing the specified browsing data, including the cache, based on your selections.
-
Completion: After the clearing process is complete, you can close the Settings tab. The cache in Google Chrome has now been successfully cleared, and you can enjoy a more responsive and optimized browsing experience.
By following these steps, you can efficiently clear the cache in Google Chrome on your Mac, ensuring that your browsing data is refreshed and unnecessary files are removed. Regularly clearing the cache in Google Chrome can contribute to improved browsing performance, faster page loading times, and a more streamlined browsing environment. This simple maintenance task can help you maintain a smooth and efficient browsing experience on your Mac.
Step 3: Clearing Cache in Mozilla Firefox
Clearing the cache in Mozilla Firefox is an essential maintenance task that can significantly enhance your browsing experience on a Mac. By removing cached files and data, you can resolve performance issues, ensure the display of updated web content, and free up valuable storage space. Here's a comprehensive guide on how to effectively clear the cache in Mozilla Firefox on your Mac:
-
Access Firefox Preferences: Launch Mozilla Firefox on your Mac and click on the three-line menu icon (hamburger icon) located in the top-right corner of the browser window. From the drop-down menu, select "Preferences" to access the browser's settings and configuration options.
-
Navigate to Privacy & Security: Within the Preferences menu, click on "Privacy & Security" in the left-hand sidebar. This section contains various privacy and security settings, including options for managing browsing data and clearing the cache.
-
Clear Site Data: Under the "Cookies and Site Data" section, click on the "Clear Data…" button. This will open a dialog box with options for clearing cookies and site data. Ensure that the "Cached Web Content" option is selected, indicating that you intend to clear the browser cache.
-
Confirm Clearing Cache: In the Clear Data dialog box, ensure that the "Cached Web Content" option is checked, and then click on the "Clear" button. This action will initiate the process of clearing the cache in Mozilla Firefox on your Mac.
-
Completion: Once the cache clearing process is complete, you can close the Preferences tab. The cache in Mozilla Firefox has now been successfully cleared, and you can enjoy a refreshed browsing experience with improved performance and updated web content.
By following these steps, you can efficiently clear the cache in Mozilla Firefox on your Mac, ensuring that your browsing data is up to date and unnecessary files are removed. Regularly clearing the cache in Mozilla Firefox can contribute to improved browsing performance, faster page loading times, and a more streamlined browsing environment. This simple maintenance task can help you maintain a smooth and efficient browsing experience on your Mac.
Step 4: Clearing Cache in Opera
Clearing the cache in Opera is a fundamental maintenance task that can help optimize your browsing experience on a Mac. By removing cached files and data, you can resolve performance issues, ensure the display of updated web content, and free up valuable storage space. Here's a comprehensive guide on how to effectively clear the cache in Opera on your Mac:
-
Access Opera Settings: Launch the Opera browser on your Mac and click on the Opera menu icon, typically located in the top-left corner of the browser window. From the drop-down menu, select "Settings" to access the browser's configuration options.
-
Navigate to Clear Browsing Data: Within the Settings menu, scroll down and click on "Advanced" to reveal additional settings. In the left-hand sidebar, select "Privacy & security" to access browsing data management options.
-
Choose Data Clearing Options: Under the Privacy & security section, locate and click on "Clear browsing data." This will open a new tab with various options for clearing browsing data, including the cache.
-
Select Cached Images and Files: In the Clear browsing data tab, ensure that the "Cached images and files" option is selected. You can also choose to clear other types of browsing data, such as cookies, browsing history, and download history, based on your preferences.
-
Specify Time Range: Opera allows you to specify the time range for which you want to clear the cached images and files. You can choose to clear data from the past hour, day, week, month, or all time, depending on your requirements.
-
Initiate Clearing Process: Once you've configured the data clearing options, click on the "Clear data" button to initiate the process. Opera will begin clearing the specified browsing data, including the cache, based on your selections.
-
Completion: After the clearing process is complete, you can close the Settings tab. The cache in Opera has now been successfully cleared, and you can enjoy a more responsive and optimized browsing experience.
By following these steps, you can efficiently clear the cache in Opera on your Mac, ensuring that your browsing data is refreshed and unnecessary files are removed. Regularly clearing the cache in Opera can contribute to improved browsing performance, faster page loading times, and a more streamlined browsing environment. This simple maintenance task can help you maintain a smooth and efficient browsing experience on your Mac.
Conclusion
In conclusion, understanding how to clear the browser cache on your Mac is essential for maintaining a smooth and efficient browsing experience. By following the step-by-step guides provided for Safari, Google Chrome, Mozilla Firefox, and Opera, you can effectively clear the cache in these popular web browsers, ensuring that your browsing data is up to date and unnecessary files are removed.
Regularly clearing the cache offers several benefits, including improved browsing performance, faster page loading times, and a more streamlined browsing environment. By removing temporary files and data stored in the cache, you can optimize your browser's performance and prevent potential browsing issues. Additionally, clearing the cache contributes to enhanced privacy by removing potentially sensitive information that may have been stored during your browsing sessions.
Furthermore, clearing the cache can free up valuable storage space on your Mac, contributing to overall system optimization. As browsers accumulate temporary files over time, regularly clearing the cache can help prevent excessive disk usage and ensure that your device operates efficiently.
It's important to note that while clearing the cache can resolve certain browsing issues and optimize performance, it's just one aspect of maintaining a healthy browsing environment. Regularly updating your browser to the latest version, managing extensions and plugins, and practicing safe browsing habits are also crucial for a secure and efficient online experience.
By incorporating the practice of clearing the cache into your routine browser maintenance, you can ensure that your browsing sessions are consistently smooth, responsive, and secure. Whether you're a casual internet user or rely on your browser for work and productivity, understanding how to clear the cache on your Mac empowers you to take control of your browsing experience and optimize your digital interactions.
In essence, clearing the cache is a simple yet impactful maintenance task that contributes to a more enjoyable and efficient browsing experience on your Mac. By following the guidelines outlined in this comprehensive guide, you can confidently navigate the process of clearing the cache in various web browsers, empowering you to maintain a clean, optimized, and secure browsing environment.