Introduction
Clearing the cache in Firefox for Mac is a simple yet essential task that can help improve the browser's performance and resolve various browsing issues. The cache is a temporary storage location for files that are downloaded by your browser to display websites. Over time, this cache can become cluttered with outdated or corrupted files, leading to slow loading times, display errors, or other browsing issues. By clearing the cache, you can ensure that Firefox functions smoothly and efficiently, providing you with a seamless browsing experience.
In this guide, we will walk you through the step-by-step process of clearing the cache in Firefox for Mac. Whether you're experiencing sluggish performance, encountering display errors, or simply want to ensure that your browser is running at its best, clearing the cache can be a quick and effective solution. By following these simple instructions, you can refresh Firefox's cache and potentially resolve any browsing issues you may be facing.
So, if you're ready to optimize your browsing experience and ensure that Firefox is running smoothly on your Mac, let's dive into the steps for clearing the cache. Whether you're a seasoned Mac user or new to the platform, this guide will equip you with the knowledge to efficiently clear the cache in Firefox, empowering you to take control of your browsing experience.
Step 1: Open Firefox
To begin the process of clearing the cache in Firefox for Mac, the first step is to open the Firefox browser on your Mac computer. Firefox is a popular and user-friendly web browser known for its customizable features, robust security, and efficient performance. Whether you use it for casual browsing, work, or research, ensuring that your Firefox browser is running smoothly is essential for a seamless online experience.
To open Firefox on your Mac, you can follow these simple steps:
-
Locate the Firefox Icon: Look for the Firefox icon on your Mac's desktop, dock, or applications folder. The icon typically features a stylized fox encircling a globe, making it easily recognizable amidst your other applications.
-
Click on the Firefox Icon: Once you've located the Firefox icon, simply click on it to launch the browser. Upon clicking the icon, Firefox will initiate its startup process, and you'll soon be greeted by the familiar and welcoming interface of the Firefox browser.
-
Wait for Firefox to Load: Depending on your Mac's processing speed and the number of add-ons or extensions you have installed, Firefox may take a few moments to fully load. During this time, the browser will initialize its various components, including any customizations you've made to the interface and settings.
-
Verify the Browser Window: After Firefox has loaded, you should see the main browser window appear on your screen. This window typically includes the address bar, navigation buttons, bookmarks toolbar, and other essential elements that make up the Firefox user interface.
By following these steps, you can successfully open the Firefox browser on your Mac, setting the stage for the subsequent steps in the cache-clearing process. With Firefox now open and ready for use, you're one step closer to optimizing your browsing experience and ensuring that your browser operates at its best.
Opening Firefox is the initial step in the cache-clearing process, and it sets the foundation for accessing the necessary settings and options within the browser to effectively clear the cache. With Firefox now at your fingertips, you're ready to proceed to the next step and delve into the process of accessing the preferences to clear the cache.
Step 2: Access the Preferences
Accessing the preferences in Firefox for Mac is a crucial step in the process of clearing the browser's cache. The preferences menu houses a range of settings and options that allow users to customize their browsing experience, manage privacy and security features, and perform essential maintenance tasks such as clearing the cache. By navigating to the preferences, you can gain access to the cache-clearing functionality and take the necessary steps to optimize Firefox's performance.
To access the preferences in Firefox for Mac, follow these steps:
-
Locate the Menu Icon: At the top of the Firefox browser window, you'll find the menu icon represented by three horizontal lines, often referred to as the "hamburger" icon due to its appearance. This icon is typically located in the upper-right corner of the browser window and serves as the gateway to various browser settings and options.
-
Click on the Menu Icon: Once you've located the menu icon, click on it to reveal a dropdown menu containing a range of options for customizing and managing Firefox.
-
Navigate to Preferences: Within the dropdown menu, you'll find the "Preferences" option, typically represented by a gear or cogwheel icon. Click on the "Preferences" option to access the settings and customization menu for Firefox.
-
Explore the Preferences Menu: Upon selecting "Preferences," a new tab or window will open, presenting you with a comprehensive array of settings and options for Firefox. This menu allows you to configure various aspects of the browser, including privacy and security settings, general preferences, and advanced configurations.
By following these steps, you can successfully access the preferences in Firefox for Mac, paving the way for the next crucial step in the cache-clearing process. With the preferences menu now at your disposal, you're poised to delve into the cache-clearing functionality and take proactive measures to optimize your browsing experience.
Accessing the preferences in Firefox empowers you to customize the browser to suit your specific needs and preferences while also providing access to essential maintenance features such as clearing the cache. With the preferences menu within reach, you're ready to proceed to the next step and initiate the cache-clearing process, ensuring that Firefox operates at its best on your Mac.
Step 3: Clear the Cache
Clearing the cache in Firefox for Mac is a pivotal maintenance task that can significantly enhance the browser's performance and resolve various browsing issues. The cache, a temporary storage location for files downloaded by the browser to display websites, can accumulate outdated or corrupted data over time, potentially leading to slow loading times, display errors, or other browsing complications. By clearing the cache, you can effectively refresh Firefox's temporary storage, ensuring that it operates efficiently and delivers a seamless browsing experience on your Mac.
To clear the cache in Firefox for Mac, follow these straightforward steps:
-
Navigate to the Privacy & Security Settings: Within the Preferences menu, locate and click on the "Privacy & Security" tab. This section houses essential privacy and security settings for Firefox, including the option to clear various types of browsing data, such as the cache.
-
Locate the Cached Web Content Section: Once in the Privacy & Security settings, scroll down to find the "Cached Web Content" section. This is where you can manage the cache-related settings and initiate the process of clearing the cache.
-
Click on the "Clear Now" Button: Within the Cached Web Content section, you'll find the "Clear Now" button. Click on this button to prompt Firefox to clear the cached web content, effectively removing the temporary files stored in the browser's cache.
-
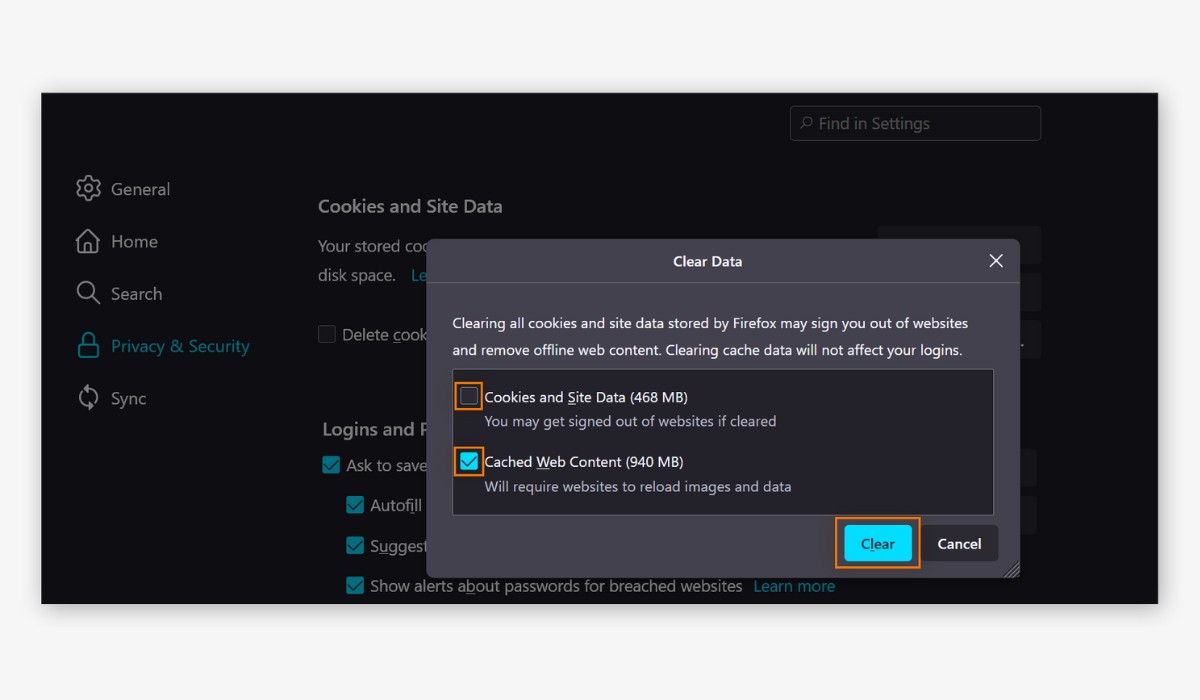
Confirm the Clearing of Cache: After clicking "Clear Now," Firefox will prompt you to confirm the action. This serves as a precautionary measure to ensure that you intend to clear the cache. Click "Clear Now" in the confirmation dialog to proceed with clearing the cache.
By following these steps, you can efficiently clear the cache in Firefox for Mac, refreshing the browser's temporary storage and potentially resolving any browsing issues stemming from outdated or corrupted cache data. Once the cache is cleared, Firefox will re-download necessary files as you browse the web, ensuring that you have access to the latest and most accurate content while enjoying improved browsing performance on your Mac.
Clearing the cache is a proactive maintenance task that can contribute to a smoother and more efficient browsing experience. By periodically clearing the cache in Firefox for Mac, you can optimize the browser's performance and mitigate potential issues related to outdated or corrupted cache data. With the cache now cleared, Firefox is primed to deliver a seamless and responsive browsing experience on your Mac.
Step 4: Confirm the Clearing of Cache
After initiating the cache-clearing process in Firefox for Mac by clicking the "Clear Now" button, a confirmation dialog will appear, prompting you to confirm the action of clearing the cache. This additional step serves as a safeguard, ensuring that you intentionally intend to clear the cached web content before proceeding.
The confirmation dialog is a crucial checkpoint that allows you to verify your decision to clear the cache, preventing accidental or unintended data removal. This deliberate confirmation process aligns with Firefox's commitment to user control and data security, empowering you to make informed choices about managing your browsing data.
Upon encountering the confirmation dialog, you'll be presented with the option to proceed with clearing the cache or to cancel the action. This provides an opportunity to reconsider the cache-clearing process before finalizing the action. By clicking "Clear Now" in the confirmation dialog, you affirm your decision to proceed with clearing the cache, signaling to Firefox that you are intentionally initiating this maintenance task.
The confirmation dialog also serves as a moment of reassurance, ensuring that you are aware of the cache-clearing action and its potential impact on your browsing experience. This transparent approach aligns with Firefox's user-centric philosophy, prioritizing user awareness and consent in data management processes.
Once you confirm the clearing of the cache by clicking "Clear Now" in the dialog, Firefox will promptly execute the cache-clearing process, removing the temporary files stored in the browser's cache. This swift action reflects Firefox's commitment to delivering a responsive and user-friendly browsing experience, streamlining the cache-clearing process to minimize disruption to your browsing activities.
By actively confirming the clearing of the cache, you demonstrate your deliberate intent to optimize Firefox's performance and ensure a seamless browsing experience on your Mac. This conscientious approach to cache management underscores the importance of user agency and informed decision-making in maintaining browser functionality and data integrity.
With the cache-clearing process confirmed, Firefox will proceed to clear the cache, refreshing its temporary storage and preparing to re-download necessary files as you continue to explore the web. This final step in the cache-clearing process signifies your proactive engagement in maintaining Firefox's performance, setting the stage for an optimized and efficient browsing experience on your Mac.
Conclusion
In conclusion, clearing the cache in Firefox for Mac is a fundamental maintenance task that can significantly enhance the browser's performance and ensure a seamless browsing experience. By following the step-by-step process outlined in this guide, you have gained the knowledge and capability to efficiently clear the cache in Firefox, empowering you to take proactive measures to optimize your browsing experience.
By opening Firefox, accessing the preferences, and navigating to the cache-clearing functionality, you have demonstrated your commitment to maintaining Firefox's performance on your Mac. Clearing the cache serves as a proactive solution to potential browsing issues stemming from outdated or corrupted cache data, allowing you to refresh Firefox's temporary storage and ensure efficient data retrieval as you explore the web.
The deliberate confirmation of the cache-clearing process underscores the importance of user awareness and consent in managing browsing data, aligning with Firefox's user-centric approach to data security and browser functionality. By actively confirming the cache-clearing action, you have exhibited a conscientious approach to maintaining Firefox's performance, contributing to a responsive and user-friendly browsing experience on your Mac.
As you proceed with your browsing activities on Firefox for Mac, the cache-clearing process sets the stage for optimized performance, swift data retrieval, and a seamless browsing experience. By periodically clearing the cache, you can proactively mitigate potential issues related to outdated or corrupted cache data, ensuring that Firefox operates at its best and delivers the latest and most accurate content as you navigate the web.
In embracing the process of clearing the cache in Firefox for Mac, you have taken a proactive step towards optimizing your browsing experience and ensuring that Firefox functions smoothly and efficiently. By incorporating cache-clearing into your regular maintenance routine, you can uphold Firefox's performance, mitigate potential browsing issues, and enjoy a responsive and seamless browsing experience on your Mac.
With the cache now cleared and Firefox primed for optimal performance, you are equipped to navigate the web with confidence, knowing that your browser is operating at its best. By leveraging the knowledge and skills gained from this guide, you are empowered to maintain Firefox's performance and enjoy a streamlined browsing experience on your Mac.