Why Use a Private Browser on Mac
A private browser, also known as incognito mode or private mode, is a feature available in popular web browsers like Safari, Google Chrome, Mozilla Firefox, and Opera. It offers users a more secure and private online browsing experience. There are several reasons why you might want to use a private browser on your Mac:
- Protecting Your Privacy: When you browse the internet using a private browser, your browsing history, cookies, and other data are not stored on your computer. This can help prevent websites, advertisers, and third-party trackers from collecting information about your online activities.
- Browsing Anonymously: Private browsers don’t keep a record of your browsing history, which means your searches and visited websites are not saved. This can be useful if you’re researching sensitive topics or want to keep your online activities private.
- Testing Websites: If you’re a web developer or designer, using a private browser can be beneficial for testing websites. It allows you to view the website as a new user, without any previous cached data or cookies influencing the browsing experience.
- Avoiding Cookie-Based Personalization: Private browsing mode disables most tracking cookies, preventing websites from personalizing content or displaying targeted ads based on your previous browsing behavior.
- Signing in with Multiple Accounts: If you have multiple online accounts on a particular website, using a private browser can help you sign in to each account simultaneously without needing to log out and log back in.
By using a private browser on your Mac, you can maintain a certain level of anonymity and privacy while browsing the internet. It’s important to note, however, that private browsing does not make you completely anonymous or protect you from other forms of tracking, such as your IP address being monitored by your internet service provider or the websites you visit.
Now that you understand the benefits of using a private browser on your Mac, let’s explore how to open a private browser window on Safari, Google Chrome, Mozilla Firefox, and Opera.
How to Open a Private Browser Window on Safari
Safari, the default web browser on macOS, offers a private browsing feature called “Private Window.” Follow these steps to open a private browser window on Safari:
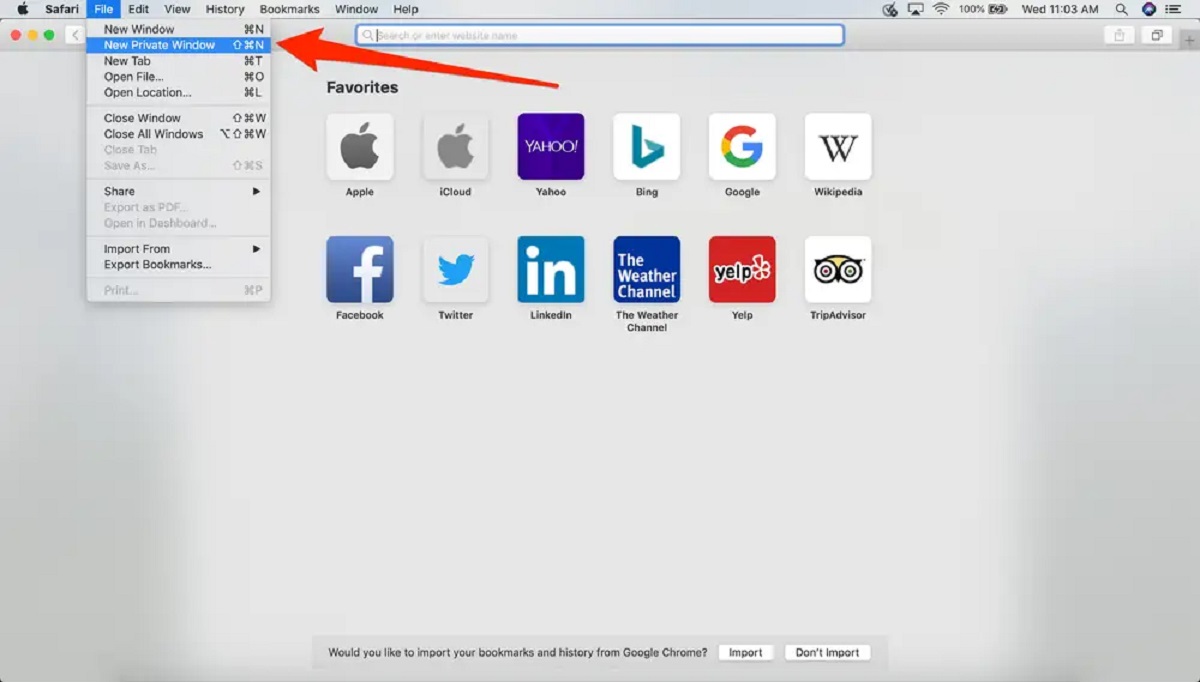
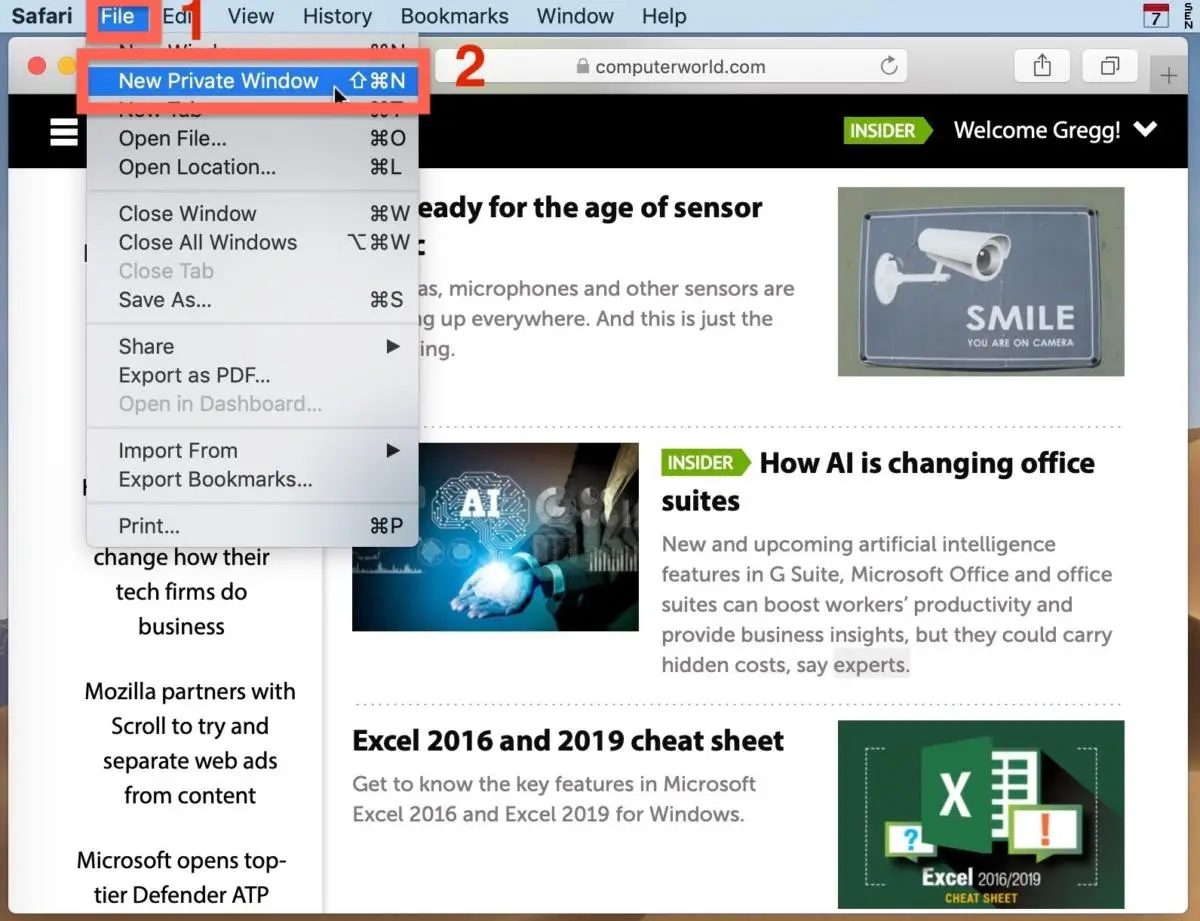
- Launch the Safari browser on your Mac.
- Click on “File” in the menu bar at the top of the screen.
- In the drop-down menu, click on “New Private Window.”
- A new window will open, indicating that you are in a private browsing session. You can also identify a private window by the dark theme and the “Private” label in the address bar.
- You can now browse the internet privately in this window. Keep in mind that any websites you visit or files you download will not be saved in your browsing history or downloads folder.
- Once you are done with your private browsing session, simply close the private window, and Safari will not retain any data from that session.
Opening a private browser window on Safari is a quick and easy way to browse the internet privately and securely. It’s important to remember that while using a private window helps protect your privacy on your local device, it does not make you anonymous to websites or network providers. Additionally, any bookmarks or saved login information will not carry over to a private browsing session, so you may need to re-enter passwords or log in to websites again.
Now that you know how to open a private browser window on Safari, let’s move on to learning how to open a private browsing tab on Safari.
How to Open a Private Browsing Tab on Safari
Opening a private browsing tab on Safari allows you to keep your browsing activities separate from your regular browsing session. Follow these steps to open a private browsing tab on Safari:
- Launch the Safari browser on your Mac.
- Click on “File” in the menu bar at the top of the screen.
- In the drop-down menu, click on “New Private Tab.”
- A new tab will open with a dark theme, indicating that you are in a private browsing session. You can also identify a private tab by the “Private” label next to the tab name.
- You can now browse the internet privately in this tab. Any websites you visit in this tab will not be saved in your browsing history, and any cookies or temporary files created during the private browsing session will be deleted when you close the tab.
- When you are finished with your private browsing session, simply close the private tab, and Safari will not retain any data from that session.
Opening a private browsing tab on Safari is a convenient way to keep your browsing activities separate from your regular browsing session without needing to open a separate private window. It’s important to note that while private browsing can help protect your privacy on your local device, it does not make you completely anonymous on the internet or protect you from other forms of tracking.
Now that you know how to open a private browsing tab on Safari, let’s move on to learning how to open a private window on Google Chrome.
How to Open a Private Window on Google Chrome
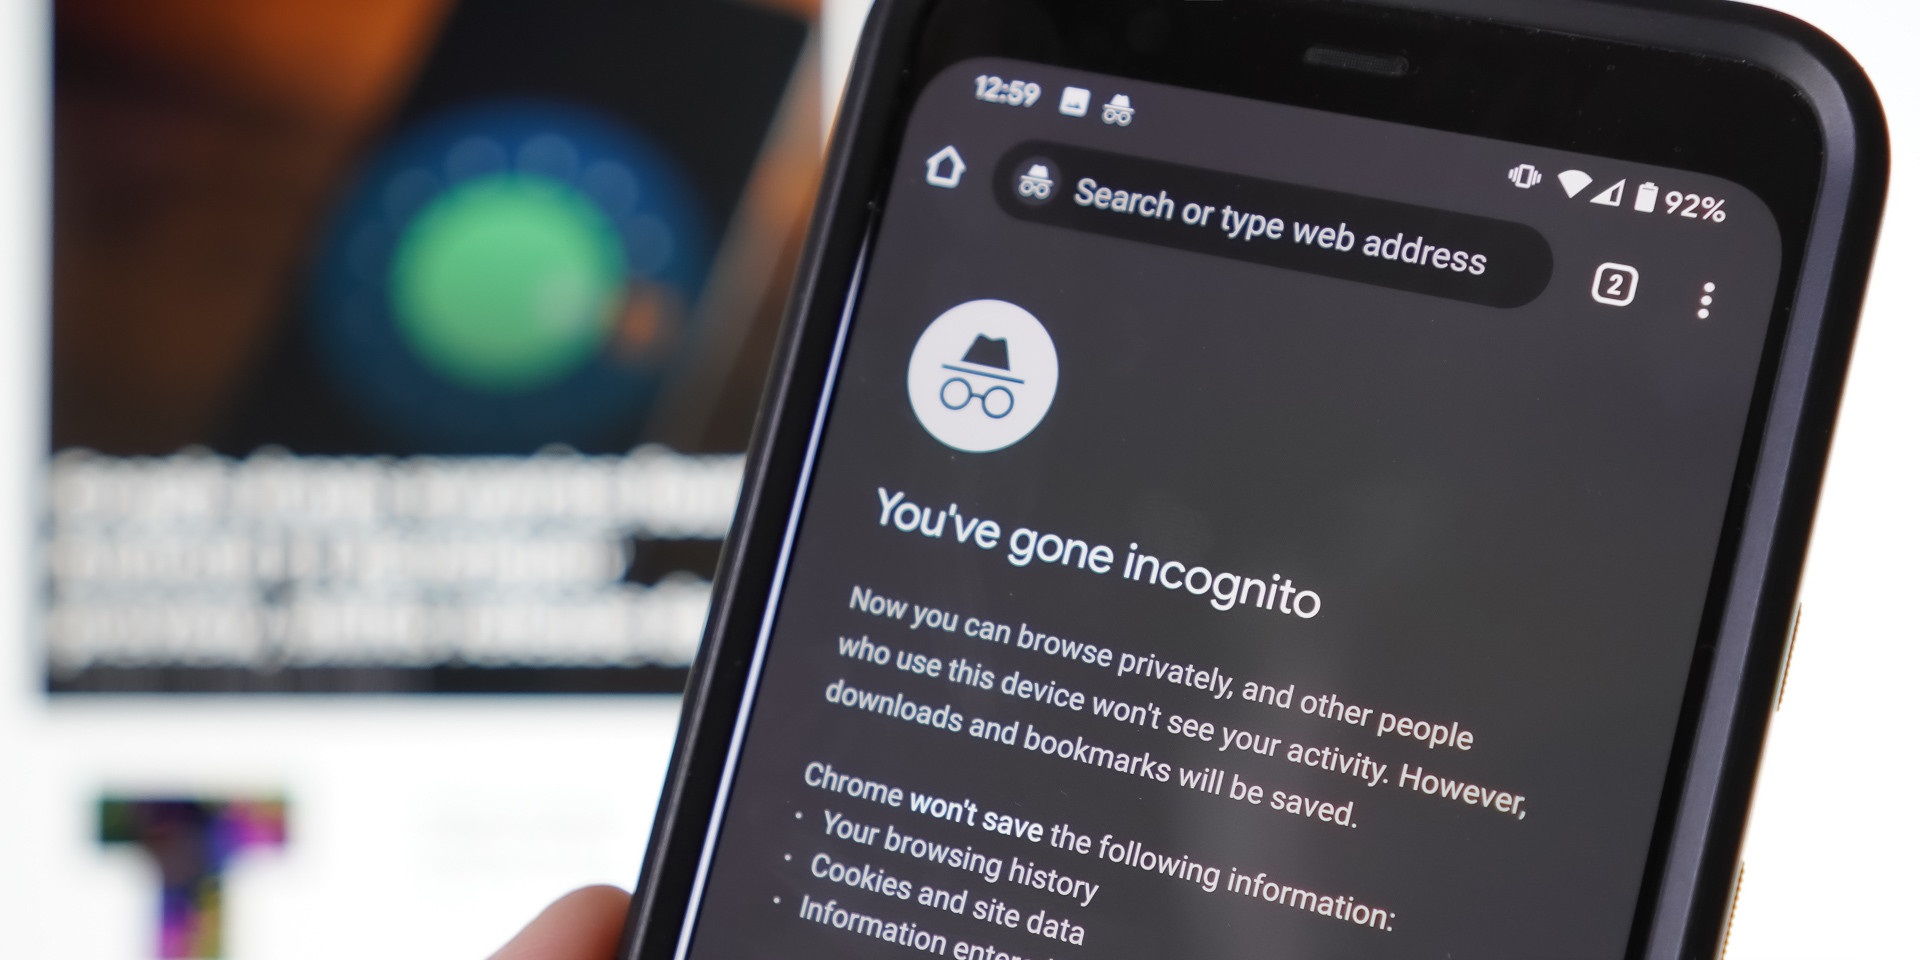
Google Chrome offers a private browsing feature called “Incognito Mode,” which allows you to browse the internet privately and without saving your browsing history. Here’s how you can open a private window on Google Chrome:
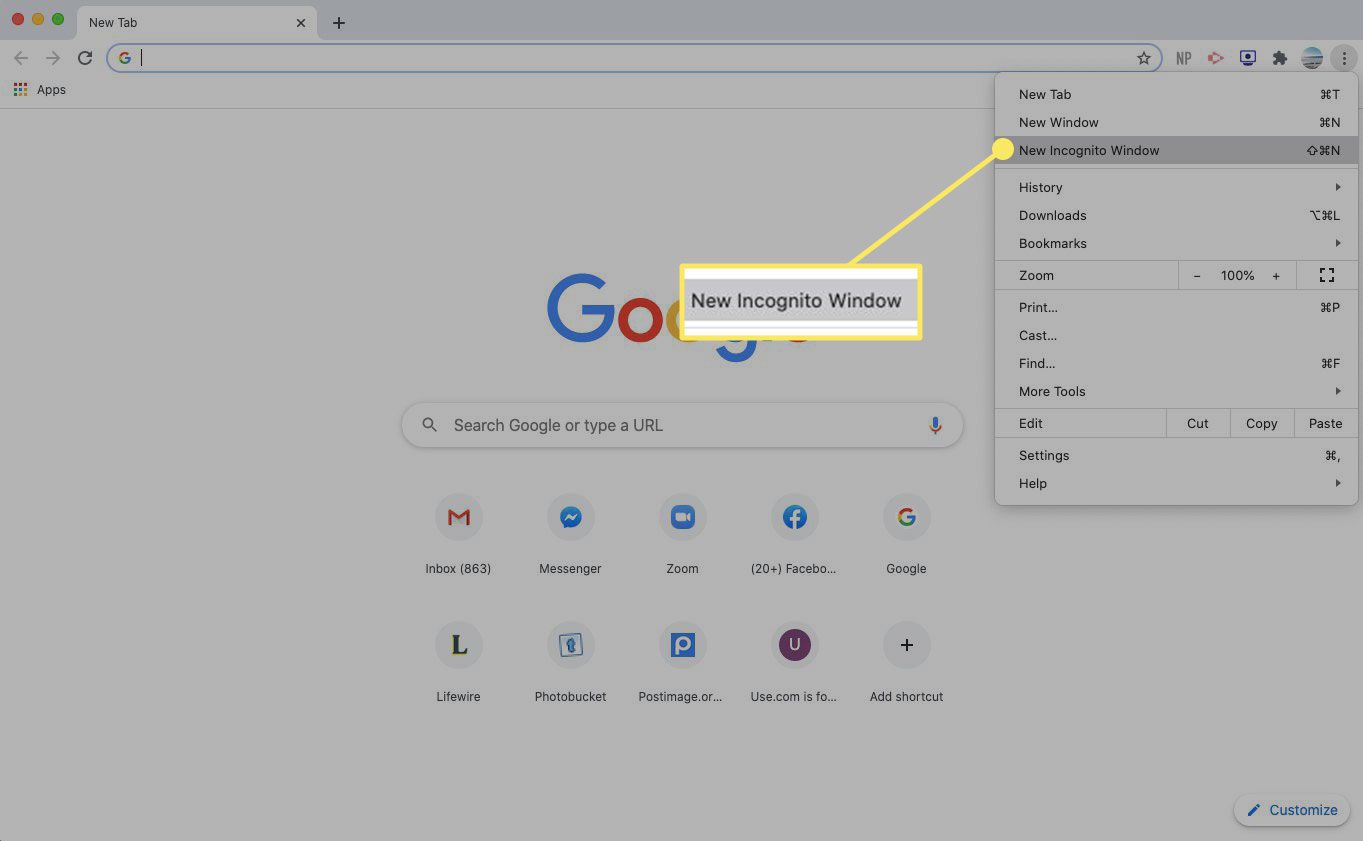
- Launch Google Chrome on your Mac.
- Click on the three dots icon in the upper-right corner of the browser window to open the Chrome menu.
- In the drop-down menu, hover over “New Window” and then click on “New Incognito Window.”
- A new window will open with a dark theme and a warning message stating that you have gone incognito. You can also identify an incognito window by the icon in the upper-left corner of the window.
- You can now browse the internet privately in this window. Any websites you visit or files you download will not be saved in your browsing history or download history.
- Once you are done with your private browsing session, simply close the incognito window, and Chrome will not retain any data from that session.
Opening a private window on Google Chrome is a simple way to protect your privacy and prevent your browsing history from being saved. It’s important to note that while browsing in incognito mode, your internet service provider, employer, or websites you visit may still be able to track your online activities.
Now that you know how to open a private window on Google Chrome, let’s move on to learning how to open an incognito window on Mozilla Firefox.
How to Open an Incognito Window on Mozilla Firefox
Mozilla Firefox offers a private browsing feature called “Private Window” or “New Private Window,” which allows you to browse the internet privately and without saving your browsing history. Here’s how you can open an incognito window on Mozilla Firefox:
- Launch Mozilla Firefox on your Mac.
- Click on the three horizontal lines icon in the upper-right corner of the browser window to open the Firefox menu.
- In the drop-down menu, click on “New Private Window.”
- A new window will open with a dark theme and a brief explanation of what private browsing does. You can also identify a private window by the purple mask icon in the upper-right corner of the window.
- You can now browse the internet privately in this window. Any websites you visit or information you enter will not be saved in your browsing history, and any cookies created during the private browsing session will be deleted when you close the window.
- Once you are done with your private browsing session, simply close the private window, and Firefox will not retain any data from that session.
Opening an incognito window on Mozilla Firefox is a great way to protect your privacy and keep your browsing activities separate from your regular browsing session. It’s important to note that while browsing in private mode, your internet service provider, employer, or websites you visit may still be able to track your online activities.
Now that you know how to open an incognito window on Mozilla Firefox, let’s move on to learning how to open a private browsing window on Opera.
How to Open a Private Browsing Window on Opera
Opera, a popular web browser known for its speed and security, offers a private browsing feature called “Private Window.” Follow these steps to open a private browsing window on Opera:
- Launch Opera on your Mac.
- Click on the “Menu” button in the upper-left corner of the browser window.
- In the drop-down menu, hover over “New Private Window” and then click on it.
- A new window will open, indicating that you are in a private browsing session. You can also identify a private window by the dark theme and the “Private” label in the address bar.
- You can now browse the internet privately in this window. Any websites you visit or data you enter in this window will not be saved in your browsing history or cookies.
- Once you are done with your private browsing session, simply close the private window, and Opera will not retain any data from that session.
Opening a private browsing window on Opera ensures that your browsing activities are not saved and that your online privacy is protected. It’s important to note that while using a private browser window can help maintain your privacy on your local device, it does not make you completely anonymous on the internet or protect you from other forms of tracking.
Now that you know how to open a private browsing window on Opera, you can enjoy a more secure and private browsing experience on your Mac.
Benefits of Using a Private Browser on Mac
Using a private browser on your Mac offers several benefits that can enhance your online browsing experience and protect your privacy. Here are some of the key advantages of using a private browser:
- Enhanced Privacy: When you use a private browser, it prevents your browsing history, cookies, and other data from being saved on your device. This helps protect your privacy by preventing websites, advertisers, and third-party trackers from collecting information about your online activities.
- Anonymous Browsing: Private browsing allows you to browse the internet without leaving behind any traces of your online activities. By not saving your browsing history or search queries, private browsers help maintain a certain level of anonymity while engaging in online activities.
- Protection from Tracking: Private browsing modes disable most tracking cookies, which are used by websites to collect data on your browsing behavior. By blocking these cookies, private browsers help prevent websites from personalizing content, displaying targeted ads, or tracking your online movements.
- Multiple Account Management: Private browsing can be beneficial if you have multiple accounts on a particular website. Using a private browser allows you to sign in to each account simultaneously, without the need to log out and log back in or switch between user profiles.
- Preventing Browser Autofill: Private browsing modes do not utilize your previously saved data, such as autofill forms or stored passwords. This feature can be particularly helpful when using a shared computer or accessing sensitive information on public networks.
While it’s important to remember that private browsing does not make you completely anonymous or protect you from all forms of tracking, it does provide an additional layer of privacy and control over your online activities.
By using a private browser on your Mac, you can enjoy a more secure browsing experience and have greater control over your online privacy. Now that you understand the benefits of using a private browser, let’s explore how to customize privacy settings in Safari.
How to Customize Privacy Settings in Safari
Safari offers various privacy settings that allow you to customize your browsing experience to suit your needs. By adjusting these settings, you can enhance your privacy and control how Safari handles your data. Here’s how you can customize privacy settings in Safari on your Mac:
- Open Safari on your Mac.
- Click on “Safari” in the menu bar at the top of the screen, and then select “Preferences” from the drop-down menu.
- In the Preferences window, click on the “Privacy” tab located at the top.
- You will see several privacy options that you can customize. Some of the important ones include:
- Prevent cross-site tracking: Enabling this option helps prevent websites from tracking your browsing activities across different sites, limiting the information advertisers and trackers can collect about you.
- Block all cookies: Activating this option blocks all cookies from being stored on your computer. While this may enhance privacy, it may also affect the functionality of some websites that rely on cookies for logins or customization.
- Manage website data: Clicking on this button allows you to view and remove stored data for individual websites. This can help you manage and control the information that websites store on your device.
- Ask websites not to track me: Enabling this option sends a request to websites you visit, asking them not to track your online activities. However, compliance with this request is voluntary and may not be followed by all websites.
- Customize these settings based on your preferences by checking or unchecking the boxes next to each option.
- Once you have configured your privacy settings, you can close the Preferences window.
Customizing privacy settings in Safari gives you greater control over how your data is handled and helps protect your online privacy. It’s important to regularly review and update these settings to align with your privacy preferences.
Now that you know how to customize privacy settings in Safari, let’s move on to learning how to clear browsing history and other data from a private browser window on your Mac.
How to Clear Browsing History and Other Data from a Private Browser Window on Mac
Clearing your browsing history and other data from a private browser window is essential to maintain your privacy and remove any traces of your online activities. If you use a private browser window on your Mac and want to clear this data, follow these steps:
- In the private browser window, click on the “History” tab in the menu bar at the top of the screen.
- In the drop-down menu, click on “Clear History.”
- A new window will appear, allowing you to customize the data you want to clear. You can choose to clear your browsing history, cookies, cached data, and other website data from the past hour, day, week, or all time.
- Select the desired time range or choose “all history” to remove all data from the private browser window.
- Click on the “Clear History” button to initiate the deletion process.
- Once the process is complete, your browsing history and other data will be deleted from the private browser window.
Clearing your browsing history and other data from a private browser window ensures that no one else using your device can access this information and helps maintain your privacy. It’s important to note that clearing this data only affects the specific private browser window you are using and does not impact your overall browsing history or data stored in other browsers or accounts.
Remember, clearing your browsing history and data should be done regularly if you want to maintain your privacy. By doing so, you can enjoy a fresh and private browsing experience each time you open a private browser window on your Mac.
Now that you know how to clear browsing history and other data from a private browser window, let’s explore some tips for maintaining online privacy while using a private browser window on your Mac.
Tips for Maintaining Online Privacy While Using a Private Browser Window on Mac
While using a private browser window on your Mac can enhance your online privacy, there are additional steps you can take to further protect your personal information. Here are some tips for maintaining online privacy while using a private browser window:
- Use a Virtual Private Network (VPN): Consider using a VPN service to encrypt your internet connection and hide your IP address. This helps protect your online activities from being monitored by your Internet Service Provider (ISP) and adds an extra layer of privacy.
- Disable Location Sharing: Be mindful of location-sharing permissions, as websites may request access to your location data. Disable or limit the sharing of your location information unless it is necessary for the functionality of a particular website or application.
- Avoid Suspicious Websites and Downloads: Be cautious when visiting unfamiliar or potentially malicious websites. Stick to reputable sources for downloads and avoid clicking on suspicious links that may lead to phishing or malware-infected sites.
- Regularly Update Browsers and Plugins: Ensure that your browser and plugins are up to date to benefit from the latest security patches and enhancements. Updated software reduces the risk of vulnerabilities that can be exploited by hackers.
- Be Mindful of Online Forms: Exercise caution when entering personal information on online forms. Verify the legitimacy and security of the website before submitting sensitive data, and try to minimize the amount of personal information shared whenever possible.
- Use Strong, Unique Passwords: Create strong, unique passwords for all your online accounts to prevent unauthorized access. Avoid reusing passwords across multiple sites and consider using a reliable password manager to help you generate and securely store complex passwords.
- Regularly Clear Cookies and Cache: Once you are done using a private browser window, clear your cookies and cache. This helps remove temporary files and data that may contain information about your browsing activities.
- Avoid Public Wi-Fi for Sensitive Activities: Public Wi-Fi networks may not be secure, making it easier for hackers to intercept your data. Avoid accessing sensitive information, such as online banking or personal email, when connected to public Wi-Fi networks.
- Be Cautious with Extensions and Add-ons: Be selective when installing browser extensions or add-ons, as they may have access to your browsing data. Only install trusted extensions from reputable sources and regularly review and remove any unnecessary ones.
By following these tips, you can enhance your online privacy and protect your personal information while using a private browser window on your Mac. Remember to exercise caution and remain vigilant to stay one step ahead of potential threats.
Now that you have learned these valuable tips, you can enjoy a safer and more private online browsing experience on your Mac.