How to Turn On Incognito Mode in Chrome
Incognito mode, also known as private browsing, allows you to surf the web without leaving any traces on your computer. Whether you want to protect your privacy, temporarily hide your browsing activity, or prevent websites from tracking you, activating the Incognito mode in Google Chrome is quick and easy. In this section, we will guide you through the steps to enable Incognito mode on your Chrome browser.
Step 1: Open the Chrome Browser
To begin, make sure you have the Chrome browser installed on your computer. Open the browser by double-clicking on its icon.
Step 2: Click on the Three Dots icon
In the top-right corner of the browser window, you will see three vertical dots. Click on these dots to open the Chrome menu.
Step 3: Select “New Incognito Window”
From the dropdown menu, you will see several options. Look for and click on the “New Incognito Window” option. Alternatively, you can use the shortcut key “Ctrl+Shift+N” (Windows) or “Command+Shift+N” (Mac) to open a new Incognito window directly.
Step 4: Start Browsing Privately
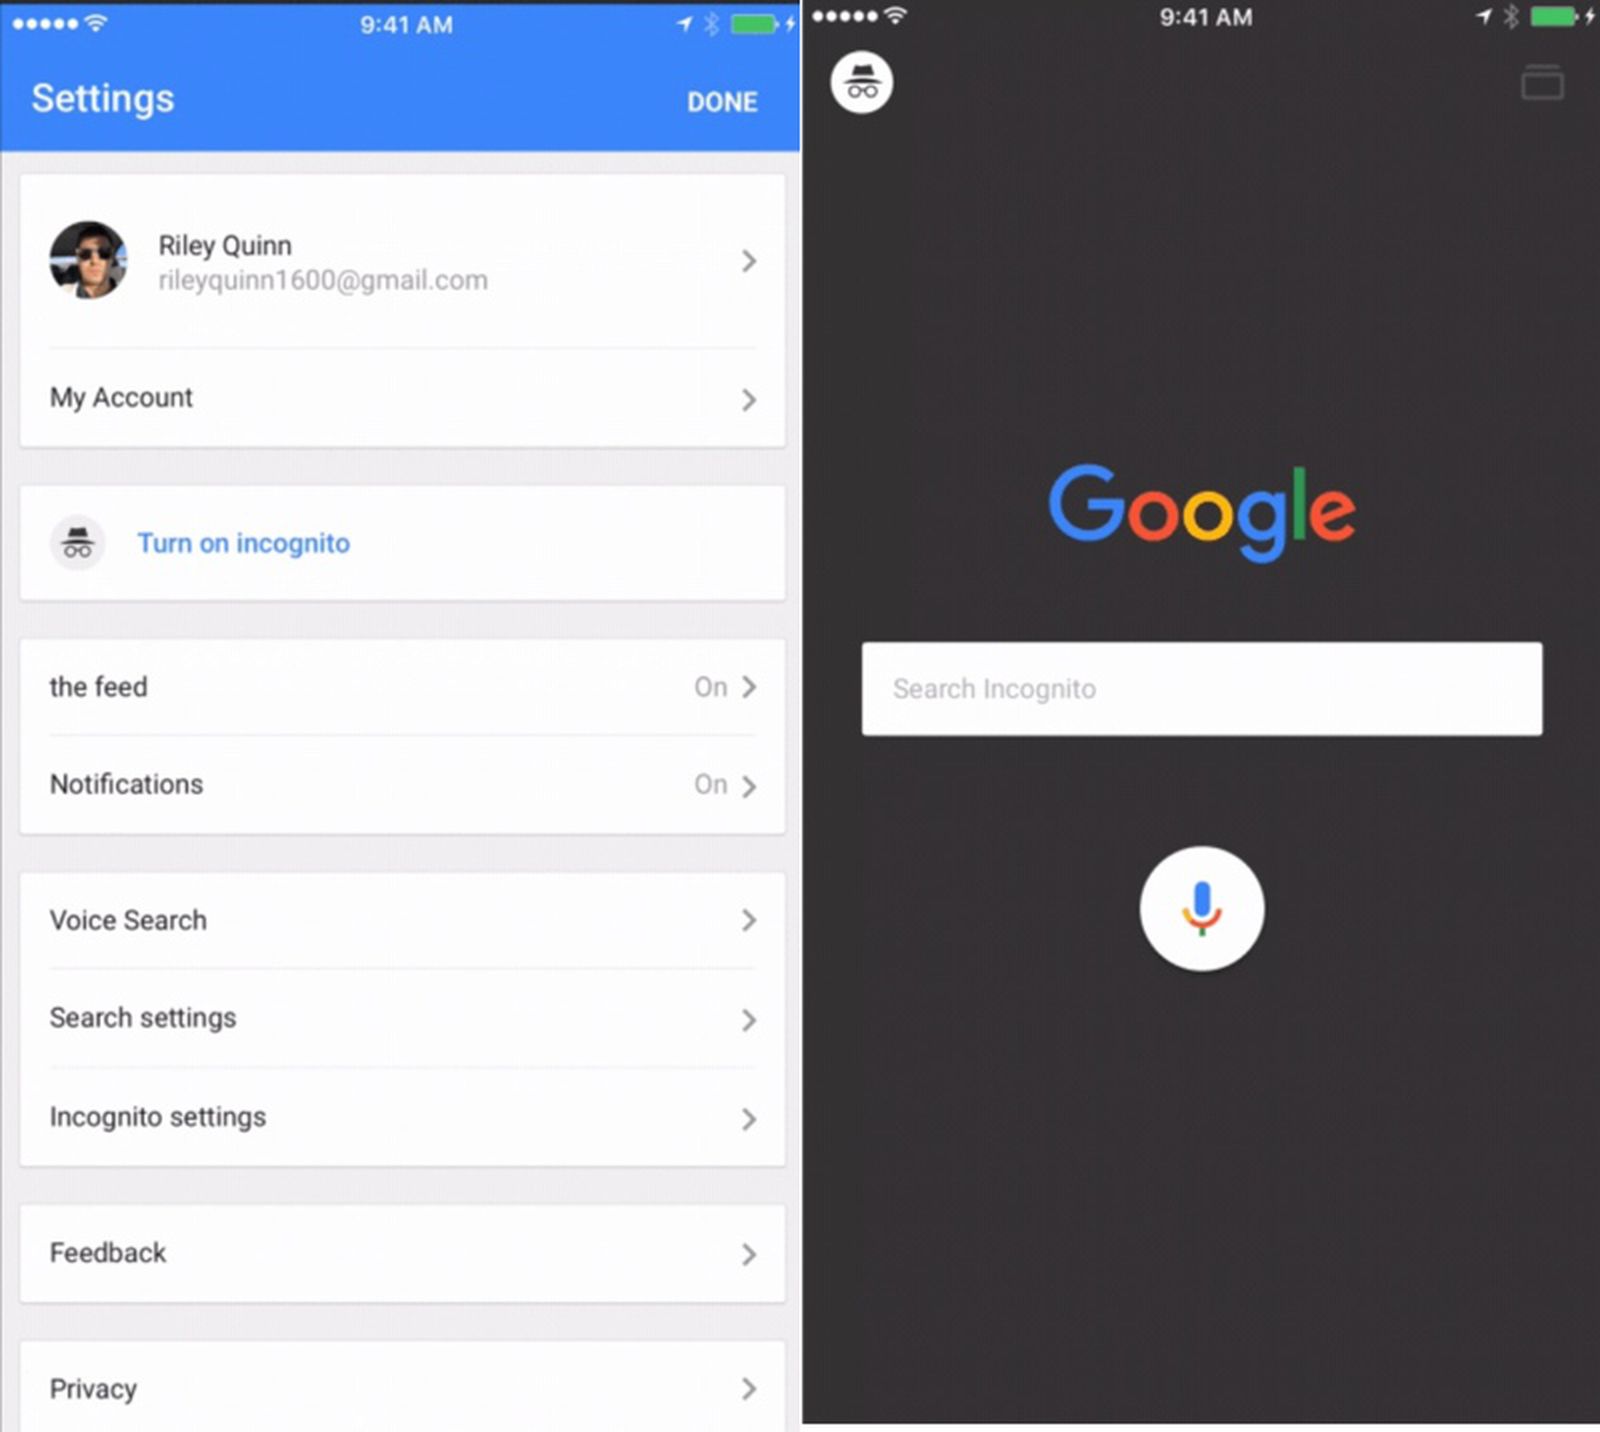
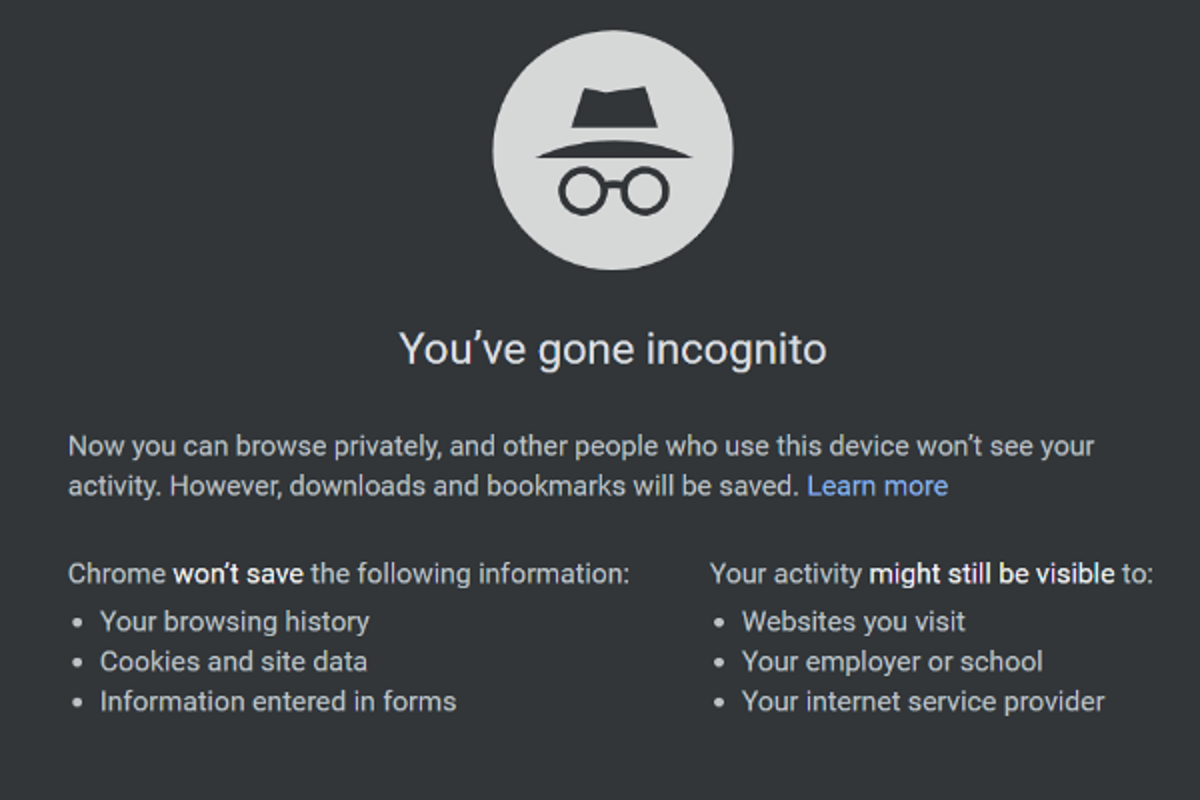
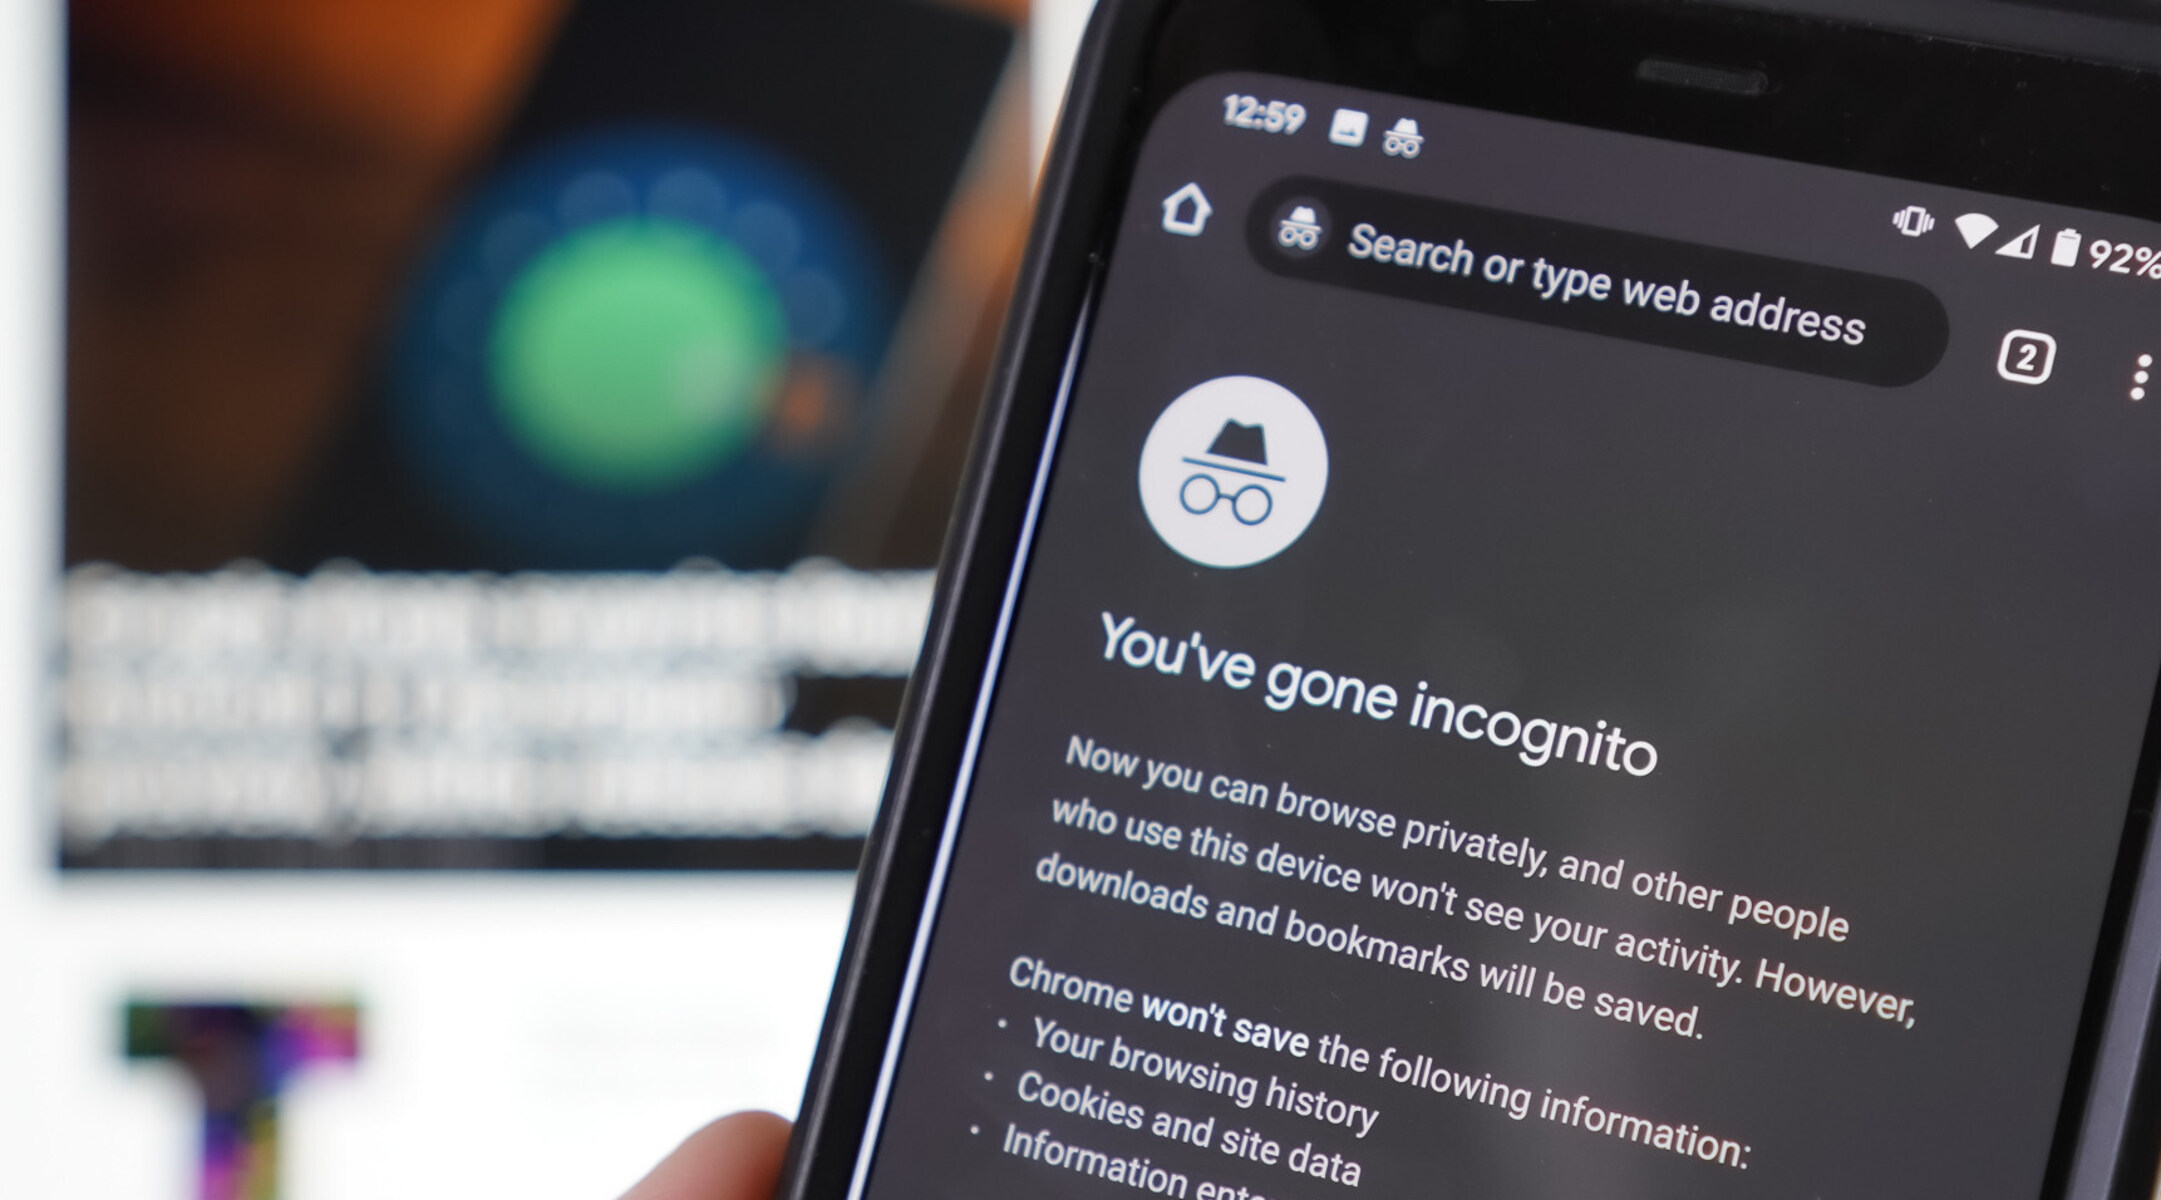
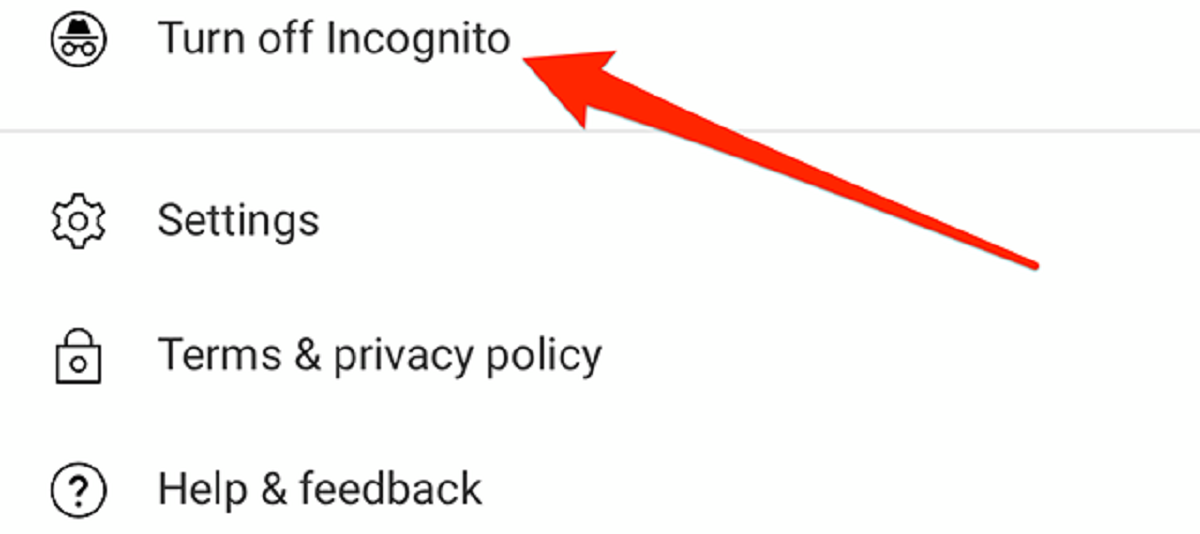
After clicking on “New Incognito Window” or using the shortcut key, a new window will open in Incognito mode. You will notice a dark background and a spy-like icon in the top-left corner. This indicates that you are now browsing privately. Any websites you visit, cookies you generate, or searches you make will not be saved in your browsing history or stored on your computer.
It’s important to note that Incognito mode only shields your activity from other users of the same device. Your internet service provider, employer, or websites themselves may still be able to track your online actions. Additionally, while in Incognito mode, any files you download or bookmarks you create will still be stored on your computer.
In summary, enabling Incognito mode allows you to browse the web without leaving traces of your online activity. Whether you want to keep your browsing habits private, avoid personalized search results, or protect your sensitive information, activating Incognito mode on Chrome is a simple process. So, the next time you need a private browsing session, just follow these steps and surf the web discreetly.
Introduction
Privacy is a crucial aspect of our online lives, and sometimes we need to browse the web without leaving a digital footprint. This is where Incognito mode, also known as private browsing, comes into play. Incognito mode allows you to explore the web without leaving behind any traces of your browsing activity, such as cookies, search history, or login details. If you’re using Google Chrome as your browser of choice, enabling Incognito mode is simple and can be done in just a few steps.
In this article, we will guide you through the process of turning on Incognito mode in Chrome, allowing you to browse privately and securely. Whether you want to research a sensitive topic, shop for a surprise gift, or simply maintain your online privacy, Incognito mode is a valuable tool to have at your disposal.
When you activate Incognito mode, Chrome creates a separate browsing session that exists independently from your regular browsing mode. This means that any websites you visit, files you download, or searches you perform while in Incognito mode won’t be saved to your browsing history. Additionally, any cookies or temporary files generated during your Incognito session will be deleted as soon as you close the Incognito window.
It’s important to note that while Incognito mode provides a certain level of privacy, it doesn’t make you completely anonymous. Your internet service provider, employer, or the websites you visit may still be able to track your online activity. Furthermore, any bookmarks you create or files you download will still be stored on your computer or device.
However, despite these limitations, Incognito mode is an effective way to limit tracking, maintain privacy, and prevent others who use the same device from accessing your browsing history. It also helps to avoid personalized search results based on your previous browsing habits.
In the following sections, we will walk you through the step-by-step process of enabling Incognito mode in Chrome. Whether you prefer using the browser menu or keyboard shortcuts, we’ve got you covered. By the end of this article, you’ll be able to confidently surf the web incognito and protect your online privacy.
Step 1: Open the Chrome Browser
The first step in enabling Incognito mode in Chrome is to ensure that you have the Chrome browser installed on your device. If you don’t have Chrome installed, you can download it from the official Google Chrome website and follow the installation instructions.
Once you have Chrome installed, locate the icon for the browser on your desktop or in your application folder and double-click to open it. Chrome will launch, and you’ll see the browser window appear on your screen.
If you already have Chrome open, make sure you’re in the regular browsing mode before proceeding to the next step. To confirm this, look for the absence of the Incognito icon in the top-left corner of the browser window. The Incognito icon consists of a hat and sunglasses symbolizing a discreet browsing mode, and it will only be visible when you’re using Incognito mode.
If you’re unsure whether you’re in regular browsing mode or not, don’t worry. The next steps will guide you through enabling Incognito mode, regardless of your current browsing mode.
Once you have Chrome open in regular browsing mode, you’re ready to proceed to the next step and activate Incognito mode.
In this step, we’ve simply ensured that the Chrome browser is available on your device and that you’re in regular browsing mode. Now, let’s move on to step two and learn how to activate private browsing in Chrome.
Step 2: Click on the Three Dots icon
In order to enable Incognito mode in Chrome, you will need to access the browser’s menu. To do this, locate the three vertical dots in the top-right corner of the browser window. This icon represents the Chrome menu and contains a variety of options for customizing your browsing experience.
Once you have found the three dots icon, click on it to open the Chrome menu. A dropdown menu will appear, displaying a list of options that you can choose from.
Take a moment to familiarize yourself with the different features and options available in the Chrome menu. However, for the purpose of enabling Incognito mode, you don’t need to venture too far into the menu.
Now that you have successfully accessed the Chrome menu by clicking on the three dots icon, you are ready to proceed to the next step: selecting “New Incognito Window”.
Keep in mind that you can also use keyboard shortcuts to open the Chrome menu. On a Windows computer, you can press the “Alt” and “F” keys simultaneously to access the menu. On a Mac, the keyboard shortcut is “Option” + “Command” + “F”. These shortcuts provide an alternative way to open the Chrome menu and proceed with enabling Incognito mode.
By clicking on the three dots icon, you have successfully accessed the Chrome menu. Now, let’s move on to the next step and learn how to open a new Incognito window.
Step 3: Select “New Incognito Window”
Now that you have opened the Chrome menu by clicking on the three dots icon, it’s time to enable Incognito mode by selecting the “New Incognito Window” option from the dropdown menu.
Look for the “New Incognito Window” option in the Chrome menu, usually located near the top of the list. The option may be labeled slightly differently depending on the version of Chrome you are using, but it typically includes the terms “New” and “Incognito”.
To enable Incognito mode, simply click on the “New Incognito Window” option. Alternatively, you can use the keyboard shortcut “Ctrl+Shift+N” (Windows) or “Command+Shift+N” (Mac) to instantly open a new Incognito window without going through the Chrome menu.
After selecting the “New Incognito Window” option, a new Chrome window will open, indicating that you have successfully activated Incognito mode. You will notice that the background of the Incognito window is dark or slightly grayed out, distinguishing it from the regular browsing mode.
In addition, you will see a spy-like icon in the top-left corner of the Incognito window. This icon serves as a visual indicator that you are now browsing in private mode.
It’s important to note that when you open a new Incognito window, it will not inherit your saved bookmarks or any previous browsing history. This ensures that your online activities while in Incognito mode remain separate from your regular browsing session.
By following these simple steps, you have successfully selected the “New Incognito Window” option and opened an Incognito window in Chrome. Now, let’s move on to the final step and learn about a shortcut to easily enable Incognito mode.
Step 4: Use the Shortcut Key
If you want a quick and effortless way to enable Incognito mode in Chrome, you can utilize a convenient keyboard shortcut. The shortcut key allows you to bypass the Chrome menu and open a new Incognito window directly.
To activate Incognito mode using the shortcut key, simply press “Ctrl+Shift+N” on your Windows computer or “Command+Shift+N” on your Mac. This combination of keys will instantly open a new Incognito window, ready for private browsing.
The shortcut key is a time-saving option for those who frequently use Incognito mode and want to avoid navigating through menus or icons. By memorizing this shortcut, you can quickly switch to Incognito mode whenever you need it, without interrupting your workflow.
It’s important to note that the keyboard shortcut will only work when you are using the Chrome browser. If you are using a different web browser, the applicable shortcut for that browser might be different.
By employing the shortcut key “Ctrl+Shift+N” (Windows) or “Command+Shift+N” (Mac), you have the power to enable Incognito mode with just a press of a few buttons. Now, enjoy your discreet browsing experience without leaving any trace.
With the completion of this final step, you have learned how to utilize the shortcut key to enable Incognito mode in Chrome. Now, let’s wrap up and reflect on the significance of Incognito mode in enhancing your online privacy.
Conclusion
In conclusion, activating Incognito mode in Chrome provides a simple yet effective way to browse the web privately and maintain your online privacy. By following the steps outlined in this article, you can easily enable Incognito mode and enjoy a secure browsing experience.
Incognito mode allows you to browse the internet without leaving any traces behind. It prevents your browsing history, cookies, and other data from being stored on your computer. This can be particularly useful when using a shared computer or when you want to keep your online activities discreet.
While Incognito mode offers a layer of privacy, it’s important to note that it doesn’t make you completely anonymous. Your internet service provider, employer, or websites themselves may still be able to track your online activities. Additionally, any bookmarks you create or files you download will still be saved on your device.
Nevertheless, Incognito mode is a powerful tool for protecting your privacy and avoiding personalized search results. It allows you to browse without the worry of leaving behind a digital footprint or having your browsing habits tracked.
Remember, you can easily enable Incognito mode in Chrome by opening the browser, clicking on the three dots icon, selecting “New Incognito Window” from the menu, or using the shortcut key “Ctrl+Shift+N” (Windows) or “Command+Shift+N” (Mac). These methods provide quick and convenient ways to start your private browsing session.
So, whether you’re making online purchases, researching sensitive topics, or simply wanting to maintain your privacy, Incognito mode in Chrome is a valuable feature to utilize. Keep your browsing activities discreet and enjoy the freedom to explore the web without leaving a trace.