Introduction
Welcome to this comprehensive guide on how to check PSU voltage. If you’re unfamiliar with the term, PSU stands for Power Supply Unit, which is an essential component of your computer system. The PSU is responsible for converting the AC power from your wall outlet into the DC power needed to run your computer’s components.
Understanding and monitoring the voltage output of your PSU is crucial for ensuring the stability and longevity of your computer system. The voltage delivered by the PSU should be within a specific range to prevent any damage to your hardware. By checking the PSU voltage, you can identify potential issues and take appropriate steps to rectify them.
This guide will equip you with the knowledge and skills to check your PSU voltage effectively. We’ll walk you through the tools you’ll need, the step-by-step process, and provide essential tips for troubleshooting common issues.
Whether you’re an advanced computer user, a DIY enthusiast, or a beginner looking to learn more about your system, this guide is designed to help you gain a better understanding of your PSU voltage and ensure optimal performance.
Before we dive into the details, it’s important to note that checking your PSU voltage involves working with electrical components, which can be dangerous if not done correctly. Please exercise caution and follow the instructions carefully. If you’re unsure or uncomfortable, consult a professional technician.
Now, let’s delve into the world of PSU voltage and empower you with the knowledge to keep your computer running smoothly.
Background Information on PSU Voltage
PSU voltage refers to the electrical output provided by the Power Supply Unit of your computer. The PSU is responsible for converting the alternating current (AC) from your wall outlet into the direct current (DC) that your computer components require to function properly.
Most modern computer systems operate on a 12-volt (V) rail, but be aware that different components within your system may have specific voltage requirements. The PSU ensures that these voltage levels are maintained and stable.
The PSU voltage is a critical aspect of your computer’s operation. If the voltage is too low or too high, it can cause adverse effects on your system’s performance and potentially damage your hardware.
PSU voltage is typically regulated through the use of various protective mechanisms, such as voltage regulators and safety circuits. These mechanisms are in place to prevent voltage spikes, surges, or fluctuations that could harm your computer.
It’s important to note that the voltage output of your PSU can vary depending on the load placed on it. As you add more components or peripherals to your system, the load on the PSU increases, which may result in a slight decrease in voltage output.
Monitoring and checking your PSU voltage at regular intervals can help ensure that your computer is receiving the correct voltage levels and safeguard against potential issues. By being proactive, you can identify any abnormalities and take appropriate action before they cause harm to your system.
Understanding the background information on PSU voltage is essential for anyone who wants to maintain the stability and performance of their computer system. With this knowledge, you’ll be better equipped to troubleshoot voltage-related issues and make informed decisions when upgrading or replacing your PSU.
In the following sections, we’ll cover the tools you’ll need and provide a step-by-step guide on how to check PSU voltage. So let’s continue on this journey to uncover the mysteries of PSU voltage and learn how to ensure the optimal performance of your computer system.
Reasons to Check PSU Voltage
Checking your PSU voltage on a regular basis is a crucial aspect of maintaining a stable and reliable computer system. Here are some of the key reasons why you should consider checking your PSU voltage:
- Ensure Proper Hardware Functionality: The voltage delivered by the PSU directly affects the functionality of your computer’s components. By checking the PSU voltage, you can ensure that each component is receiving the necessary and correct voltage levels to operate optimally.
- Prevent Damage to Hardware: If the voltage output from the PSU exceeds the specified limits, it can cause damage to your computer’s hardware. Similarly, if the voltage is too low, it may lead to instability and operational issues. Regularly checking the PSU voltage allows you to detect potential problems early and take preventive measures.
- Identify PSU Issues: A failing PSU can result in voltage fluctuations or drops. By checking the PSU voltage, you can identify if there are any irregularities or inconsistencies in voltage output, which could indicate a problem with your PSU. This knowledge can help you address the issue promptly and avoid any further damage to your system.
- Diagnose System Instability: If you’re experiencing frequent system crashes, freezes, or unexpected reboots, it’s possible that voltage irregularities may be causing these issues. Checking the PSU voltage can help you determine if voltage fluctuations are the underlying cause and take appropriate measures to stabilize your system.
- Optimize Overclocking: Overclocking your system involves increasing the voltage supplied to your components to achieve higher performance. However, if the voltage exceeds safe limits, it can lead to overheating and damage. Regularly monitoring the PSU voltage allows you to ensure that your overclocked system is receiving the appropriate voltage levels for stability and longevity.
- Prepare for System Upgrades: If you’re planning to upgrade your computer’s components or add new ones, it’s important to ensure that your PSU can handle the increased power requirements. Checking the PSU voltage can give you a clear understanding of its current capabilities and help you determine if an upgrade is necessary.
By being proactive and checking your PSU voltage, you can ensure the proper functioning of your hardware, prevent damage, diagnose issues, optimize performance, and prepare for system upgrades. It’s an essential step in maintaining a stable and reliable computer system.
Now that we understand the importance of checking PSU voltage, let’s move on to the next section, where we’ll discuss the tools you’ll need for this task.
Tools Needed for Checking PSU Voltage
Checking the voltage output of your PSU requires the use of specific tools to ensure accurate measurements. Here are the essential tools you’ll need:
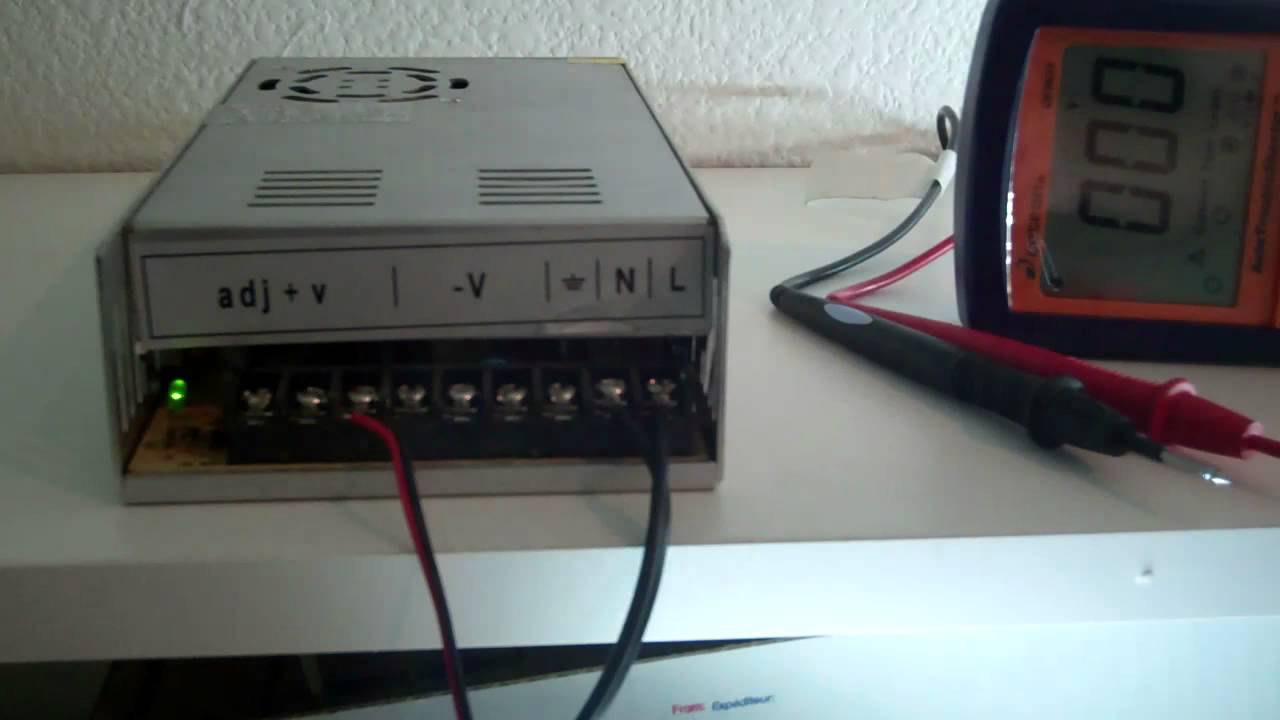
- Digital Multimeter (DMM): A digital multimeter is the primary tool used for measuring voltage. A DMM allows you to measure the DC voltage provided by your PSU accurately. Make sure to choose a DMM with a high level of precision and a voltage range that accommodates the expected voltage output of your PSU.
- Molex-to-PCIe Adapter: This adapter is necessary if your PSU does not have dedicated PCIe power connectors. It converts the Molex connectors on your PSU into PCIe power connectors, which are needed for testing GPU voltage.
- Motherboard User Manual: The motherboard manual is a valuable resource that provides information on the location and pinouts of various connectors, including the 24-pin ATX power connector and the 8-pin CPU power connector. It is important to refer to the manual to ensure you are measuring the correct voltages and using the appropriate probe points.
- Anti-Static Wrist Strap: To protect your sensitive computer components from electrostatic discharge (ESD), it is advisable to wear an anti-static wrist strap while working inside your computer case. This strap prevents static electricity build-up on your body, reducing the risk of damaging your components.
- Power-On Self Test (POST) Card: While not absolutely necessary, a POST card can be a helpful diagnostic tool. It plugs into a PCI or PCIe slot and provides real-time error code readouts, allowing you to identify any power-related issues during the testing process.
These tools will assist you in accurately measuring the voltage output of your PSU and identify any irregularities or problems. Remember to always use caution when working with electrical components and consult professional help if you are unsure.
In the next section, we will guide you through the step-by-step process of checking PSU voltage, ensuring that you perform the task safely and accurately.
Step-by-Step Guide on How to Check PSU Voltage
Follow these step-by-step instructions to effectively check the voltage output of your PSU:
- Ensure Safety Precautions: Before starting, make sure to shut down your computer and disconnect it from the power source. Also, wear an anti-static wrist strap to prevent any static electricity discharge that could potentially damage your components.
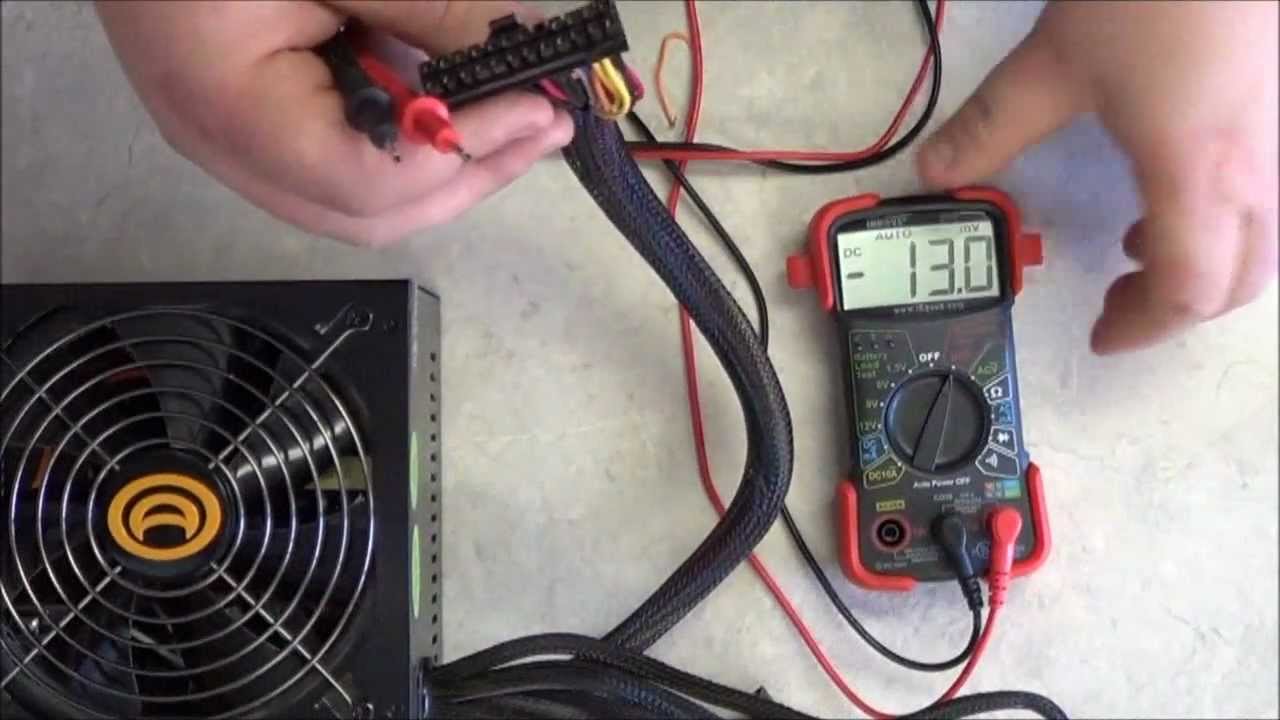
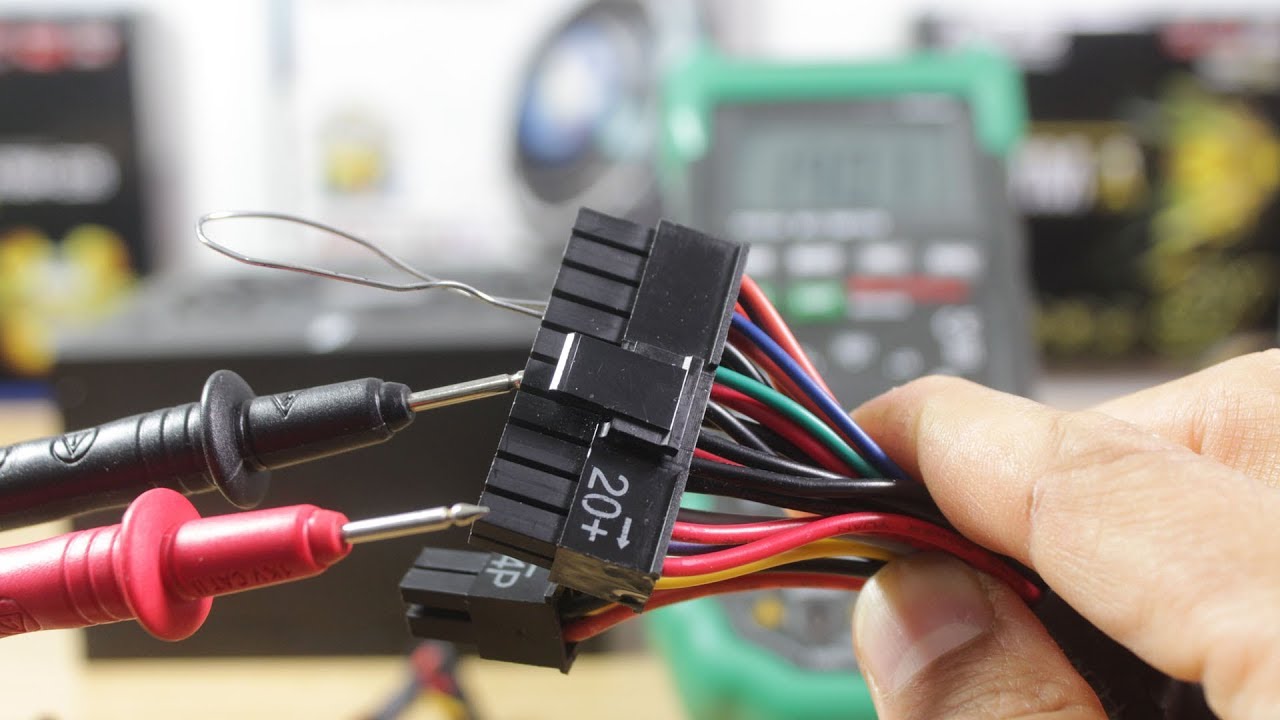
- Identify Probe Points: Refer to your motherboard’s user manual to locate the appropriate probe points for measuring voltage. The most common probe points are the 24-pin ATX power connector and the 8-pin CPU power connector. These connectors provide power to the motherboard and are ideal for voltage measurement.
- Set Up Your DMM: Turn on your digital multimeter (DMM) and set it to measure DC voltage (V). Ensure the voltage range selected on the DMM is suitable for the expected voltage output of your PSU. If uncertain, start with a higher range and adjust accordingly.
- Attach the Probe Leads: Connect the black probe lead to the COM (common) port on your DMM and the red probe lead to the VΩmA (voltage) port. Take caution not to touch the metal parts of the probe leads while the other ends are connected.
- Check Ground Connection: Identify a suitable ground point to attach the black probe lead. This can be a metal screw on the computer case or any unpainted metal surface. Ensuring a good ground connection is crucial for accurate voltage measurement.
- Measure Voltage: Touch the red probe lead to the desired probe point, such as the 24-pin ATX power connector or the 8-pin CPU power connector, to measure the corresponding voltage. Take note of the reading on the DMM display.
- Repeat for Other Probe Points: If desired, repeat the measurement process for other relevant probe points, such as the PCIe power connectors for GPU voltage measurement. Use the Molex-to-PCIe adapter if your PSU does not have dedicated PCIe power connectors.
- Compare Readings: Compare the measured voltage readings with the specified voltage ranges for your specific components. Ensure that the values fall within the acceptable range to confirm that your PSU is delivering the correct voltages.
- Interpret Error Codes (Optional): If you have a POST card installed, pay attention to any error codes displayed. These codes can help you identify any specific power-related issues that might require further investigation or troubleshooting.
By following this step-by-step guide, you can accurately measure the PSU voltage at various probe points and ensure that your computer components are receiving the correct voltage levels. Regularly verify the voltage output to detect any fluctuations or abnormalities that may require further action.
Now that you know how to check PSU voltage, let’s move on to the next section, where we’ll discuss important precautions you should take to maintain safety while handling electrical components.
Precautions to Take While Checking PSU Voltage
Working with electrical components can be hazardous if proper precautions are not taken. To ensure your safety and prevent any damage to your computer, it is essential to follow these precautions while checking PSU voltage:
- Power Off and Disconnect: Before beginning any work inside your computer, ensure it is powered off and disconnected from the electrical outlet. This eliminates the risk of electrical shock and damage to your components.
- Wear an Anti-Static Wrist Strap: To prevent static electricity discharge, wear an anti-static wrist strap grounded to a metal surface, such as your computer case. This protects your components from potential damage caused by static electricity.
- Choose the Proper Tools: Use a digital multimeter (DMM) with a suitable voltage range to measure the output of your PSU accurately. Make sure you are using the correct probe points and following the guidelines provided by your motherboard manual.
- Maintain Proper Grounding: Establish a good ground connection by using the black probe lead of your DMM to a suitable grounding point. This ensures accurate voltage measurements and minimizes any risk of electrical shock.
- Avoid Touching Live Circuits: Never touch any live circuitry with your hands or metallic objects while the PSU is connected to a power source. This includes the power connectors, wires, or any other exposed electrical components.
- Be Mindful of Capacitors: Capacitors store electrical energy even when the system is powered off. Exercise caution when working near capacitors, as they can discharge unexpectedly and cause injury or damage to nearby components.
- Double-Check Connections: Ensure that all connections, including the probe leads of your DMM, are properly attached. Loose connections can lead to inaccurate readings or even short circuits, potentially harming your components.
- Handle the DMM with Care: Treat your digital multimeter with care and avoid dropping it or subjecting it to unnecessary physical strain. Always follow the manufacturer’s instructions for use and maintenance.
- Consult a Professional if Unsure: If you are uncertain about any step of the process or feel uncomfortable working with electrical components, it is always advisable to seek the assistance of a professional technician who can ensure the task is carried out safely and accurately.
By adhering to these precautions, you can minimize the risk of injuries, damage to your computer components, and electrical hazards when checking PSU voltage. Safety should always be a top priority when working with electrical systems.
In the next section, we will discuss common issues that may arise during the PSU voltage checking process and provide some troubleshooting tips to help you resolve them.
Common Issues and Troubleshooting Tips
While checking PSU voltage, you may encounter some common issues. Here are a few of them and troubleshooting tips to help you resolve them:
- Fluctuating Voltage Readings: If you notice voltage readings that are constantly fluctuating, it may indicate a problem with your PSU or electrical interference. Check that all connections are secure and tightly plugged in. If the issue persists, consider replacing your PSU.
- Voltage Outside Acceptable Range: If the voltage readings are consistently outside the acceptable range, it could indicate a faulty PSU. First, double-check the connections and ensure accurate measurements. If the issue persists, it may be necessary to replace the PSU with a new one that meets the voltage requirements of your components.
- Incorrect Probe Point: Using incorrect probe points can lead to inaccurate voltage readings. Make sure you identify the correct probe points based on your motherboard manual. Check the manual for any additional voltage measurement recommendations and follow them carefully.
- Unstable System after Checking Voltage: If your computer becomes unstable or experiences issues after checking the PSU voltage, it could be due to accidentally dislodging connections or causing ESD damage. Double-check all connections and reseat any loose components. If the problem persists, consider seeking assistance from a professional technician.
- Error Codes Displayed: If you are using a POST card and encounter error codes during voltage checking, refer to the user manual or manufacturer’s documentation to troubleshoot the specific error codes. This can help identify any power-related issues that need further investigation.
It’s important to note that power-related issues can sometimes stem from factors other than the PSU voltage. Insufficient airflow, faulty components, or software-related issues can also lead to system instability. If you have exhausted all troubleshooting options and the issue persists, it may be helpful to consult a professional technician for a thorough diagnosis.
Remember, working with electrical components requires caution and attention to detail. If you’re uncertain about any troubleshooting steps or experience difficulties, seek assistance from a qualified professional to ensure the safety of yourself and your computer system.
In the final section, we’ll wrap up the guide and summarize key points to keep in mind when checking PSU voltage.
Conclusion
Checking the voltage output of your PSU is a vital task for maintaining a stable and reliable computer system. By ensuring the proper voltage levels, you can avoid hardware damage, diagnose issues, and optimize performance. Throughout this guide, we have covered the essential background information, reasons to check PSU voltage, the tools needed, a step-by-step guide, precautions to take, and troubleshooting tips.
Remember, when checking PSU voltage, it is crucial to prioritize safety. Always power off and disconnect your computer, wear an anti-static wrist strap, and use the proper tools. Take precautions to avoid electrical shock and damage to components. If uncertain or uncomfortable, consult a professional technician.
By regularly checking PSU voltage, you can identify any irregularities or fluctuations in voltage output. This proactive approach allows you to address potential issues before they cause harm to your hardware or system stability. It also helps in optimizing overclocking, preparing for system upgrades, and ensuring the longevity of your computer.
We hope this guide has provided valuable insights and guidance on how to check PSU voltage. Remember to follow the step-by-step instructions, adhere to safety precautions, and troubleshoot any issues that arise. By doing so, you’ll be well on your way to maintaining a stable and high-performing computer system.
Thank you for reading, and happy computing!