Introduction
Welcome to our guide on how to check CPU temperature using MSI Afterburner. Whether you’re an avid gamer, a content creator, or just a regular computer user, monitoring your CPU temperature is crucial for maintaining optimal performance and preventing damage to your processor. Overheating can lead to system instability, decreased lifespan of your components, and potential data loss. That’s where MSI Afterburner comes in handy.
MSI Afterburner is a powerful graphics card overclocking utility that also includes a feature to monitor CPU temperature. It allows you to keep a close eye on your CPU’s temperature, utilization, and other vital statistics in real-time. Not only does it provide valuable insights, but it also offers customization options, making it a popular choice among PC enthusiasts.
In this guide, we will walk you through the step-by-step process of downloading, installing, and setting up MSI Afterburner to monitor your CPU temperature. We’ll also show you how to customize the monitoring options to suit your preferences. So, without further ado, let’s dive in and get started!
What is MSI Afterburner?
MSI Afterburner is a popular and widely-used graphics card overclocking utility developed by MSI. It’s primarily known for its ability to tweak and optimize the performance of your graphics card, allowing you to push the limits of its capabilities and achieve higher frame rates in games or improve rendering speeds in applications.
But beyond its overclocking features, MSI Afterburner also offers a comprehensive hardware monitoring tool that enables you to keep tabs on critical system metrics, including CPU temperature. This functionality allows you to monitor the temperature and performance of both your graphics card and CPU from a centralized dashboard.
One of the standout features of MSI Afterburner is its compatibility with a wide range of graphics cards from various manufacturers, not just MSI. Whether you own an NVIDIA or AMD graphics card, you can be confident that MSI Afterburner will work seamlessly with it, providing accurate monitoring and overclocking capabilities.
MSI Afterburner is designed with user-friendliness in mind, featuring an intuitive and user-friendly interface that makes it accessible to both beginners and experienced PC users. The software offers detailed graphs and real-time statistics, allowing you to track various performance metrics effortlessly.
Furthermore, MSI Afterburner provides advanced customization options, giving you the ability to personalize the monitoring settings based on your preferences. You can choose which metrics to display, customize the look and feel of the dashboard, and even set up alerts to notify you if certain thresholds are exceeded, such as the CPU temperature reaching a dangerous level.
Overall, MSI Afterburner is a versatile tool that goes beyond just graphics card overclocking. Its CPU temperature monitoring feature makes it an invaluable utility for keeping your system in check and ensuring optimal performance and stability. So, whether you’re a hardcore gamer, a content creator, or a DIY enthusiast, MSI Afterburner is definitely worth considering for monitoring your CPU temperature.
Why is it important to check CPU temperature?
Monitoring your CPU temperature is of utmost importance, especially if you engage in activities that put a significant load on your processor, such as gaming, video editing, or running resource-intensive software. Here’s why it’s crucial to keep a close eye on your CPU temperature:
Preventing overheating: Excessive heat is the enemy of computer components, and your CPU is no exception. When your CPU operates at high temperatures for prolonged periods, it can lead to thermal throttling, which is a mechanism that reduces the processor’s performance to protect it from overheating. This can result in reduced system performance and sluggishness.
Preserving component lifespan: Heat is a major factor that affects the lifespan of your CPU and other computer components. Excessive heat can cause thermal stress on the CPU, leading to premature aging and potential failure. By monitoring the CPU temperature, you can ensure that it stays within safe limits and prolong the lifespan of your processor.
Optimizing performance: CPUs are designed to operate within a certain temperature range called the “thermal design power” (TDP). When the CPU temperature exceeds this range, it can negatively impact performance, causing system instability, frequent crashes, and even data corruption. By monitoring the CPU temperature, you can identify any performance issues caused by overheating and take appropriate measures to rectify them.
Preventing hardware damage: Overheating can cause permanent damage to your CPU and other sensitive components. Excess heat can lead to the degradation of the CPU’s thermal paste, which can affect the heat transfer efficiency and result in higher temperatures. Additionally, high temperatures can lead to solder joint failure, capacitor degradation, and other hardware issues that may require expensive repairs or component replacements.
Keeping noise levels in check: As the CPU temperature rises, the cooling fans inside your computer may have to work harder to dissipate the heat. This can result in increased noise levels as the fans spin at higher speeds. By monitoring the CPU temperature and ensuring it stays within optimal ranges, you can help maintain a quieter and more comfortable computing environment.
In summary, checking your CPU temperature is vital for preventing overheating, preserving the lifespan of your components, optimizing performance, preventing hardware damage, and maintaining a quiet computing environment. With the help of MSI Afterburner’s CPU temperature monitoring feature, you can effectively monitor and manage your CPU’s temperature to ensure the longevity and optimal performance of your system.
Step 1: Download and Install MSI Afterburner
The first step in checking your CPU temperature using MSI Afterburner is to download and install the software on your computer. Here’s how you can do it:
- Visit the official MSI Afterburner website: Open your preferred web browser and navigate to the official MSI Afterburner website.
- Locate the download section: Look for the download section on the website, where you can find the latest version of MSI Afterburner available for download. Ensure that you download the version compatible with your operating system.
- Start the download: Click on the download link to initiate the download process. The file size may vary, so it might take a few moments to complete the download depending on your internet speed.
- Run the installer: Once the download is complete, locate the downloaded setup file and double-click on it to run the installer.
- Follow the installation wizard: Follow the on-screen instructions provided by the installation wizard to proceed with the installation. Review the terms and conditions, choose the installation location, and select any additional components you wish to install (such as the MSI Afterburner Remote Server for mobile monitoring).
- Complete the installation: Once you have made all the necessary selections, click on the “Install” button to begin the installation process. The installation may take a few moments, so be patient.
- Launch MSI Afterburner: After the installation is complete, you can launch MSI Afterburner by locating its shortcut on your desktop or by searching for it in the Start Menu.
After following these steps, you should now have MSI Afterburner installed on your computer. In the next steps, we will guide you on how to set up MSI Afterburner to monitor your CPU temperature.
Step 2: Launch MSI Afterburner
Now that you have successfully installed MSI Afterburner on your computer, it’s time to launch the software and get started with checking your CPU temperature. Follow these steps to launch MSI Afterburner:
- Locate the MSI Afterburner shortcut: Look for the MSI Afterburner shortcut on your desktop or in the Start Menu. It typically has a distinctive icon with a flame and the letters “AB.”
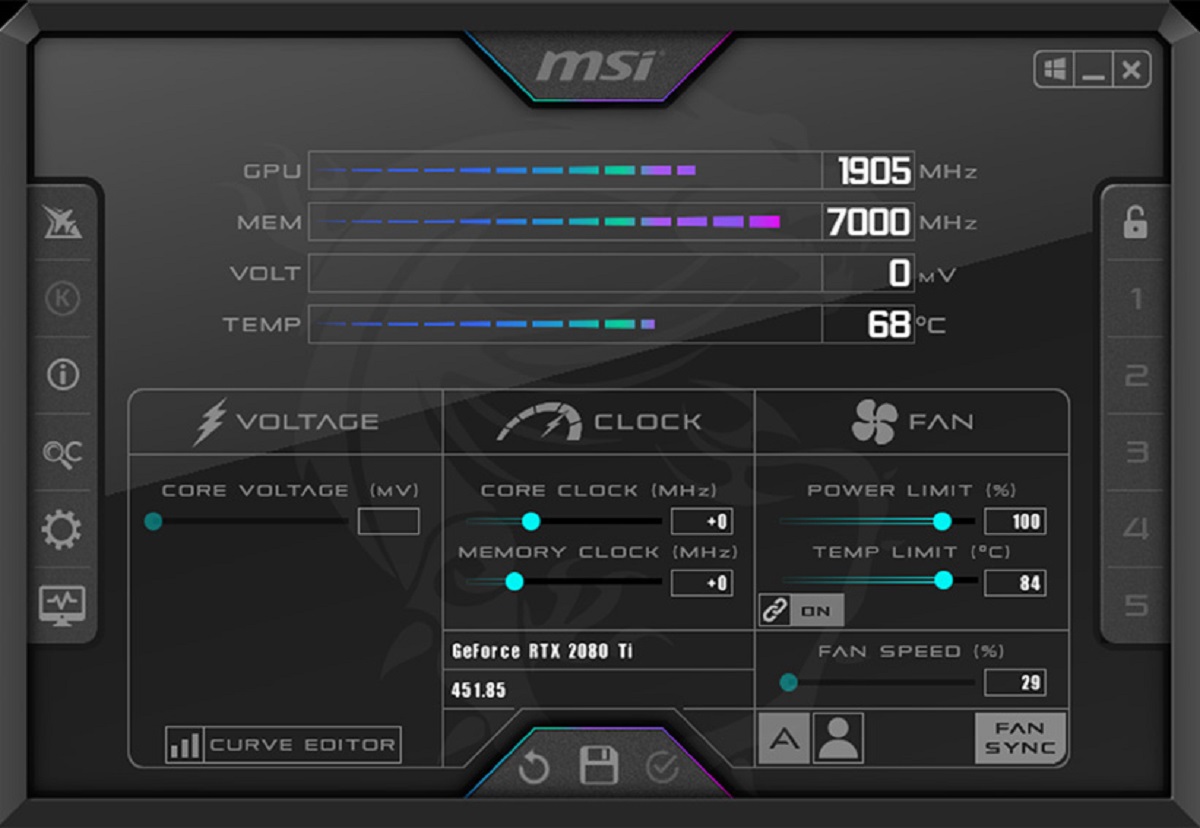
- Double-click on the MSI Afterburner shortcut: Double-click on the shortcut to open MSI Afterburner. The software will start to load, and you will see the main user interface appear on your screen.
- Accept any necessary permissions: Depending on your operating system and security settings, you may be prompted to grant administrative permissions to MSI Afterburner. If prompted, click “Yes” or enter the necessary credentials to proceed.
- Familiarize yourself with the user interface: Take a moment to explore the various sections and options available in the MSI Afterburner user interface. You will find sliders, graphs, monitoring windows, and customization options that will help you monitor and control your CPU temperature.
- Configure any desired settings: MSI Afterburner offers a range of customization options that allow you to tailor the software to your preferences. You can adjust the layout, colors, monitoring metrics, and even set up hotkeys for quick access. Spend some time fine-tuning these settings to your liking.
After following these steps, you should have MSI Afterburner launched and ready for monitoring your CPU temperature. In the next step, we will show you how to enable CPU temperature monitoring within the software.
Step 3: Enable CPU Temperature Monitoring
Enabling CPU temperature monitoring in MSI Afterburner allows you to keep track of your CPU’s temperature in real-time. By following these steps, you can easily enable CPU temperature monitoring:
- Open MSI Afterburner: Launch MSI Afterburner by clicking on its shortcut on the desktop or finding it in the Start Menu.
- Access the settings: In the main interface of MSI Afterburner, click on the gear icon or navigate to the “Settings” tab. This will open the settings window.
- Select the monitoring tab: In the settings window, click on the “Monitoring” tab. This is where you can configure the monitoring options for various system metrics, including the CPU temperature.
- Choose CPU temperature as a monitored item: Under the “Active hardware monitoring graphs” section, find the CPU temperature option in the list of available items. Check the box next to it to enable CPU temperature monitoring. You can also adjust the colors and position of the graph if desired.
- Adjust monitoring refresh rate: MSI Afterburner allows you to set the refresh rate for the monitoring graphs. You can choose a value that suits your needs or leave it at the default refresh rate.
- Save the settings: Once you have enabled CPU temperature monitoring and made any other desired changes, click on the “Apply” or “OK” button to save the settings and close the settings window.
After following these steps, you have successfully enabled CPU temperature monitoring in MSI Afterburner. In the next step, we will discuss how you can view the CPU temperature and other monitored metrics within the MSI Afterburner interface.
Step 4: View CPU Temperature in MSI Afterburner
After enabling CPU temperature monitoring in MSI Afterburner, you can easily view your CPU’s temperature in real-time. Follow these steps to view the CPU temperature within the MSI Afterburner interface:
- Launch MSI Afterburner: Open MSI Afterburner by clicking on its shortcut on the desktop or finding it in the Start Menu.
- Observe the monitoring graphs: In the main interface of MSI Afterburner, you will see various monitoring graphs and statistics. Look for the CPU temperature graph, which represents the current temperature of your CPU.
- Monitor the CPU temperature: Observe the CPU temperature graph as it updates in real-time. The graph will display the temperature values, usually in degrees Celsius, along the vertical axis, while the horizontal axis represents the passage of time.
- Read the CPU temperature: To determine the exact temperature value, hover your mouse cursor over the CPU temperature graph. MSI Afterburner will display a tooltip indicating the temperature at that specific point in time.
- Keep an eye on the temperature trends: Monitor how the CPU temperature fluctuates over time and observe any patterns or trends. If you notice the temperature consistently exceeding safe levels, it may indicate a need for better cooling or optimizing your system’s airflow.
- Note any abnormal temperature readings: If you observe unusually high temperatures or rapid temperature spikes, it could indicate a cooling problem or a CPU-intensive task running in the background. Take note of these instances and investigate further if necessary.
By following these steps, you can easily view your CPU’s temperature within the MSI Afterburner interface. In the next step, we will explore how you can customize the CPU temperature monitoring options to suit your preferences.
Step 5: Customize CPU Temperature Monitoring in MSI Afterburner
Customizing the CPU temperature monitoring options in MSI Afterburner allows you to personalize the display and behavior of the temperature monitoring graph. Follow these steps to customize the CPU temperature monitoring in MSI Afterburner:
- Open MSI Afterburner: Launch MSI Afterburner by clicking on its shortcut on the desktop or finding it in the Start Menu.
- Access the settings: Click on the gear icon or navigate to the “Settings” tab in the main interface of MSI Afterburner. This will open the settings window.
- Select the monitoring tab: In the settings window, click on the “Monitoring” tab. This is where you can customize the monitoring options for various system metrics, including the CPU temperature.
- Customize the CPU temperature graph: Under the “Active hardware monitoring graphs” section, locate the CPU temperature option. Click on the button next to it that resembles a small wrench or pencil icon.
- Modify graph settings: In the CPU temperature graph customization window, you can adjust various settings, such as the line color, fill color, graph position, and line thickness. Experiment with these settings to achieve the desired visual representation of the CPU temperature graph.
- Set up temperature thresholds: MSI Afterburner allows you to define temperature thresholds and configure alerts for when your CPU temperature exceeds a certain limit. Enable the option to display thresholds and specify the desired values for warning or critical temperature levels.
- Save the settings: Once you have made the desired customizations to the CPU temperature monitoring, click on the “Apply” or “OK” button to save the settings and close the customization window.
By following these steps, you can customize the CPU temperature monitoring in MSI Afterburner to your liking. Experiment with different settings to find the visual representation and thresholds that suit your preferences and needs. In the final step, we will discuss some troubleshooting tips and additional considerations for using MSI Afterburner.
Step 6: Troubleshooting and Tips
While MSI Afterburner is a reliable and user-friendly software for monitoring CPU temperature, you may encounter some common issues or have questions along the way. Here are some troubleshooting tips and additional considerations to help you get the most out of MSI Afterburner:
- Ensure compatibility: Make sure that the version of MSI Afterburner you have installed is compatible with your operating system and graphics card. Check for any available updates on the official MSI Afterburner website.
- Check hardware support: While MSI Afterburner supports a wide range of graphics cards, ensure that your particular model is supported for CPU temperature monitoring. Refer to the documentation or the MSI Afterburner website for compatibility information.
- Verify sensor readings: If you encounter unusually high or incorrect CPU temperature readings, check whether other monitoring software or BIOS readings give similar results. It’s possible that the sensors or monitoring software may have compatibility issues or require calibration.
- Monitor background processes: Keep an eye on background processes and applications that may be running and consuming CPU resources. These processes can increase CPU temperature. Use task manager tools to identify resource-intensive processes and close unnecessary ones.
- Ensure proper cooling: Verify that your computer’s cooling system, including CPU fans and heatsinks, is functioning properly and clean from any dust buildup. Insufficient cooling can lead to higher CPU temperatures. Consider cleaning or upgrading your cooling system if necessary.
- Consider undervolting: If you want to lower your CPU temperature and potentially reduce power consumption, you can explore undervolting. Undervolting is the process of adjusting the voltage supplied to the CPU to reduce heat generation. However, be cautious and ensure stability by performing appropriate stress testing.
- Backup and restore profiles: MSI Afterburner allows you to save and load profiles, including your custom monitoring settings. Consider backing up your profiles so that you can restore them if you need to reinstall the software or switch to a new computer.
- Refer to user community and forums: If you encounter any specific issues or have questions about using MSI Afterburner, consult the user community and forums. These resources can provide valuable insights, troubleshooting tips, and advice from experienced users.
By following these troubleshooting tips and considering best practices, you can optimize the use of MSI Afterburner for monitoring your CPU temperature and ensuring the stability and performance of your system.
Conclusion
Checking your CPU temperature is essential for maintaining the performance, stability, and longevity of your computer system. With MSI Afterburner, you can easily monitor your CPU temperature in real-time and make informed decisions about cooling and performance optimization.
In this guide, we have walked you through the step-by-step process of downloading, installing, and setting up MSI Afterburner to monitor your CPU temperature. We discussed the importance of monitoring CPU temperature and explored the features and benefits of using MSI Afterburner for this purpose.
We covered the steps to enable CPU temperature monitoring, view the temperature in the MSI Afterburner interface, and customize the monitoring options to suit your preferences. Additionally, we provided troubleshooting tips and additional considerations to help you overcome common issues and make the most out of MSI Afterburner.
By monitoring your CPU temperature with MSI Afterburner, you can prevent overheating, preserve the lifespan of your components, optimize performance, and prevent hardware damage. With the ability to customize the monitoring settings, you can tailor the software to your liking and keep track of your CPU temperature with ease.
Remember to regularly monitor your CPU temperature, especially during resource-intensive tasks and gaming sessions. By doing so, you can ensure that your system remains within safe temperature limits and continues to perform at its best.
So, start using MSI Afterburner to monitor your CPU temperature today and keep your computer running smoothly and efficiently!


