Introduction
Changing the wallpaper on your HP Ultrabook is a simple and effective way to personalize your device and give it a fresh look. Whether you want to add a stunning nature scene, a favorite photograph, or a motivational quote, customizing your wallpaper can enhance your overall computing experience.
An HP Ultrabook offers a sleek and powerful platform for productivity, entertainment, and creative pursuits. With its slim design, high-resolution display, and powerful hardware, an Ultrabook is a versatile companion for both work and play. By changing the wallpaper, you can reflect your unique personality and style while making your Ultrabook truly yours.
In this article, we’ll guide you through the simple process of changing the wallpaper on your HP Ultrabook. Whether you’re a tech-savvy user or a beginner, you’ll find the steps easy to follow, allowing you to customize your Ultrabook in no time.
Before we proceed, it’s important to note that the steps may slightly vary depending on the operating system and version installed on your HP Ultrabook. However, we’ll provide general instructions that should work for most HP Ultrabooks.
So, if you’re ready to give your HP Ultrabook a fresh new look, let’s dive into the step-by-step guide on changing the wallpaper!
Step 1: Accessing the Desktop Background Settings
To change the wallpaper on your HP Ultrabook, you’ll need to access the desktop background settings. Here’s how you can do it:
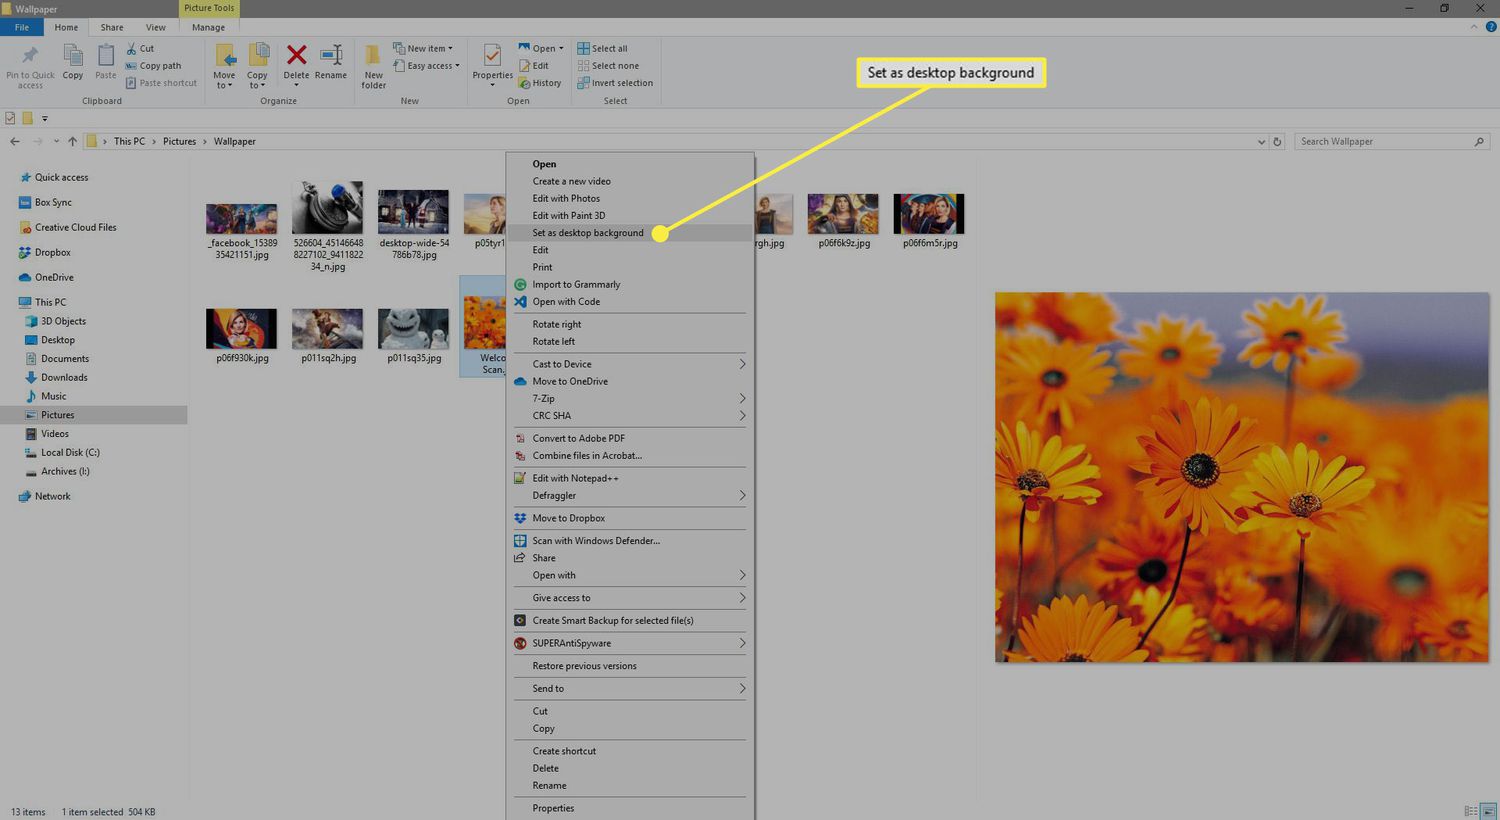
- Start by right-clicking on an empty area of your desktop. This will bring up a context menu with various options.
- From the context menu, select “Personalize” or “Display settings,” depending on your operating system version. This will open the personalization settings for your Ultrabook.
- In the personalization settings, you’ll see different customization options, including the wallpaper. Look for an option like “Background” or “Desktop background” and click on it.
- A new window will open, displaying the available wallpaper options. You can choose from a variety of pre-installed wallpapers or browse through your computer’s files to select your own image. Some Ultrabooks may also offer the option to set a solid color as the background.
- Once you’ve found the wallpaper you want to use, click on it to select it. You can also preview how it will look on your Ultrabook’s desktop by using the “Preview” button.
- After selecting the desired wallpaper, click on the “Apply” or “Save changes” button to apply it to your Ultrabook’s desktop.
That’s it! You have successfully accessed the desktop background settings on your HP Ultrabook. Now, let’s move on to the next step, where we’ll guide you on choosing the perfect wallpaper for your device.
Step 2: Choosing a Wallpaper
Now that you’ve accessed the desktop background settings on your HP Ultrabook, it’s time to choose the perfect wallpaper that suits your style and preferences. Here’s how you can do it:
- Take some time to think about the kind of wallpaper you want. Do you prefer a serene landscape, a vibrant abstract design, or a favorite photograph? Consider your personal taste and the mood you want to create on your Ultrabook’s desktop.
- If you want to use one of the pre-installed wallpapers, browse through the available options in the desktop background settings window. These wallpapers are designed to fit different screen resolutions and aspect ratios, ensuring a seamless and visually appealing experience.
- Alternatively, if you have your own image that you want to use as a wallpaper, click on the “Browse” or “Choose file” button in the desktop background settings window. Navigate to the location on your computer where the image is stored, and select it. This will set the chosen image as your Ultrabook’s wallpaper.
- If you’re unsure about which wallpaper to choose, you can also explore online resources and websites that offer a wide range of high-quality wallpapers. These websites often categorize wallpapers based on themes, resolutions, and popularity, making it easier for you to find something that catches your eye.
- Remember that your Ultrabook’s wallpaper can reflect your personality and inspire you during your daily tasks. Choose a wallpaper that resonates with you and enhances your overall computing experience.
With these steps, you can now select the perfect wallpaper for your HP Ultrabook. Once you’ve found the one that speaks to you, let’s move on to the next step, where we’ll guide you through applying the new wallpaper.
Step 3: Applying the New Wallpaper
After you have chosen the perfect wallpaper for your HP Ultrabook, it’s time to apply it and give your device a fresh new look. Follow these simple steps to apply the new wallpaper:
- In the desktop background settings window, make sure you have selected the desired wallpaper that you want to apply to your Ultrabook’s desktop.
- Preview the selected wallpaper by using the “Preview” button. This will give you an idea of how it will look on your Ultrabook’s screen.
- Once you are satisfied with your choice, click on the “Apply” or “Save changes” button. This will immediately apply the new wallpaper to your Ultrabook’s desktop.
Take a moment to admire the refreshed look of your Ultrabook’s desktop with the new wallpaper. You may find that it adds a touch of personalization and enhances your overall computing experience.
If you ever want to change the wallpaper again in the future, simply repeat the previous steps and select a new image. It’s a quick and easy process that allows you to constantly update and customize your Ultrabook’s appearance.
Remember, your Ultrabook’s wallpaper is a reflection of your style and preferences. Don’t be afraid to experiment with different wallpapers and change them regularly to suit your mood or to match the seasons or holidays.
Now that you have successfully applied the new wallpaper, enjoy using your HP Ultrabook with a fresh and customized look. Personalizing your Ultrabook can bring a sense of ownership and make your device truly yours.
Congratulations on completing the process of changing the wallpaper on your HP Ultrabook. You now have a device that’s not only powerful but also tailored to your unique style and tastes.
Conclusion
Changing the wallpaper on your HP Ultrabook is a simple yet impactful way to personalize your device and make it feel more like your own. With just a few clicks, you can transform the appearance of your Ultrabook’s desktop and reflect your unique style and preferences.
In this article, we have provided you with a step-by-step guide on how to change the wallpaper on your HP Ultrabook. We started by explaining how to access the desktop background settings, where you can find various customization options. We then guided you through the process of choosing the perfect wallpaper, whether it’s from the pre-installed options or your own image. Finally, we showed you how to apply the new wallpaper and enjoy the refreshed look of your Ultrabook’s desktop.
By personalizing your Ultrabook’s wallpaper, you can create a more enjoyable and inspiring computing experience. Whether you choose a scenic landscape to relax your mind or a vibrant design to energize your workspace, the right wallpaper can have a significant impact on your mood and productivity.
Remember, changing the wallpaper is not a one-time task. You can always revisit the desktop background settings in the future to experiment with new wallpapers and give your Ultrabook a fresh new look. Allow your device to evolve and adapt to your changing preferences over time.
So go ahead and explore the world of wallpapers, unleash your creativity, and make your HP Ultrabook truly yours. Enjoy the process of customizing your device and let your personality shine through every time you power it on.
Thank you for choosing this guide as your companion in changing the wallpaper on your HP Ultrabook. We hope that the steps provided have been helpful, and we wish you endless joy and productivity with your personalized device.