Why is it important to change the time in Windows 10?
Changing the time in Windows 10 may seem like a simple task, but it holds significant importance for various reasons. Here are a few key reasons why changing the time in Windows 10 is essential:
1. Accuracy: The accuracy of the system time is crucial for many applications and functions on your computer. It ensures that timestamps in your files, emails, and other documents are correct. Additionally, accurate time is necessary for scheduling software updates, backups, and system maintenance tasks.
2. Time-sensitive Applications: Various applications and services rely on accurate time to function correctly. For instance, online banking, financial transactions, and stock trading platforms require accurate time to ensure secure and accurate transactions. Similarly, time-dependent software, such as time-limited trials or software licenses, require proper time synchronization to function correctly.
3. Time Zone Differences: Changing the time in Windows 10 allows you to set the correct time zone based on your location. This is especially important if you travel frequently or if you are dealing with people or organizations in different time zones. Ensuring that your computer displays the correct local time can help prevent confusion and facilitate communication and coordination.
4. Daylight Saving Time: Daylight Saving Time (DST) adjustments are made in many countries to optimize daylight usage and conserve energy. It is crucial to change the time in Windows 10 during DST transitions to ensure that your computer automatically adjusts the time accordingly. This helps avoid discrepancies and keeps your system in sync with the local time standards.
5. Event Reminder Accuracy: Your computer’s clock is often used to set reminders for important events and appointments. Changing the time ensures that these reminders are accurate and reliable. Whether it’s a work deadline, a virtual meeting, or a personal commitment, having the correct time displayed on your computer reduces the risk of missing important events due to inaccurate time settings.
Overall, changing the time in Windows 10 is essential for maintaining the accuracy and functionality of various applications and services. It helps ensure that timestamps are correct, time-sensitive transactions are executed accurately, and communication across different time zones is facilitated. By keeping your system’s time up to date, you can avoid issues and optimize your computer’s performance for daily tasks and critical operations.
Step 1: Opening the Date and Time settings
Changing the time in Windows 10 can be done through the Date and Time settings, which provide a range of options for customizing your system’s time and date settings. Here’s how you can open the Date and Time settings:
Method 1: Using the taskbar:
- Look for the date and time display on the right side of your taskbar, which is usually located at the bottom-right corner of the screen.
- Click on the date and time display to open the calendar and clock popup.
- At the bottom of the popup, click on the “Date and time settings” link. This will open the Date and Time settings window in the Settings app.
Method 2: Using the Settings app:
- Click on the Start button in the bottom-left corner of the screen to open the Start menu.
- Click on the “Settings” icon, which resembles a gear. Alternatively, you can press the “Windows key + I” keyboard shortcut to open the Settings app directly.
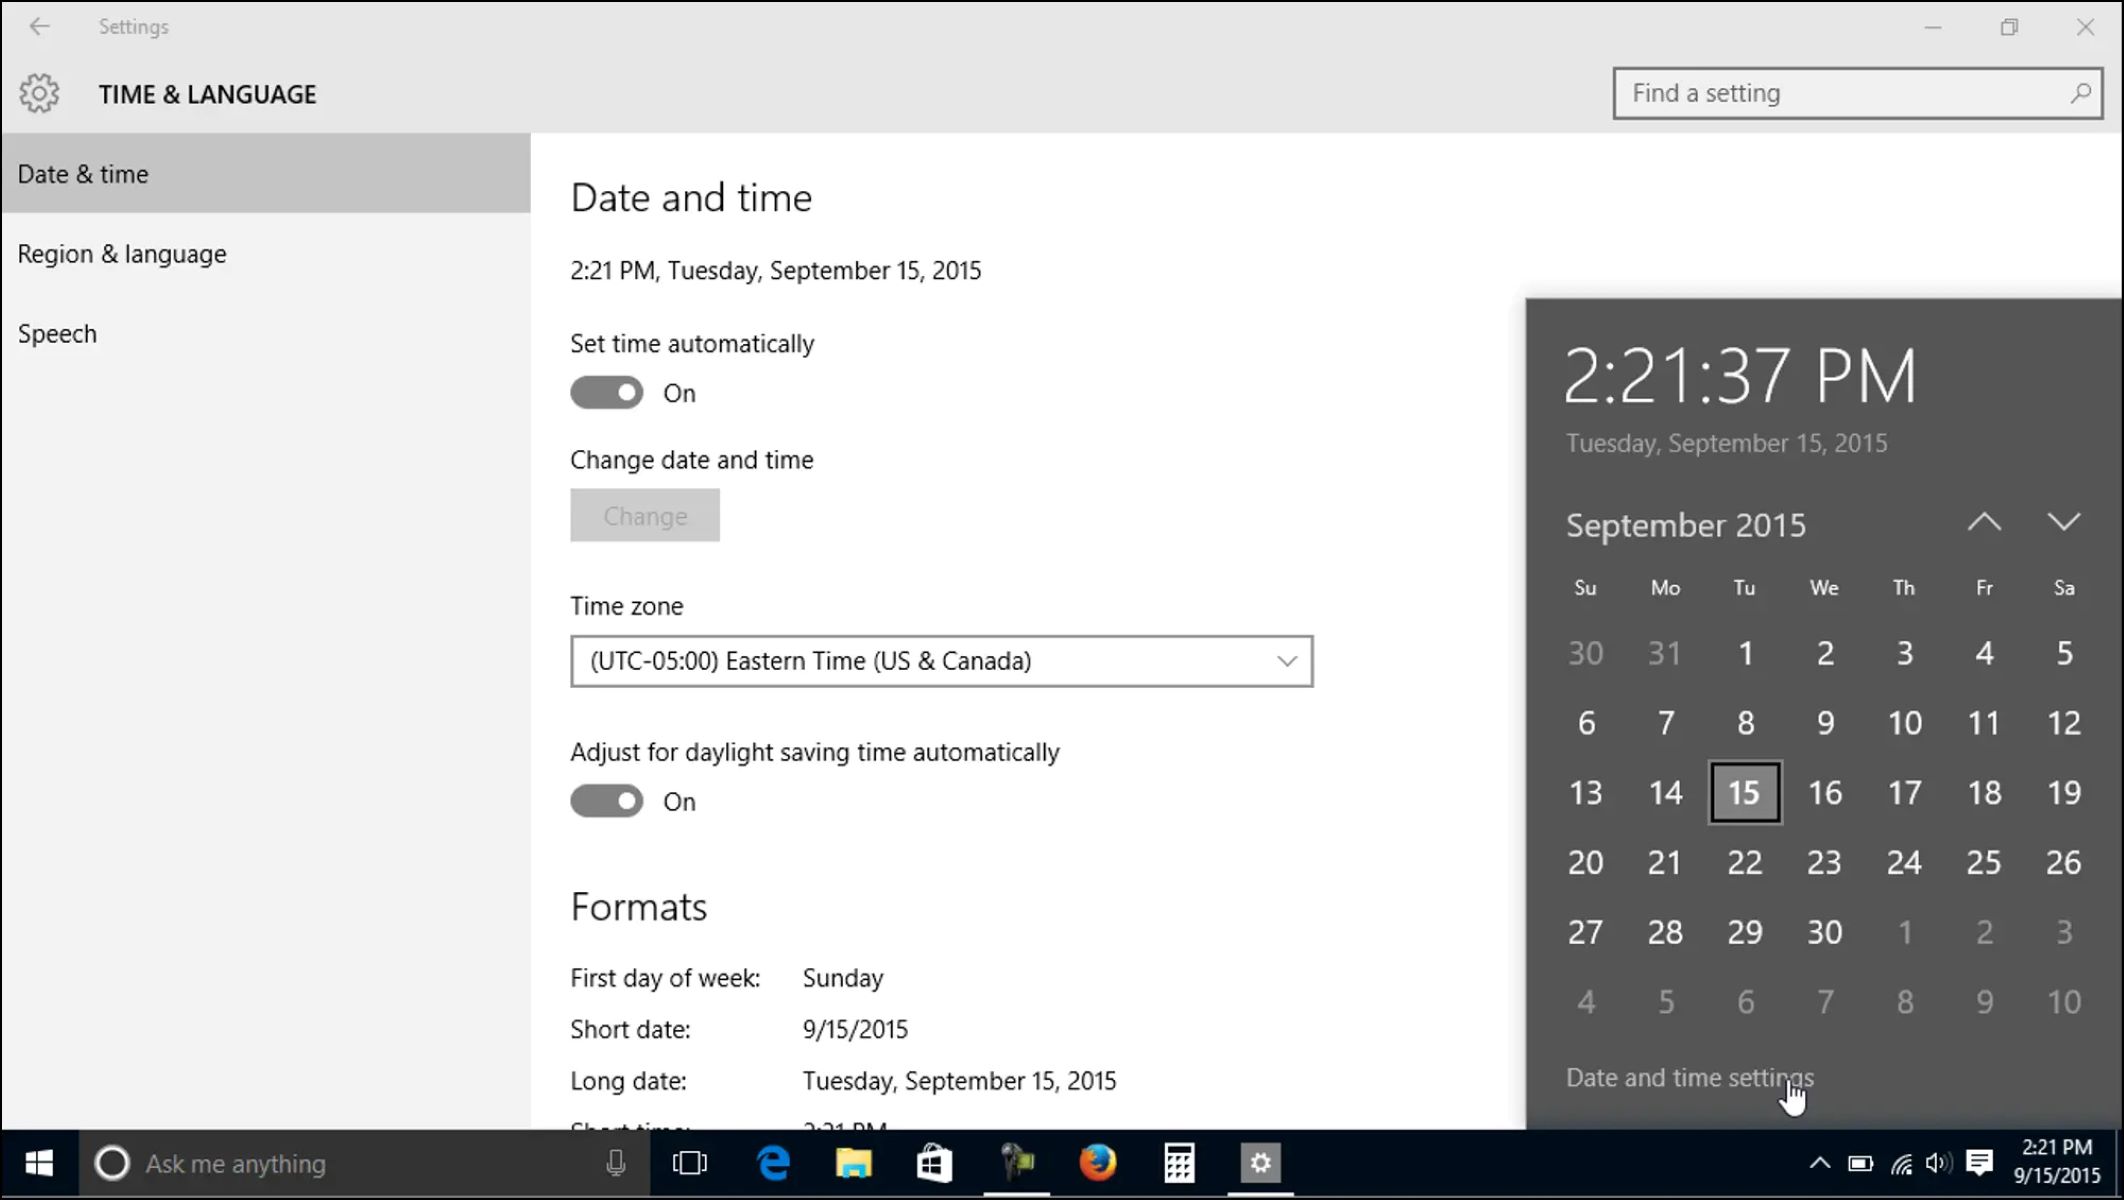
- In the Settings app, click on the “Time & Language” category.
- From the left sidebar, select the “Date & Time” tab.
These methods allow you to access the Date and Time settings in Windows 10 easily. Once you have opened the settings, you can proceed to the next step of changing the time based on your requirements.
It’s important to note that accessing the Date and Time settings requires administrative privileges. If you are using a shared or managed computer, you may need to consult your system administrator or provide the necessary credentials to make changes to the time settings.
Step 2: Changing the time manually
If you need to change the time manually in Windows 10, you can easily do so through the Date and Time settings. Here’s how:
- Open the Date and Time settings using one of the methods outlined in Step 1.
- Once in the Date and Time settings window, you will see the option to set the time manually.
- To change the time, click on the toggle switch next to “Set time automatically” to turn it off.
- Once the automatic time setting is turned off, you can now modify the time manually.
- Click on the “Change” button next to the time displayed.
- A new window will appear, allowing you to adjust the date and time. Use the provided fields to enter the desired time.
- Once you have entered the correct time, click on the “OK” button to save the changes.
- You will be returned to the Date and Time settings window. Verify that the time displayed now matches the time you have set manually.
- Close the Date and Time settings window.
Changing the time manually can be useful in situations where the automatic time setting is not accurate or if you prefer to have more control over the system’s time. However, it is worth noting that manually setting the time means that it will not automatically update based on time zone changes or daylight saving adjustments.
If you want your computer to always display the correct time, you may want to consider enabling the “Set time automatically” option and using the internet time synchronization feature, as mentioned in Step 4. This ensures that your system’s time remains accurate and synced with the global time standards.
Step 3: Changing the time zone
Changing the time zone in Windows 10 is necessary to ensure that your computer displays the correct local time based on your geographical location. Here’s how you can change the time zone:
- Open the Date and Time settings using one of the methods outlined in Step 1.
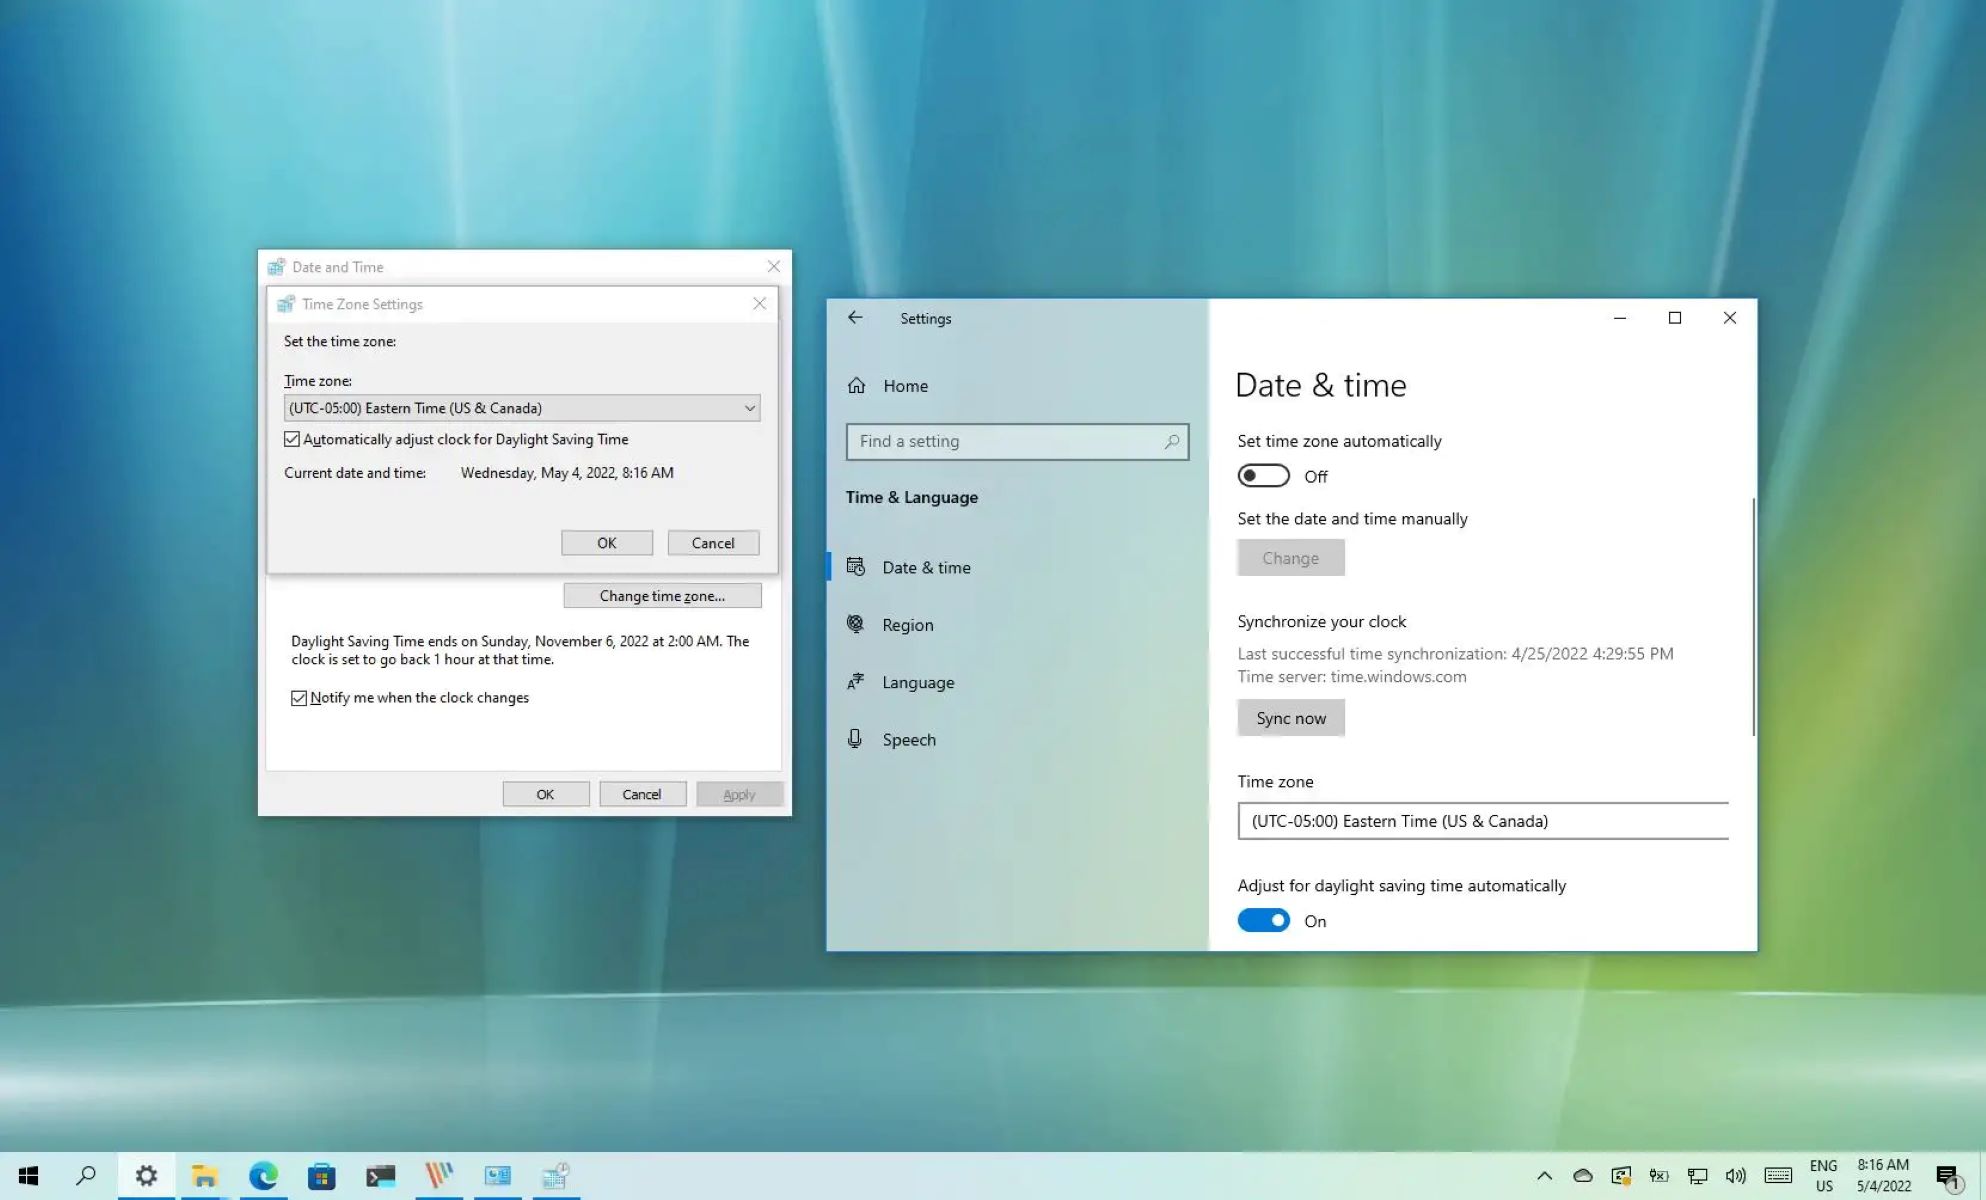
- In the Date and Time settings window, make sure you are on the “Date & Time” tab.
- Scroll down to the “Time zone” section.
- Click on the drop-down menu under “Time zone” to view the list of available time zones.
- Select the appropriate time zone based on your location. You can search for a specific time zone or scroll through the list to find the one you need.
- Once you have selected the correct time zone, close the Date and Time settings window.
Changing the time zone ensures that your computer displays the local time for your geographical region. It is especially important if you travel frequently or if you frequently communicate with people or organizations in different time zones. By setting the correct time zone, you can avoid confusion and accurately coordinate activities based on local time.
Keep in mind that changing the time zone does not automatically update the time on your computer. You still need to manually set the time or enable the automatic time setting if you want your system to display the current time accurately.
Lastly, if you are unsure about the appropriate time zone for your location, you can use online resources or consult with your local authorities to determine the correct time zone to select in Windows 10.
Step 4: Using the internet time synchronization feature
Windows 10 offers a convenient feature that allows you to synchronize your computer’s time with an internet time server. This ensures that your system’s time remains accurate and aligned with global time standards. Here’s how you can use the internet time synchronization feature:
- Open the Date and Time settings using one of the methods outlined in Step 1.
- In the Date and Time settings window, make sure you are on the “Date & Time” tab.
- Scroll down to the “Synchronize your clock” section.
- Click on the “Sync now” button. This will initiate the synchronization process and update your system’s time.
- Windows 10 will connect to an internet time server and retrieve the current time.
- Once the synchronization is complete, you will see a message indicating the success of the synchronization process.
- Close the Date and Time settings window.
By using the internet time synchronization feature, you can ensure that your computer’s time is always accurate and up to date. Windows 10 connects to a predefined time server, typically one operated by Microsoft, to retrieve the correct time. This allows your computer to automatically adjust for changes in time zone and daylight saving time, ensuring that the displayed time remains correct.
It’s important to note that internet time synchronization requires an active internet connection. If your computer is not connected to the internet, the synchronization process will fail. In such cases, you can apply the manual time setting method mentioned in Step 2 to set the time accurately.
Using the internet time synchronization feature is a convenient way to maintain accurate time on your Windows 10 computer without the need for manual adjustments. It saves you time and ensures that your system’s time remains in sync with the global time standards.
Step 5: Troubleshooting common time-related issues
While changing the time in Windows 10 is usually a straightforward process, you may encounter some common time-related issues along the way. Here are a few troubleshooting steps to help you resolve these issues:
Issue 1: Incorrect time or time zone:
- Ensure that you have set the correct time zone in the Date and Time settings, as described in Step 3.
- If the time is still incorrect, try enabling the “Set time automatically” option in the Date and Time settings. This allows Windows to automatically synchronize the time with an internet time server, as explained in Step 4.
- If the issue persists, you can try manually setting the time following the steps outlined in Step 2.
Issue 2: Time synchronization errors:
- If you encounter synchronization errors while using the internet time synchronization feature, try restarting your computer and then attempt the synchronization again.
- Ensure that your computer has a stable internet connection. If the connection is weak or unreliable, the synchronization process may fail.
- If synchronization issues persist, you can try selecting a different internet time server. In the Date and Time settings, click on the “Change” button next to the “Sync now” option, and then select a different server from the drop-down menu.
Issue 3: Daylight Saving Time adjustments:
- For regions that observe Daylight Saving Time (DST), ensure that the “Adjust for daylight saving time automatically” option is enabled in the Date and Time settings.
- If the time does not automatically adjust for DST, you can try manually changing the time zone to one that observes DST and then changing it back to your correct time zone. This can sometimes trigger the correct DST adjustment.
If you are unable to resolve time-related issues using the troubleshooting steps above, you may need to seek additional technical support from your system administrator or Microsoft support.
It’s essential to keep your computer’s time accurate, as it influences various aspects of your system’s functionality. By troubleshooting and resolving common time-related issues, you can ensure that your Windows 10 computer displays the correct time and functions properly.
Conclusion
Changing the time in Windows 10 is a simple yet significant task that ensures the accuracy and functionality of your computer. By following the steps outlined in this guide, you can easily change the time, time zone, and troubleshoot common time-related issues on your Windows 10 system.
First, opening the Date and Time settings allows you to access the necessary options for time customization. From there, you can proceed to change the time manually, if needed, based on your preferences or requirements.
Changing the time zone is crucial for displaying the correct local time, especially when dealing with different time zones or traveling frequently. Setting the appropriate time zone ensures effective communication and coordination.
Utilizing the internet time synchronization feature enables your computer to stay accurately synced with global time standards. By synchronizing your time with an internet time server, you can automate the process and avoid discrepancies caused by time zone or daylight saving changes.
If you encounter any time-related issues, troubleshooting steps can help you resolve them. By ensuring the correct time, time zone, and synchronization settings, you can address common problems and maintain accurate time on your Windows 10 computer.
In conclusion, understanding how to change the time in Windows 10 equips you with the knowledge and tools to keep your system’s time accurate and aligned with global standards. By following the steps outlined in this guide and addressing any issues that may arise, you can ensure that your Windows 10 computer displays the correct time and operates smoothly in various time-related applications and services.