Introduction
Adjusting the time zone on your Windows 10 computer is essential for ensuring that the date and time displayed are accurate based on your location. Whether you’re traveling to a different time zone or you simply need to update your settings, Windows 10 offers a simple and straightforward method to change the time zone. In this guide, we will walk you through the step-by-step process to easily change the time zone on your Windows 10 computer.
By correctly setting your time zone, you can ensure that your computer’s clock aligns with the local time, allowing you to schedule your tasks and appointments accurately. Additionally, having the correct time zone is crucial for syncing with online services, such as email or cloud-based applications, as they rely on accurate time information to function properly. So, whether you are a frequent traveler or simply need to adjust your time zone temporarily, knowing how to change the time zone on Windows 10 is a valuable skill.
In this guide, we will also cover how to enable automatic time zone synchronization, which can automatically adjust the time zone based on your current location. This feature is not only convenient, but it also ensures that your computer’s clock is always accurate, even if you travel across different time zones frequently.
If you prefer to set the time manually or change the time format, we will provide instructions for those options as well. These additional settings can be useful if you have specific preferences or requirements, allowing you to customize your Windows 10 experience to suit your needs.
Now, let’s dive into the step-by-step process to change the time zone on your Windows 10 computer.
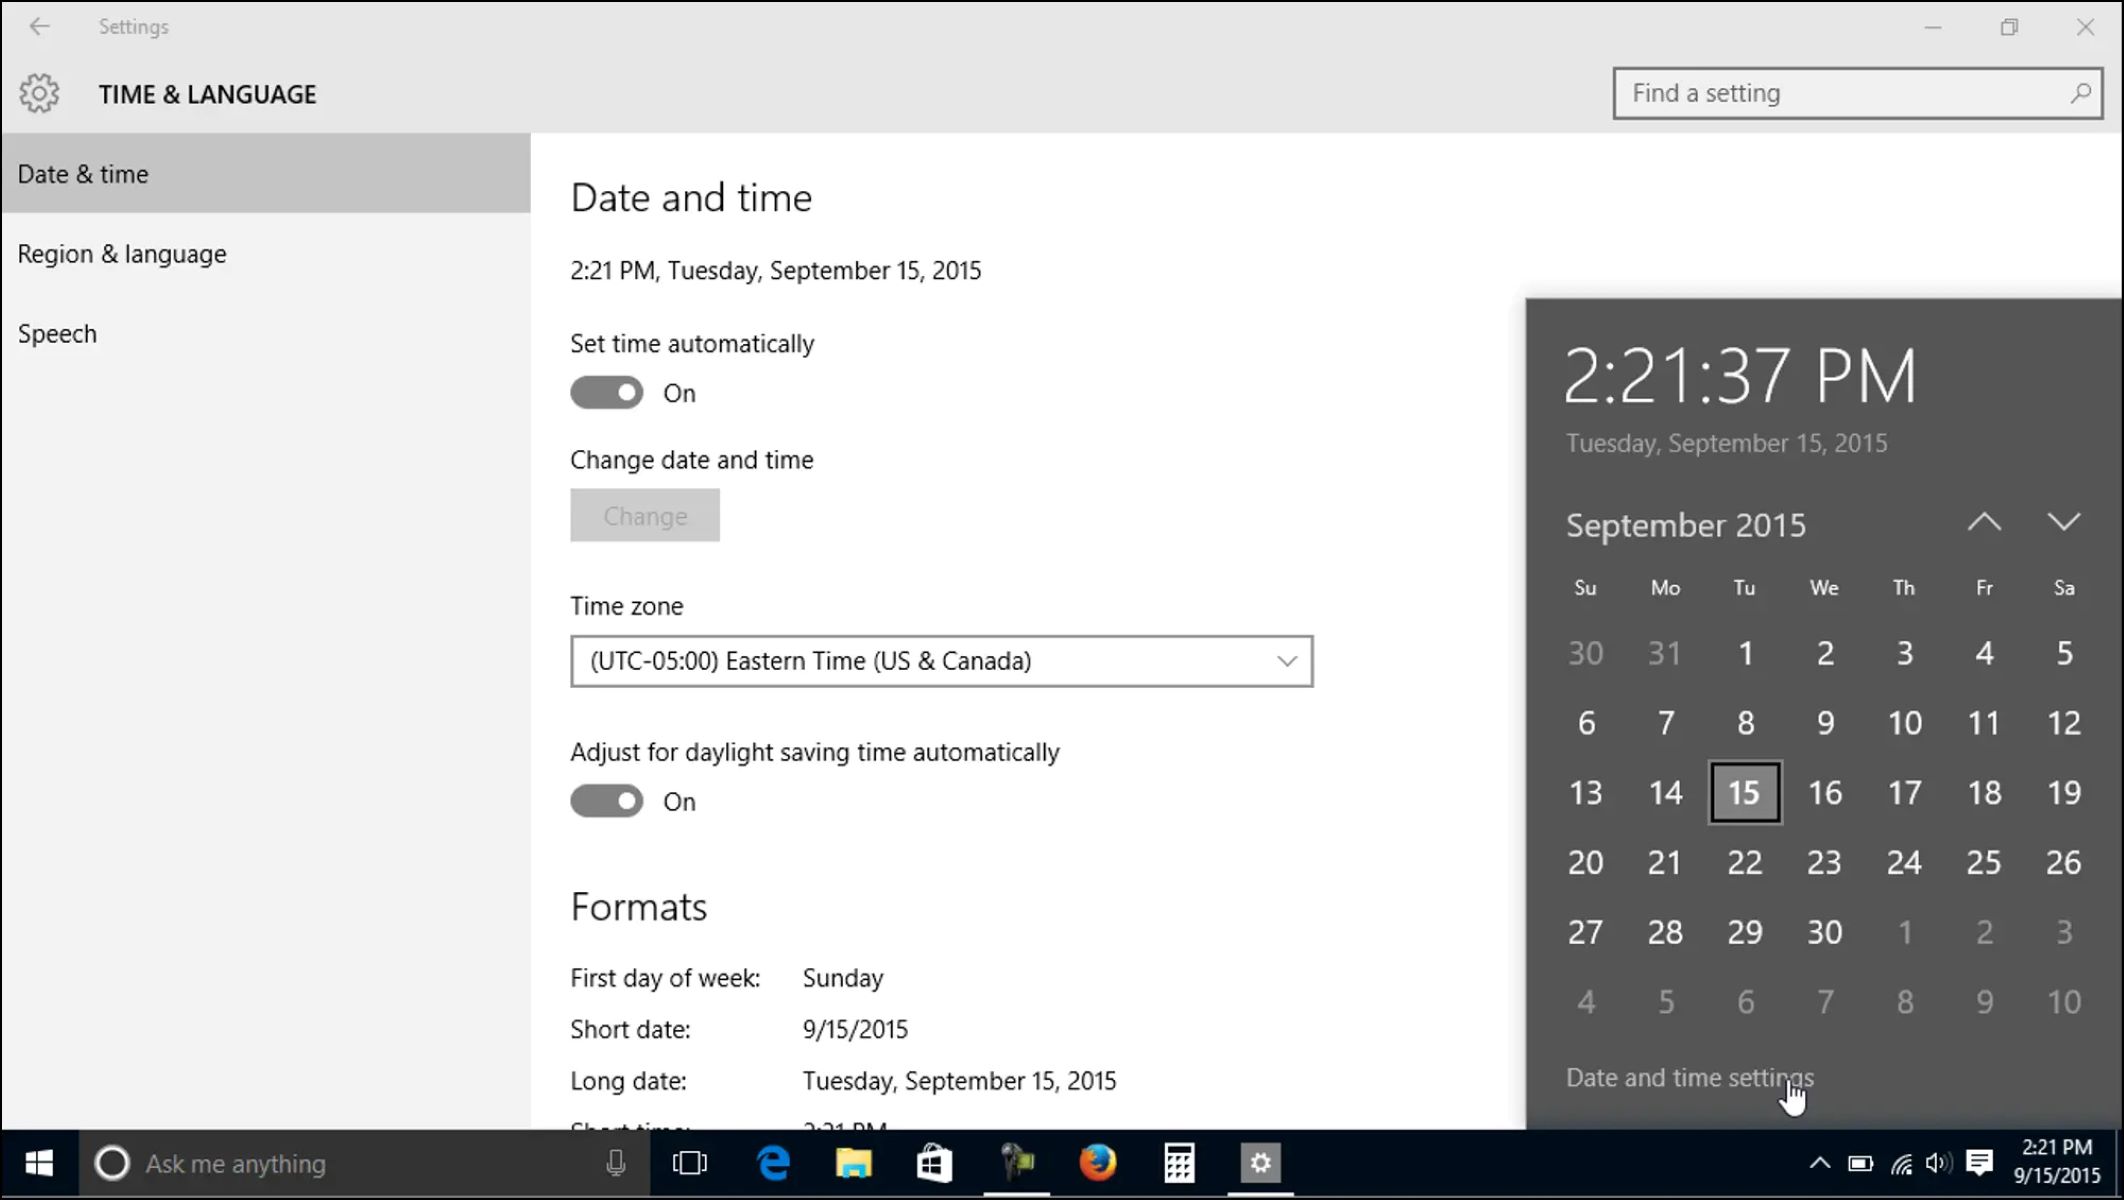
Step 1: Open the Date & Time Settings
The first step in changing the time zone on your Windows 10 computer is to open the Date & Time settings. Here’s how you can do it:
- Click on the “Start” button located at the bottom left corner of your screen. This will open the Start menu.
- From the Start menu, select the “Settings” icon. It resembles a gear and can be found above the power button. Click on it to open the Settings window.
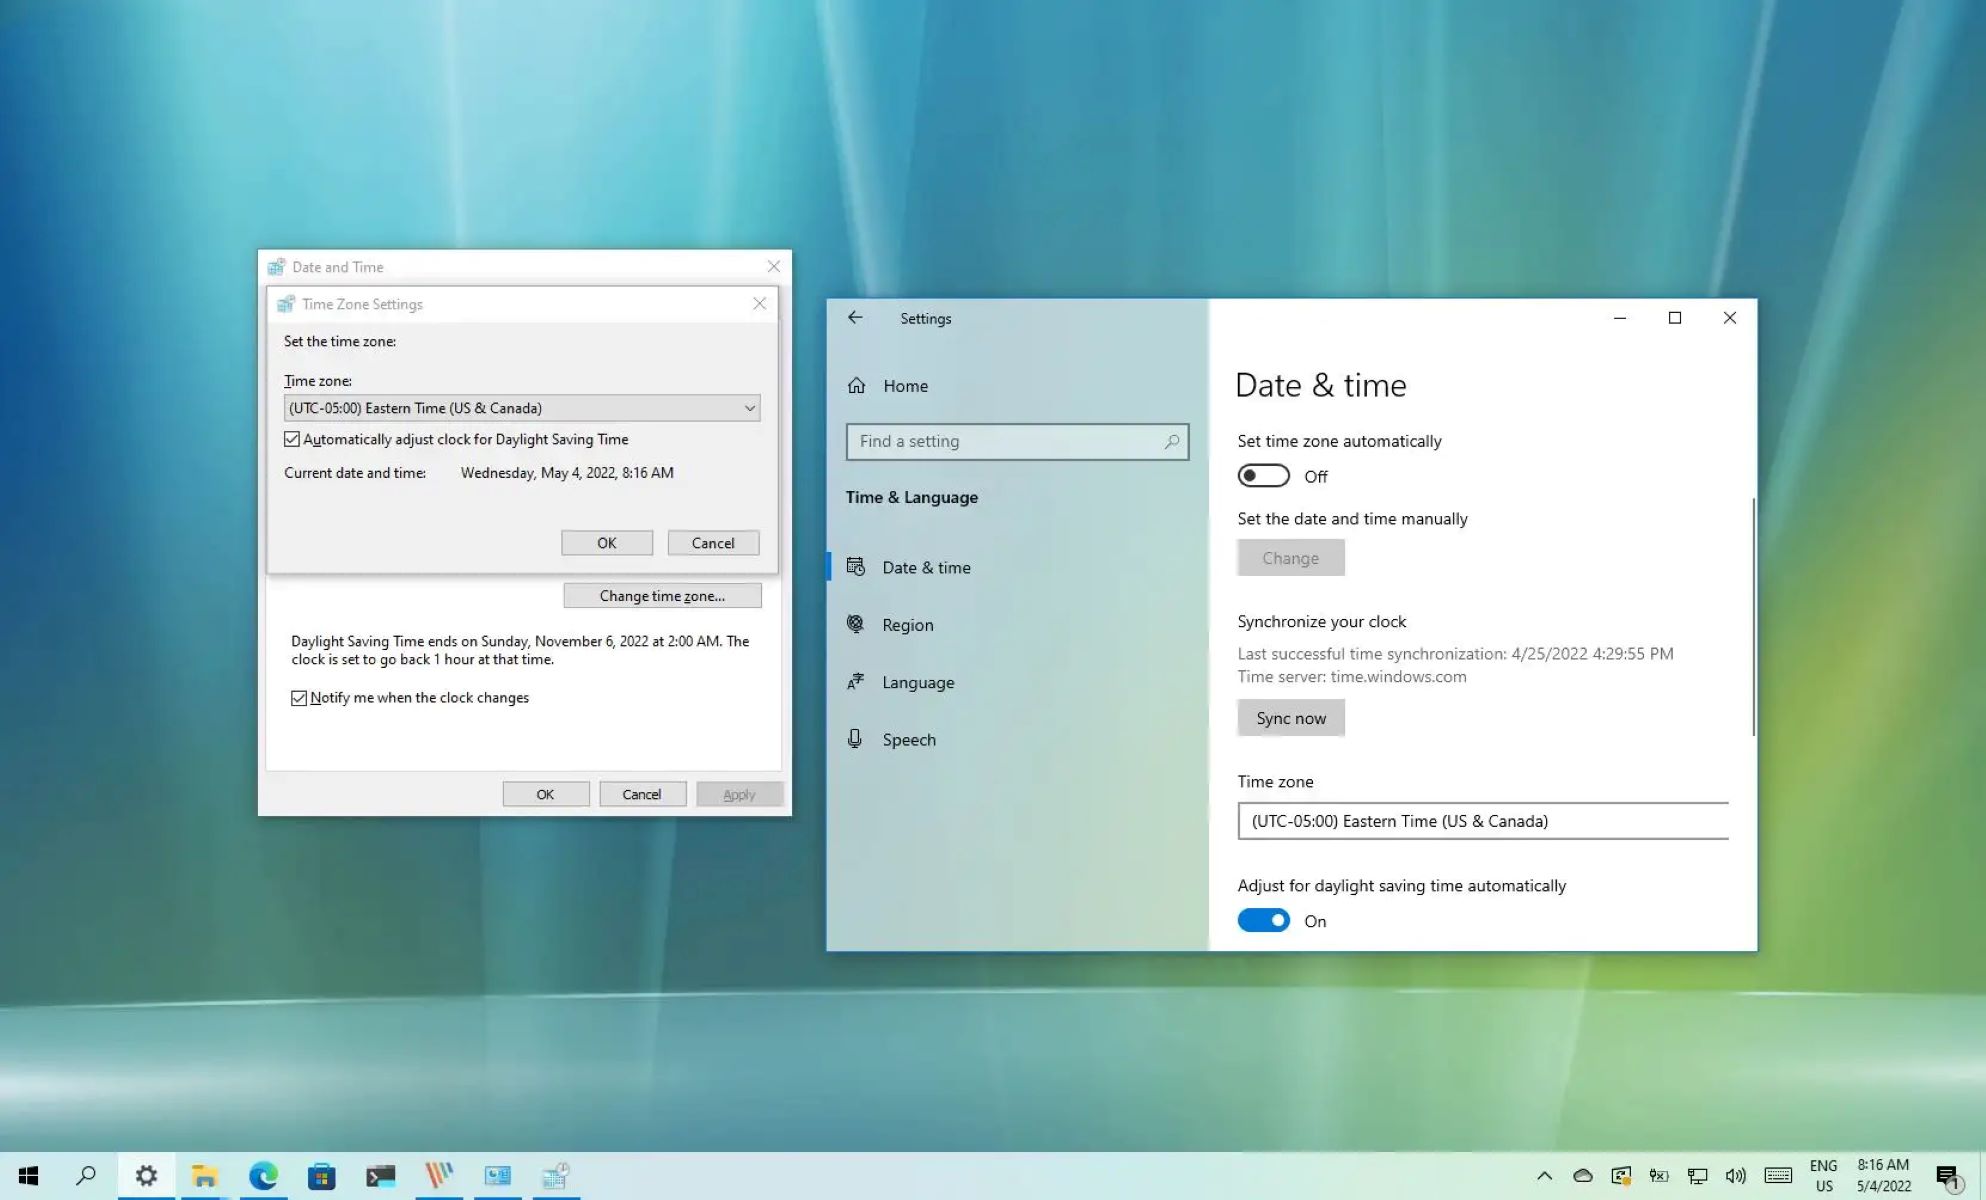
- In the Settings window, locate and click on the “Time & Language” option. It is represented by an icon with a clock and a globe.
- Within the Time & Language settings, click on the “Date & Time” tab in the left-hand menu. This will show the date and time settings options on the right-hand side of the window.
- You have now successfully navigated to the Date & Time settings. Continue to the next step to adjust the time zone.
Opening the Date & Time settings is the first crucial step in changing your time zone on Windows 10. By following the instructions above, you will easily access the necessary settings to proceed with the time zone adjustment.
Step 2: Adjust the Time Zone
Once you have opened the Date & Time settings, you are ready to adjust the time zone on your Windows 10 computer. Follow the steps below to change the time zone:
- Under the “Date & Time” settings, locate the section labeled “Time zone”. It will display your current time zone.
- To change the time zone, click on the drop-down menu next to the current time zone. A list of available time zones will appear.
- Scroll through the list to find your desired time zone and click on it to select it. The selected time zone will be highlighted.
- Once you have chosen the desired time zone, the changes will take effect immediately. Your computer’s clock will adjust accordingly to the selected time zone.
Adjusting the time zone settings allows you to align your computer’s clock with the local time of your chosen location. This ensures that your system displays the accurate time no matter where you are.
It’s important to note that Windows 10 provides a comprehensive list of time zones, covering various regions and countries. If you are unsure about the time zone to select, you can use the “Set time zone automatically” feature, which we will discuss in the next step, to let your computer determine the correct time zone based on your geographic location.
Now that you have successfully adjusted the time zone, you can proceed to the next step to enable automatic time zone synchronization.
Step 3: Enable Automatic Time Zone
Windows 10 offers a convenient feature called “Set time zone automatically” that allows your computer to automatically adjust the time zone based on your current location. Enabling this feature ensures that your computer’s clock is always accurate, even if you travel across different time zones frequently. Here’s how you can enable automatic time zone synchronization:
- In the Date & Time settings, scroll down to the “Set time zone automatically” option.
- Toggle the switch to the “On” position.
- Windows 10 will now use your device’s location information to automatically detect and update the time zone as you move to different regions.
With automatic time zone enabled, you no longer need to manually adjust the time zone settings whenever you travel. Windows 10 will take care of updating the time zone for you, ensuring that your computer displays the correct local time wherever you are.
Please note that for the automatic time zone feature to work properly, your device needs to have location services enabled. If you haven’t done so, you may be prompted to turn on location services when enabling this feature.
Enabling automatic time zone synchronization simplifies the process of keeping your computer’s clock accurate, allowing you to focus on your tasks without worrying about adjusting the time zone settings manually.
However, if you prefer to set the time manually or have specific time zone preferences, you can proceed to the next step to learn how to change the time manually on Windows 10.
Step 4: Change the Time Manually (Optional)
If you prefer to set the time manually on your Windows 10 computer, or if you have specific time requirements, you have the option to change the time manually. Follow the steps below to adjust the time manually:
- In the Date & Time settings, locate the section labeled “Change date and time”. You will see the current date and time displayed.
- To change the date, click on the “Change” button next to the displayed date. A calendar will appear, allowing you to select the desired date.
- To change the time, click on the “Change” button next to the displayed time. You can then enter the desired time in the provided text box.
- After making the necessary changes, click on the “Change” button to apply the new date and time settings to your Windows 10 computer.
Changing the time manually gives you full control over the date and time displayed on your computer. This can be useful in situations where you need to set a specific time for a task or event, or when your computer’s clock is not synchronized with the correct time.
Keep in mind that when changing the time manually, it’s important to ensure that you enter the accurate date and time information to maintain the correct chronological order of your tasks and appointments.
Now that you know how to change the time manually, you can proceed to the next step to learn about setting the time format on Windows 10.
Step 5: Set Time Format (Optional)
In addition to adjusting the time zone and setting the time manually, Windows 10 allows you to customize the time format according to your preference. You can choose between a 12-hour clock or a 24-hour clock format. Here’s how you can set the time format:
- In the Date & Time settings, scroll down to the “Formats” section.
- Click on the “Change” button next to the “Short time” or “Long time” option, depending on which time format you want to modify.
- A drop-down list will appear, allowing you to select your preferred time format. Choose either the 12-hour clock (AM/PM) or the 24-hour clock format.
- Once you have selected the desired time format, click on the “Apply” button to save the changes.
Setting the time format allows you to display the time in a way that is familiar and convenient for you. If you prefer a specific time format, such as using the 24-hour clock format commonly used in military or certain countries, Windows 10 provides the flexibility to adjust it accordingly.
It’s worth mentioning that changing the time format will only affect how the time is displayed on your Windows 10 computer. It does not impact the actual functioning of the clock or the time synchronization. The time format setting is purely a cosmetic preference.
Now that you know how to set the time format on Windows 10, you can customize your time display to suit your personal preference.
Conclusion
Adjusting the time zone and managing the time settings on your Windows 10 computer is essential for keeping your system’s clock accurate and aligned with your local time. Whether you are traveling to different time zones or simply need to customize your time preferences, Windows 10 provides a user-friendly interface to make these adjustments. By following the step-by-step instructions outlined in this guide, you can easily change the time zone, enable automatic time zone synchronization, set the time manually (if desired), and customize the time format.
Having the correct time zone is not only important for displaying the accurate time on your computer, but it also ensures that your scheduled events, appointments, and tasks are organized properly. Additionally, enabling automatic time zone synchronization eliminates the hassle of manually adjusting the time zone when you travel, as Windows 10 will do it automatically based on your location.
Remember that you have the flexibility to set the time manually if you have specific time requirements or preferences. This allows you to tailor the time display on your computer to suit your needs.
Windows 10 provides a range of time-related settings, giving you control over how time is managed on your computer. By following the instructions in this guide, you can easily navigate through the Date & Time settings and make the necessary adjustments that ensure your computer’s clock is accurate and synchronized.
Now that you have mastered the process of changing the time zone, enabling automatic time zone synchronization, setting the time manually, and customizing the time format on Windows 10, you can confidently manage your time settings to fit your lifestyle and geographical location.