Introduction
Windows 10 provides a range of customizable features to personalize your computer and make it uniquely yours. One of these features is the screensaver, which allows you to display your favorite images or animations when your computer is idle. Changing the screensaver on Windows 10 is a simple process, and in this article, we will guide you through the steps to do so.
Whether you want to showcase your vacation photos, display soothing nature scenes, or add a touch of nostalgia with classic animations, Windows 10 offers a variety of options for your screensaver. By following the steps below, you can easily change and customize the screensaver to suit your personal preferences.
From the nostalgic flying Windows logo to mesmerizing underwater scenes, the screensaver adds a touch of personality and visual appeal to your computer. It not only prevents static images from burning into your screen but also provides an enjoyable visual experience when your computer is idle. By understanding how to change the screensaver on Windows 10, you have the power to transform your computer’s look and feel with just a few clicks.
Whether you’re looking to impress your friends with stunning visuals, add a touch of relaxation to your work environment, or simply want to customize your screensaver to match your style, this guide will walk you through the process step by step. So, let’s get started and learn how to change and customize the screensaver on your Windows 10 computer.
Step 1: Open the Settings App
The first step in changing the screensaver on Windows 10 is to open the Settings app. The Settings app is the centralized hub where you can customize various aspects of your computer. Here’s how to open it:
- Click on the “Start” button in the bottom left corner of your screen. It’s the Windows logo icon.
- In the Start menu, you’ll find a gear-shaped icon labeled “Settings”. Click on it to open the Settings app.
- Alternatively, you can use the keyboard shortcut by pressing the “Windows key + I” to directly open the Settings app.
Once the Settings app opens, you’ll have access to a wide range of customization options for your Windows 10 computer. Now that you have successfully opened the Settings app, let’s move on to the next step.
Step 2: Select Personalization
After opening the Settings app, the next step in changing the screensaver on Windows 10 is to select the “Personalization” option. The Personalization settings allow you to customize various aspects of your computer’s appearance. Follow these steps to navigate to the Personalization settings:
- Once the Settings app is open, you’ll see several categories listed. Look for and click on the “Personalization” category.
- Within the Personalization settings, you’ll find options to customize your desktop background, colors, lock screen, and more.
- Selecting “Personalization” will open a new window with various customization options. This is where you can make changes to the screensaver settings.
The Personalization settings provide an extensive range of customization options to make your Windows 10 experience more tailored to your preferences. Whether you want to change the screensaver, modify the desktop background, or tweak color accents, the Personalization settings have got you covered.
Now that you have successfully navigated to the Personalization settings, let’s move on to the next step and find the specific option to change the screensaver.
Step 3: Click on Lock screen in the left sidebar
In order to change the screensaver on Windows 10, you need to access the Lock screen settings. Follow these steps to find the Lock screen option:
- Within the Personalization settings window, you’ll notice a sidebar on the left-hand side. Look for and click on the “Lock screen” option.
- By selecting the Lock screen option, you’ll be taken to a new window where you can customize various aspects of your Windows 10 lock screen, including the screensaver.
- Alternatively, you can directly open the Lock screen settings by right-clicking anywhere on your desktop and selecting “Personalize” from the context menu. This will also take you to the Lock screen settings.
The Lock screen settings allow you to personalize the screen that appears when your computer is locked or when you wake it from sleep. Within these settings, you’ll find options to customize the background image, slideshow, and screensaver.
Now that you have successfully accessed the Lock screen settings, let’s move on to the next step and explore the screensaver options available to you.
Step 4: Choose screensaver settings
Once you’re in the Lock screen settings, you can now navigate to the screensaver options. Windows 10 provides several screensaver styles to choose from, including both built-in options and custom ones. Follow these steps to choose your screensaver settings:
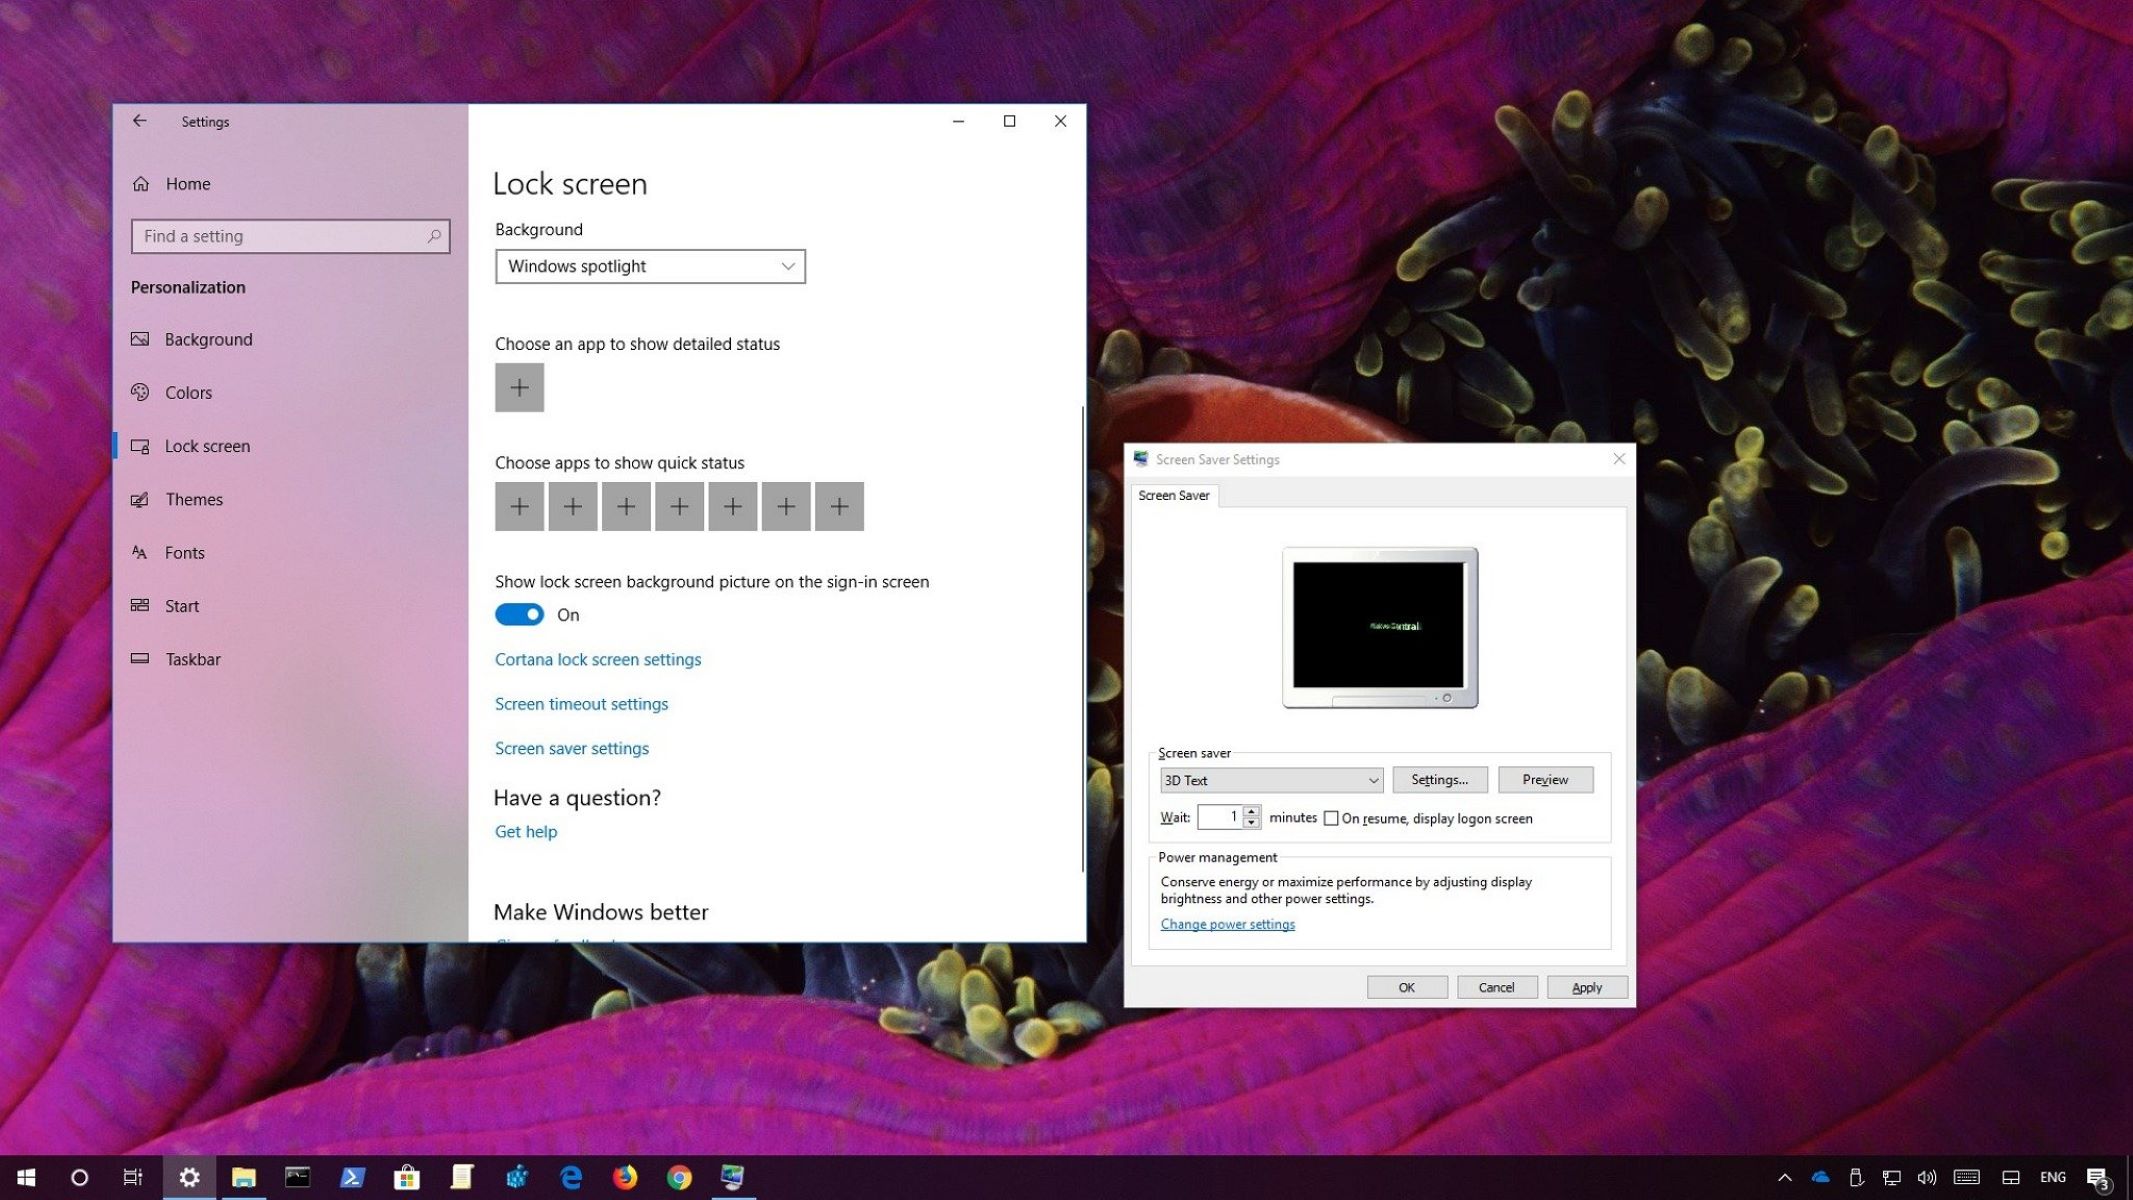
- In the Lock screen settings window, scroll down to find the “Screen saver settings” section.
- Click on the “Screen saver settings” link to open the Screen Saver Settings dialog box.
- In the dialog box, you’ll see a list of available screensavers. These are the pre-installed screensavers that come with Windows 10.
- Select the screensaver you want to use from the drop-down menu. You can choose from options like “Bubbles,” “Mystify,” “Ribbons,” or “3D Text,” among others.
Aside from the built-in screensavers, you can also install custom screensavers if you have downloaded them from trusted sources. To do this, click on the “Browse” button in the Screen Saver Settings dialog box and locate the downloaded screensaver file on your computer.
Each screensaver has its own unique set of settings and configurations that you can customize. To access these options, click on the “Settings” button next to the screensaver selection in the dialog box. This will open a separate settings window where you can fine-tune aspects such as speed, size, and effects.
Once you have chosen your screensaver and adjusted any additional settings, click “OK” to save your changes and exit the Screen Saver Settings dialog box.
Now that you have selected your screensaver settings, let’s move on to the next step and learn how to customize the screensaver further.
Step 5: Customize the screensaver
After selecting the screensaver, you have the option to further customize it according to your preferences. Windows 10 provides various customization options that allow you to personalize the screensaver experience. Follow these steps to customize your screensaver:
- In the Screen Saver Settings dialog box, click on the “Settings” button next to the selected screensaver.
- A new window will appear with specific customization options for the selected screensaver. These options may vary depending on the screensaver you have chosen.
- Adjust the settings according to your preferences. For example, you can modify the speed, direction, or other visual effects of the screensaver.
- Take your time to explore and experiment with the available options until you have personalized the screensaver to your liking.
Additionally, if you have installed a custom screensaver, you may have even more customization options available. Explore the custom screensaver’s settings to unlock even greater flexibility in personalizing your screensaver experience.
Remember to click “OK” or “Apply” to save your customization changes before exiting the settings window. This ensures that your personalized screensaver settings are preserved and ready to be enjoyed.
Now that you have customized the screensaver to your liking, let’s move on to the next step and preview the screensaver before applying it.
Step 6: Preview and apply the screensaver
Once you have selected and customized your screensaver, it’s time to preview how it will look and apply it to your Windows 10 computer. Follow these final steps to preview and apply the screensaver:
- In the Screen Saver Settings dialog box, you’ll notice a “Preview” button. Click on it to see a live preview of your selected screensaver.
- The preview will give you an idea of how the screensaver will appear on your computer screen when it is activated.
- If you’re not satisfied with the screensaver’s appearance, you can go back and make further adjustments to the settings or select a different screensaver.
- Once you are happy with the preview, click on the “OK” button within the Screen Saver Settings dialog box to apply the screensaver to your computer.
From this point onward, whenever your computer is idle for the specified time, the screensaver you selected will activate, providing visual entertainment or displaying your favorite images.
If you ever want to change or modify your screensaver in the future, simply follow the same steps outlined in this guide. You can explore different screensaver options, add new custom screensavers, or adjust the settings to keep your computer’s appearance fresh and appealing.
With the ability to change and customize the screensaver on Windows 10, you have the power to personalize your computer and add a touch of creativity and visual interest to your desktop environment.
Congratulations! You have successfully learned how to change and customize the screensaver on your Windows 10 computer.
Conclusion
Changing and customizing the screensaver on Windows 10 is a straightforward process that allows you to add a personal touch to your computer. By following the step-by-step guide outlined in this article, you can easily navigate through the settings and select the screensaver that best suits your style and preferences.
Windows 10 provides a range of built-in screensavers, each with its own unique visual effects and customization options. Additionally, you have the flexibility to install custom screensavers downloaded from trusted sources, further expanding your options for personalization.
Remember, the screensaver not only prevents screen burn-in but also adds an enjoyable visual experience when your computer is idle. With the ability to customize settings such as speed, direction, or effects, you can truly make the screensaver your own and enhance the visual appeal of your desktop environment.
Give your computer a personal touch by showcasing your favorite images, animations, or even adding a touch of nostalgia with classic screensavers. Explore the available options, experiment with different settings, and create a screensaver that speaks to your individuality.
So, why wait? Take a few moments and follow the steps outlined in this guide to change and customize the screensaver on your Windows 10 computer. Unleash your creativity and transform your idle screen into a visual delight that reflects your unique personality.
Enjoy the visual experience and make your computer truly yours with a personalized screensaver on Windows 10!