Introduction
Are you tired of using the same PIN to unlock your Windows device? Do you want to change your Windows PIN for added security or simply for a refreshing change? If so, you’ve come to the right place! In this article, we’ll guide you through the step-by-step process of changing your Windows PIN.
Windows PIN serves as a convenient and secure way to sign in to your device. It allows you to replace the traditional password with a custom numeric code, making it faster and easier to unlock your Windows device. Whether you’re using a laptop, desktop, or tablet running Windows 10 or later versions, the process to change your PIN remains relatively similar across all devices.
Changing your Windows PIN not only enhances your device’s security but also helps in preventing unauthorized access to your personal data. It is a recommended practice to change your PIN periodically, especially if you suspect that someone has gained knowledge of your current PIN.
In the following sections, we’ll walk you through the step-by-step process of changing your Windows PIN. So, grab your device and let’s get started on customizing a new PIN that suits your preferences and provides you with an extra layer of security.
Step 1: Open the Windows Settings
To change your Windows PIN, start by opening the Windows Settings on your device. You can do this by clicking on the Start menu and selecting the “Settings” icon, which resembles a gear.
Alternatively, you can press the “Windows key + I” on your keyboard to directly open the Windows Settings. This keyboard shortcut is a quick way to access the settings menu without having to navigate through the Start menu.
Once the Settings window opens, you’ll see various categories and options to customize your Windows device. The Settings window presents an intuitive interface where you can easily manage and personalize your device’s settings.
Take a moment to familiarize yourself with the Settings window, as it allows you to modify a wide range of settings related to your device’s system, display, apps, accounts, and more. But for now, let’s focus on changing your Windows PIN, so let’s move on to the next step.
Step 2: Go to Accounts
After opening the Windows Settings, the next step is to navigate to the “Accounts” section. This is where you can manage various aspects related to your user account, including your Windows PIN.
In the Settings window, you’ll notice a list of different categories on the left-hand side. Scroll down and click on the “Accounts” option. This will take you to the accounts settings where you can make changes to your user account, password, and other related settings.
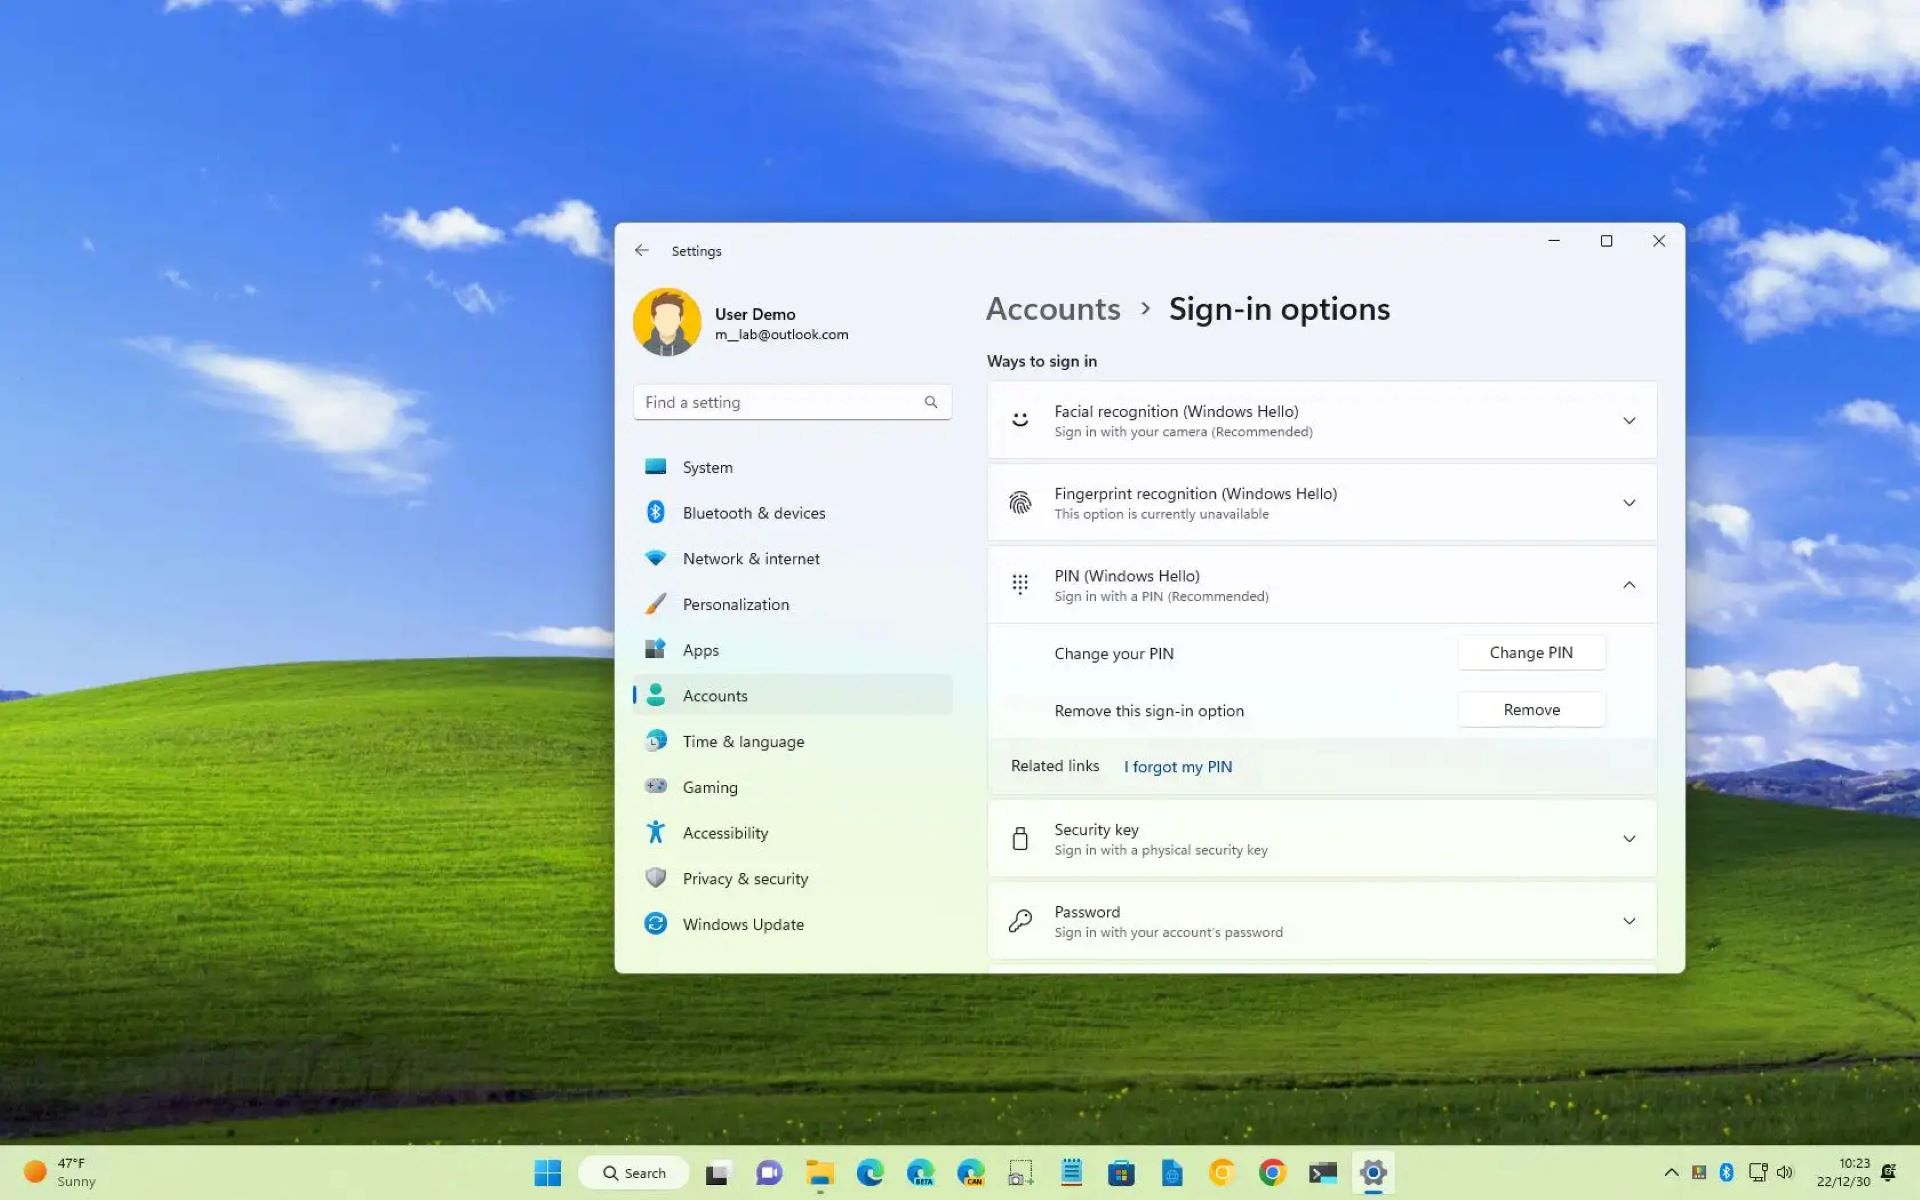
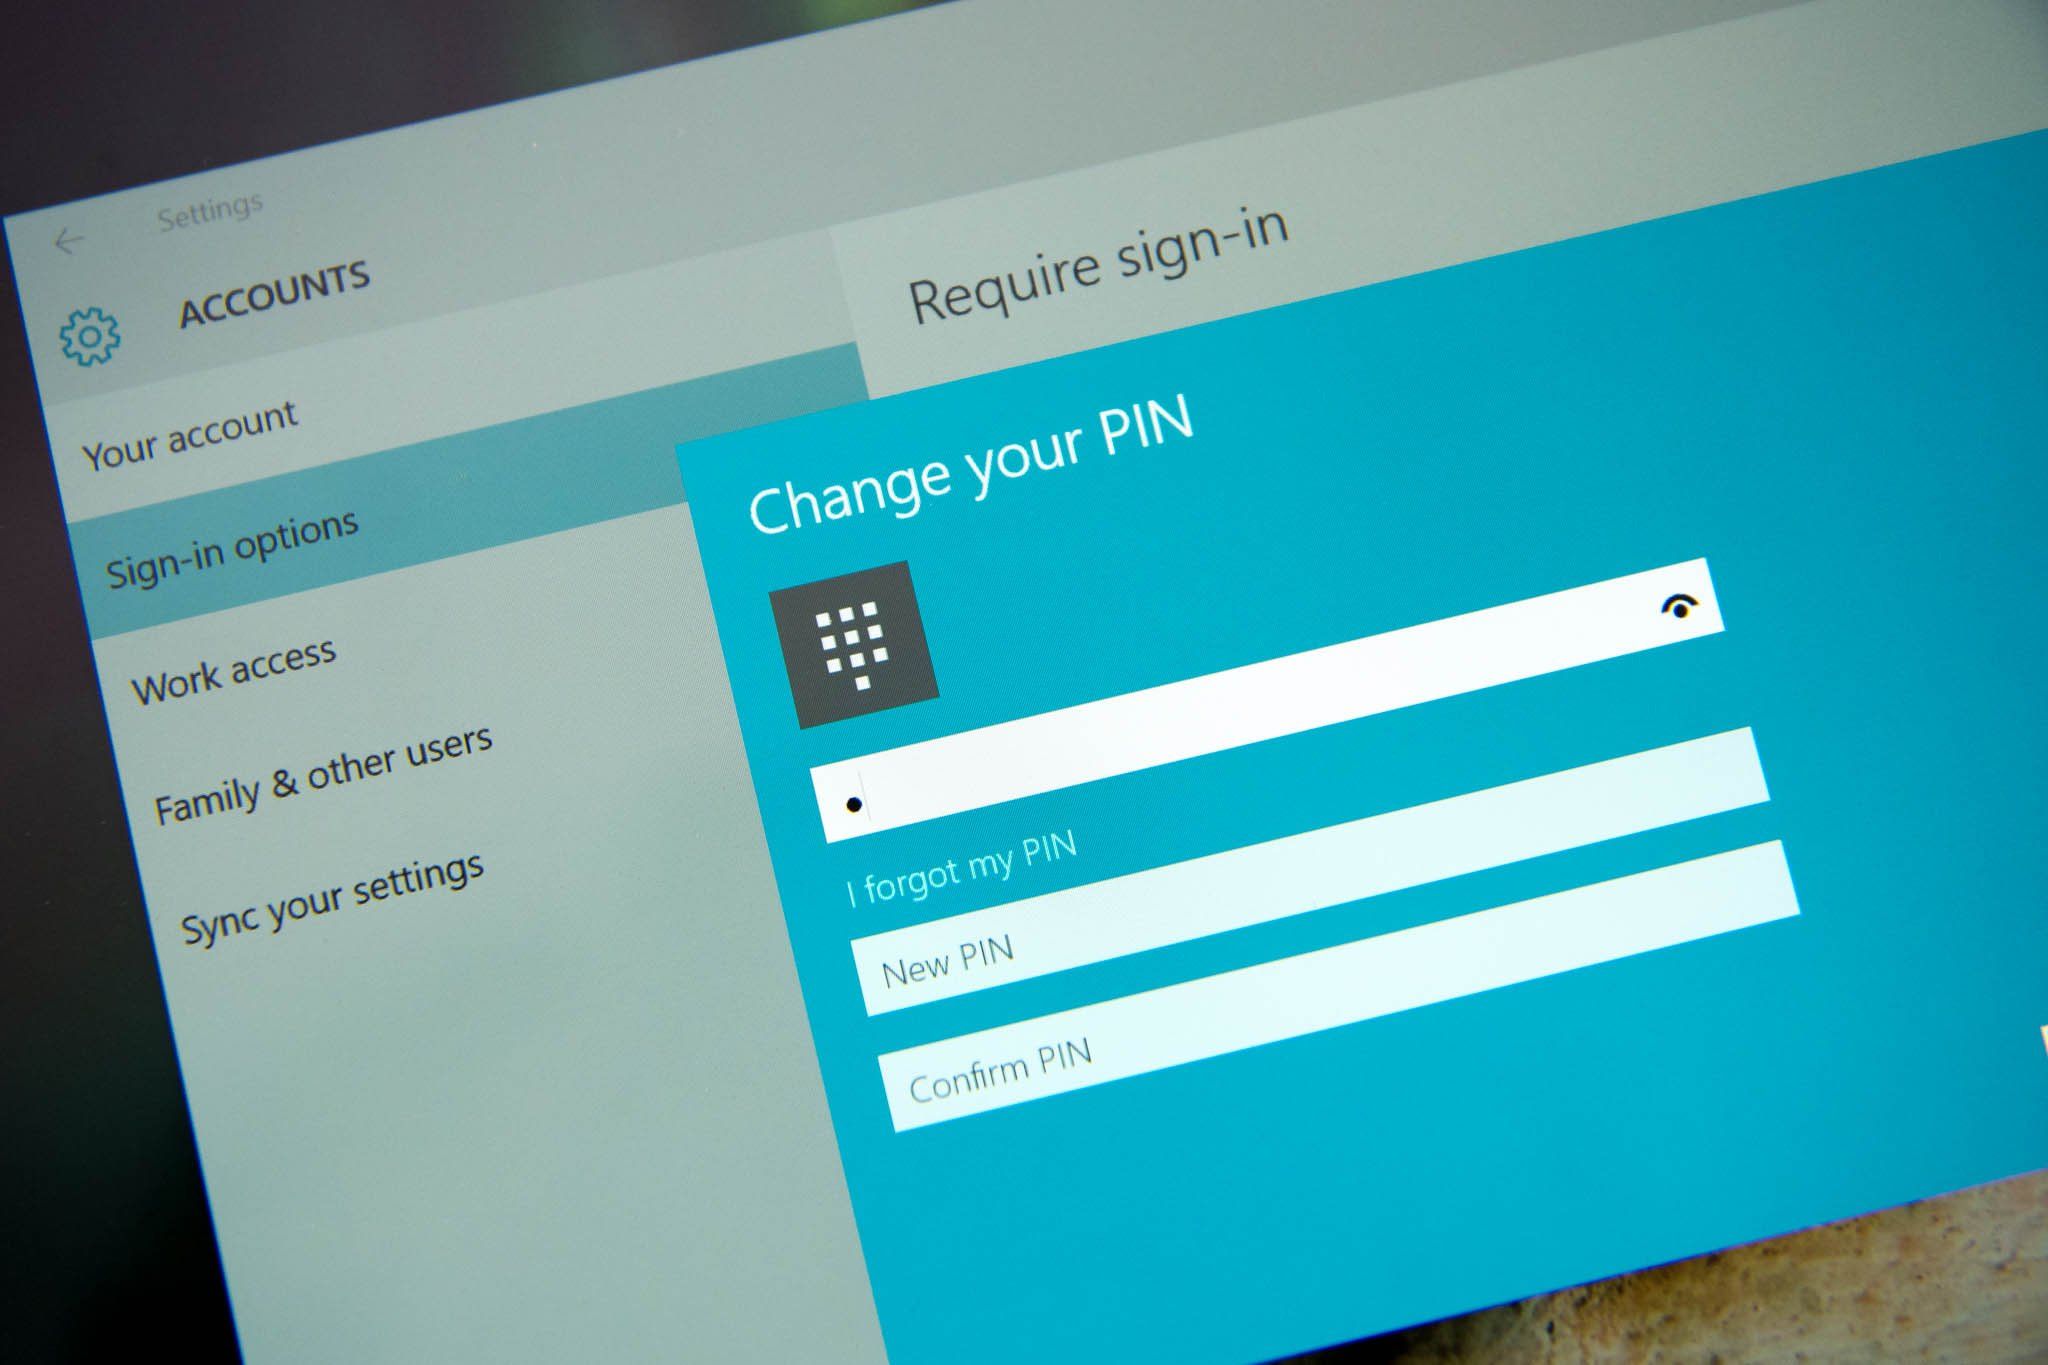
Within the Accounts section, you’ll find multiple sub-categories such as “Your Info,” “Email & Accounts,” “Sign-in Options,” and more. Since we’re specifically focusing on changing the Windows PIN, click on “Sign-in Options.”
The Sign-in Options page allows you to configure different methods of signing in to your Windows device, such as password, PIN, fingerprint, facial recognition, and more. Here, you’ll be able to modify or add a new PIN to enhance your device security.
Take a moment to explore the other options available on the Sign-in Options page, as Windows offers various sign-in methods to cater to different user preferences. But for now, let’s continue with the process of changing your Windows PIN by moving on to the next step.
Step 3: Select Sign-in options
Once you’ve reached the “Sign-in Options” page within the Accounts section of the Windows Settings, it’s time to select the appropriate options to change your Windows PIN.
On the Sign-in Options page, you’ll see a section labeled “PIN.” This section provides you with options to change, remove, or add a new PIN to your Windows device. To proceed with changing your PIN, click on the “Change” button located under the PIN section.
When you select the “Change” button, a new window will appear, asking you to verify your current PIN before proceeding further. This verification step ensures that only authorized users can make changes to the PIN associated with the device.
It’s important to note that if you haven’t set up a PIN or have forgotten your current PIN, you may need to select alternative sign-in options like password, fingerprint, or facial recognition to verify your identity. Once you successfully verify your identity, you can return to the Sign-in Options page and proceed with changing your PIN.
At this point, you’ve reached a crucial stage in the process of changing your Windows PIN. Make sure you have your current PIN ready, as you’ll need it for the next step. So, let’s move on to the next step and verify your current PIN before creating a new one.
Step 4: Click on Change under the PIN section
After selecting “Change” under the PIN section, a window will appear prompting you to enter your current PIN for verification. This additional security measure ensures that only authorized users can make changes to the PIN associated with your Windows device.
Type in your current PIN and click on the “OK” or “Enter” button to proceed. If you’ve entered the correct PIN, another window will open, allowing you to create a new PIN for your device.
In this window, you’ll have the opportunity to customize a new PIN that suits your preferences and provides you with a secure means of accessing your Windows device. Keep in mind that a strong PIN should be a combination of numbers that aren’t easily guessed by others.
When choosing a new PIN, ensure that it is something you can easily remember, but not something that could be easily guessed by someone else. Avoid using common sequences like “1234” or “1111.” Instead, opt for a combination of numbers that are familiar to you, but not readily obvious to others.
Once you’ve decided on a new PIN, enter it in the designated field. As you type, you might notice that the characters appear as dots or asterisks to hide your input from prying eyes and ensure privacy.
Before proceeding, take a moment to double-check your newly entered PIN to ensure there are no typos or mistakes. This is important to avoid any difficulties or lockouts when attempting to access your Windows device.
In the next step, we’ll walk you through the process of re-entering your new PIN for confirmation. So, let’s proceed to the next step and ensure that your new PIN is accurately recorded.
Step 5: Verify your current PIN
After entering your new PIN, the next step is to verify that you’ve entered the correct PIN by re-entering it. This verification process ensures that you haven’t made any typographical errors and that your new PIN is accurately recorded.
In the designated field, enter your new PIN once again, paying careful attention to the numbers you input. As you type, the characters will appear as dots or asterisks, ensuring that your PIN remains confidential and secure.
Take a moment to carefully compare the two sets of numbers to ensure that they match. This step is crucial in preventing any potential lockouts or accessibility issues later on.
If the two sets of numbers match, you can proceed to the next step. However, if there is a discrepancy, take the time to carefully re-enter your new PIN, ensuring that it aligns with your initial input.
Once you’ve successfully verified your new PIN, you can proceed to the next step, where you’ll save your changes and finalize the process. So, let’s move on and complete the setup of your new Windows PIN.
Step 6: Create a new PIN
Now that you’ve verified your current PIN, it’s time to create a new PIN for your Windows device. This step allows you to personalize your device’s security by choosing a unique numeric code that you’ll use to unlock your device.
In the designated field, enter your desired new PIN. As you type, the characters will be hidden, appearing as dots or asterisks to protect your privacy and prevent others from seeing your PIN.
When creating a new PIN, it’s important to choose a combination of numbers that is not easily guessable. Avoid using obvious sequences like “1234” or personal information like your birthdate or phone number. Opt for a unique and memorable combination that is difficult for others to guess.
Windows requires your PIN to be at least four characters long, but you can choose a longer PIN for added security if desired. Keep in mind that longer PINs may be more secure, but they can also be more challenging to remember.
As you create your new PIN, be mindful of the instructions provided on the screen. Windows might prompt you to include uppercase or lowercase letters, special characters, or a combination of numbers and letters. Follow any specific requirements provided to ensure that your new PIN meets the necessary criteria.
Take a moment to review the PIN you’ve entered before moving on to the next step. This will help ensure that your new PIN is accurately recorded and can be easily remembered for future use.
In the next step, we’ll guide you through the process of re-entering your new PIN for confirmation. So, let’s proceed to the next step and complete the setup of your new Windows PIN.
Step 7: Re-enter your new PIN for confirmation
After creating your new PIN, it’s important to ensure accuracy by re-entering it for confirmation. This step allows you to double-check that you’ve entered the correct PIN and prevents any potential lockouts or accessibility issues in the future.
In the designated field, re-enter your new PIN exactly as you did before. As you type, the characters will be displayed as dots or asterisks to protect your privacy and maintain the confidentiality of your PIN.
Carefully compare the two sets of numbers to ensure that they match. It’s crucial to accurately reproduce your new PIN to avoid any difficulties when attempting to unlock your Windows device.
If the two sets of numbers match, congratulations! You’ve successfully created a new PIN for your Windows device. However, if there is a discrepancy, take the time to carefully re-enter your new PIN and ensure that it aligns with your initial input.
When both sets of numbers match, you can proceed to the next step, where you’ll save your changes and finalize the process. This step ensures that your new PIN is securely recorded and can be used to enhance the security of your Windows device.
In the next step, we’ll guide you through the final process of saving your changes and completing the setup of your new Windows PIN. So, let’s move on and complete the final step.
Step 8: Click on OK to save the changes
After re-entering your new PIN, it’s time to save your changes and complete the process of changing your Windows PIN. This final step ensures that your new PIN is securely saved and can be used to unlock your Windows device moving forward.
In the window where you entered your new PIN for confirmation, look for the “OK” or “Save” button. It is usually located at the bottom right corner of the window. Click on this button to proceed.
By clicking “OK” or “Save,” the system will finalize the changes and update your Windows device with the new PIN you have created. Once the changes are saved, your Windows device will prompt you to use the new PIN for future login attempts.
Congratulations! You have successfully changed your Windows PIN. With the new PIN in place, you can now enjoy improved security and ease of access when logging into your Windows device.
Remember to keep your new PIN confidential and avoid sharing it with others. Additionally, make sure to choose a PIN that is memorable to you but difficult for others to guess. This will help maintain the security of your Windows device and protect your personal information.
If you ever wish to change your PIN again in the future, you can revisit the Sign-in Options page within the Windows Settings and follow the same process outlined in this guide.
Thank you for following this step-by-step guide on how to change your Windows PIN. We hope this information has been helpful to you. If you have any further questions or encounter any difficulties along the way, feel free to seek additional assistance or consult official Windows support resources.
Conclusion
Changing your Windows PIN can enhance both the security and personalization of your Windows device. It allows you to create a unique and memorable numeric code that serves as your key to unlocking your device. By following the step-by-step process outlined in this guide, you can easily change your Windows PIN and enjoy the benefits it brings.
By regularly changing your PIN, you can prevent unauthorized access to your device and mitigate the risk of data breaches. It is recommended to choose a PIN that is not easily guessable and to avoid using obvious sequences or personal information.
Remember to keep your new PIN confidential and never share it with others. This will help safeguard your personal information and protect your device from unauthorized users.
Additionally, exploring the various sign-in options available in Windows allows you to customize the way you access your device. Whether it’s using a PIN, password, fingerprint, or facial recognition, Windows provides multiple methods to suit your preferences and security needs.
In summary, changing your Windows PIN is a simple and effective way to enhance the security and convenience of your Windows device. By following the step-by-step instructions provided in this guide, you can easily customize your PIN and ensure a personalized and secure login experience.
We hope this article has been informative and helpful in guiding you through the process of changing your Windows PIN. If you have any further questions or need additional assistance, don’t hesitate to reach out to official Windows support resources or consult with a technical expert. Stay safe and enjoy your secure Windows experience!