Introduction
Zooming in on Windows is a valuable tool that allows users to increase the size of text and images on their screens. Whether you have difficulty reading small text, want to focus on details in an image, or simply prefer a larger view, knowing how to use the zoom function can greatly enhance your Windows experience.
Windows provides various options for zooming in, depending on the application or content you are working with. From basic zoom functions to specialized tools, this article will guide you through the process of zooming in on different elements of your Windows computer.
Whether you’re using a web browser, working on a document, or browsing through your photo library, you’ll find tips and tricks to help you zoom in seamlessly. Additionally, we’ll explore the accessibility options available for users with visual impairments or specific accessibility needs.
If you’ve ever struggled to read small text, missed important details in an image, or found yourself squinting at your computer screen, this article is for you. By the end, you’ll have all the knowledge and tools you need to zoom in on Windows like a pro.
Basic Zoom Functions on Windows
Windows provides several built-in options for zooming in on your computer screen, making it easier to read text and view images. Here are some of the basic zoom functions you can use:
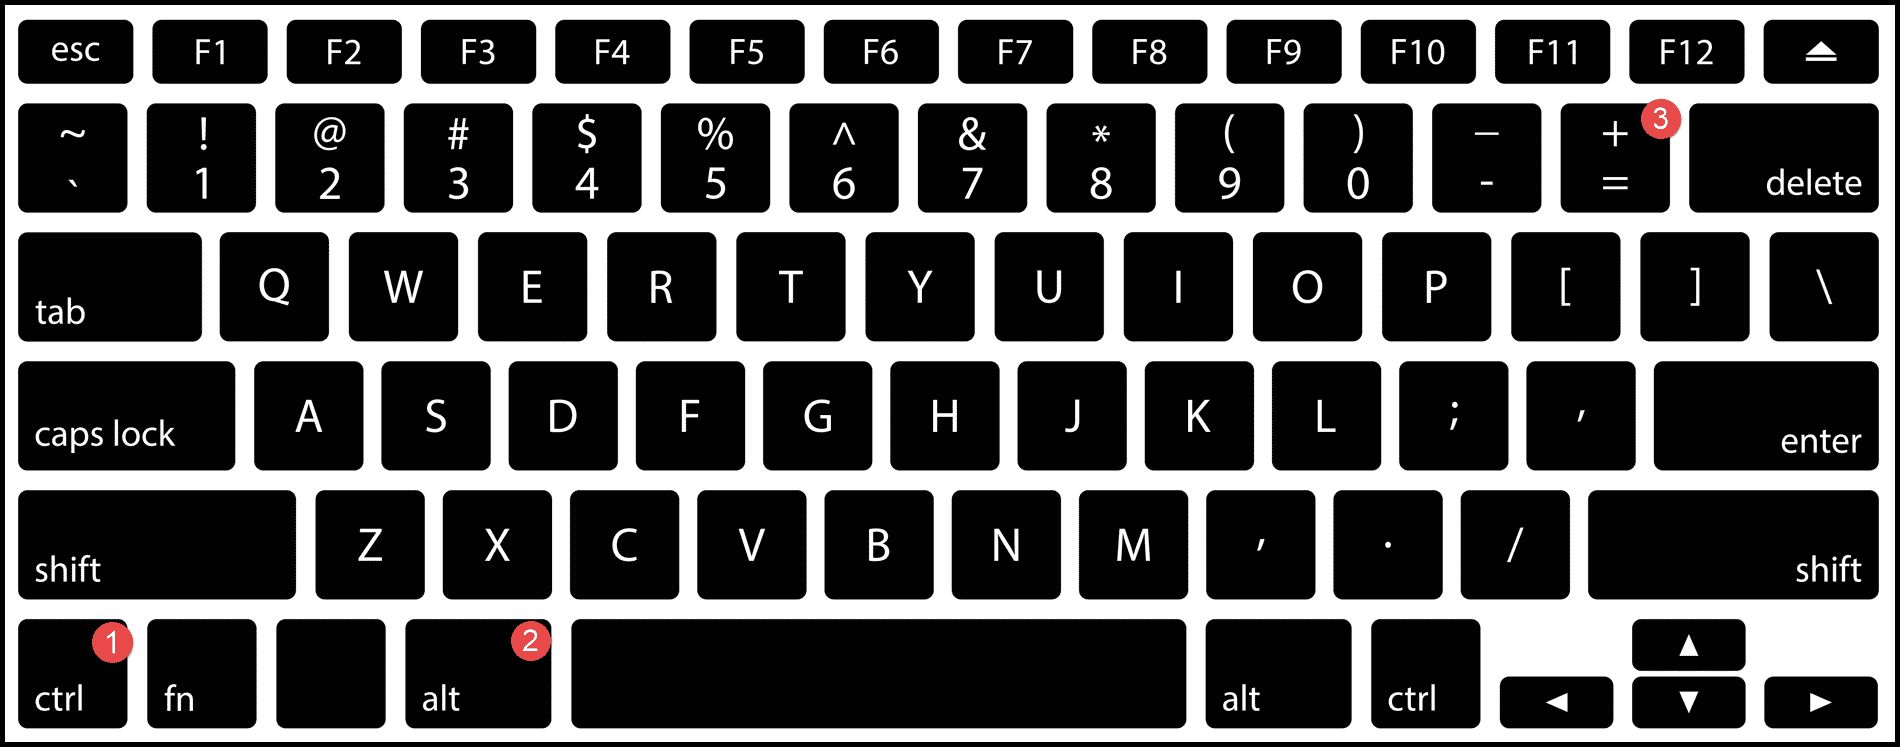
- Zoom In and Zoom Out: The simplest way to zoom in on Windows is by using the keyboard shortcuts. Press “Ctrl” and “+” to zoom in and “Ctrl” and “-” to zoom out. This method works in many applications, including web browsers, documents, and images.
- Mouse Scroll: Another quick way to adjust the zoom level is by using your mouse scroll wheel. Hold down the “Ctrl” key on your keyboard and scroll up to zoom in or scroll down to zoom out. This method is especially convenient when browsing the web or viewing documents.
- Windows Magnifier Tool: Windows includes a built-in magnifier tool that allows you to zoom in on specific areas of the screen. Press the “Windows” key and the “+” key simultaneously to launch the magnifier tool. You can then use the mouse to navigate and adjust the zoom level within the magnified area.
- Touch Gesture: If you have a touchscreen device, you can use touch gestures to zoom in and out. Place two fingers on the screen and spread them apart to zoom in, or pinch them together to zoom out.
These basic zoom functions are handy for quickly adjusting the zoom level across various applications and content on your Windows computer. However, depending on the specific application or content you are working with, there may be additional zoom options available.
Now that you are familiar with the basic zoom functions, let’s explore how to use the magnifier tool in more detail.
Using the Magnifier Tool
If you need to zoom in on specific areas of your screen or require a higher level of magnification, the Windows Magnifier tool has got you covered. Here’s how you can use it:
- Press the “Windows” key on your keyboard and type “Magnifier” in the search bar. Click on the “Magnifier” app to open it.
- The magnifier window will appear, displaying a zoomed-in view of a portion of your screen. You can resize and move the magnifier window to your desired location by clicking and dragging its edges or title bar.
- By default, the magnifier may be set to “Full screen.” To switch to “Lens” mode, which allows you to zoom in on a specific area, click the “Views” button in the magnifier window and select “Lens.”
- To adjust the zoom level, use the “+” and “-” buttons in the magnifier window or press the “+” and “-” keys on your keyboard.
- If needed, you can further customize the magnifier settings by clicking on the “Settings” button in the magnifier window. Here, you can tweak options such as tracking, color inversion, and keyboard shortcuts to suit your preferences.
The Windows Magnifier tool provides precise control over zooming in on specific areas, making it an ideal choice for tasks that require detailed examination or enhanced visibility. Whether you’re analyzing intricate visuals, reading small text, or fine-tuning design elements, the magnifier tool helps you achieve optimal clarity.
Now that you know how to use the magnifier tool, let’s move on to exploring how to zoom in specifically within web browsers.
Zooming In on Web Browsers
When browsing the internet, you may come across web pages with small text or images that are challenging to view. Luckily, most web browsers offer built-in zoom features to help you enlarge the content. Here’s how to zoom in on web browsers:
- Zoom Controls: Look for the zoom controls in the browser’s toolbar, typically represented by a magnifying glass icon or percentage value. You can click on the “+” or “-” buttons to zoom in or out, respectively. Alternatively, you can use keyboard shortcuts like “Ctrl” and “+” to zoom in and “Ctrl” and “-” to zoom out.
- Zoom Indicators: Some browsers display a zoom indicator in the address bar, showing the current zoom level. You can click on the indicator and adjust the zoom level using a slider.
- Mouse Scroll: Another quick way to zoom in and out is by using your mouse scroll wheel. Hold down the “Ctrl” key on your keyboard and scroll up to zoom in or scroll down to zoom out. This method is particularly useful for quickly adjusting the zoom level while browsing.
- Zoom Text Only: If you only want to enlarge the text on a web page without affecting the layout and images, you can enable the “Zoom Text Only” option. Look for this option in the browser’s settings or preferences menu.
Zooming in on web browsers helps improve readability, especially when viewing content with small fonts or images. Whether you’re reading articles, browsing social media, or shopping online, adjusting the zoom level ensures a comfortable viewing experience.
However, keep in mind that zooming in too much may cause the layout of the web pages to appear distorted or cropped. In such cases, you can use horizontal scroll bars (if available) to navigate through the content.
Now that you’re well-versed in zooming within web browsers, let’s move on to exploring how to zoom in on Office applications.
Zooming In on Office Applications
When working with documents, spreadsheets, or presentations in Microsoft Office applications, zooming in allows you to focus on specific details or make content more readable. Here’s how you can zoom in on Office applications:
- Ribbon Menu: Look for the “View” tab in the ribbon menu at the top of the application window. In this tab, you’ll find a “Zoom” group with options to increase or decrease the zoom level. You can click on the “+” or “-” buttons to zoom in or out respectively, or type in a specific percentage value.
- Zoom Slider: Some Office applications, such as Microsoft Word, feature a zoom slider in the bottom right corner of the window. Dragging the slider to the right increases the zoom level, making the content larger and easier to read.
- Keyboard Shortcuts: Office applications also offer keyboard shortcuts to adjust the zoom level quickly. Press “Ctrl” and “+” to zoom in or “Ctrl” and “-” to zoom out. You can use these shortcuts repeatedly to achieve your desired zoom level.
- Zoom Settings: Depending on the Office application, you may have additional zoom settings available. For example, in Microsoft Excel, you can specify custom zoom settings for worksheets or use the “Fit to Window” option to automatically adjust the zoom level.
Zooming in on Office applications allows you to work more efficiently and comfortably with your documents, spreadsheets, and presentations. Whether you’re reviewing text, analyzing data, or creating visually engaging slides, adjusting the zoom level helps you focus on the content details.
Remember that the zoom level you set within an Office application is independent of the overall system zoom level. This means that even if you have adjusted the system-wide zoom settings, the Office application will maintain its specific zoom level.
Now that you’ve mastered zooming in on Office applications, let’s explore how to zoom in on photos and images.
Zooming In on Photos and Images
Zooming in on photos and images is particularly useful when you want to examine details or focus on specific areas. Whether you’re viewing personal photos, editing images, or analyzing visual content, Windows provides various options for zooming in on photos and images:
- Windows Photos App: Open the desired photo in the Windows Photos app. In the app’s toolbar, you’ll find a slider labeled “Zoom.” Simply drag the slider to the right to zoom in on the image. You can also use the “+” and “-” buttons next to the slider or scroll with your mouse wheel while holding down the “Ctrl” key.
- Image Editors: If you’re using an image editing software like Adobe Photoshop or GIMP, there are dedicated zoom tools available. Look for the zoom options in the application menu or toolbar. You can typically zoom in by selecting a percentage value or using keyboard shortcuts like “Ctrl” and “+”.
- Photoshop-specific Features: In Adobe Photoshop, you can utilize advanced zoom features such as the “Zoom Tool” and “Scrubby Zoom.” The “Zoom Tool” allows you to click on specific areas to zoom in, while the “Scrubby Zoom” enables you to zoom in and out by clicking and dragging on the image.
- Zoom Gesture: If you’re using a touchscreen device, you can perform a pinch-to-zoom gesture on the screen to zoom in and out on photos and images. Place two fingers on the screen and spread them apart to zoom in, or pinch them together to zoom out.
Zooming in on photos and images allows you to appreciate the finer details, spot imperfections, or make precise edits. Whether you’re a photography enthusiast or a graphic designer, these zooming options enable you to work with visual content more effectively.
Remember to be mindful of the image resolution when zooming in excessively. Low-resolution images may appear blurry or pixelated when zoomed in too much. It’s best to work with high-resolution images for optimal clarity and detail.
Now that you know how to zoom in on photos and images, let’s explore the accessibility options available for users with specific zooming needs.
Accessibility Options for Zooming In
Windows offers a range of accessibility options that cater to users with visual impairments or specific zooming needs. These options ensure that everyone can comfortably use their Windows computer and access content. Here are some accessibility options for zooming in:
- High Contrast Mode: Windows includes a High Contrast mode that enhances the visibility of text and images. Enabling this mode can help individuals with visual impairments by providing better contrast and making content easier to read. To activate High Contrast mode, press the “Left Alt,” “Left Shift,” and “Print Screen” keys simultaneously.
- Windows Magnifier: As mentioned earlier, the Windows Magnifier tool is specifically designed for users who need to magnify portions of their screen. It offers various magnification options and customization settings to accommodate different visual needs.
- Display Scaling: Windows allows you to adjust the scaling of text and UI elements on your screen. By increasing the display scaling, you can make everything on the screen larger and easier to read. To change the display scaling, right-click on the desktop, select “Display settings,” and adjust the “Scale and layout” option.
- Narrator: Narrator is a built-in screen reader in Windows that reads out on-screen text and provides audio descriptions of important events. It can be especially helpful for visually impaired individuals who rely on auditory cues to navigate their computer and access content.
- Third-Party Accessibility Software: In addition to the native accessibility options, there are also third-party software programs available that specialize in providing enhanced zooming and accessibility features. These programs often offer more advanced zooming controls and additional customization options.
These accessibility options go beyond basic zoom functions, aiming to provide a more inclusive computing experience. By utilizing these features, individuals with visual impairments or specific zooming needs can customize their Windows environment to better suit their requirements.
Remember to explore the available accessibility options and experiment with different settings to find what works best for you or the intended user. Making use of these features can greatly enhance usability and improve accessibility on Windows.
Now that you’re familiar with the accessibility options for zooming in, let’s move on to troubleshooting common issues you may encounter while zooming.
Troubleshooting Zooming Issues
While zooming in on Windows is generally a straightforward process, you may occasionally encounter some issues or unexpected behavior. Here are some troubleshooting tips to help you overcome common zooming issues:
- Check Application Compatibility: Not all applications support zooming, or they may have limited zoom functionality. If you’re experiencing problems zooming in a particular application, check its documentation or settings to see if zooming is supported.
- Restart the Application: Sometimes, zooming issues can be resolved by simply restarting the application. Close the application, reopen it, and try zooming in again to see if the problem persists.
- Update Your Graphics Drivers: Outdated or incompatible graphics drivers can sometimes cause zooming issues. Visit the website of your computer manufacturer or graphics card manufacturer to download and install the latest graphics drivers for your system.
- Reset Zoom Settings: If you’ve customized the zoom settings in an application and are experiencing problems, try resetting the zoom level to its default setting. Look for an option like “Reset Zoom” or “100%” within the application’s zoom controls.
- Disable Third-Party Extensions: Some browser extensions or add-ons can interfere with zooming functionality. Try disabling any third-party extensions and relaunch the browser to see if the zooming issues are resolved.
- Check System Zoom Settings: If you’re encountering consistent zooming issues across multiple applications, check your system-wide zoom settings. Go to “Settings” > “Display” and ensure that the “Scale and layout” option is set to a value that suits your preferences.
- Restart Your Computer: In some cases, a simple system restart can help resolve temporary glitches or conflicts that may be causing zooming issues. Restart your computer and try zooming again.
- Seek Technical Support: If you’ve exhausted all troubleshooting steps and are still facing zooming issues, it may be worth reaching out to the technical support channels provided by the application or your computer manufacturer. They may be able to provide specific guidance or solutions for your problem.
By following these troubleshooting tips, you can overcome common issues that may arise while zooming in on Windows. Remember to be patient and persistent, as sometimes it takes a bit of trial and error to identify and resolve the root cause of the problem.
Now that you’re equipped with troubleshooting knowledge, let’s wrap up this guide on zooming in on Windows.
Conclusion
Zooming in on Windows is a valuable feature that allows users to enhance their experience by increasing the size of text and images on their screens. Whether you need to read small text, examine intricate details in images, or have specific accessibility needs, Windows provides a range of options for zooming in.
In this guide, we explored the basic zoom functions on Windows, including keyboard shortcuts and mouse scroll, which are handy for quickly adjusting the zoom level across various applications. We also delved into the usage of the Magnifier tool, which offers precise control for zooming in on specific areas of the screen.
Additionally, we discussed how to zoom in on web browsers, allowing for better readability and visibility when browsing the internet. We explored zooming options in Office applications, enabling users to focus on specific details within their documents, spreadsheets, and presentations.
We also covered the process of zooming in on photos and images, which is useful for analyzing visual content or making edits. Moreover, we highlighted the accessibility options available for users with visual impairments or specific zooming needs, ensuring a more inclusive computing experience.
Lastly, we provided troubleshooting tips to help address common zooming issues that users may encounter, allowing for a smoother zooming experience on Windows.
By utilizing these zooming features and techniques, you can tailor your Windows experience to your preferences, improving both productivity and accessibility.
Remember to explore the various zooming options and experiment with different settings to find what works best for you. Don’t hesitate to seek technical support when faced with persistent issues.
Now that you have a strong understanding of how to zoom in on Windows, go ahead and take full advantage of this powerful feature to enhance your computing experience!