Introduction
When running a business, it is crucial to stay updated with the latest sales tax rates to ensure accurate invoicing and financial reporting. Quickbooks, a popular accounting software, offers a user-friendly interface and intuitive features to make managing sales tax rates a breeze. In this article, we will guide you through the step-by-step process of changing the sales tax rate in Quickbooks.
Whether the sales tax rate in your locality has been revised, or you simply need to update it based on new regulations, Quickbooks allows you to easily make this adjustment. By following the instructions outlined in this article, you will be able to ensure compliance with the latest tax regulations and maintain accurate financial records.
Before proceeding with the steps, it is important to note that changing the sales tax rate in Quickbooks will impact the tax calculation for all future transactions. Any previous transactions already recorded with the old tax rate will not be affected unless you manually update them.
Now, let’s dive into the step-by-step process of changing the sales tax rate in Quickbooks. We will cover everything from accessing the Sales Tax Center to updating existing transactions and verifying the changes.
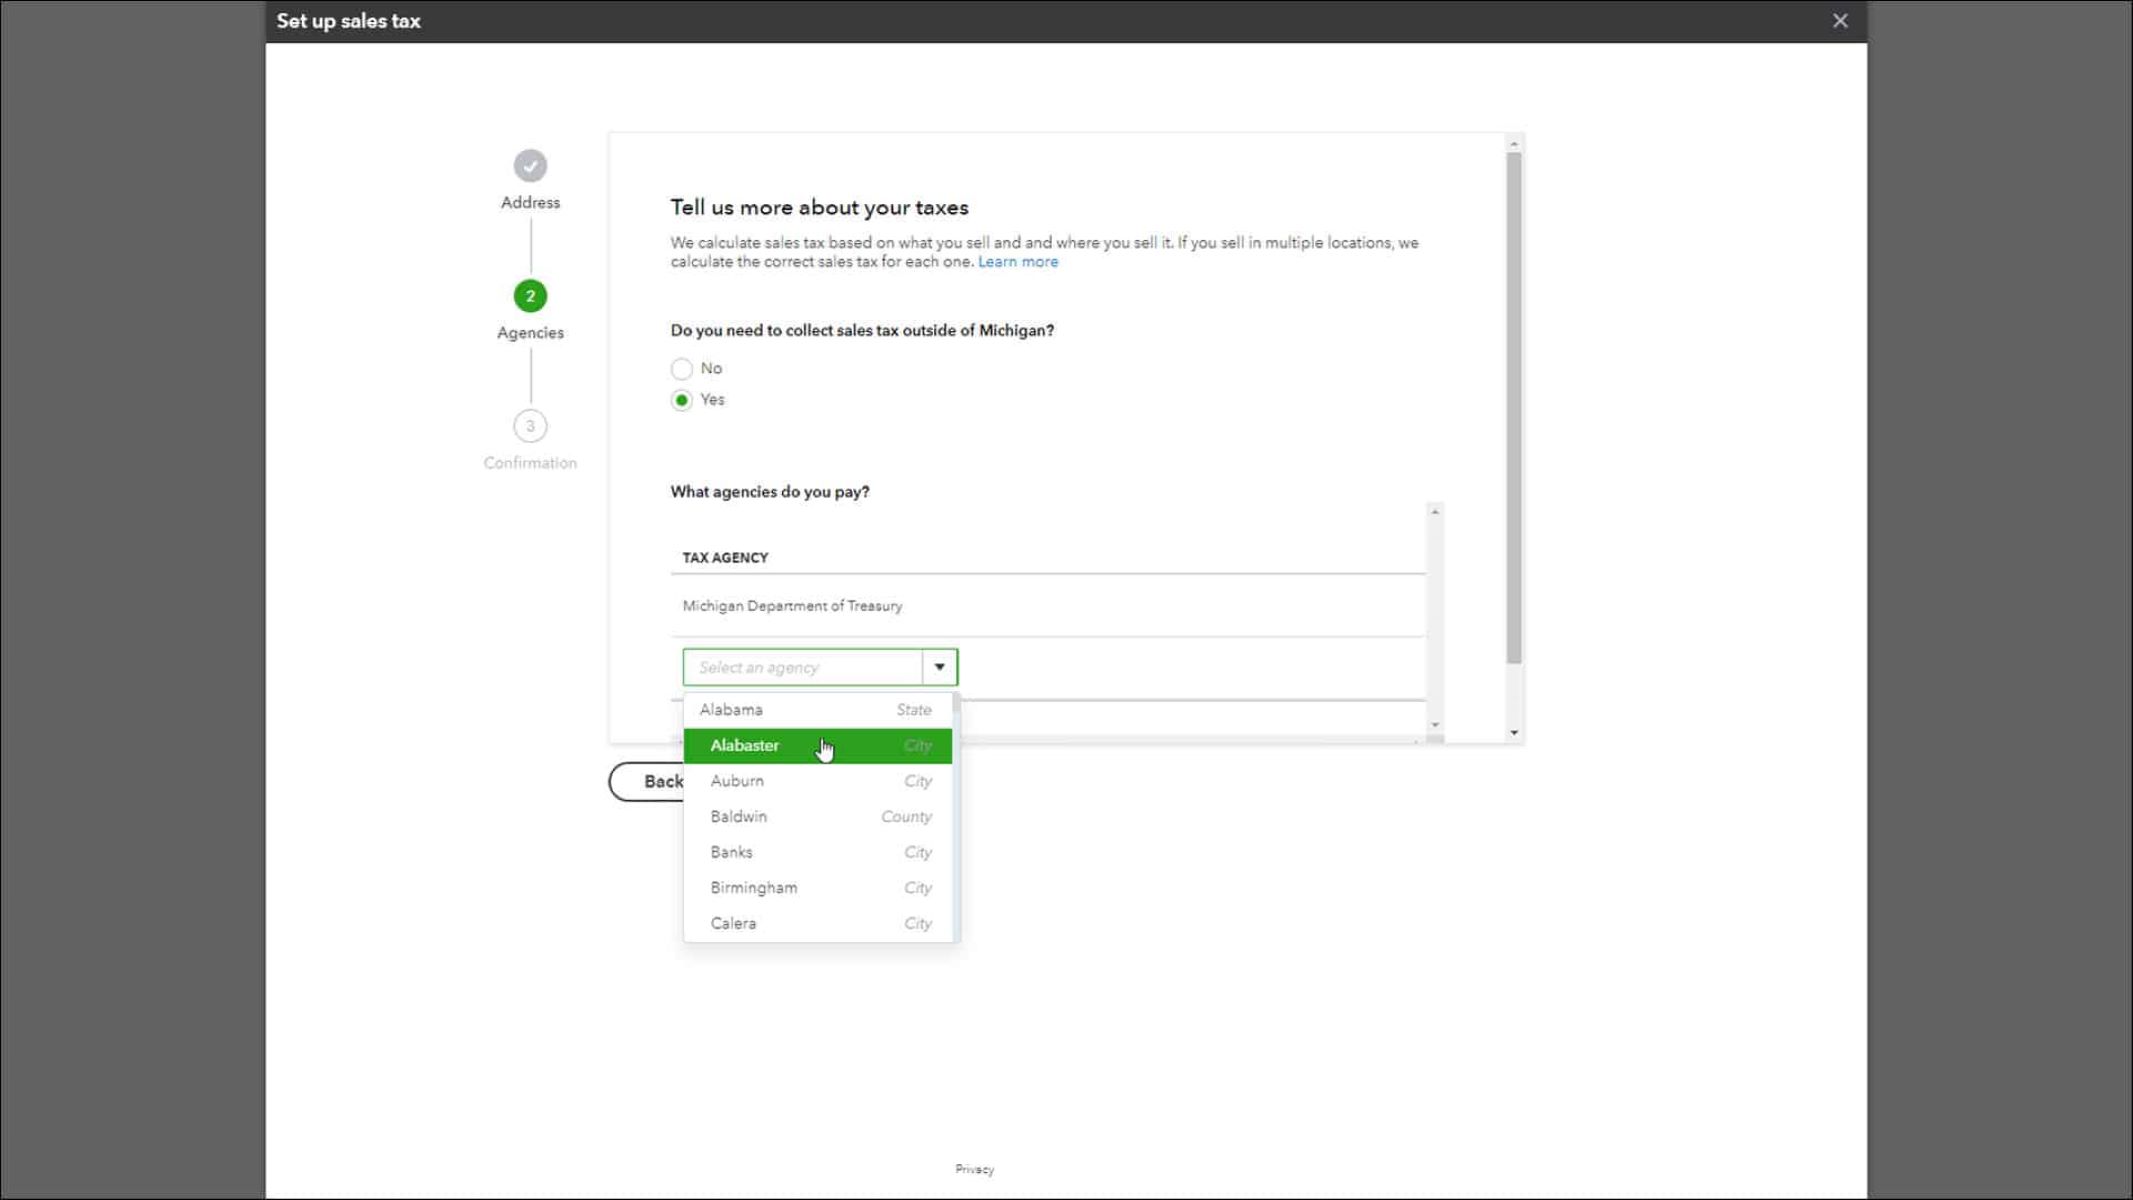
Step 1: Accessing Sales Tax Center
To begin the process of changing the sales tax rate in Quickbooks, you first need to access the Sales Tax Center. Follow the steps below:
- Launch Quickbooks and sign in to your account. Once you are logged in, navigate to the homepage.
- In the top navigation menu, click on the “Taxes” tab. This will take you to the Taxes page.
- On the Taxes page, locate and click on the “Sales Tax” option. This will open the Sales Tax Center, where you can manage all aspects of sales tax in Quickbooks.
- Once you are in the Sales Tax Center, you will see various options and sections related to sales tax management. Here, you can view and edit sales tax rates, set up sales tax items, and track sales tax liabilities.
By accessing the Sales Tax Center, you will have full control over sales tax-related settings and can make the necessary changes to update the sales tax rate.
It’s important to note that the steps aforementioned may vary slightly depending on the version of Quickbooks you are using. The instructions provided are based on the latest version of Quickbooks at the time of writing this article. If you are using an older version, the interface and navigation may differ slightly, but the general process should remain relatively similar.
Now that you have successfully accessed the Sales Tax Center, you are ready to move on to the next step: editing the sales tax rate to reflect the new rate in Quickbooks.
Step 2: Editing Sales Tax Rate
Once you are in the Sales Tax Center, editing the sales tax rate in Quickbooks is a straightforward process. Follow the steps below:
- Within the Sales Tax Center, locate the section titled “Sales Tax Items” or “Sales Tax Rates.” This section typically displays a list of existing sales tax rates and their corresponding details.
- Locate the sales tax rate that you need to change and select it by clicking on it. This will highlight the specific rate and allow you to edit its details.
- After selecting the sales tax rate, look for an option that says “Edit” or “Modify.” Click on this option to enter the edit mode for the selected sales tax rate.
- In the edit mode, you will be able to update the details of the sales tax rate. Locate the field that contains the current tax rate percentage and update it with the new rate. Make sure to input the correct value to ensure accurate calculations.
- Once you have entered the new sales tax rate, double-check the other details such as the sales tax agency, effective date, and any other relevant information. Ensure that everything is accurate and up-to-date.
- After making the necessary changes, click on the “Save” or “Save and Close” button to save the updated sales tax rate in Quickbooks.
By following these steps, you can successfully edit the sales tax rate in Quickbooks. The new rate will now be applied to all future transactions.
It is important to note that editing the sales tax rate does not affect any previously recorded transactions. Any invoices, sales receipts, or payments that were processed with the previous tax rate will remain unchanged. If you need to update the tax rate for these transactions, you will need to manually edit each individual transaction.
Now that you have successfully updated the sales tax rate in Quickbooks, let’s move on to the next step: updating existing transactions to reflect the new rate.
Step 3: Updating Existing Transactions
After you have changed the sales tax rate in QuickBooks, it is important to update any existing transactions that were recorded with the previous rate. This will ensure accurate reporting and calculations in your financial records. Follow the steps below to update existing transactions:
- From the QuickBooks homepage, navigate to the “Sales” or “Customers” tab.
- Select the type of transaction that you need to update, such as “Invoices” or “Sales Receipts.”
- Locate the specific transaction that needs to be updated and open it for editing.
- Within the transaction editing screen, locate the sales tax section. This area will display the previously recorded sales tax rate.
- Update the sales tax rate field with the new rate that you have set in the Sales Tax Center. Make sure to enter the correct rate to ensure accurate calculations.
- Once you have made the necessary changes, review the rest of the transaction details to ensure everything is accurate. If any other information needs updating, make the necessary adjustments.
- Finally, save the updated transaction by clicking on the “Save” or “Save and Close” button.
Repeat these steps for each existing transaction that needs to be updated with the new sales tax rate. It is important to double-check all updated transactions to avoid any discrepancies in your financial records.
Additionally, it is worth noting that QuickBooks provides a convenient feature called “Batch Transactions.” This feature allows you to update multiple transactions at once, saving you time and effort. If you have a large number of transactions that need to be updated, consider using the Batch Transactions feature to streamline the process.
Now that you have successfully updated your existing transactions with the new sales tax rate in QuickBooks, let’s move on to the final step: verifying the changes to ensure accuracy.
Step 4: Verifying Changes
After changing the sales tax rate and updating existing transactions in QuickBooks, it is important to verify that the changes have been applied correctly. This step will help ensure the accuracy of your financial records. Follow the steps below to verify the changes:
- From the QuickBooks homepage, navigate back to the “Sales Tax Center.”
- Review the sales tax rates listed in the center and locate the sales tax rate that you changed. Confirm that the new rate is displayed correctly.
- Next, generate a sales report for the period that includes both the transactions recorded with the old tax rate and the updated transactions with the new tax rate.
- Review the report and calculate the total sales tax collected for each rate. Compare this with the expected amount based on the new sales tax rate. Ensure that the totals match, indicating that the updated transactions are being calculated correctly.
- Double-check a few individual transactions to ensure that the sales tax rate is applied accurately. Open the transactions and verify that the correct rate has been applied.
- If you spot any discrepancies or errors, review the steps you followed in the previous sections. Check that you correctly changed the sales tax rate and updated the transactions with the new rate. Make any necessary corrections as needed.
- Once you have verified that the changes have been applied accurately, you can be confident that your financial records are up to date and in compliance with the new sales tax rate.
Regularly reviewing and verifying the changes you make to sales tax rates in QuickBooks is crucial to ensure the accuracy of your financial records and avoid any potential discrepancies or miscalculations.
Now that you have successfully changed the sales tax rate in QuickBooks, updated existing transactions, and verified the changes, you can be confident that your sales tax calculations are accurate and compliant with the new rate.
Conclusion
Managing and updating sales tax rates is an essential task for businesses to accurately calculate and report their financial records. With QuickBooks, changing the sales tax rate is a straightforward process, ensuring compliance with the latest regulations. By following the step-by-step instructions in this article, you can easily change the sales tax rate in QuickBooks, update existing transactions, and verify the changes for accuracy.
Remember, the process starts with accessing the Sales Tax Center in QuickBooks, where you can navigate to the Sales Tax Items or Sales Tax Rates section. From there, you can select and edit the sales tax rate, entering the new rate accurately. Afterward, it is essential to update existing transactions to reflect the new rate by locating and editing each individual transaction’s sales tax section.
Once the changes have been made, it is crucial to verify their accuracy. You can do this by reviewing the Sales Tax Center to ensure that the new sales tax rate is displayed correctly and generating a sales report to compare the total sales tax collected against the expected amount based on the new rate.
Regularly reviewing and verifying the changes made to sales tax rates is essential for maintaining accurate financial records and staying compliant. By following the steps outlined in this article, you can confidently manage and update sales tax rates in QuickBooks.
Remember, maintaining accurate sales tax records not only ensures compliance but also contributes to the overall financial health and success of your business. So, take the time to make sure your sales tax rates are up to date and accurate in QuickBooks.
Now that you are equipped with the knowledge of how to change the sales tax rate in QuickBooks, you can navigate through any future changes seamlessly and ensure your financial records are always accurate and compliant.