Introduction:
QuickBooks is a popular accounting software solution used by businesses of all sizes to manage their financial transactions. One important aspect of managing financials is dealing with sales tax. Adding sales tax to your QuickBooks setup ensures that you accurately track and report the taxes you owe to the government.
In this guide, we will walk you through the process of adding sales tax to QuickBooks, step by step. Whether you are a small business owner or a bookkeeper in charge of managing sales tax, this guide will help you set up and apply sales tax to your customer transactions with ease.
By setting up sales tax in QuickBooks, you can automate the calculation and tracking of sales tax, saving you time and ensuring accuracy in your financial records. Plus, with the ability to generate sales tax reports, you can easily review how much sales tax you have collected and owed to the tax authorities.
Before we dive into the steps, it’s important to note that sales tax regulations vary by jurisdiction. Make sure to consult with a tax professional or check the specific requirements in your area to ensure compliance with local tax laws. Now, let’s get started on adding sales tax to QuickBooks!
Step 1: Set up sales tax in QuickBooks
The first step in adding sales tax to QuickBooks is to set up the sales tax feature in the software. This will enable you to accurately calculate and track sales tax on your customer transactions.
To begin, log in to your QuickBooks account and navigate to the “Taxes” tab. Here, you will find the option to “Set up sales tax.” Click on it to get started.
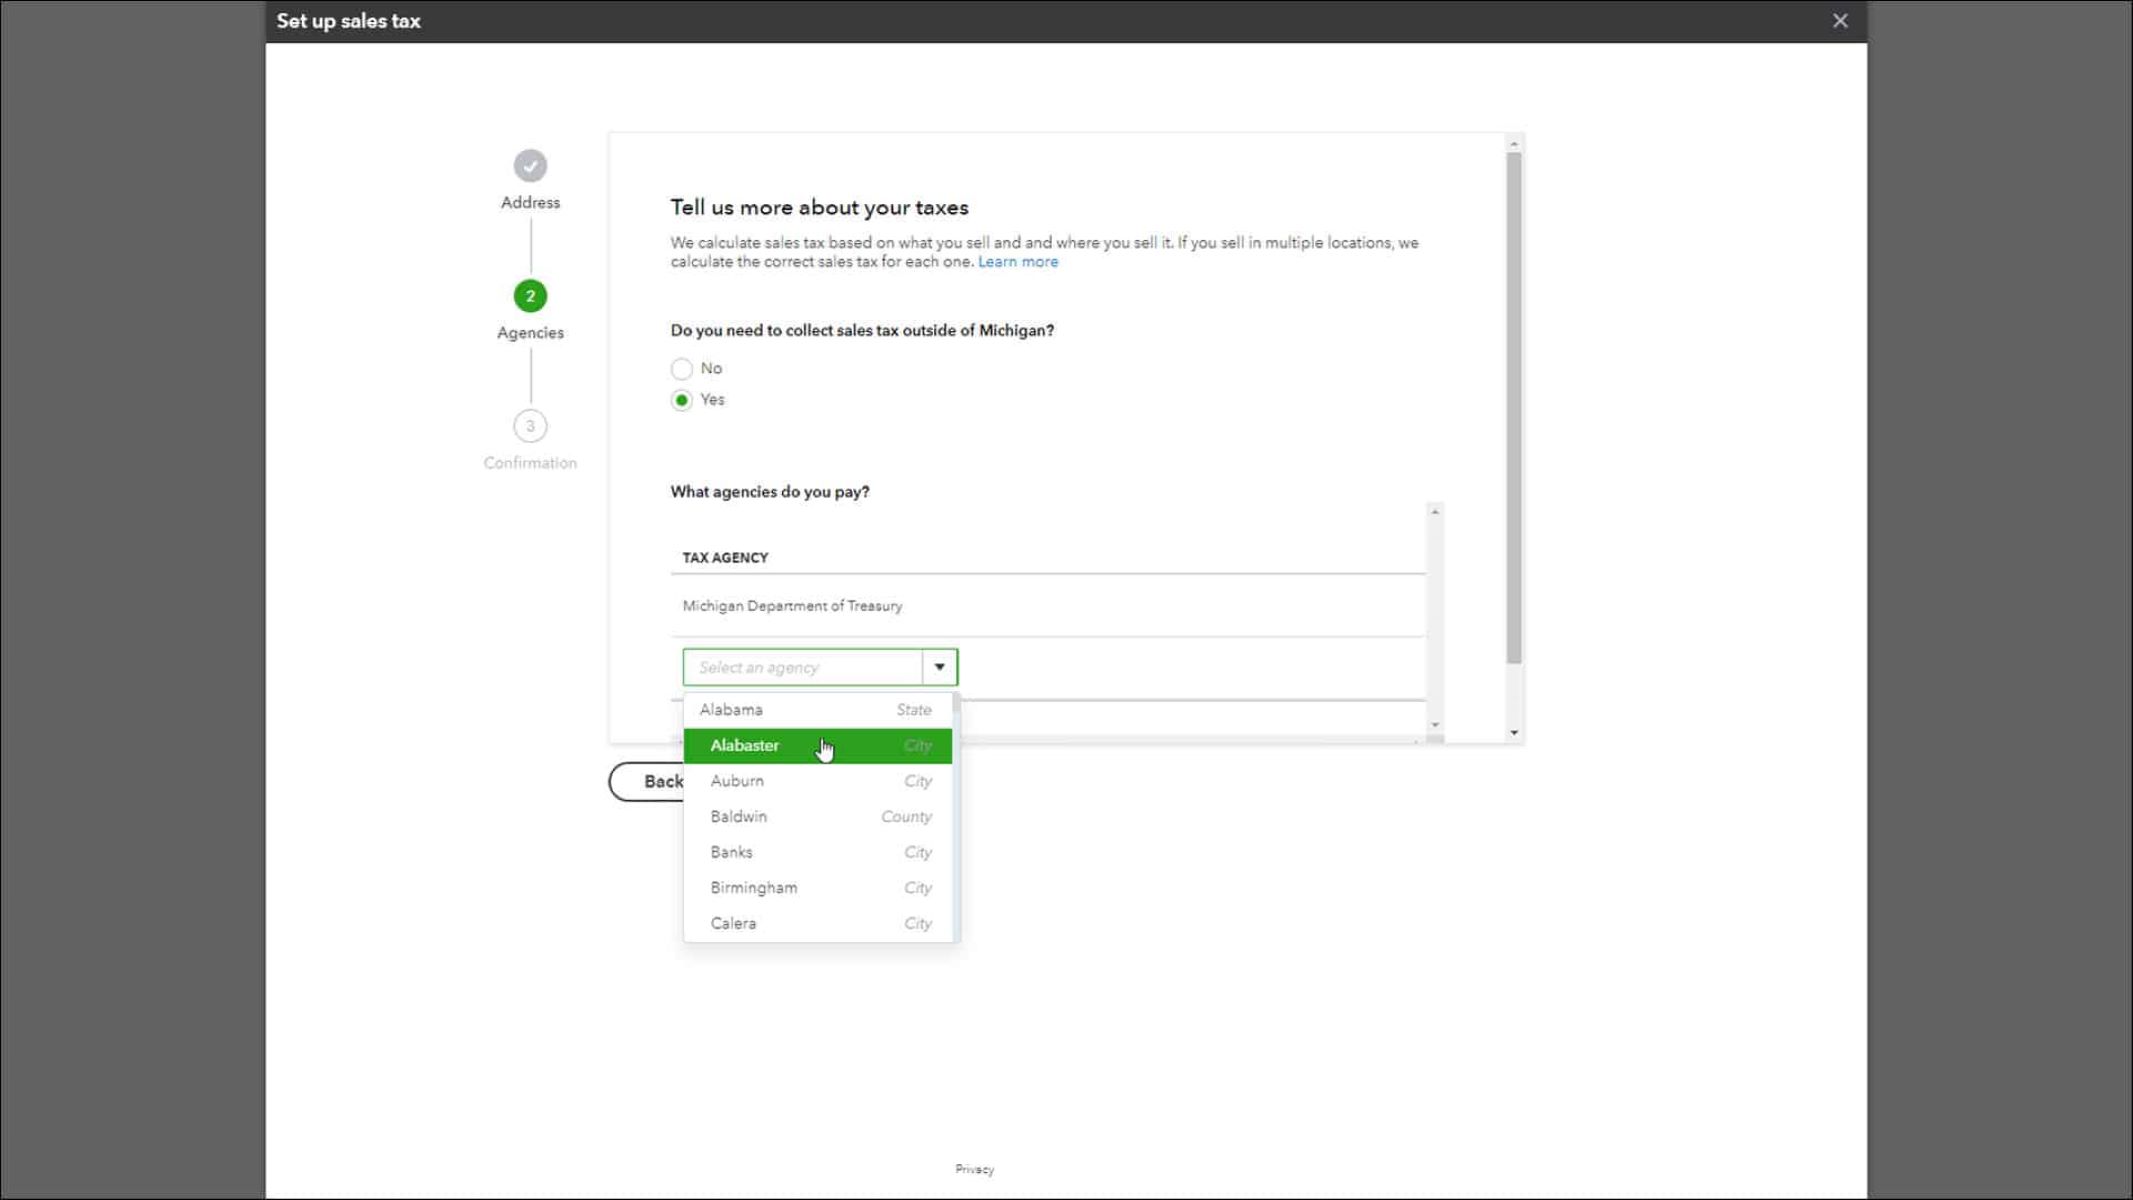
Next, you will be prompted to provide information about your business’s tax agency and tax filing frequency. It’s important to enter accurate details as this will determine how sales tax is calculated and reported.
If you are unsure about your tax agency or tax filing frequency, consult with a tax professional or refer to your local tax laws. They will be able to advise you on the correct information to input in this step.
Once you have entered the necessary details, QuickBooks will guide you through the process of setting up your sales tax preferences. You will have the option to choose either “Single tax rate” or “Multiple tax rates.”
If you only need to charge a single tax rate, such as a state sales tax, select “Single tax rate.” On the other hand, if you need to charge multiple tax rates, such as county or city sales tax in addition to state sales tax, choose “Multiple tax rates.”
After selecting your tax rate preference, QuickBooks will ask you to confirm the default tax agency and tax rate. Review the information for accuracy and make any necessary adjustments before proceeding.
Finally, QuickBooks will display a summary of your sales tax setup. Take a moment to review the information and ensure everything is correct. If you need to make any changes, click on the “Back” button to revise the settings.
Once you are satisfied with the setup, click on the “Finish” button to complete the process. Congratulations! You have successfully set up sales tax in QuickBooks and are ready to move on to the next step of creating sales tax items.
Step 2: Create sales tax items
Now that you have set up sales tax in QuickBooks, the next step is to create sales tax items. Sales tax items are used to track and apply sales tax to specific products and services in your transactions.
To create a sales tax item, navigate to the “Lists” menu in your QuickBooks account and select “Item List.” Click on the “Item” button and choose “New” to create a new sales tax item.
In the “New Item” window, select “Sales Tax Item” as the item type. Here, you can enter the name of the sales tax item, which should correspond to the specific tax rate or jurisdiction it represents.
Next, you will need to specify the tax rate and the tax agency associated with the sales tax item. If you chose to set up multiple tax rates in the previous step, you can select the applicable tax rate from the drop-down menu.
If you have not yet created the tax agency, you can enter its details directly in the “New Item” window. Include the name, address, and contact information of the tax agency to ensure accurate reporting.
Once you have entered all the necessary information, click on the “OK” button to save the sales tax item. You have now successfully created a sales tax item in QuickBooks.
Repeat this process for any additional tax rates or jurisdictions that you need to track. By creating separate sales tax items for each tax rate or jurisdiction, you can accurately apply the correct sales tax to your transactions.
It’s important to note that you should consult with a tax professional or refer to your local tax laws to ensure you are creating the correct sales tax items for your specific jurisdiction.
With the sales tax items created, you are one step closer to accurately calculating and applying sales tax to your customer transactions. In the next step, we will cover how to assign sales tax items to products and services.
Step 3: Assign sales tax items to products and services
Once you have created sales tax items in QuickBooks, the next step is to assign these items to your products and services. This ensures that the correct sales tax is applied when you sell these items to your customers.
To assign a sales tax item to a product or service, navigate to the “Lists” menu in your QuickBooks account and select “Item List.” Locate the product or service that you want to assign a sales tax to and double-click on it to edit.
In the “Edit Item” window, look for the box labeled “Sales Tax Code” or “Tax.” Click on the drop-down menu and select the appropriate sales tax item that corresponds to the tax rate or jurisdiction for that particular product or service.
If you are selling multiple products or services that have different tax rates or jurisdictions, make sure to assign the correct sales tax item to each item individually.
Once you have assigned the sales tax item, click on the “OK” button to save the changes. Now, when you sell the product or service in a customer transaction, QuickBooks will automatically apply the associated sales tax based on the assigned sales tax item.
It’s important to review and update the sales tax assignment for all your products and services to ensure accurate calculation and reporting of sales tax. Regularly check for any changes in tax rates or jurisdictions and make the necessary adjustments to the assigned sales tax items in QuickBooks.
By assigning sales tax items to your products and services, you can streamline the process of applying sales tax to your customer transactions. This ensures compliance with tax regulations and helps you maintain accurate financial records.
In the next step, we will cover how to set up sales tax rates in QuickBooks. This will allow you to customize the tax rates based on your specific business needs and the requirements of your jurisdiction.
Step 4: Set up sales tax rates
Setting up sales tax rates in QuickBooks is an important step to ensure accurate calculation and reporting of sales tax. By customizing the tax rates based on your jurisdiction and business needs, you can ensure compliance with tax regulations.
To set up sales tax rates, go to the “Taxes” tab in your QuickBooks account and select “Sales Tax Center.” From there, click on the “Sales tax settings” link to access the sales tax settings page.
In the sales tax settings page, you will see the option to “Add rate” or “Add agency.” If you need to add a new tax rate, click on the “Add rate” button.
Enter the name of the tax rate and specify the jurisdiction it applies to. This could be a state, county, city, or any other taxing authority that you are required to collect sales tax for.
Next, input the tax rate percentage. Make sure to enter the rate accurately to reflect the tax obligations in your jurisdiction. QuickBooks allows you to set either a single tax rate or multiple tax rates depending on your needs.
After setting up the tax rate, click on the “Save” button. You have now successfully set up a sales tax rate in QuickBooks.
If you need to add a new tax agency, click on the “Add agency” button in the sales tax settings page. Enter the name and contact information of the tax agency, as well as any additional details required.
Once you have added the tax agencies and rates, you can easily manage and update them as needed. QuickBooks provides the flexibility to modify or delete existing tax rates or agencies, keeping your sales tax settings up to date.
It’s important to note that sales tax rates can vary depending on the products or services you sell and the jurisdictions you operate in. Consult with a tax professional or refer to your local tax laws to ensure you set up the correct tax rates in QuickBooks.
Now that you have set up your sales tax rates in QuickBooks, you are ready to apply sales tax to your customer transactions. This will be covered in the next step.
Step 5: Apply sales tax to customer transactions
Applying sales tax to customer transactions in QuickBooks ensures that you accurately calculate and collect the appropriate tax amounts from your customers. This step is crucial for maintaining compliance and accurate financial records.
To apply sales tax to a customer transaction, such as a sale or an invoice, first, create or open the transaction in QuickBooks. Enter the details of the transaction like you normally would, including the customer information, products or services sold, and quantities.
Once you have entered the transaction details, you will notice a section labeled “Sales tax” or “Tax” depending on your version of QuickBooks. This is where you can specify whether sales tax should be applied to the transaction.
If the transaction is subject to sales tax, ensure that the appropriate sales tax item or rate is selected. QuickBooks will automatically calculate the tax amount based on the rate and apply it to the transaction subtotal.
If the customer is exempt from sales tax, you have the option to remove the sales tax from the transaction by selecting the appropriate exemption status or reason. This will exclude the tax from being calculated and added to the transaction total.
Once you have reviewed and ensured the accuracy of the sales tax calculation, save the transaction. QuickBooks will record the sales tax amount and update your financial records accordingly.
It’s important to consistently apply sales tax to customer transactions to maintain accurate tax records and ensure compliance. Regularly review your transactions and verify that sales tax is correctly applied to avoid any discrepancies.
In addition to customer transactions, QuickBooks also allows you to apply sales tax to other types of transactions like credit memos, estimates, and purchase orders. Familiarize yourself with the sales tax options available for each transaction type to ensure complete and accurate recording of sales tax.
Now that you have successfully applied sales tax to your customer transactions, let’s move on to the next step – reviewing and adjusting sales tax reports in QuickBooks.
Step 6: Review and adjust sales tax reports
Reviewing and adjusting sales tax reports in QuickBooks is essential to ensure accurate financial reporting and compliance with tax regulations. QuickBooks provides a range of sales tax reports that can help you track and analyze your sales tax data.
To access the sales tax reports, navigate to the “Reports” tab in your QuickBooks account and select “Sales Tax.” Here, you will find various reports, including the Sales Tax Liability Report, Sales Tax Revenue Summary, and Sales by Tax Code report.
The Sales Tax Liability Report provides an overview of the sales tax you have collected within a specific period. It shows the total taxable sales, total sales tax collected, and any adjustments or credits applied to the sales tax liability.
The Sales Tax Revenue Summary report breaks down the sales tax collected by tax agency or tax rate. This report gives you a detailed view of how much sales tax you have collected from each jurisdiction or tax agency.
The Sales by Tax Code report allows you to analyze sales data based on the tax codes assigned to your products or services. This report can provide valuable insights into the sales performance of items subject to different tax rates.
Reviewing these reports regularly will help you identify any discrepancies or errors in your sales tax calculations. If you notice any discrepancies, it may be necessary to adjust your sales tax settings, reassess the assigned sales tax items, or make corrections to the transactions.
To make adjustments to sales tax transactions, navigate to the “Sales Tax” menu in QuickBooks and select “Adjust Sales Tax.” Here, you can review and modify specific sales tax entries or make global adjustments to correct any errors or discrepancies.
Ensure that any adjustments made are correctly reflected in the sales tax reports to maintain accurate financial records. Consult with a tax professional if you’re unsure about any adjustments that need to be made.
By consistently reviewing and adjusting sales tax reports, you can ensure that your sales tax data is accurate and up to date. This will help you stay in compliance with tax regulations and provide you with valuable insights into your business’s sales tax obligations.
Congratulations! You have successfully reviewed and adjusted sales tax reports in QuickBooks.
Conclusion:
Adding sales tax to QuickBooks is a crucial step in managing your business’s financial transactions and ensuring compliance with tax regulations. By following the steps outlined in this guide, you can set up and apply sales tax to your customer transactions accurately and efficiently.
Remember, the first step is to set up sales tax in QuickBooks, providing the necessary information about your tax agency and tax filing frequency. From there, you can create sales tax items to track and apply sales tax to specific products and services.
By assigning sales tax items to your products and services, you guarantee that the correct tax rates are applied when you sell them to your customers. Then, setting up sales tax rates in QuickBooks allows you to customize the tax rates based on your jurisdiction and business needs.
Once your sales tax setup is complete, you can apply sales tax to customer transactions, ensuring accurate calculation and collection of sales tax amounts. Regularly reviewing and adjusting sales tax reports in QuickBooks helps identify any discrepancies or errors, allowing you to make corrections as needed.
Remember to consult with a tax professional or refer to your local tax laws to ensure compliance with specific tax regulations in your jurisdiction. They can provide guidance and answer any questions you may have regarding sales tax setup and implementation.
By properly managing sales tax in QuickBooks, you can streamline your financial processes, maintain accurate records, and meet your tax obligations. This will help you focus on growing your business with confidence, knowing that your sales tax calculations are accurate and compliant.
With the completion of this guide, you are well-equipped to add sales tax to QuickBooks and manage your business’s sales tax responsibilities effectively.