Introduction
Welcome to the step-by-step guide on how to change your Netgear Wi-Fi password. If you’re looking to update your Wi-Fi password for security reasons or simply because you want to create a new one, this article will walk you through the process.
Your Netgear router is the central hub that connects all your devices to the internet, and changing the Wi-Fi password ensures that only authorized users can connect to your network. By keeping your Wi-Fi password secure, you can prevent unauthorized access, protect your personal information, and maintain a reliable and fast internet connection.
Changing your Netgear Wi-Fi password involves a few simple steps, and in this guide, we’ll break them down for you. We’ll show you how to access your Netgear router settings, log in to the router’s admin interface, locate the wireless settings, and change the Wi-Fi password. We’ll also guide you on saving the new settings and reconnecting your devices using the updated password.
Whether you’re a tech-savvy individual or a beginner, don’t worry! This guide is designed to be user-friendly and accessible to all. Just follow the instructions provided, and you’ll be able to change your Netgear Wi-Fi password without any hassle.
Before we dive into the steps, make sure you have your Netgear router nearby, as well as a device connected to it through either a wired or wireless connection. Now, let’s get started on changing your Netgear Wi-Fi password!
Step 1: Accessing the Netgear router settings
In order to change your Netgear Wi-Fi password, you need to access the router’s settings. Here’s how you can do it:
1. Connect your computer or mobile device to the Netgear router using an Ethernet cable or through a wireless connection.
2. Open a web browser of your choice (such as Chrome, Firefox, or Safari) on the connected device.
3. In the address bar of the browser, type in the default IP address for Netgear routers, which is usually “192.168.1.1” or “192.168.0.1. Press Enter to load the login page.
4. If the above IP addresses don’t work for your router, you can find the correct one by referring to the documentation that came with your Netgear router or by checking the router manufacturer’s website.
5. You will be prompted to enter the router login credentials. The default username is often “admin” and the default password is usually “password”. If you have changed the login credentials in the past and cannot remember them, you may need to reset your Netgear router to its factory settings.
6. Once you have entered the correct login information, click on the “Login” or “Submit” button to proceed.
7. After successful login, you will be redirected to the Netgear router’s settings page, where you can make various changes to your router’s configuration, including changing the Wi-Fi password.
Now that you have accessed the Netgear router settings, you’re ready to move on to the next step: logging into the router and locating the wireless settings. This will allow you to change the Wi-Fi password and secure your network.
Step 2: Logging in to the Netgear router
Once you have accessed the Netgear router settings, the next step is to log in to the router’s administrative interface. This will allow you to navigate through the settings and make changes, such as updating your Wi-Fi password. Here’s how you can do it:
1. On the Netgear router settings page, locate the section where you can log in. This is usually found at the top of the page or in a sidebar menu.
2. Enter the username and password that you set up when initially accessing the router settings. If you have not changed these credentials, use the default username, which is often “admin,” and the default password, which is usually “password.”
3. Double-check that the login details are correct, and then click on the “Login” or “Submit” button to proceed.
4. If the login details are correct, you will be granted access to the router’s administrative interface. This is where you can manage various settings, including changing the Wi-Fi password.
5. If you are unable to log in using your credentials, it’s possible that you have forgotten the password or have changed it in the past. In such cases, you may need to reset the Netgear router to its factory settings. To do this, locate the reset button (usually found on the back or bottom of the router) and press and hold it for a few seconds until the router restarts.
6. Once you have successfully logged in to the Netgear router and are on the administrative interface, you are ready to proceed to the next step: locating the wireless settings.
Now that you have logged in to the Netgear router, you can navigate through its settings and access the specific section where you can change the Wi-Fi password. This will ensure that your network remains secure and that only authorized individuals can connect to your Wi-Fi network.
Step 3: Locating the wireless settings
After logging in to your Netgear router’s administrative interface, the next step is to locate the section where you can access the wireless settings. This is where you will find the option to change your Wi-Fi password. Follow the steps below to find the wireless settings:
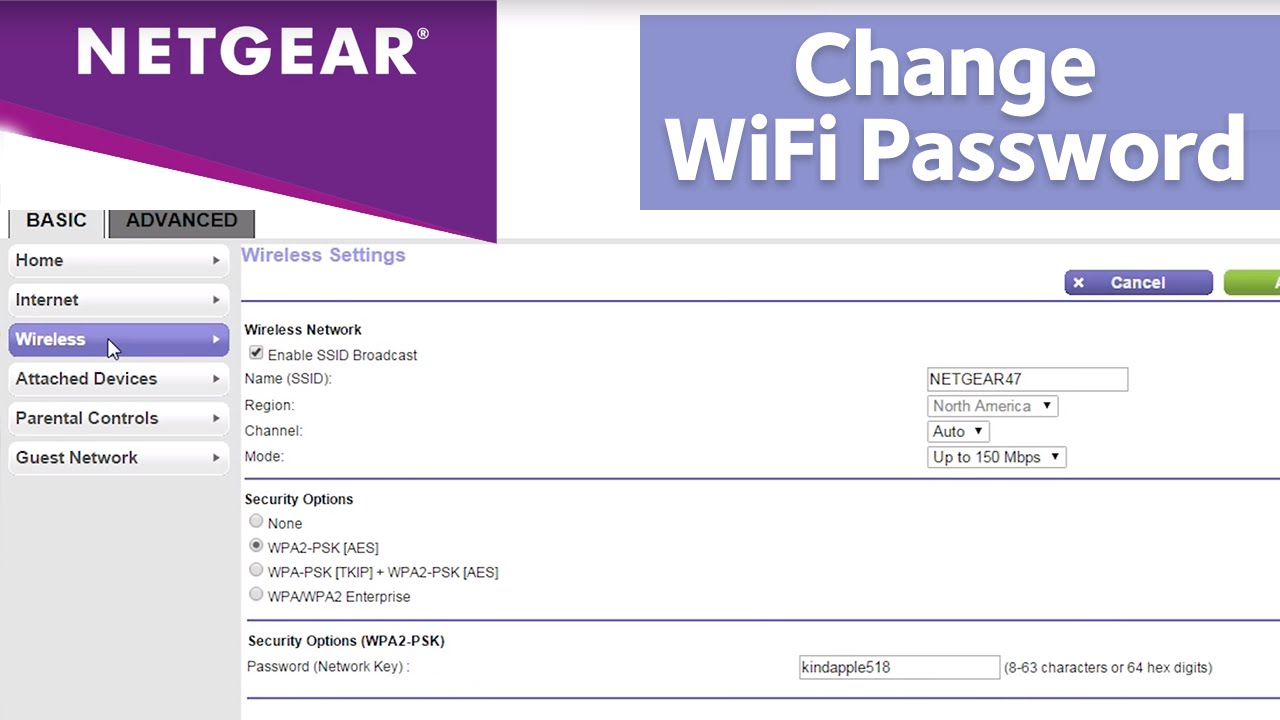
1. Look for a tab or menu option labeled “Wireless” or “Wireless Settings” on the router’s administrative interface. It is typically located in the main navigation menu or in a sidebar.
2. Click on the “Wireless” or “Wireless Settings” tab to access the wireless settings page.
3. On the wireless settings page, you will see several options related to your Wi-Fi network. These may include the network name (SSID), security settings, and the current Wi-Fi password.
4. Take note of the current Wi-Fi password. You will need this information when you change the password in the next step.
5. If you want to change other wireless settings, such as the network name or security type, you can do so on this page as well. However, for the purpose of this guide, let’s focus on changing the Wi-Fi password.
Now that you have located the wireless settings page and have taken note of your current Wi-Fi password, you can proceed to the next step: changing the Wi-Fi password. Follow the instructions in the upcoming section to secure your network with a new password.
Step 4: Changing the Wi-Fi password
Now that you have accessed the wireless settings page on your Netgear router’s administrative interface, it’s time to change your Wi-Fi password. Follow the steps below to update your password:
1. Locate the field or option that allows you to change the Wi-Fi password. This is typically labeled as “Password,” “Passphrase,” or “Network Key.”
2. Click on the field or option to enter a new password. It’s important to create a strong and secure password to protect your network. Make sure your new password is a combination of letters, numbers, and special characters. Consider using a mix of upper and lowercase letters to add complexity.
3. As you enter the new password, keep an eye on the strength indicator (if available). Aim for a high-strength rating to ensure maximum security.
4. It’s a good practice to also change the network name (SSID) to something unique, especially if it’s still set to the default value. This can make it more difficult for unauthorized users to identify and target your network.
5. Once you have entered the new Wi-Fi password and, if desired, changed the network name, click on the “Save” or “Apply” button to save the changes.
6. The router will then apply the new settings and may take a few seconds to restart. Do not interrupt this process.
Now that you have successfully changed your Wi-Fi password, it’s time to move on to the next step: saving the new settings. This will ensure that your new password is applied and your network remains secure. Proceed to the next section for instructions on how to save the changes.
Step 5: Saving the new settings
After changing your Wi-Fi password on your Netgear router, it’s crucial to save the new settings to ensure that your changes take effect. Follow the steps below to save the new settings:
1. Once you have clicked on the “Save” or “Apply” button to change your Wi-Fi password, wait for the router to process the settings update. This may take a few seconds.
2. It’s important not to interrupt the process or turn off the router during this time, as it could lead to incomplete settings changes or even cause network connection issues.
3. Once the new settings have been successfully saved, you will usually see a confirmation message on the router’s administrative interface, indicating that the changes have been applied.
4. To ensure that the new settings are properly implemented, it’s recommended to restart your router. You can do this by unplugging the power cable from the back of the router, waiting for about 10 seconds, and then plugging it back in. This will allow the router to fully reset and apply the new settings.
5. After the router has restarted, you can reconnect to your Wi-Fi network using the new password. Remember to update the Wi-Fi password on all of your devices that were previously connected to the network to ensure uninterrupted internet access.
Congratulations! You have successfully changed the Wi-Fi password on your Netgear router and saved the new settings. This will help protect your network from unauthorized access and keep your internet connection secure. In the next step, we will guide you on reconnecting your devices using the newly updated Wi-Fi password.
Step 6: Reconnecting devices using the new Wi-Fi password
Now that you have changed your Wi-Fi password on your Netgear router, the final step is to reconnect all of your devices using the new password. This ensures that your devices can connect to the updated network and continue to enjoy a secure internet experience. Follow the steps below to reconnect your devices:
1. Open the Wi-Fi settings on your device. This can usually be found in the settings menu, often labeled as “Wi-Fi,” “Wireless,” or “Networks.”
2. Locate your Wi-Fi network in the list of available networks. It should be displayed with the new network name (SSID) that you set earlier.
3. Select your Wi-Fi network and click on the “Connect” or “Join” button. You will be prompted to enter the new Wi-Fi password.
4. Enter the new Wi-Fi password that you changed in the previous steps. Make sure to type it correctly, as Wi-Fi passwords are case-sensitive.
5. Once you have entered the new password, click on the “Connect” or “Join” button to establish a connection to the network.
6. Wait for your device to connect to the network. The Wi-Fi icon on your device should change to indicate a successful connection.
7. Repeat this process for all of your devices, including smartphones, tablets, laptops, smart TVs, and any other devices that were previously connected to your Netgear Wi-Fi network.
By reconnecting your devices using the new Wi-Fi password, you can ensure that they are securely connected to your network. This helps protect your personal information and ensures a reliable and fast internet connection for all of your devices.
With all devices reconnected to your Netgear Wi-Fi network, you have successfully completed the process of changing your Wi-Fi password. Congratulations! Your network is now secure and ready for you to enjoy all your online activities with peace of mind.
Conclusion
Changing your Netgear Wi-Fi password is an essential step in maintaining the security and privacy of your network. By following the simple steps outlined in this guide, you can easily update your Wi-Fi password and protect your network from unauthorized access.
Remember, a strong and unique password is key to ensuring the security of your network. Make sure to choose a password that combines letters, numbers, and special characters and that is not easily guessable.
Throughout this guide, we walked you through the process of accessing your Netgear router settings, logging in to the router, locating the wireless settings, changing the Wi-Fi password, and saving the new settings. We also provided guidance on reconnecting your devices using the updated password.
By regularly changing your Wi-Fi password and implementing strong security measures, you can maintain a safe and secure network environment for all of your devices. This helps protect your personal information, ensures a reliable internet connection, and provides peace of mind.
As technology evolves and new threats emerge, it is always a good idea to stay informed about the latest recommendations for network security. Netgear provides regular firmware updates for their routers, so make sure to keep your router up to date to benefit from enhanced security features.
Thank you for following this step-by-step guide on how to change your Netgear Wi-Fi password. We hope that this guide has been helpful and that you have successfully completed the process. Enjoy your secure Wi-Fi network!