Introduction
Welcome to this step-by-step guide on how to change the background on a MacBook Pro. Your desktop background is not only a visual representation of your personal style, but it can also contribute to your overall user experience. Changing the background allows you to explore different aesthetics and create a personalized environment that suits your preferences and mood. Whether you want to use a stunning nature photograph, a motivating quote, or a solid color background, we’ll walk you through the process of customizing your MacBook Pro’s desktop to reflect your unique style.
With the ease of Mac’s user-friendly interface, you can quickly navigate through the settings and choose from various options to find the perfect background that resonates with you. In this guide, we will cover the steps required to change your desktop background, customize the picture settings, and even use a solid color background if you prefer minimalism. So, let’s get started and give your MacBook Pro a fresh new look!
Note: The following instructions are based on the latest macOS version at the time of writing. The steps may vary slightly depending on your operating system version, but the overall process should remain similar.
Step 1: Accessing System Preferences
The first step to changing the background on your MacBook Pro is accessing the System Preferences. This is where you can find various settings and customization options for your device. Follow these simple steps to get started:
- Click on the Apple icon located at the top-left corner of your screen. A dropdown menu will appear.
- In the dropdown menu, select “System Preferences.” This will open the System Preferences window.
- Within the System Preferences window, you will find a collection of icons representing different settings. Look for the “Desktop & Screen Saver” icon and click on it. This will open the Desktop & Screen Saver preferences.
Alternatively, you can access the System Preferences by clicking on the “Launchpad” icon in the Dock and searching for “System Preferences” in the search bar at the top of the screen. Once you find it, click on the icon to open the preferences window.
By following these steps, you have successfully accessed the System Preferences, specifically the Desktop & Screen Saver preferences. In the next step, we will explore how to choose a new background image for your MacBook Pro.
Step 2: Choosing a New Background Image
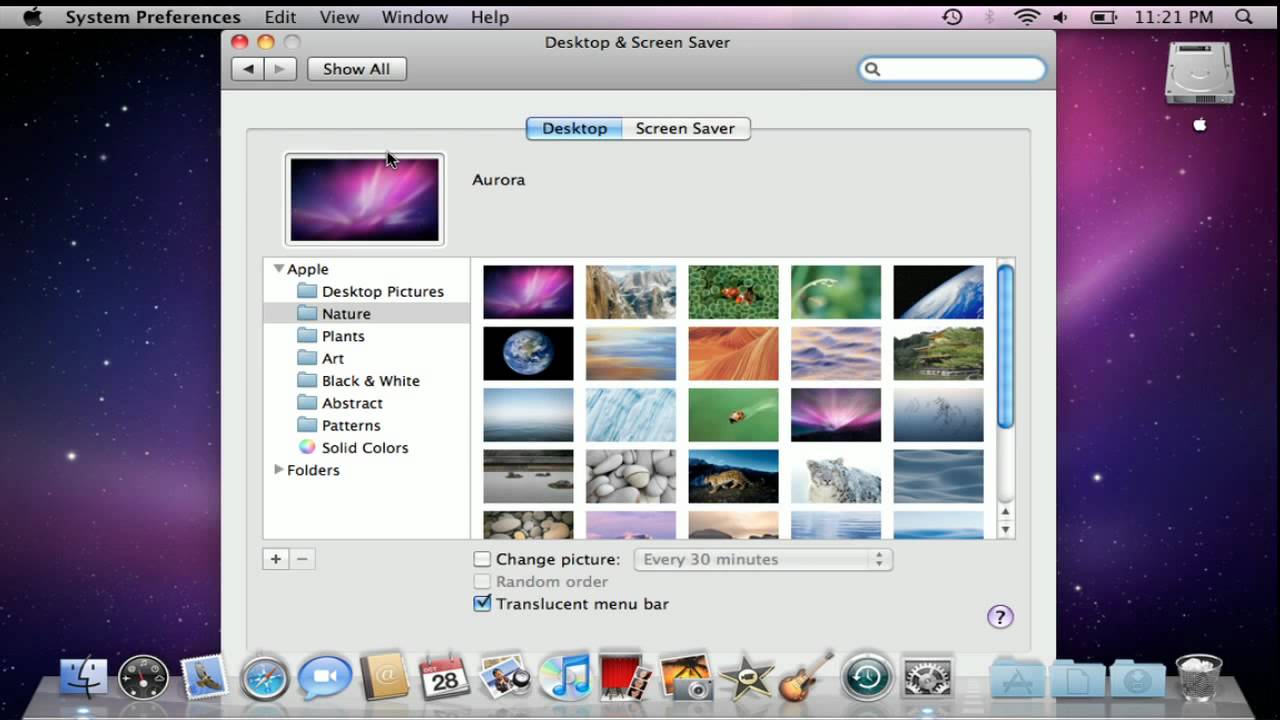
Once you have accessed the Desktop & Screen Saver preferences, it’s time to choose a new background image for your MacBook Pro. Apple provides a range of stunning built-in wallpapers to choose from, or you can use your own personal images. Follow these steps to select a new background image:
- In the Desktop & Screen Saver preferences window, you will see two tabs: Desktop and Screen Saver. Make sure the “Desktop” tab is selected.
- On the left-hand side of the window, you’ll find a selection of categories such as “Apple”, “Nature”, “Solid Colors”, “Pictures Folder”, and more. Click on any category to expand it and reveal the available wallpapers.
- Browse through the wallpapers within each category by scrolling down, and click on the image you want to set as your background.
If you want to use your own image as the background, you can click on the “+” button at the bottom-left corner of the window to browse and select an image from your computer.
Once you have chosen your desired background image, the preview on the right-hand side of the window will update to show how the image will appear on your desktop. Take your time to explore different options until you find the perfect background that resonates with you.
Step 3: Changing the Desktop Background
Now that you have selected a new background image, it’s time to change the desktop background on your MacBook Pro. Follow these simple steps:
- In the Desktop & Screen Saver preferences window, make sure the “Desktop” tab is selected if it’s not already.
- On the right-hand side of the window, you will see a list of available monitors if you are using multiple displays. Select the monitor where you want to change the background.
- Just below the monitor selection, you will find a drop-down menu labeled “Change picture:”. Click on it to reveal the available options.
- By default, the option “Every hour” is selected, which means the background image will change automatically every hour. However, if you prefer a fixed background, you can select “Never” and manually change it whenever you want.
- If you want to keep the background image fixed, click on the “Change picture” button. This will set your chosen image as the desktop background.
- If you prefer the background to change automatically, select the desired interval from the drop-down menu.
By following these steps, you have successfully changed the desktop background on your MacBook Pro. Take a moment to admire your new background image and enjoy the refreshed look of your desktop!
Step 4: Customizing Desktop Picture Settings
After changing the desktop background on your MacBook Pro, you may want to further customize the picture settings to achieve the desired look. The Desktop & Screen Saver preferences offer several options to help you fine-tune your desktop picture. Follow these steps to customize the desktop picture settings:
- In the Desktop & Screen Saver preferences window, make sure the “Desktop” tab is selected.
- On the right-hand side of the window, you will see a preview of your current desktop background image.
- Below the preview, you will find a set of options to customize the appearance of the background image.
- The “Fit to screen” option is selected by default, ensuring that the image fills the entire screen without distortion. If you prefer a different arrangement, you can choose the “Fill screen”, “Stretch to fit screen”, “Center”, or “Tile” options.
- Experiment with these different options to see which one best suits your preference and the resolution of your screen.
- Beneath the arrangement options, you can adjust the brightness of the background image using the slider. Move the slider to the left to decrease the brightness or to the right to increase it.
- Take your time to play around with the options until you achieve the desired look for your desktop background.
By following these steps, you can customize the desktop picture settings to create a visually appealing and personalized desktop background that perfectly fits your style and preferences.
Step 5: Using a Solid Color as the Background
If you prefer a minimalist approach or want a clean and distraction-free desktop, you have the option to use a solid color as the background on your MacBook Pro. Follow these steps to set a solid color background:
- In the Desktop & Screen Saver preferences window, make sure the “Desktop” tab is selected.
- On the left-hand side of the window, click on the category labeled “Solid Colors.”
- A palette of different solid color options will appear on the right-hand side of the window.
- Choose the color you want to set as your background by clicking on it.
If you have a specific color in mind that is not available in the default palette, you can also create a custom solid color by following these steps:
- In the “Solid Colors” category, select any color from the palette as a starting point.
- Just below the palette, you will see a “Custom color” button. Click on it.
- A color picker will appear, allowing you to choose a custom color using various controls including sliders, color wheel, or entering the specific color values.
- Once you have chosen the custom color, click on the “Choose” button.
By following these steps, you can easily set a solid color as the background on your MacBook Pro. Experiment with different colors to find the one that creates a clean and visually pleasing desktop environment.
Conclusion
Changing the background on your MacBook Pro is a simple and effective way to personalize your device and create a visually appealing workspace. By following the steps outlined in this guide, you can easily navigate through the System Preferences and customize your desktop background to suit your style and preferences.
We started by accessing the System Preferences and then proceeded to choose a new background image from the available options or using your own personal image. Next, we learned how to change the desktop background, whether you prefer a fixed image or an automatic slideshow. Additionally, we explored how to customize the desktop picture settings, allowing you to fine-tune the appearance of your background image.
If you prefer a minimalistic look, you can also use a solid color as your background, either choosing from the default color palette or creating a custom color of your choice.
Remember that the steps outlined in this guide are based on the latest macOS version at the time of writing and may vary slightly depending on your operating system version. However, the overall process should remain fairly similar.
Now that you have the knowledge and steps to change your background, feel free to explore different images, colors, and arrangements to create a desktop environment that reflects your personality and enhances your user experience on your MacBook Pro.