Introduction
Disney Plus is a popular streaming platform that offers a wide range of movies and TV shows from Disney, Pixar, Marvel, Star Wars, and more. Whether you’re a fan of animated classics, thrilling superhero adventures, or captivating space odysseys, Disney Plus has something for everyone.
One of the great features of Disney Plus is the ability to choose your preferred language for audio and subtitles. This allows you to enjoy your favorite content in a language that you’re comfortable with. If you’re using Disney Plus on your Roku TV and want to know how to change the language settings, you’ve come to the right place. In this guide, we’ll walk you through the steps to change the language on Disney Plus on a Roku TV.
Whether you’re learning a new language, want to watch content with subtitles, or simply prefer watching movies and shows in a different language, changing the language settings on Disney Plus is quick and easy. By following a few simple steps, you can customize your Disney Plus experience and enjoy your favorite content in the language of your choice.
In the following sections, we will provide you with a step-by-step guide on how to change the language settings on Disney Plus on your Roku TV. So, grab your remote and let’s get started!
Step 1: Open the Disney Plus app on your Roku TV
To begin the process of changing the language on Disney Plus, you first need to open the Disney Plus app on your Roku TV. If you haven’t installed the app yet, you can do so by following these simple steps:
- Start by turning on your Roku TV and navigating to the home screen.
- Scroll through the available apps and locate the Disney Plus app. It is usually represented by the iconic Disney logo.
- Select the Disney Plus app by highlighting it and pressing the OK button on your remote.
Wait for the app to load and once it’s open, you’ll be ready to proceed to the next step of changing the language settings.
It’s important to note that you will need a valid Disney Plus subscription to access the app. If you haven’t subscribed yet, you can sign up by visiting the official Disney Plus website or through the Roku Channel Store. Once you’re subscribed, you can login to the app with your credentials and start enjoying your favorite Disney content.
Now that you have the Disney Plus app open on your Roku TV, let’s move on to the next step and explore how to access the language settings within the app.
Step 2: Go to the “Settings” menu in the Disney Plus app
After opening the Disney Plus app on your Roku TV, the next step is to navigate to the “Settings” menu. This is where you can access various options and customize your Disney Plus experience. To find the “Settings” menu, follow these simple instructions:
- Using your Roku remote, navigate to the Disney Plus app’s main screen.
- Look for the icons or options at the top or bottom of the screen. Locate the “Settings” icon, which is usually represented by a gear or cogwheel symbol.
- Highlight the “Settings” icon by hovering over it and press the OK button on your remote to enter the settings menu.
Once you’re in the “Settings” menu, you will have access to a range of options to personalize your Disney Plus experience, including language settings, audio preferences, video quality settings, and more. In the next step, we will specifically focus on how to change the language options for audio and subtitles.
It’s worth noting that the layout and design of the Disney Plus app may vary slightly depending on your Roku TV model and the version of the app you have installed. However, the general steps to access the “Settings” menu remain the same across different devices.
Now that you have successfully found and entered the “Settings” menu in the Disney Plus app, let’s move on to the next step and explore how to change the audio and subtitle language settings.
Step 3: Select “Audio and Subtitles”
Once you’re in the “Settings” menu of the Disney Plus app on your Roku TV, it’s time to navigate to the “Audio and Subtitles” option. This is where you can adjust the language settings for audio and subtitles in your preferred language. Here’s how you can do it:
- Using your Roku remote, navigate through the options in the “Settings” menu until you find the “Audio and Subtitles” option.
- Highlight the “Audio and Subtitles” option by hovering over it and press the OK button on your remote to enter the language selection screen.
By selecting the “Audio and Subtitles” option, you are now one step closer to customizing your language preferences on Disney Plus. In the next step, we will explore how to choose your preferred language for audio playback.
It’s important to mention that depending on the content you are watching, not all languages may be available for audio or subtitles. The options displayed in the “Audio and Subtitles” menu may vary based on the availability of different language options for the specific movie or TV show you are accessing. However, Disney Plus offers a wide selection of languages to choose from, ensuring that you can enjoy their content in your desired language.
Now that you’ve successfully accessed the “Audio and Subtitles” option within the “Settings” menu on the Disney Plus app, let’s continue to the next step and learn how to set your preferred language for audio playback.
Step 4: Choose your preferred language for audio
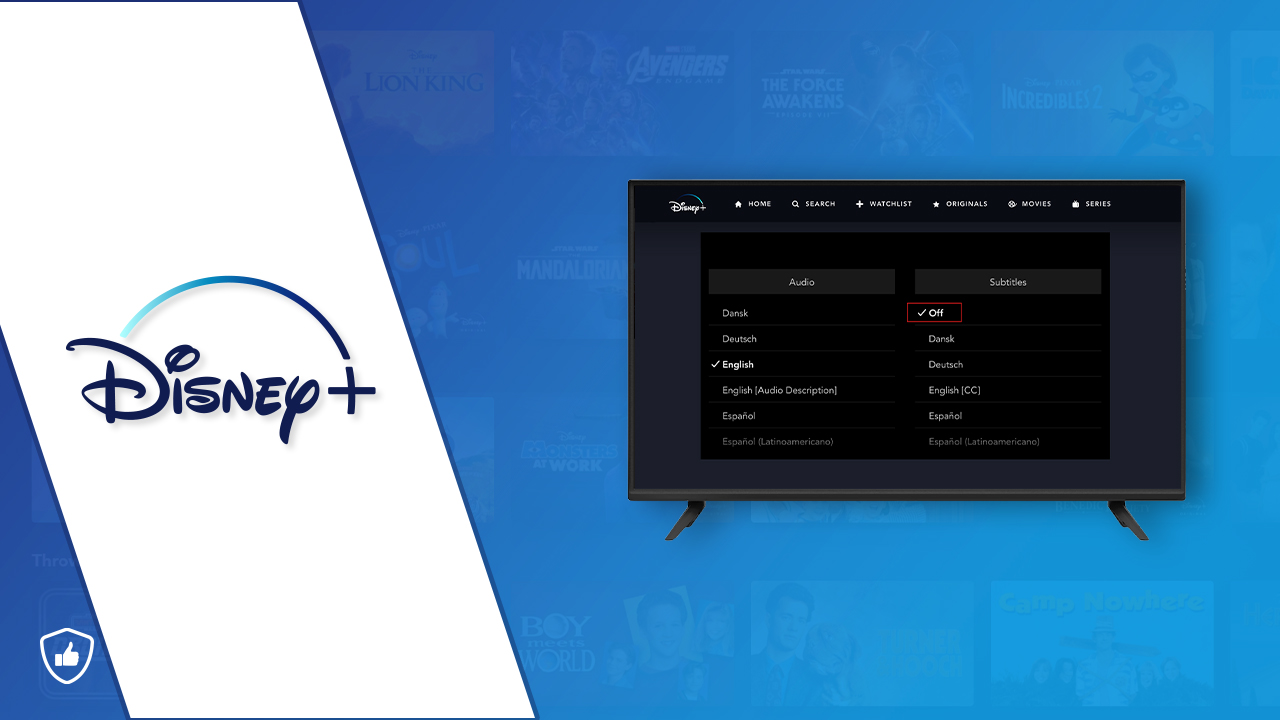
Now that you’re in the “Audio and Subtitles” menu within the Disney Plus app on your Roku TV, it’s time to select your preferred language for audio playback. This will ensure that you can enjoy movies and TV shows in the language that suits you best. Follow these simple steps to choose your preferred audio language:
- Using your Roku remote, navigate to the audio language options displayed on the screen.
- Scroll through the available language options and select the one you prefer by highlighting it and pressing the OK button on your remote.
The Disney Plus app provides a wide range of audio language options to choose from, including but not limited to English, Spanish, French, German, Italian, and many more. Select the language that you understand best or the one you’d like to practice and improve your language skills.
It’s worth noting that the availability of different audio languages may vary depending on the content you are watching. Not all movies or TV shows may have audio options in every language. However, Disney Plus strives to provide a diverse range of language options to cater to the needs of their global audience.
Now that you’ve set your preferred language for audio playback, let’s continue to the next step and explore how to select your preferred language for subtitles.
Step 5: Select your preferred language for subtitles
After choosing your preferred language for audio playback in the previous step, it’s time to select your preferred language for subtitles. This will ensure that you can follow along with the dialogue and narration in your desired language while watching movies and TV shows on Disney Plus. Here’s how you can do it:
- Navigate to the subtitle language options displayed on the screen using your Roku remote.
- Scroll through the available language options and select the one you prefer by highlighting it and pressing the OK button on your remote.
Disney Plus offers a wide range of subtitle language options to choose from, allowing you to enjoy content in your preferred language even if you want to watch it with the sound turned off or if the audio is not available in your desired language. Some popular subtitle languages include English, Spanish, French, German, Italian, and many others.
By selecting your preferred language for subtitles, you can fully immerse yourself in the story and dialogue of your favorite movies and TV shows, even if they are in a different language. It also serves as a valuable tool for language learning and comprehension.
It’s important to note that not all movies or TV shows on Disney Plus may have subtitles available in every language. The availability of subtitle options may vary depending on the content you are watching. However, Disney Plus strives to provide a comprehensive range of language options to cater to the diverse preferences of their audience.
Now that you’ve successfully chosen your preferred language for subtitles, let’s move on to the next step and learn how to confirm your language selections on Disney Plus.
Step 6: Confirm your language selections
After choosing your preferred language for both audio and subtitles on the Disney Plus app, it’s important to confirm your language selections to ensure that they are applied to your viewing experience. Follow these simple steps to confirm your language choices:
- Using your Roku remote, navigate to the “Confirm” or “Save” button displayed on the screen.
- Highlight the button and press the OK button on your remote to confirm your language selections.
By confirming your language selections, you are ensuring that the chosen audio language and subtitles will be applied to the content you watch on Disney Plus. This step is crucial to make sure that your preferred language settings are saved and implemented for future viewing sessions.
If you ever want to change your language settings again in the future, you can revisit the “Audio and Subtitles” menu in the Disney Plus app’s settings and go through the steps outlined in the previous sections.
It’s important to remember that your language options may vary depending on the availability of different languages for specific movies or TV shows. Disney Plus aims to provide a diverse array of language options, but some content may have limited language choices. Nevertheless, there are usually several language alternatives available to cater to a broad audience.
Now that you’ve confirmed your language selections, you’re all set to start watching your favorite Disney Plus content in the language of your choice. Sit back, relax, and enjoy the magic of Disney in the language that brings you the most joy and immersion!
Step 7: Start watching your favorite Disney Plus content in your chosen language
Congratulations! You have successfully changed the language settings on Disney Plus for your Roku TV. Now it’s time to sit back, relax, and start enjoying your favorite Disney Plus content in your chosen language. Here’s how you can dive into the magical world of Disney in your preferred language:
- Exit the “Settings” menu and go back to the main screen of the Disney Plus app.
- Browse through the extensive library of movies and TV shows available on Disney Plus.
- Select the movie or TV show you want to watch by highlighting it and pressing the OK button on your remote.
Once you’ve selected your desired movie or TV show, the audio and subtitles will automatically be played in the language you previously selected. The dialogue will be synchronized with the audio track, and the subtitles will provide an additional layer of understanding if you prefer to have them enabled.
Enjoy the enchanting tales of Disney characters, follow along with the thrilling adventures of Marvel superheroes, get lost in the captivating worlds of Pixar animation, and immerse yourself in the epic Star Wars saga – all in the language that resonates with you the most.
Whether you’re improving your language skills, watching with subtitles, or simply enjoying the content in a different language, the flexibility of changing the language settings on Disney Plus allows you to have a tailored experience that suits your preferences.
Remember, you can always revisit the “Audio and Subtitles” menu in the Disney Plus app’s settings if you wish to change the language for future viewing sessions.
Now that you’re all set to start watching, grab some popcorn, get comfortable, and embark on a magical journey with Disney Plus, where the power of storytelling comes to life in your chosen language!
Additional Tips and Troubleshooting
While changing the language settings on Disney Plus on your Roku TV is generally a straightforward process, there may be some instances where you encounter issues or have additional questions. Here are some helpful tips and troubleshooting steps to ensure a smooth experience:
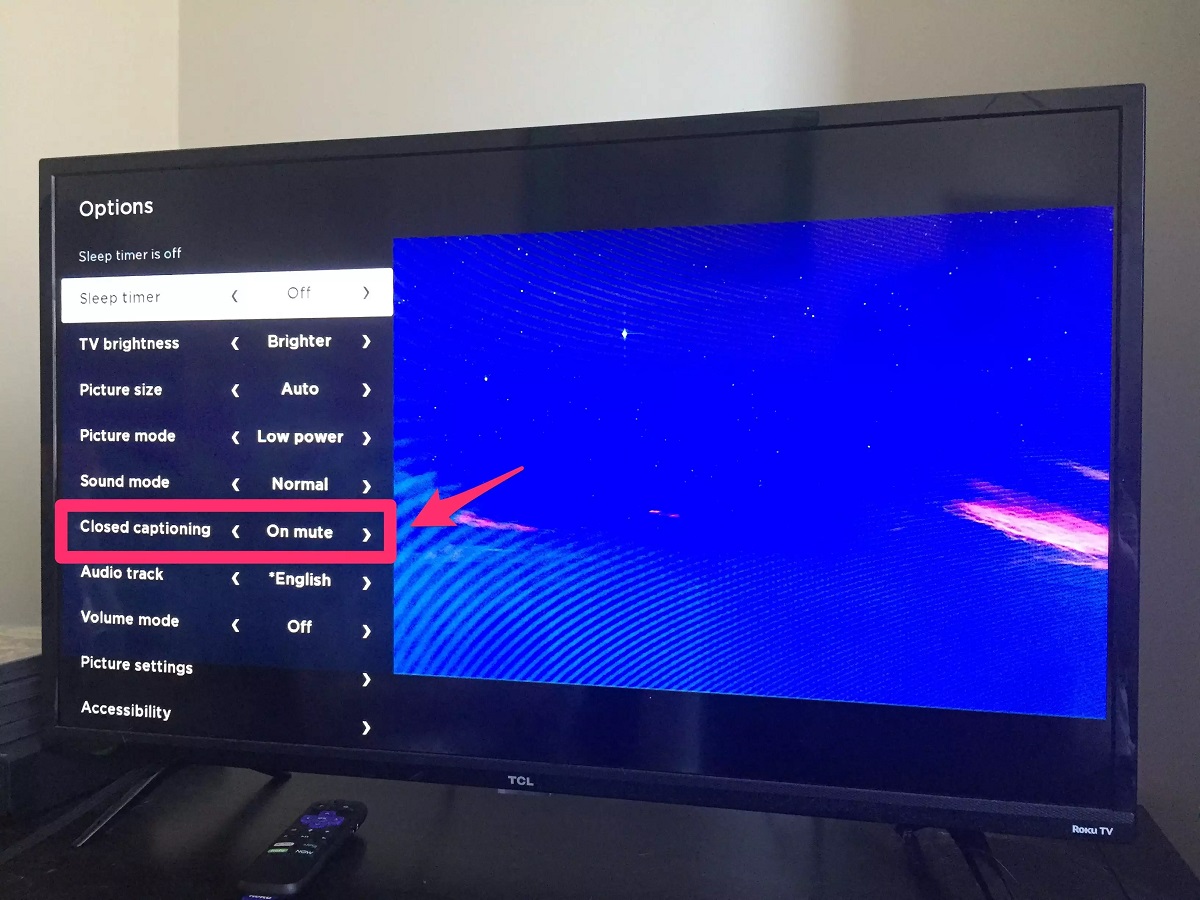
- If you’re unable to find the “Settings” menu in the Disney Plus app, try navigating through the app’s interface or consult the user guide provided with your Roku TV for specific instructions.
- Ensure that your Roku TV is connected to the internet and that the Disney Plus app is updated to the latest version. Outdated apps may not have all the language options available.
- If your preferred language is not available for a specific movie or TV show, it’s possible that the content is not yet localized in that language. In such cases, you may need to choose a different audio or subtitle language.
- Double-check your language selections in the “Audio and Subtitles” menu before confirming. This will help avoid any potential errors or unintended language settings.
- If you experience any issues with audio or subtitles not syncing properly, try restarting the Disney Plus app or restarting your Roku TV. This can help refresh the app and resolve any temporary glitches.
- If you encounter persistent issues with language settings or other aspects of the Disney Plus app, you can reach out to Disney Plus customer support for further assistance. They will be able to provide specific troubleshooting steps based on your device and account.
- Remember to keep your Disney Plus subscription up to date to ensure uninterrupted access to the app and its features, including language options.
By following these tips and troubleshooting steps, you can overcome any potential challenges and make the most of the language customization options on Disney Plus. Now, go ahead and enjoy a truly personalized viewing experience in the language that brings the magic of Disney to life!
Conclusion
Changing the language settings on Disney Plus on your Roku TV is a simple and convenient way to tailor your viewing experience to your preferences. Whether you want to watch your favorite movies and TV shows in a different language or enhance your language skills with subtitles, Disney Plus offers a wide range of language options to choose from.
By following the step-by-step guide outlined in this article, you can easily navigate through the Disney Plus app on your Roku TV and customize your language settings. From opening the app to accessing the “Settings” menu, selecting audio and subtitle languages, and confirming your choices, each step ensures that you can fully immerse yourself in the world of Disney Plus in your preferred language.
Remember, with Disney Plus, you can enjoy a vast library of content from beloved Disney classics, Marvel superhero adventures, enchanting Pixar movies, thrilling Star Wars sagas, and much more. By changing the language settings, you can enhance your viewing experience and connect with your favorite content on a deeper level.
If you encounter any difficulties or have questions along the way, the additional tips and troubleshooting section will help you troubleshoot common issues and ensure a smooth experience.
So, grab your remote, open the Disney Plus app on your Roku TV, and start watching your favorite Disney content in the language that speaks to your heart. Whether you’re seeking entertainment, education, or simply a change of pace, Disney Plus offers a world of enchantment in the language of your choice.