Introduction
Having properly adjusted headlights is crucial for ensuring optimum visibility and safety while driving at night or during adverse weather conditions. If you own a vehicle with Spyder Halo Projector headlights, it’s essential to know how to adjust them correctly. These projector headlights not only provide enhanced illumination but also add a stylish and modern look to your car.
In this guide, we’ll walk you through the step-by-step process of adjusting your Spyder Halo Projector headlights. With a few basic tools and a little patience, you can easily achieve optimal alignment and improve your night driving experience.
Proper headlight alignment is essential for a variety of reasons. Misaligned headlights can pose a safety hazard by reducing your visibility on the road and potentially blinding oncoming drivers. Additionally, improperly aligned headlights may not illuminate the road ahead effectively, making it difficult for you to identify obstacles or hazards in your path.
Before we dive into the adjustment process, let’s quickly go over the tools you’ll need:
- Socket wrench set
- Long Phillips head screwdriver
- Masking tape
- Measuring tape or ruler
- Level (optional, but helpful)
Now that you have the necessary tools ready, let’s move on to the step-by-step instructions for adjusting your Spyder Halo Projector headlights.
Tools Needed
Before you begin adjusting your Spyder Halo Projector headlights, make sure you have the following tools on hand:
- Socket wrench set: You’ll need this to remove any screws or bolts securing the headlights in place.
- Long Phillips head screwdriver: This tool will be used to access and adjust the alignment screws on the headlights.
- Masking tape: This will help you mark the current position of the headlights and ensure you can easily identify any adjustments you make.
- Measuring tape or ruler: You’ll use this to measure the distance between the ground and the height of the headlights, ensuring they are aligned properly vertically.
- Level (optional, but helpful): A level can assist you in determining if the alignment is balanced horizontally and vertically.
Having these tools readily available will ensure a smoother adjustment process and help you achieve precise alignment for your Spyder Halo Projector headlights.
Remember, it’s important to use the correct tools for the job to avoid damaging any components of your headlights. Additionally, make sure to work in a well-lit area and take the necessary safety precautions to prevent any accidents or injuries.
Now that you’re equipped with the necessary tools, let’s proceed to the next steps, where we’ll guide you through the adjustment process for your Spyder Halo Projector headlights.
Step 1: Gather the Information
Before you begin adjusting your Spyder Halo Projector headlights, it’s important to gather some essential information about your specific vehicle model and the recommended alignment specifications. Here’s what you need to do:
- Refer to your vehicle’s user manual: The user manual provided by the manufacturer will often include information about the headlight alignment process specific to your make and model. It may also provide the recommended alignment specifications, such as the distance between the ground and the height of the headlights.
- Check online resources: If you don’t have access to the user manual or want more information, you can also search for your vehicle’s make and model online. There are many forums, websites, and automotive communities where you can find detailed instructions and alignment specifications for your specific car.
- Consult a professional: If you’re unsure about the alignment process or want to be extra cautious, it’s recommended to consult a professional or an experienced mechanic. They can provide expert guidance and ensure that the headlights are adjusted correctly.
By gathering the necessary information, you’ll have a better understanding of the alignment process and can proceed with confidence. Remember, every vehicle model may have different specifications, so it’s essential to gather accurate information specific to your car.
Once you have gathered all the necessary information, we can move on to the next steps in adjusting your Spyder Halo Projector headlights.
Step 2: Park Your Car
Before you begin adjusting your Spyder Halo Projector headlights, you need to park your car in a suitable location. Here’s what you should do:
- Find a level surface: Look for a level and flat area, such as a garage or a driveway, where you can safely park your vehicle. A level surface will ensure more accurate alignment measurements.
- Position your car: Park your car approximately 25 feet away from a flat surface, such as a wall or garage door. This distance will provide enough space to observe the headlight beams and make adjustments effectively.
- Turn off the engine: Make sure your car is turned off, and the headlights are switched off as well. This will prevent any accidental movements or electrical issues during the adjustment process.
- Ensure proper clearance: Check that there is enough space around the front of your car to move freely and access the headlights. You may need to clear any obstacles or adjust the positioning of your vehicle if necessary.
By parking your car in a suitable location and ensuring proper clearance, you’ll have a comfortable and safe environment to adjust your Spyder Halo Projector headlights. Taking the time to properly set up your vehicle will contribute to more accurate alignment results.
With your car parked and ready, we can now proceed to the next steps, where we will learn how to remove the headlights and access the adjustment screws.
Step 3: Remove the Headlights
To adjust your Spyder Halo Projector headlights, you will need to remove them from your vehicle. Follow these steps:
- Locate the headlight mounting screws: Depending on your car model, there may be a series of screws or bolts securing the headlights in place. Typically, you will find these screws on the top or sides of the headlight assembly.
- Use a socket wrench set: Select the appropriate socket size, place it on the screw, and rotate it counterclockwise to loosen and remove the screw. Repeat this process for all mounting screws.
- Release any electrical connections: Once the screws are removed, gently detach any electrical connections that are connected to the headlight assembly. These connections may include the wiring harness or bulb sockets. Be careful not to damage any wires during this step.
- Gently pull out the headlight assembly: After detaching the electrical connections, you can carefully pull the headlight assembly forward and out of its housing. Be cautious not to apply excessive force or drop the assembly.
- Place the headlights in a safe location: Once removed, set the headlights on a clean and safe surface, preferably covered with a soft cloth or towel, to prevent any scratches or damage.
By following these steps, you will be able to remove the headlights from your vehicle, allowing you to access the adjustment screws and make the necessary alignment changes. Remember to keep track of the screws and electrical connections, as you will need them when reassembling the headlights later.
With the headlights successfully removed, we can now move on to the next step, where we will learn how to access the adjustment screws.
Step 4: Access the Adjustment Screws
Now that the headlights are removed, it’s time to access the adjustment screws. The location and number of adjustment screws may vary depending on your specific Spyder Halo Projector headlights and vehicle model. Here’s what you need to do:
- Inspect the headlight assembly: Carefully examine the back of the headlight assembly to locate the adjustment screws. These screws are typically located on the top, bottom, or sides of the assembly, and they allow you to adjust the horizontal and vertical alignment of the headlights.
- Identify the correct screws: The adjustment screws are often labeled or color-coded for convenience. Look for labels such as “H” for horizontal adjustment and “V” for vertical adjustment. If the screws are not labeled, consult your vehicle’s user manual or online resources to determine which screws to adjust for each alignment.
- Prepare the screwdriver: Grab your long Phillips head screwdriver, ensuring it fits properly into the screw heads without slipping. This will allow you to have better control and make precise adjustments.
- Get into a comfortable position: Position yourself in front of the headlights, ensuring you have a clear view and easy access to the adjustment screws. Adjust your body position or use a flashlight if necessary to improve visibility.
By following these steps, you will be able to locate and prepare for adjusting the alignment screws on your Spyder Halo Projector headlights. Take your time and ensure you have a clear understanding of which screws correspond to the horizontal and vertical adjustments.
Once you have accessed the adjustment screws, we can proceed to the next steps, where we will learn how to adjust the horizontal and vertical alignment of your headlights.
Step 5: Adjust the Horizontal Alignment
Properly aligning the horizontal position of your Spyder Halo Projector headlights is crucial for optimal visibility and safety. Follow these steps to adjust the horizontal alignment:
- Locate the horizontal adjustment screws: Identify the adjustment screws responsible for the horizontal alignment. These screws are typically located on the sides of the headlight assembly.
- Turn the screws: Using your long Phillips head screwdriver, carefully turn the horizontal adjustment screws in the desired direction. If you need to move the light beam towards the right, rotate the screw in a clockwise direction. For an adjustment towards the left, rotate the screw counterclockwise.
- Make incremental adjustments: It’s important to make small and gradual adjustments, as even a slight movement can have a significant impact on the alignment. Use the screws to fine-tune the horizontal position until the headlight beam appears straight and parallel to the ground.
- Check for symmetry: Adjust one headlight at a time and compare it to the other to ensure they are symmetrical. This is particularly important to avoid uneven light distribution or distracting oncoming drivers.
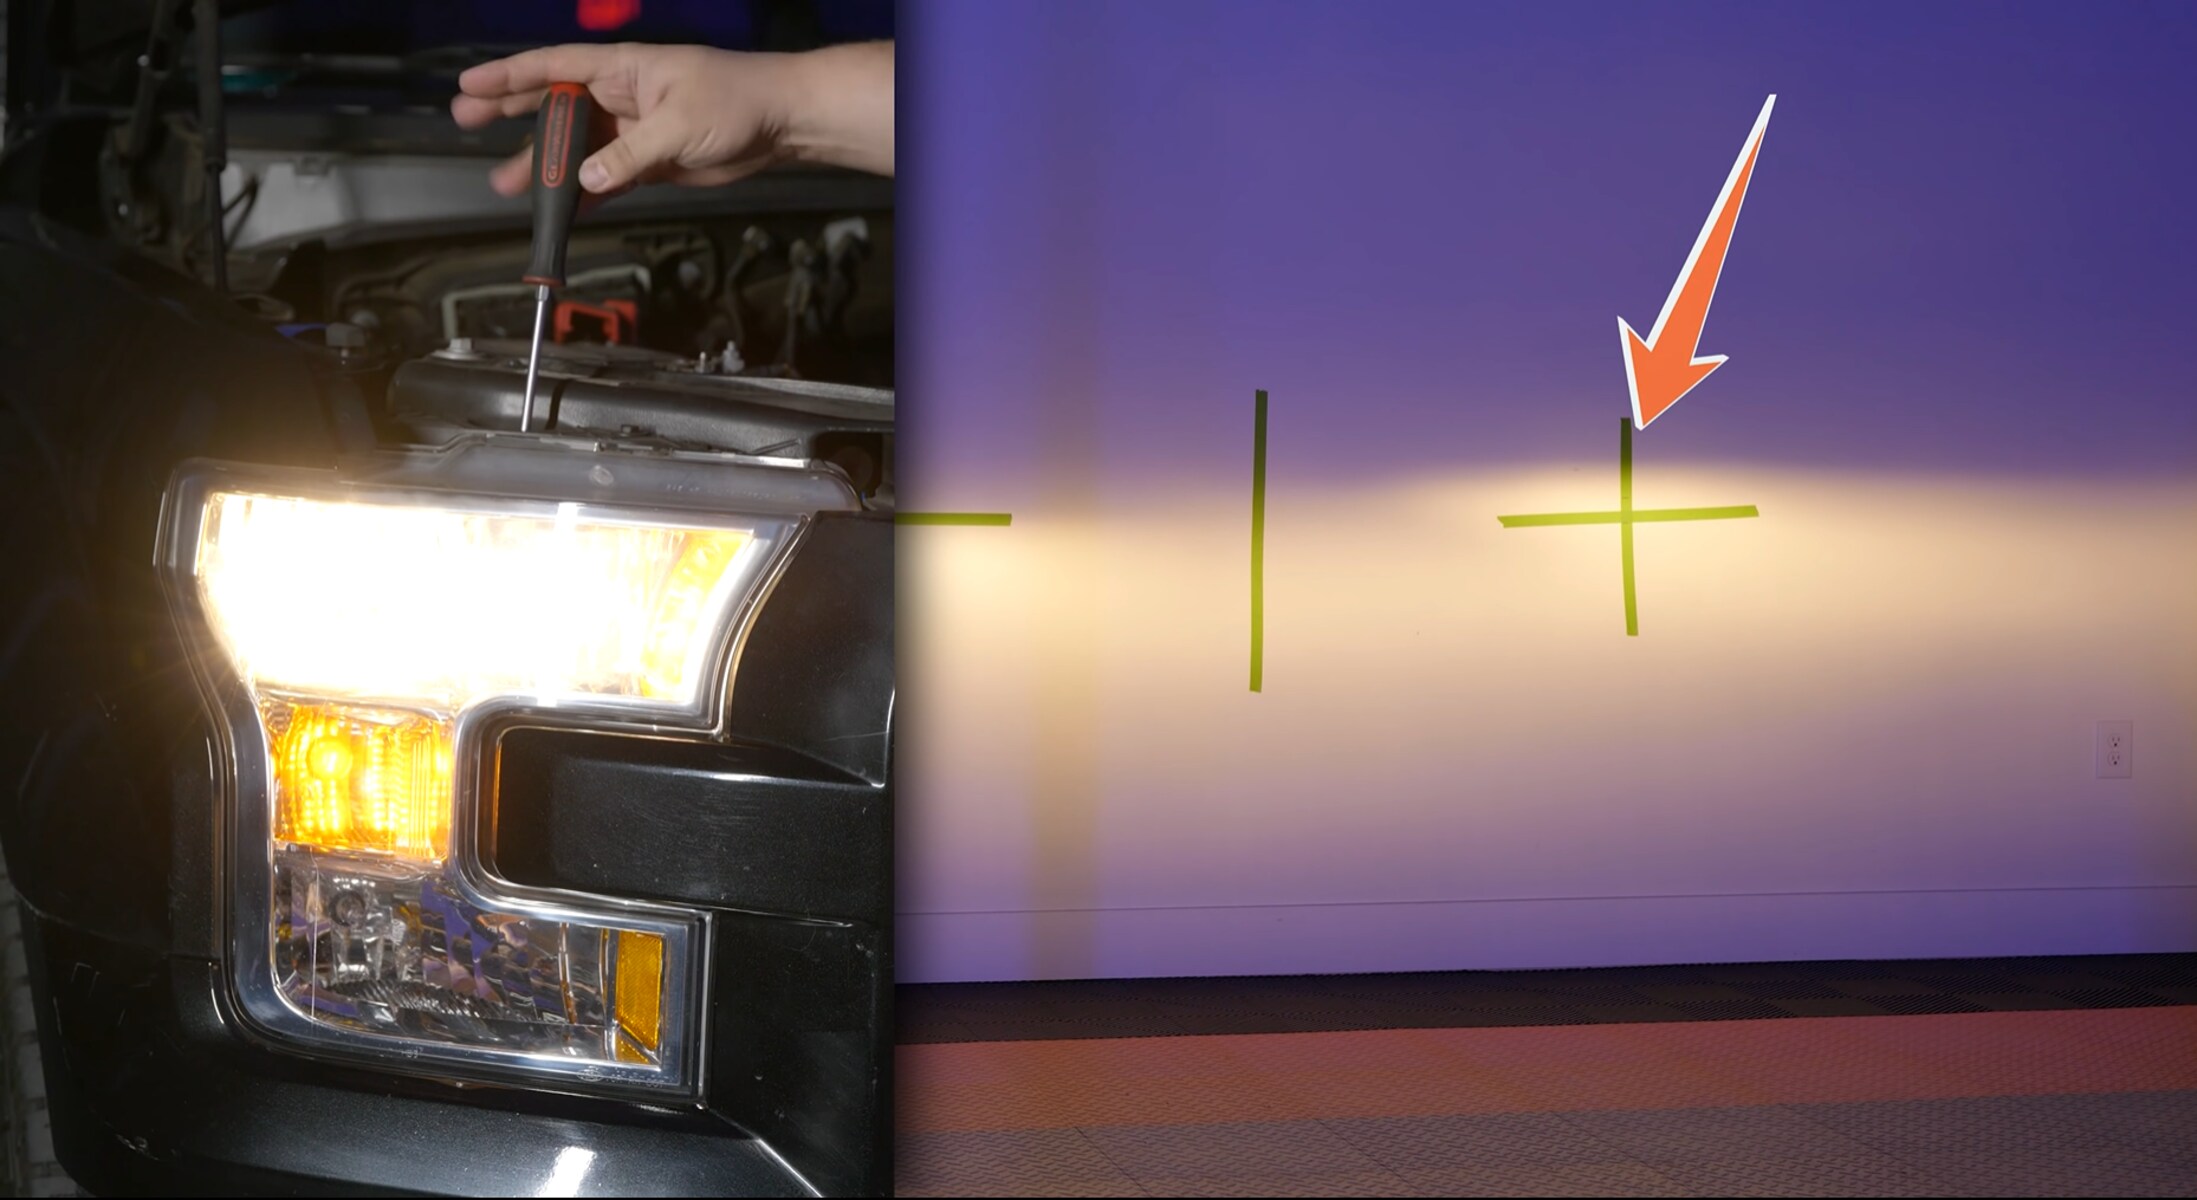
- Test the alignment: Once you are satisfied with the horizontal adjustment, it’s time to test the alignment. Turn on the headlights and observe the light beam pattern on the wall or garage door you positioned the car in front of earlier. The beam should be straight, well-focused, and not pointing too high or too low.
By following these steps, you will be able to adjust the horizontal alignment of your Spyder Halo Projector headlights. Remember to make incremental adjustments, check for symmetry between both headlights, and test the alignment to ensure optimal illumination and visibility on the road.
With the horizontal alignment successfully adjusted, we can now move on to the next step, where we will learn how to adjust the vertical alignment of your headlights.
Step 6: Adjust the Vertical Alignment
Properly aligning the vertical position of your Spyder Halo Projector headlights is crucial for optimum visibility and safety. Follow these steps to adjust the vertical alignment:
- Locate the vertical adjustment screws: Identify the adjustment screws responsible for the vertical alignment. These screws are typically located at the top or bottom of the headlight assembly.
- Turn the screws: Using your long Phillips head screwdriver, carefully turn the vertical adjustment screws in the desired direction. If you need to raise the light beam, rotate the screw in a clockwise direction. To lower the beam, rotate the screw counterclockwise.
- Make incremental adjustments: Similar to the horizontal alignment, it’s important to make small and gradual adjustments to achieve precise vertical alignment. Use the screws to fine-tune the height of the light beam until it aligns with the recommended specifications provided in your vehicle’s user manual or online resources.
- Check for proper aim: Ensure that the light beam is hitting the ground in front of the car and not pointing too high or too low. Too high of an aim can blind oncoming drivers while too low of an aim may not provide adequate visibility.
- Test the alignment: After making the necessary adjustments, turn on the headlights again and observe the light beam pattern on the wall or garage door. Verify that the beam is well-focused, without any noticeable tilting or inconsistencies.
By following these steps, you will be able to adjust the vertical alignment of your Spyder Halo Projector headlights. Take your time, make small adjustments, and test the alignment to ensure optimal visibility and safety while driving at night or in adverse weather conditions.
With the horizontal and vertical alignment successfully adjusted, we can now move on to the next step, where we will test the headlight alignment and make any final adjustments if necessary.
Step 7: Test the Headlight Alignment
After adjusting the horizontal and vertical alignment of your Spyder Halo Projector headlights, it’s crucial to test the alignment to ensure optimal performance and safety. Here’s how to test the headlight alignment:
- Turn on the headlights: Start your car and turn on the headlights to illuminate the road ahead.
- Park in front of a flat surface: Position your vehicle approximately 25 feet away from a flat surface such as a wall or garage door. This will provide a clear view of the headlight beams.
- Observe the light beam pattern: Take a moment to carefully observe the light beam pattern projected onto the flat surface. Look for a well-defined, even beam with no significant gaps or noticeable tilting.
- Check the alignment height: Verify that the light beams are hitting the ground at the correct height. The recommended alignment height may vary depending on your vehicle model, so refer to your user manual or online resources for specific measurements.
- Make final adjustments if necessary: If you notice any issues with the alignment during the test, such as an uneven beam or improper height, make further adjustments using the horizontal and vertical adjustment screws. Remember to make small, incremental changes until the alignment is satisfactory.
Testing the headlight alignment is a critical step to ensure optimal visibility and safety while driving at night or in low-light conditions. By following these steps and making any necessary final adjustments, you can confidently drive with properly aligned Spyder Halo Projector headlights.
With the headlight alignment tested and adjusted if needed, we can now move on to the final step, where we will reinstall the headlights onto your vehicle.
Step 8: Reinstall the Headlights
After completing the adjustment process for your Spyder Halo Projector headlights, it’s time to reinstall them onto your vehicle. Follow these steps to reinstall the headlights:
- Retrieve the headlight assembly: Pick up the headlights from their safe location and position them in front of the headlight housing.
- Reconnect the electrical connections: Carefully reconnect any electrical connections that were detached earlier during the removal process. Ensure a secure and snug fit for each connection to prevent any loose connections.
- Align the mounting holes: Align the mounting holes on the headlight assembly with the corresponding holes on the vehicle’s body or headlight housing.
- Insert the mounting screws: Insert the screws or bolts through the mounting holes and thread them into place by hand. Make sure they are properly aligned and not cross-threaded.
- Tighten the mounting screws: Once the screws are hand-tightened, use a socket wrench set to securely tighten them. Be cautious not to overtighten, as it may damage the threads or the headlight assembly.
- Inspect the headlight installation: Double-check that the headlights are securely fastened and properly aligned within the headlight housing. Ensure there are no visible gaps or misalignments.
- Turn on the headlights: With the headlights reinstalled, turn on your car’s engine and test the headlights to confirm they are functioning correctly.
- Verify the alignment: Park your car in front of a flat surface and observe the headlight beams to ensure they are correctly aligned and providing proper illumination.
By following these steps, you will successfully reinstall your Spyder Halo Projector headlights onto your vehicle. Make sure all connections are secure, and the headlights are properly aligned within the housing.
With the headlights reinstalled and functioning correctly, you have completed the process of adjusting and reinstalling your Spyder Halo Projector headlights. Enjoy improved visibility and safety while driving at night or in low-light conditions!
Conclusion
Adjusting your Spyder Halo Projector headlights is a crucial step in ensuring optimal visibility and safety while driving. By following the step-by-step process outlined in this guide, you can easily adjust the horizontal and vertical alignment of your headlights.
Start by gathering the necessary information about your vehicle’s make and model, and make sure to have the required tools on hand. Park your car in a suitable location and remove the headlights to access the adjustment screws. Adjust the horizontal alignment first, making small incremental changes and checking for symmetry. Then, proceed to adjust the vertical alignment, ensuring the light beams are hitting the ground at the correct height.
Remember to test the headlight alignment by turning on the headlights and observing the beam pattern on a flat surface. Make any necessary final adjustments to achieve optimal alignment. Once you are satisfied, carefully reinstall the headlights, ensuring a secure fit and proper alignment within the headlight housing.
With your Spyder Halo Projector headlights adjusted and successfully reinstalled, you can enjoy improved visibility and a stylish look for your vehicle. Safe and clear night-time driving awaits you, providing enhanced safety for both you and other road users.
Keep in mind that if you’re unsure about any aspect of the adjustment process, or if you encounter any difficulties, it’s always a good idea to consult a professional or an experienced mechanic for assistance.
Now that you have completed the process of adjusting your Spyder Halo Projector headlights, you can confidently hit the road with properly aligned headlights that illuminate your path with precision and style.