Introduction
The advancement of technology has led to the development of faster and more efficient storage solutions. One such solution is the M.2 SSD, which has gained popularity for its high speed and compact form factor. However, simply installing an M.2 SSD is not enough to start using it; it needs to be activated in the BIOS (Basic Input/Output System) settings of your computer.
The BIOS is a firmware that is responsible for initializing hardware components during the booting process. It provides a platform for configuring and customizing various settings, including the activation of the M.2 SSD. Activating the M.2 SSD in BIOS ensures that the system recognizes it as a bootable device and enables you to take advantage of its blazing-fast speeds.
Activating an M.2 SSD in BIOS may seem like a daunting task, especially for users who are not familiar with the inner workings of their computer. However, with the right guidance and step-by-step instructions, the process can be easily accomplished.
In this article, we will provide you with a comprehensive guide on how to activate an M.2 SSD in BIOS. We will walk you through each step, from accessing the BIOS settings to enabling the M.2 SSD, ensuring that you can unleash the full potential of your high-speed storage solution. Whether you are a tech enthusiast building your own PC or someone looking to upgrade their existing system, this guide will equip you with the knowledge to successfully activate your M.2 SSD in BIOS.
What is an M.2 SSD?
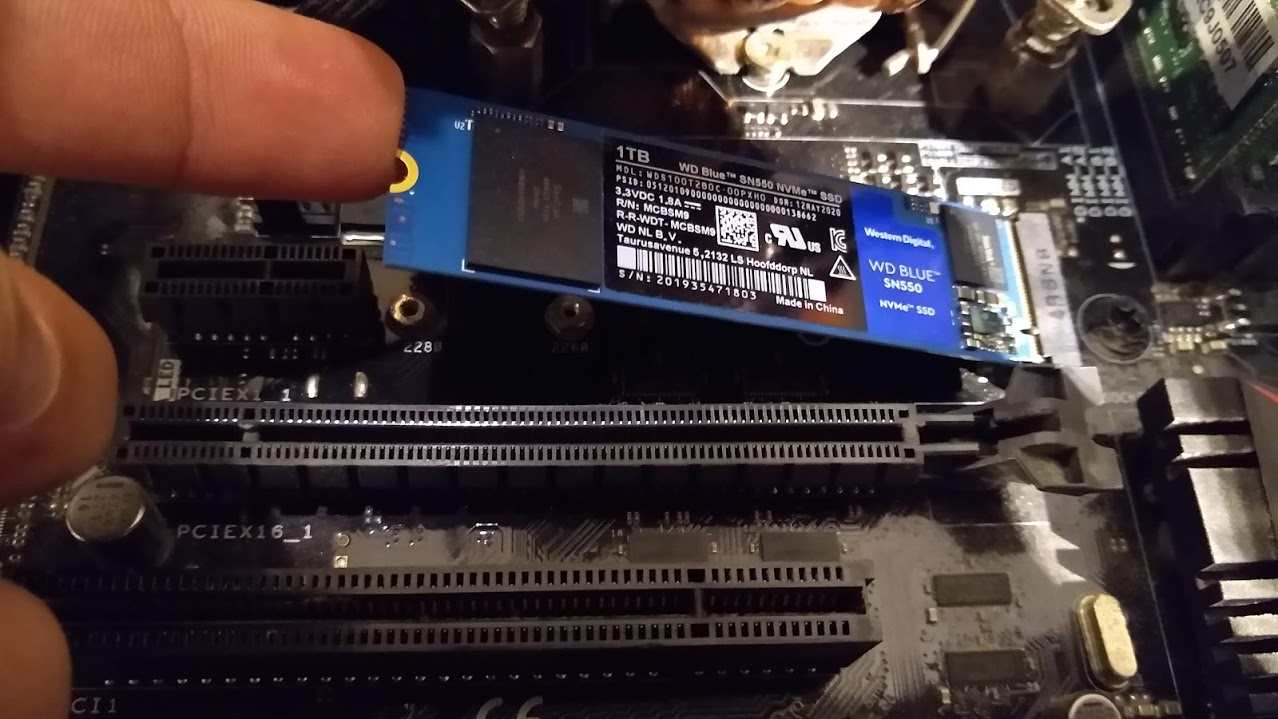
M.2 SSD, also known as Next Generation Form Factor (NGFF), is a solid-state drive that uses the M.2 interface to connect directly to the motherboard of a computer. It is a compact and versatile storage solution that has become increasingly popular in recent years.
One of the main advantages of M.2 SSDs is their compact form factor. They are much smaller than traditional hard drives, which allows for more flexibility in terms of system design and installation options. M.2 SSDs are typically about the size of a stick of gum, making them ideal for thin and lightweight laptops or ultrabooks.
In addition to their small size, M.2 SSDs are known for their high data transfer speeds. They utilize the PCI Express (PCIe) or Serial ATA (SATA) interface, enabling significantly faster read and write speeds compared to traditional hard drives. This means faster boot times, quicker file transfers, and improved overall system responsiveness.
M.2 SSDs also offer different storage capacities, ranging from 128GB to several terabytes, depending on the model. This allows users to choose the capacity that best suits their needs, whether it’s for basic system operations or data-intensive tasks such as video editing or gaming.
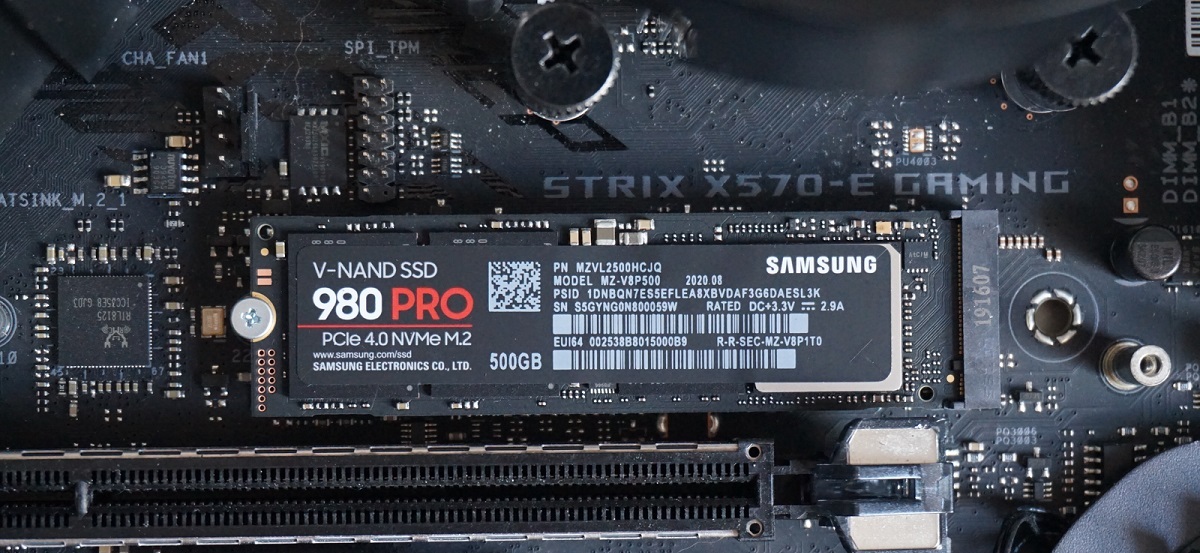
It is important to note that M.2 SSDs come in different types or “keys.” The most common types are SATA-based M.2 SSDs and NVMe (Non-Volatile Memory Express) M.2 SSDs. SATA M.2 SSDs are more affordable and offer decent performance, while NVMe M.2 SSDs are faster and more expensive. It’s essential to check your motherboard’s specifications to ensure compatibility with the type of M.2 SSD you plan to install.
Overall, M.2 SSDs provide a significant performance boost compared to traditional hard drives. Their compact form factor, high transfer speeds, and various storage capacities make them an attractive choice for anyone looking to upgrade their storage solution or build a new system with faster and more efficient storage capabilities.
Why Activate M.2 SSD in BIOS?
Activating an M.2 SSD in BIOS is an essential step to ensure that your system recognizes and utilizes the full potential of this high-speed storage device. Let’s delve into the reasons why activating the M.2 SSD in BIOS is crucial.
Firstly, activating the M.2 SSD in BIOS allows the system to recognize it as a bootable device. By enabling the M.2 SSD in the BIOS settings, you ensure that your operating system can be installed and run from the SSD. This is particularly beneficial for users who want to take advantage of faster boot times and improved system responsiveness that an SSD offers.
Additionally, activating the M.2 SSD in BIOS enables the system to allocate the necessary resources to optimize its performance. The BIOS settings control the interface mode, such as SATA or NVMe, and other configuration options specific to the M.2 SSD. By activating it, you ensure that the SSD is operating at its intended speed, allowing for faster data transfer and a smoother overall user experience.
Another reason to activate the M.2 SSD in BIOS is to access advanced features or functionalities associated with the specific SSD model. Some SSDs may have additional features, such as hardware encryption or drive monitoring tools, that can be accessed only when the drive is properly activated in BIOS. Activating the M.2 SSD allows you to utilize and benefit from these extra features.
Furthermore, activating the M.2 SSD in BIOS provides you with the ability to manage and configure the drive settings. This includes options such as enabling secure boot, adjusting power management settings, or configuring RAID arrays if you have multiple M.2 SSDs installed. Having control over these settings ensures that your M.2 SSD operates in a manner that best suits your needs and system requirements.
In summary, activating the M.2 SSD in BIOS is essential to unleash the full power and capabilities of this high-speed storage solution. By enabling it in the BIOS settings, you ensure that the system recognizes the M.2 SSD as a bootable device, optimizes its performance, grants access to advanced features, and provides customization options. Activating the M.2 SSD is a critical step in ensuring that you can fully utilize the speed and efficiency benefits that this storage technology has to offer.
Step-by-Step Guide to Activate M.2 SSD in BIOS
Activating an M.2 SSD in BIOS may vary slightly depending on your computer’s manufacturer and model. However, the following step-by-step guide provides a general overview of the process that applies to most systems. Let’s get started on activating your M.2 SSD in BIOS!
Step 1: Accessing BIOS
1. Start by restarting your computer.
2. As your computer boots up, on the initial screen, you will see a message indicating the key to press to enter the BIOS settings. This is often the “Delete” or “F2” key, but it can vary depending on your system. Press the indicated key repeatedly until the BIOS menu appears.
Step 2: Locating the M.2 SSD Settings in BIOS
1. Once you are in the BIOS menu, navigate through the various tabs and options to find the Storage or Boot settings. These menus may have different names depending on your motherboard’s manufacturer.
2. Look for a section that lists your storage devices, such as “Drives,” “Boot Options,” or “SATA Configuration.”
3. Within these menus, locate the M.2 SSD. It may be identified by its model name or a generic label like “M.2 Slot 1.” Take note of its position or any relevant details needed for enabling it.
Step 3: Enabling the M.2 SSD
1. Once you have located the M.2 SSD, select it and change its status to “Enabled.” This may involve pressing the “+” or “-” keys, using the arrow keys to highlight the SSD and pressing “Enter,” or selecting an option from a drop-down menu.
2. Confirm the changes and save the settings by pressing the appropriate key (usually “F10”) to exit BIOS. You may be prompted to confirm the changes before exiting. Select “Save and Exit” or a similar option.
Step 4: Saving and Exiting BIOS
1. After saving the changes, your computer will restart.
2. Wait for the system to boot up, and if everything was done correctly, your M.2 SSD should now be activated and recognized by the system.
It’s important to note that these instructions are general guidelines, and the exact steps and terminology can differ between computer manufacturers. Consult your motherboard’s manual or the manufacturer’s website for specific instructions tailored to your system.
By following these steps, you should be able to successfully activate your M.2 SSD in BIOS, enabling your system to fully utilize the high-speed storage and unlock its maximum performance potential. Enjoy the speed and efficiency improvements that come with your newly activated M.2 SSD!
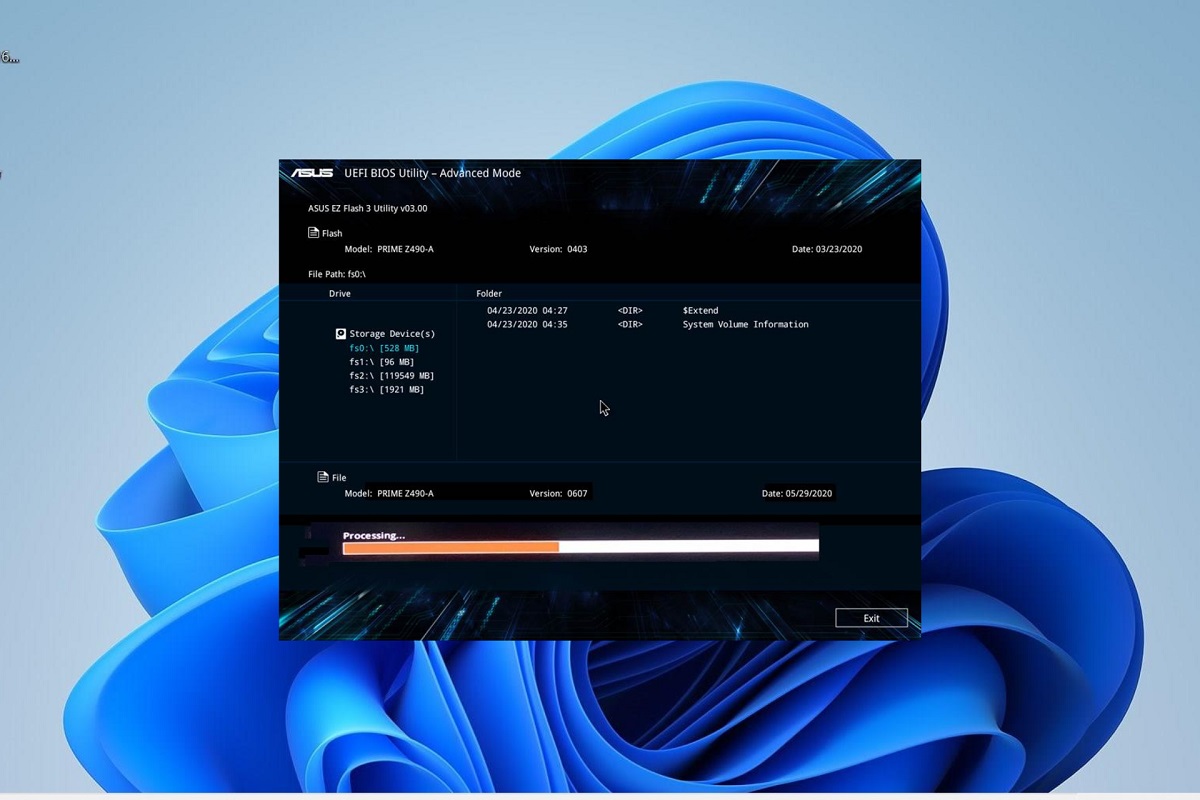
Step 1: Accessing BIOS
Accessing the BIOS (Basic Input/Output System) is the first step to activate your M.2 SSD. The BIOS is a firmware that provides the platform to configure and customize various settings of your computer’s hardware. To access the BIOS, follow the steps below:
1. Start by restarting your computer. You can either click the “Restart” option in the Windows Start menu or manually press the power button to turn off your computer and then turn it back on.
2. As your computer begins to boot up, pay attention to the initial screen. Usually, there will be a message displayed that indicates the key or keys you need to press to enter the BIOS settings. This can vary depending on your computer’s manufacturer, but common keys include “Delete,” “F2,” “F10,” or “Esc.” It may be helpful to consult your motherboard or computer manual for the specific key to enter the BIOS.
3. Once you have identified the correct key, start pressing it repeatedly as soon as the initial screen appears. Timing is crucial, so be sure to press the key several times in quick succession to ensure that you enter the BIOS.
4. After pressing the key, the BIOS menu should appear on the screen. The layout and options may vary between computer models, but you will typically see a list of categories or tabs along the top or side of the screen. These categories include options such as “Main,” “Boot,” “Advanced,” “Storage,” or “Security.”
5. Use the arrow keys on your keyboard to navigate through the menu options. Each category may contain several subcategories or settings, so take your time to explore and familiarize yourself with the layout of your BIOS.
6. It is important to note that the BIOS interface can be different based on your computer’s manufacturer and model. Some computer manufacturers provide a graphical interface, while others rely on a more traditional text-based interface. Regardless of the appearance, the functionality remains the same.
Remember to exercise caution when navigating the BIOS settings as changes made without proper knowledge can affect the stability and functionality of your computer. If you are unsure about a particular setting, it is recommended to consult your computer or motherboard manual or seek assistance from a qualified technician.
By successfully accessing the BIOS, you are now ready to proceed to the next step of activating your M.2 SSD. Read on to learn how to locate the M.2 SSD settings in the BIOS menu.
Step 2: Locating the M.2 SSD Settings in BIOS
After accessing the BIOS, the next step is to locate the M.2 SSD settings. These settings may vary depending on your computer’s manufacturer and BIOS version, but the general process remains consistent. Follow the steps below to find the M.2 SSD settings in the BIOS:
1. Once you are in the BIOS menu, navigate through the tabs or categories using the arrow keys on your keyboard. Look for options related to storage, boot, or SATA configuration. These names may vary depending on your motherboard’s manufacturer, but they should be related to drive configuration.
2. Within the storage or drive configuration options, you should see a list of connected storage devices. This list may include hard drives, SSDs, and the M.2 SSD. The M.2 SSD may be identified by its model name or a general label such as “M.2 Slot 1” or “M.2 SSD.” Take note of its position or any other relevant details mentioned in the BIOS menu.
3. Pay attention to the available options for the M.2 SSD. You might see options related to enabling or disabling the SSD, selecting the interface mode (SATA or NVMe), or configuring other drive-specific settings. These options may be located within a sub-menu for the M.2 SSD or in the main storage configuration menu.
4. Use the arrow keys on your keyboard to select the M.2 SSD or navigate to the sub-menu where the M.2 SSD settings are located. Press the “Enter” key to access the settings for the M.2 SSD.
5. Depending on your computer’s BIOS, you may need to change the status of the M.2 SSD from “Disabled” to “Enabled” or select the appropriate interface mode (SATA or NVMe) if applicable. Use the arrow keys and the “Enter” key to make the necessary changes.
6. Once you have made the desired changes, navigate to the option to save and exit the BIOS. This is usually located at the top or bottom of the BIOS screen and may be labeled as “Save and Exit,” “Exit and Save Changes,” or similar wording. Press the corresponding key, typically “F10,” to save the changes and exit the BIOS.
7. Your computer will now restart, and upon booting up, it will recognize and activate the M.2 SSD.
Remember that the exact steps and terminology may vary based on your computer’s manufacturer and BIOS version. If you are unsure of any settings or need further assistance, consult your motherboard’s manual or visit the manufacturer’s support website for more specific instructions.
Now that you have successfully located the M.2 SSD settings in the BIOS, you are ready to proceed to the next step of enabling the M.2 SSD. Follow along to learn how to enable your M.2 SSD for optimal performance.
Step 3: Enabling the M.2 SSD
Once you have located the M.2 SSD settings in your computer’s BIOS, the next step is to enable the M.2 SSD. Enabling the M.2 SSD ensures that your system recognizes it as a bootable device and optimizes its performance. Follow the steps below to enable your M.2 SSD in the BIOS:
1. With the M.2 SSD settings menu open in the BIOS, locate the option that corresponds to the M.2 SSD you want to enable. This could be labeled as the model name of the M.2 SSD or a generic identifier like “M.2 Slot 1.” Use the arrow keys on your keyboard to select the M.2 SSD.
2. Once the M.2 SSD is selected, you will need to change its status from “Disabled” to “Enabled.” This can typically be done by pressing the “+” or “-” keys on your keyboard or selecting the appropriate option from a drop-down menu. Refer to the instructions provided on the BIOS screen for guidance on enabling the M.2 SSD.
3. After enabling the M.2 SSD, double-check any additional settings related to the SSD. Some BIOS menus may provide options to specify the interface mode (SATA or NVMe) or adjust other drive-specific settings. Make sure that the settings align with your M.2 SSD’s specifications.
4. Once you have made the necessary changes, navigate to the option to save and exit the BIOS. This is usually located at the top or bottom of the BIOS screen and may be labeled as “Save and Exit,” “Exit and Save Changes,” or a similar wording. Press the corresponding key, typically “F10,” to save the changes and exit the BIOS.
5. Your computer will restart, and during the startup process, it will recognize the M.2 SSD as a bootable device and activate it. You can verify its activation by checking the BIOS screen or using your operating system’s storage management tools.
It’s important to note that the steps and options in your computer’s BIOS may vary depending on the manufacturer and model. If you encounter any difficulties or are unsure about any settings, referring to your motherboard manual or contacting the manufacturer’s support can provide further guidance.
By enabling the M.2 SSD in the BIOS, you have now set the stage for your system to fully utilize the speed and efficiency benefits of this high-speed storage device. The next step is to save and exit the BIOS, allowing your computer to complete the boot process and start using the M.2 SSD for improved performance and faster data access.
Step 4: Saving and Exiting BIOS
After enabling the M.2 SSD in the BIOS and making the necessary changes, the final step is to save the changes and exit the BIOS. This ensures that the settings you have configured are applied and that your computer can recognize and utilize the M.2 SSD properly. Follow the steps below to save and exit the BIOS:
1. With the M.2 SSD settings menu still open in the BIOS, navigate to the option for saving and exiting. This option is typically located at the top or bottom of the BIOS screen and may be labeled as “Save and Exit,” “Exit and Save Changes,” or something similar.
2. Once you have located the option, press the corresponding key on your keyboard to save the changes. In most cases, this key is “F10,” but it can vary depending on your computer’s manufacturer and BIOS version. Consult the BIOS screen for the specific key to save and exit.
3. Some BIOS menus may prompt you to confirm your choice or provide additional options before saving and exiting. Read the on-screen instructions carefully and select the appropriate option to proceed.
4. After saving the changes, the BIOS will exit, and your computer will restart automatically. During the startup process, it will recognize and activate the M.2 SSD based on the settings you configured in the BIOS.
5. Once your computer has booted up, you can verify the activation of the M.2 SSD by checking the BIOS screen or using your operating system’s storage management tools. Confirm that the M.2 SSD is detected and recognized as a bootable device.
It is important to note that saving and exiting the BIOS can take a few moments, depending on your computer’s hardware and BIOS version. Do not interrupt the process or turn off your computer while the changes are being saved, as this could lead to configuration errors or data loss.
If you encounter any issues after saving and exiting the BIOS, such as your system failing to boot or the M.2 SSD not being recognized, consult your motherboard’s manual or contact the manufacturer’s support for further assistance.
By successfully saving and exiting the BIOS, you have completed the process of activating and enabling the M.2 SSD. Your computer is now ready to harness the speed and efficiency benefits offered by this high-speed storage device. Enjoy the improved performance and faster data access that the M.2 SSD provides!
Troubleshooting Common Issues
While activating and using an M.2 SSD in the BIOS is a relatively straightforward process, there can be instances where you may encounter some common issues. Here are a few troubleshooting tips to help you address these problems:
1. M.2 SSD not detected: If your M.2 SSD is not being recognized by the system or is not listed in the BIOS, try the following steps:
- Check the physical connection of the M.2 SSD. Ensure that it is properly inserted into the M.2 slot and fully secured.
- Verify that your M.2 SSD is compatible with your motherboard and BIOS version. Certain older motherboards may not support NVMe-based M.2 SSDs. Consult your motherboard’s documentation or the manufacturer’s website for compatibility information.
- Update your motherboard’s BIOS to the latest version. Manufacturers frequently release updates that incorporate support for new hardware, including M.2 SSDs.
- Try inserting the M.2 SSD into a different M.2 slot on your motherboard, if available.
2. Incorrect interface mode: If you are using an NVMe-based M.2 SSD, ensure that the BIOS is set to NVMe as the interface mode. Some older systems default to SATA mode, which can lead to compatibility issues. To resolve this, locate the interface mode settings in the BIOS and switch it to NVMe if available.
3. Compatibility issues with other storage devices: In some cases, having certain other storage devices, such as older hard drives or SSDs, connected to your system can interfere with the detection or operation of the M.2 SSD. Disconnect any unnecessary storage devices temporarily and test if the M.2 SSD is detected properly. If it is, you can reconnect the other storage devices one by one to identify the conflicting device.
4. Update SSD firmware: If you are experiencing frequent system crashes or slow performance, it may be worth checking if there are any firmware updates available for your M.2 SSD. Manufacturers often release firmware updates that address compatibility or performance issues. Visit the manufacturer’s website and follow their instructions to update the firmware if necessary.
5. Seek professional assistance: If you have exhausted all troubleshooting options and are still encountering issues, it may be helpful to seek assistance from a qualified technician or contact the manufacturer’s support for further guidance.
Remember to always refer to your computer’s documentation or consult the manufacturer’s support resources for detailed troubleshooting steps specific to your system. By addressing these common issues, you can ensure the smooth operation and optimal performance of your M.2 SSD in the BIOS.
Conclusion
Activating an M.2 SSD in the BIOS is a crucial step in ensuring optimal performance and utilization of this high-speed storage solution. By following the step-by-step guide outlined in this article, you can easily activate and enable your M.2 SSD, allowing your system to take full advantage of its fast data transfer speeds and improved responsiveness.
We discussed the importance of activating the M.2 SSD in the BIOS to recognize it as a bootable device, allocate necessary resources, access advanced features, and manage drive settings. Through the process of accessing the BIOS, locating the M.2 SSD settings, enabling the SSD, and saving and exiting the BIOS, you can successfully activate your M.2 SSD.
Additionally, we provided troubleshooting tips for common issues you may encounter during the activation process. By addressing these issues, such as a non-detected SSD or incorrect interface mode, you can effectively troubleshoot and resolve problems that may arise.
Remember to consult your computer’s documentation, motherboard manual, or the manufacturer’s support resources for specific instructions tailored to your system. If you are uncertain about any changes in the BIOS settings or encounter difficulties, seeking assistance from a qualified technician or contacting the manufacturer’s support is recommended.
Activating an M.2 SSD in the BIOS unlocks its full potential, offering faster boot times, quicker file transfers, and improved overall system performance. Whether you are building a new PC or upgrading your existing system, the activation of the M.2 SSD is a vital step in harnessing the power of modern storage technology.
Now that you have completed this guide, you are equipped with the knowledge and tools to activate your M.2 SSD in the BIOS. Enjoy the enhanced speed and efficiency that come with this high-speed storage solution, and experience a new level of performance in your computing endeavors.