Introduction
Welcome to the fascinating world of Google Photos! If you are wondering how to create a collage using Google Photos, you have come to the right place. In this article, we will walk you through the step-by-step process of making a collage in Google Photos, enabling you to effortlessly combine your favorite photos into a beautiful, visually appealing masterpiece.
Google Photos is a versatile and feature-rich platform that allows users to store, organize, and edit their photos and videos. It offers a seamless experience across various devices, making it accessible on your computer, smartphone, or tablet. With Google Photos, you can not only store and organize your digital memories, but also bring them to life by creating stunning collages that showcase multiple photos in a single frame.
A collage is a unique way to curate a collection of photos and present them together as a unified composition. It provides a visually appealing and compact display of multiple images, allowing you to tell a story, showcase a special event, or simply capture various moments in one beautifully arranged format.
Now, let’s dive into the step-by-step process of creating a collage in Google Photos and unlock the potential to transform your cherished memories into stunning visual art.
What is Google Photos?
Google Photos is a popular photo and video storage service developed by Google. It offers users a convenient and secure way to manage and access their digital memories across various devices. Whether you are an avid photographer or someone who loves capturing everyday moments, Google Photos is designed to simplify the storage and organization of your photos and videos.
One of the highlights of Google Photos is its unlimited storage capacity for high-quality photos. This means you can safely store your images without worrying about running out of space on your device. Additionally, Google Photos automatically backs up your photos and videos as you capture them, ensuring that your precious memories are securely stored in the cloud.
The platform also offers powerful search capabilities, allowing you to find specific photos or videos using keywords, locations, or even people’s faces. This makes it incredibly easy to locate a particular image amidst a vast collection.
In addition to its storage and organization features, Google Photos provides a range of editing options to enhance the quality of your photos. From basic adjustments like cropping and rotating to more advanced features like applying filters and adjusting brightness and contrast, you can take your photos from average to extraordinary with just a few taps.
Furthermore, Google Photos offers intuitive sharing options, making it effortless to share your photos and videos with family and friends. Whether you want to create a shared album, send a link, or share directly to social media platforms, Google Photos simplifies the process of sharing your cherished memories with the people who matter most.
With its user-friendly interface, powerful features, and seamless integration across devices, Google Photos has become a go-to platform for millions of users worldwide. Whether you are managing a personal collection or collaborating with others on a project, Google Photos provides a comprehensive solution for all your photo and video management needs.
What is a Collage?
A collage is a creative way to combine multiple images into a single composition, creating a visually captivating arrangement that tells a story or presents a theme. It involves arranging photos and sometimes other elements such as text or shapes in a visually appealing and cohesive manner.
Collages can be a fun and artistic way to showcase memorable moments, highlight a specific event, or simply display a collection of photos in a unique and eye-catching format. They offer a blend of creativity and storytelling, allowing you to curate a visual narrative that captures the essence of your chosen subject.
Collages can be created using various physical or digital mediums. In the digital realm, creating collages has become easier than ever, thanks to the availability of numerous photo editing tools and platforms such as Google Photos. Digital collages provide the flexibility to experiment with different layouts, photo arrangements, and customization options.
One of the key benefits of creating a collage is the ability to showcase multiple images in a compact space. Instead of displaying individual photos, a collage allows you to merge them into a single frame, saving precious screen or physical space while still conveying the desired message or aesthetic.
Collages can also evoke emotions and evoke memories by presenting a collection of images that are thematically connected. Whether it’s a collection of vacation photos, a collage of family pictures, or a compilation of wedding snapshots, the arrangement of images in a collage can enhance the overall impact and create a powerful visual narrative.
Furthermore, collages offer endless opportunities for personalization and customization. You can choose from a variety of layout options, experiment with different photo arrangements, add captions or text, apply filters or effects, and incorporate other design elements. This allows you to create a collage that truly reflects your style, preferences, and the story you want to tell.
In summary, a collage is a creative and visually appealing way to combine multiple images into a single composition. It provides a versatile platform for storytelling, showcasing memories, and creating beautiful visual arrangements that captivate viewers’ attention and evoke emotions.
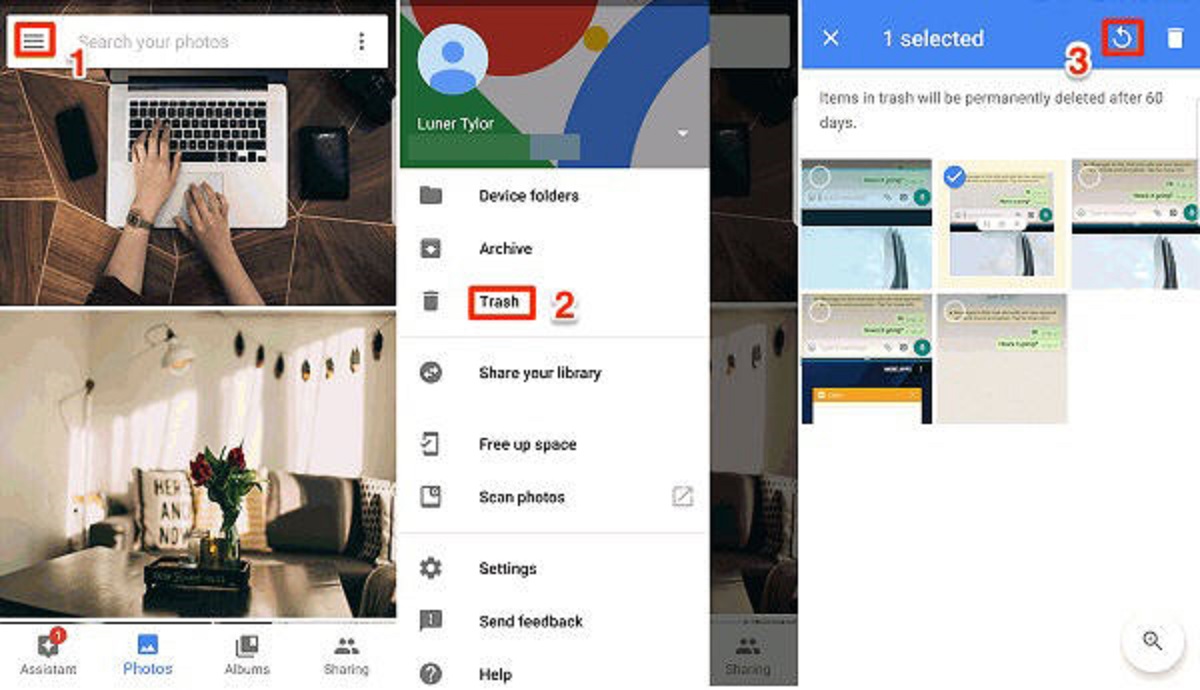
Step 1: Accessing Google Photos
Before you can create a collage in Google Photos, you need to access the platform. Here’s how you can do it:
- Open a web browser on your computer or launch the Google Photos app on your smartphone or tablet.
- If you’re using a web browser, go to https://photos.google.com. If you’re using the app, simply open it from your device’s home screen.
- If you’re logging in for the first time, you’ll need to sign in using your Google account credentials. If you don’t have a Google account, you can create one by clicking on the “Create account” option.
- Once you’ve signed in, you will be greeted with the Google Photos home screen, which displays all your stored photos and videos.
It’s important to note that Google Photos allows you to access your photos and create collages from any device with an internet connection. Whether you prefer using a computer, smartphone, or tablet, you can seamlessly navigate and utilize the Google Photos platform.
Furthermore, Google Photos provides a consistent experience across different platforms, ensuring that your photos and collages are synced and accessible from all your devices. This means that any collage you create on your computer will also be available on your mobile devices and vice versa.
Now that you have accessed Google Photos, you’re ready to move on to the next step: selecting the photos you want to include in your collage!
Step 2: Selecting Photos
Once you’ve accessed Google Photos, the next step in creating a collage is selecting the photos you want to include. Follow these simple steps:
- Navigate to your photo library by clicking on the “Photos” tab at the top of the screen.
- Scroll through your photos and click on the first image you want to add to your collage.
- To select multiple photos, hold down the Ctrl key (Windows) or the Command key (Mac) while clicking on each desired photo. Alternatively, you can click and drag your cursor to select a continuous range of photos.
- As you select photos, you’ll notice that they are highlighted or marked with a checkmark.
- If you want to include all photos within a specific timeframe or album, you can click on the “Albums” or “Library” tab and select the desired album or date range.
- If you change your mind and want to remove a selected photo, simply click on it again to deselect it.
It’s important to choose photos that complement each other and tell a coherent story within your collage. Consider the theme or message you want to convey and select photos that align with that vision.
Google Photos also offers the option to search for specific photos using keywords, locations, or even people’s faces. This can be helpful when you’re trying to find specific images or want to include photos that share a common subject or location.
Once you have selected the photos for your collage, you’re ready to proceed to the next step: creating a new collage in Google Photos!
Step 3: Creating a New Collage
Now that you have selected the photos you want to include in your collage, it’s time to create a new collage in Google Photos. Follow these steps:
- Ensure that you are still in your Google Photos library or album view.
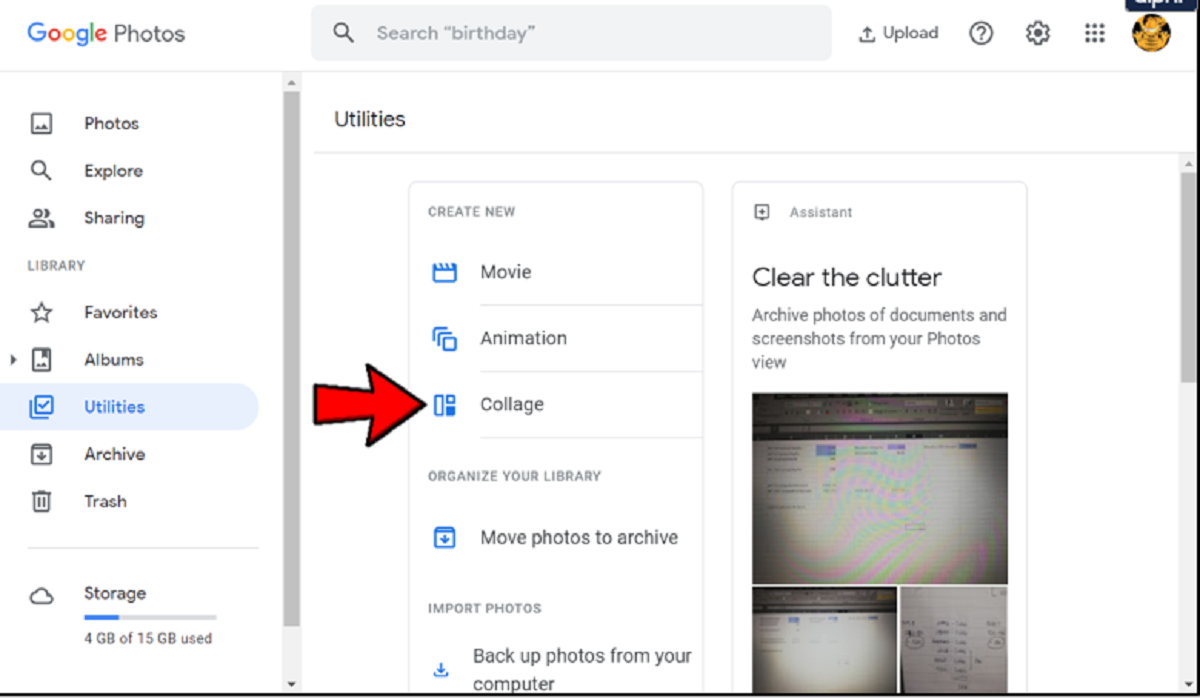
- Click on the “+” button or the “Create” button, typically located at the top of the screen or in the menu.
- A dropdown menu will appear with various options. Select “Collage” or “New Collage” from the list.
- Google Photos will automatically generate a collage using the selected photos.
- Your newly created collage will appear on the screen, ready for customization and editing.
Google Photos utilizes intelligent algorithms to automatically arrange the selected photos into a visually appealing collage. The arrangement may vary depending on the number and orientation of the photos you chose, as well as the size and aspect ratio of your screen.
It’s important to note that Google Photos provides a quick and effortless way to create collages. However, if you are not satisfied with the automatically generated layout, don’t worry! You have the flexibility to customize the collage to your liking in the next step.
Now that you have successfully created a new collage in Google Photos, it’s time to move on to Step 4: customizing the layout of your collage!
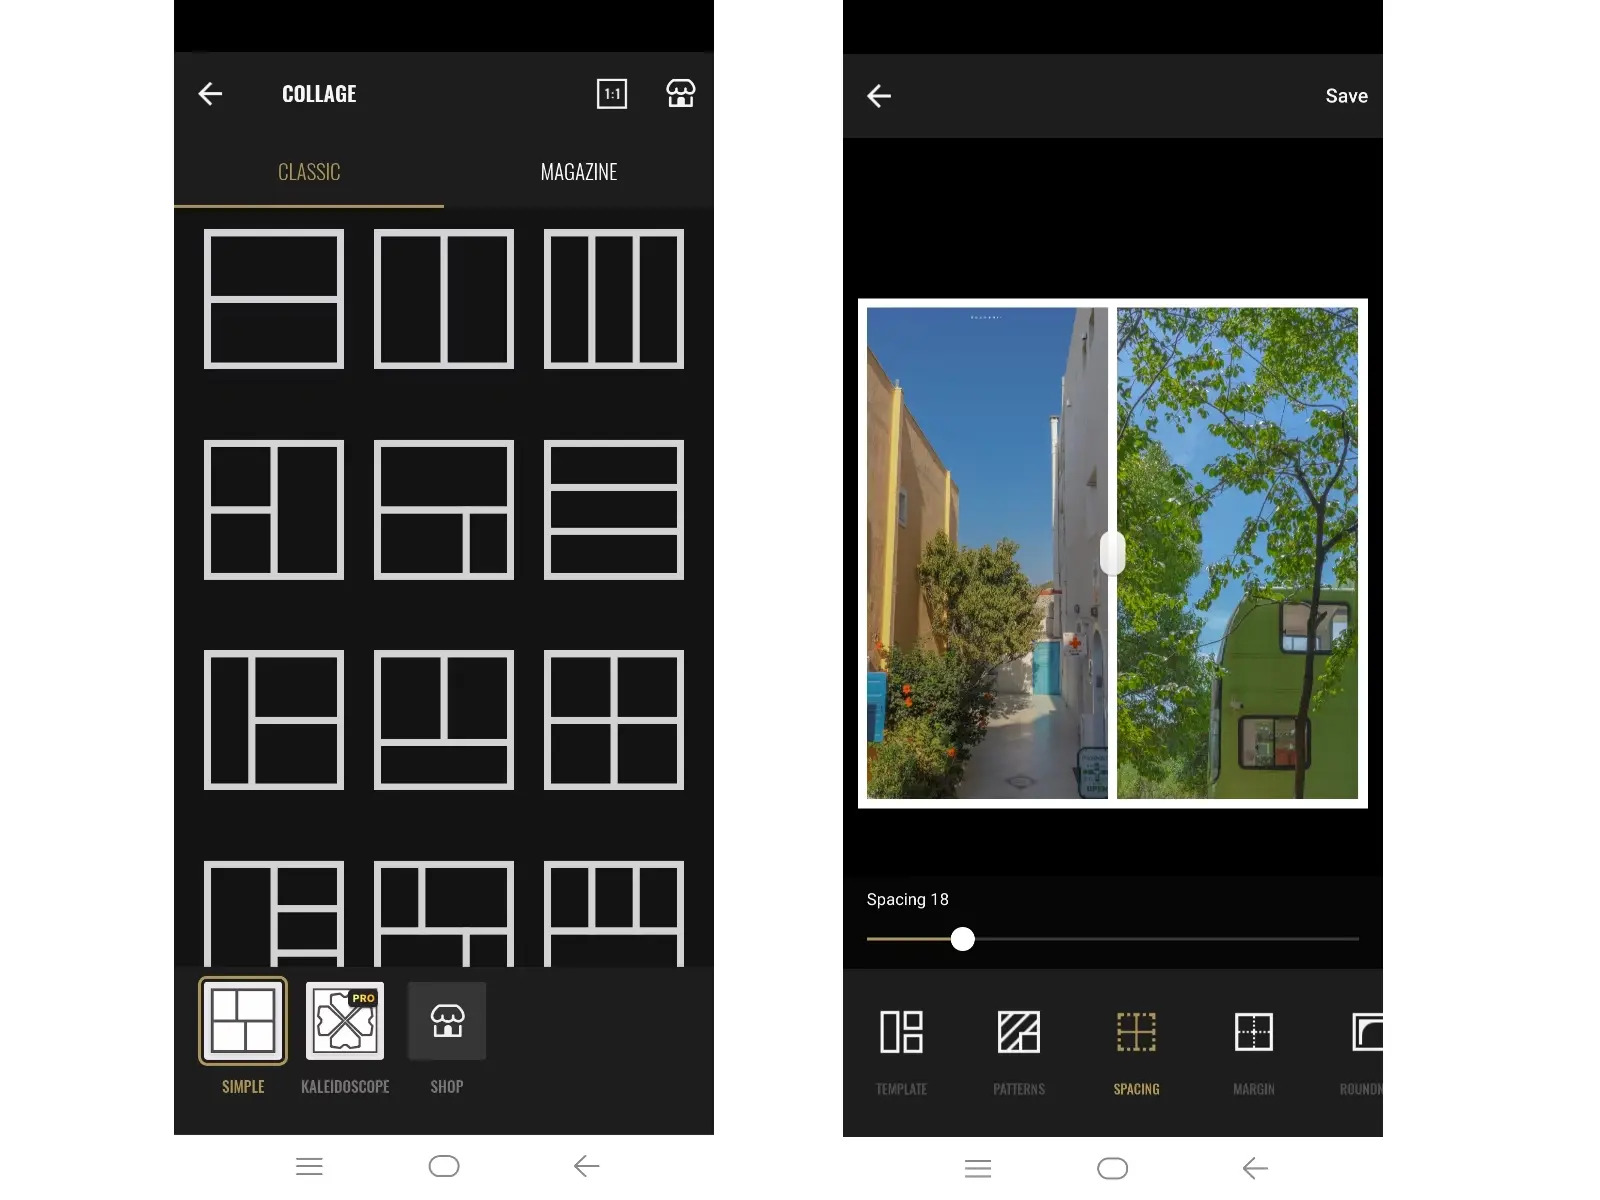
Step 4: Customizing Collage Layout
After creating a new collage in Google Photos, you have the option to customize the layout to your preferences. Follow these steps to personalize the collage layout:
- Click on the collage to select it. You’ll notice that various editing options become visible.
- Look for the “Layout” or “Edit Layout” option and click on it. This will allow you to modify the arrangement of the photos within the collage.
- Google Photos provides different layout options to choose from. Look for a layout that best suits your desired visual presentation.
- If you’re not happy with the current layout, click on the “Shuffle” or “Randomize” button to let Google Photos generate a new arrangement for you.
- Feel free to experiment with different layout options until you find the one that best showcases your selected photos.
- Once you are satisfied with the layout, click on the “Save” or “Apply” button to confirm your changes.
Customizing the layout of your collage allows you to have control and creative input on how the photos are arranged. It gives you the ability to create a visually harmonious composition that highlights the best aspects of your selected images.
Keep in mind that the number and orientation of the selected photos may affect the available layout options. Experimenting with different layouts and shuffling the arrangement can yield surprising and visually appealing results.
Now that you have customized the layout of your collage, it’s time to move on to Step 5: editing the settings to fine-tune your collage’s appearance!
Step 5: Editing Collage Settings
Once you have customized the layout of your collage in Google Photos, you can further enhance its appearance by editing the settings. Here’s how you can tweak the settings:
- Select your collage by clicking on it to reveal the editing options.
- Look for the “Settings” or “Edit” option and click on it. This will allow you to access the various editing tools for your collage.
- Depending on the available options, you may be able to adjust settings such as border thickness, border color, spacing between photos, and more.
- Explore the different editing options and make adjustments as desired.
- If you want to add text to your collage, look for the “Text” or “Add Caption” option and click on it. This will enable you to insert custom text into your collage.
- Experiment with different font styles, sizes, and placements to ensure the text complements the overall design.
- Continue making adjustments until you are satisfied with the appearance of your collage.
- Once you are done editing the settings, click on the “Save” or “Apply” button to save your changes.
Editing the settings of your collage gives you the opportunity to personalize and fine-tune its overall visual presentation. By adjusting settings such as borders, spacing, and text placement, you can create a collage that matches your desired aesthetic and conveys your intended message.
Remember to strike a balance and ensure that the settings enhance the overall composition without overpowering or distracting from the photos themselves. The goal is to create a visually harmonious collage that showcases your selected images in the best possible way.
Now that you have edited the settings of your collage, it’s time to move on to Step 6: saving and sharing your masterpiece!
Step 6: Saving and Sharing the Collage
Once you are satisfied with the final look of your collage in Google Photos, it’s time to save and share your creation. Follow these steps to complete the process:
- Ensure that you have made all the desired edits and adjustments to your collage.
- Click on the “Save” or “Done” button to save your collage.
- If prompted, choose a location on your Google Photos account where you want to store the collage.
- Once saved, your collage will be accessible from your Google Photos library.
- To share your collage, click on the “Share” button or choose the “Share” option from the menu.
- You can select the desired sharing method, such as creating a shared link, sending the collage via email, or sharing directly to social media platforms.
- Follow the on-screen instructions to complete the sharing process.
Saving your collage allows you to keep a permanent copy of your creation within your Google Photos library. This ensures that you can access and share it at any time.
Sharing your collage allows you to showcase your creation with others, whether it’s friends, family, or social media followers. Google Photos offers flexible sharing options, making it easy to distribute and display your collage to the intended audience.
Remember to consider the privacy settings when sharing your collage. Google Photos provides options to control who can view and access your shared collages, ensuring that you have control over who can see your masterpiece.
Congratulations! You have successfully created, saved, and shared your collage using Google Photos. Now you can enjoy the satisfaction of showcasing your selected photos in a visually captivating and cohesive composition.
Conclusion
Creating collages in Google Photos is a fun and creative way to combine multiple photos into a single composition. By following the step-by-step process outlined in this article, you can easily access Google Photos, select your desired photos, create a new collage, customize the layout, edit the settings, and finally, save and share your masterpiece.
Google Photos offers a user-friendly platform that allows you to store, organize, and edit your photos and videos. With its unlimited storage capacity, intelligent search capabilities, and seamless integration across devices, Google Photos simplifies the process of managing and accessing your precious memories.
Creating a collage enables you to showcase a collection of photos in a visually appealing and compact format. Whether you’re curating a collage of family memories, documenting a special event, or simply capturing various moments, a collage tells a unique story and evokes emotions through the arrangement and composition of photos.
Throughout the collaging process, you have the opportunity to personalize your creation by customizing the layout and adjusting the settings. This allows you to create a visually harmonious and aesthetically pleasing collage that truly reflects your vision and style.
Once your collage is complete, you can save it within your Google Photos library, ensuring that it is easily accessible whenever you want to revisit or share it. Sharing your collage allows you to showcase your creativity and share your cherished memories with friends, family, or social media followers.
So, let your creativity soar and unleash the artist within you by creating collages in Google Photos. Explore the possibilities, experiment with different layouts and settings, and turn your collection of photos into captivating visual narratives. Start creating your collage and have fun telling your story!