Introduction
Google Photos is a popular platform for storing and organizing your digital photos. It offers a convenient way to access your images from any device with an internet connection. However, there may be times when you want to download your photos from Google Photos to your computer for various reasons, such as creating backups or editing them using specialized software.
In this article, we will guide you through the process of downloading your Google Photos to your computer. We will provide you with step-by-step instructions, so you can easily retrieve your precious memories and have them readily available on your local storage.
Whether you have a Mac or Windows computer, the process is relatively straightforward. You will need to sign in to your Google account, open Google Photos, select the photos you want to download, and choose a location on your computer to save them. Once you complete these steps, you can access the downloaded photos at any time, even without an internet connection.
Before we get started, ensure that you have a stable internet connection and enough free space on your computer to accommodate the downloaded photos. Additionally, ensure that your Google account is logged in and synced with Google Photos to ensure a smooth download process.
Now, let’s dive into the detailed steps to download Google Photos to your computer and preserve your memories offline.
Step 1: Sign in to your Google account
The first step to downloading your Google Photos to your computer is to sign in to your Google account. Your Google account is linked to Google Photos, which allows you to access and manage your photos in one centralized location.
If you already have a Google account, open your preferred web browser and go to photos.google.com. On the top right corner of the page, click on the “Sign in” button. Enter your email or phone number associated with your Google account, then click “Next”.
Next, enter your password and click “Next” to proceed. If you have enabled two-factor authentication for your Google account, you may need to provide the additional verification code sent to your phone or email.
If you don’t have a Google account, click on the “Create account” button and follow the prompts to set up a new account. Once you have created your account, proceed to sign in to access Google Photos.
Once you have successfully signed in, you will be redirected to the Google Photos homepage, where you can view and manage your photos.
It is important to ensure that you are signed in to the correct Google account associated with the Google Photos you wish to download. This is particularly important if you have multiple Google accounts.
Now that you have successfully signed in to your Google account, let’s move on to the next step and open Google Photos.
Step 2: Open Google Photos
Now that you are signed in to your Google account, the next step is to open Google Photos. Google Photos allows you to view and manage your entire photo library, as well as perform various actions like downloading, sharing, and organizing your photos.
To open Google Photos, go to your web browser and enter the URL photos.google.com. Press Enter to load the page.
Once the page is loaded, you will be directed to the Google Photos homepage. Here, you will find all your uploaded photos and albums neatly organized and displayed.
In the sidebar on the left-hand side of the page, you will find different options to navigate through your photos, such as “Photos,” “Albums,” “Sharing,” and “Trash.” You can click on these options to access and manage different aspects of your Google Photos.
By default, the “Photos” tab will be selected, displaying all your uploaded photos in chronological order. You can also switch to the “Albums” tab to view your photo albums or explore the “Sharing” tab to see photos shared with you by others.
From the Google Photos homepage, you can also use the search bar at the top to search for specific photos or browse through your photos using different filters like date, location, people, and more.
Now that you have successfully opened Google Photos, you are ready to move on to the next step and select the photos you want to download.
Step 3: Select the photos you want to download
After opening Google Photos, the next step is to select the specific photos that you want to download to your computer. Selecting the photos you want will allow you to download and save them locally for offline access.
To select photos, you can either navigate through your photo library using the different tabs and filters or use the search bar to find specific images.
If you want to download individual photos, simply click on the photo to select it. You will notice a blue checkmark appearing on the selected photo. To deselect a photo, click on it again to remove the checkmark.
If you want to select multiple photos at once, you can either hold down the Shift key while clicking on photos to select a continuous range, or hold down the Ctrl key (Windows) or Command key (Mac) to select multiple photos individually.
Additionally, if you want to select all the photos in a particular album, simply click on the first photo and then hold down the Shift key while clicking on the last photo in the album. This will select all the photos in between as well.
You can also select multiple non-contiguous photos in an album or across your entire library by holding down the Ctrl key (Windows) or Command key (Mac) while clicking on each individual photo.
Furthermore, Google Photos also offers the option to create and select specific photo albums. To select photos from an album, click on the album name from the “Albums” tab and then follow the same steps mentioned above to select the individual or multiple photos within the album.
Once you have selected the photos you want to download, you are ready to move on to the next step and start the download process.
Step 4: Download the selected photos to your computer
Now that you have selected the photos you want to download, it’s time to proceed with actually downloading them to your computer. Google Photos provides an easy and efficient way to save your selected photos locally for offline access.
To download the selected photos, there are a few different methods you can use:
- Method 1: Right-click and select “Download”
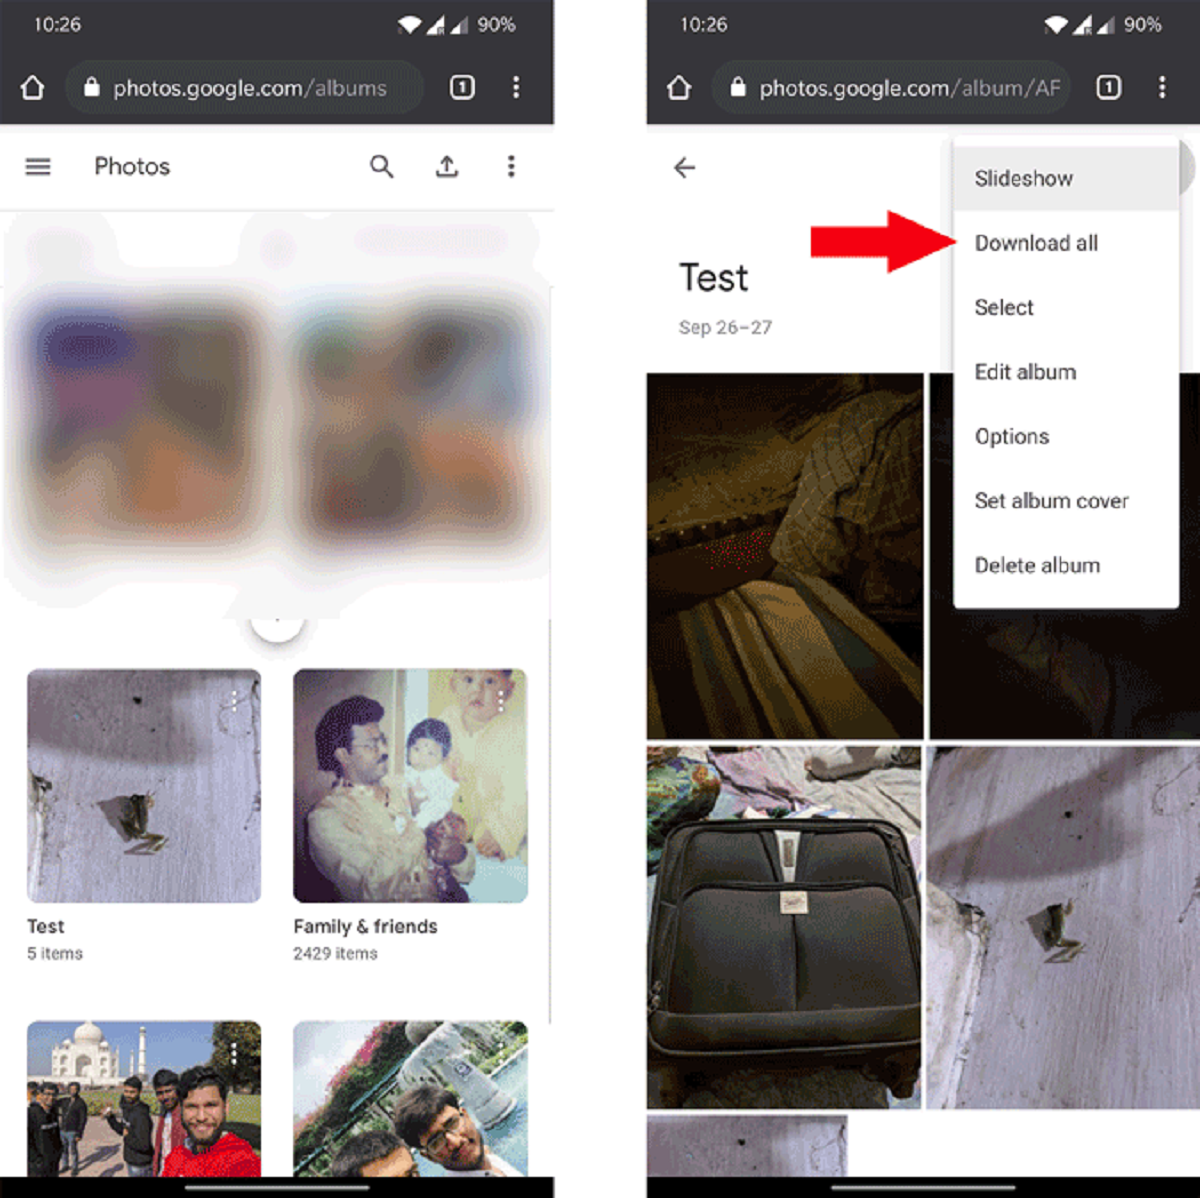
One simple method is to right-click on any of the selected photos and choose “Download” from the context menu that appears. This will initiate the download process and prompt you to choose a location on your computer where you want to save the photos. - Method 2: Use the “three-dot” menu
Another way to download the selected photos is to use the “three-dot” menu located at the top right corner of the Google Photos interface. Click on the menu icon, and from the drop-down menu, select “Download”. This will start the download process for the selected photos. - Method 3: Keyboard shortcut
If you prefer using keyboard shortcuts, you can simply press the Shift + D keys simultaneously after selecting the photos you want to download. This will also trigger the download process.
Regardless of the method you choose, once you initiate the download process, a pop-up window will appear asking you to specify a location on your computer where you want to save the downloaded photos.
Navigate to the desired folder on your computer, or create a new folder specifically for these photos, and click on the “Save” or “OK” button. The selected photos will then be downloaded and saved to the chosen location on your computer.
Depending on the number and size of the photos being downloaded, the time it takes to complete the download process may vary. It is recommended to have a stable internet connection to ensure a smooth and uninterrupted download.
Congratulations! You have successfully downloaded the selected photos from Google Photos to your computer. In the next step, we will guide you on how to choose a location to save the downloaded photos.
Step 5: Choose a download location
After initiating the download process for your selected photos, you will be prompted to choose a download location on your computer where you want to save the photos. This step allows you to specify the folder or directory where the downloaded photos will be stored.
When the pop-up window appears, you will see the option to browse through your computer’s file system to select a desired location. You can navigate to a specific folder or create a new one to save the photos.
To choose a download location:
- Browse through existing folders: Click on the folders listed to navigate to the desired location. You can open different folders to access their contents and select the appropriate one to save the photos.
- Create a new folder: If you wish to create a new folder for the downloaded photos, look for the “New Folder” or “Create New Folder” button or icon. Click on it and provide a name for the folder. This will create a new directory where you can save the photos.
It is important to choose a download location that is easily accessible and organized for future reference. Consider creating a dedicated folder specifically for your downloaded Google Photos to keep them separate from other files on your computer.
Once you have selected or created the desired download location, click on the “Save” or “OK” button to proceed. The selected photos will then be downloaded and saved to the specified folder or directory on your computer.
Take note of the chosen download location so that you can easily locate the downloaded photos later on.
Now that you have chosen a download location, the selected photos will be saved in that location on your computer. In the next step, we will discuss what to do while waiting for the download process to complete.
Step 6: Wait for the download to complete
After selecting the photos you want to download and choosing the download location, you will need to wait for the download process to complete. The time it takes to download the photos will depend on the number and size of the selected files as well as the speed of your internet connection.
While the download is in progress, it is important not to interrupt or close the download window or navigate away from the page. Doing so may result in incomplete downloads or errors.
You can monitor the progress of the download by looking at the download window or download manager on your web browser. Some browsers may show the download progress as a percentage, while others may display a progress bar.
If your download is taking longer than expected, it is advisable to verify the speed of your internet connection. A slow internet connection can significantly impact the download time.
During this waiting period, you can use this time to organize your photos on your computer or perform other tasks. Ensure that you have enough free space on your computer’s storage to accommodate the downloaded photos.
Once the download is complete, you will receive a notification or see a message indicating that the photos have been successfully downloaded to your specified location on your computer.
Congratulations! You have successfully waited for the download to complete. In the final step, we will discuss how to access the downloaded photos on your computer.
Step 7: Access the downloaded photos on your computer
Once the download of your selected photos from Google Photos to your computer is complete, you can now access and view them locally. The downloaded photos will be saved in the designated download location on your computer’s storage.
To access the downloaded photos:
- File Explorer (Windows): Open the File Explorer by clicking the folder icon on your taskbar or by pressing the Windows key + E on your keyboard. Navigate to the download location you specified, and you will find the downloaded photos listed.
- Finder (Mac): Open the Finder by clicking the smiley face icon on your Dock or by pressing Command + Space and typing “Finder”. Navigate to the download location you specified, and you will find the downloaded photos listed.
Once you locate the downloaded photos, you can open and view them using the default photo viewer or any image editing software of your choice. You can also perform various tasks like renaming, organizing, or editing the photos as needed.
By downloading the photos to your computer, you now have offline access to your precious memories. You can easily share them with others, create backups, or use them for creative projects.
Remember to regularly backup the downloaded photos to external storage drives or cloud storage services to ensure their safety and prevent any potential loss.
With the downloaded photos readily accessible on your computer, you can enjoy them even without an internet connection or when Google Photos is temporarily unavailable.
Congratulations! You have successfully accessed the downloaded photos on your computer. You can now relish in the joy of having your cherished memories available at your fingertips.
Conclusion
Downloading your photos from Google Photos to your computer allows you to have offline access to your cherished memories. Whether you want to create backups, edit them using specialized software, or simply enjoy them without relying on an internet connection, the process of downloading your photos is straightforward.
In this article, we guided you through the step-by-step process of downloading Google Photos to your computer. We covered signing in to your Google account, opening Google Photos, selecting the photos you want to download, choosing a download location, waiting for the download to complete, and finally accessing the downloaded photos on your computer.
Remember to ensure a stable internet connection, have enough free space on your computer, and select a meaningful download location for your photos. Regularly back up your downloaded photos to protect them from loss.
By downloading your Google Photos, you can not only preserve your memories but also have the flexibility to use them offline and share them with others without relying on the internet.
So, next time you want to download your Google Photos to your computer, follow these simple steps, and enjoy the convenience of offline access to your treasured moments.