It goes without saying that users like to use software that provides great quality output while offering convenience. There are video editing software or applications that you would find easy to use regardless of your skills or experience. These kinds of software are easy to find now that almost everything you need is available on the internet. There are even some that you can enjoy using only your browser, as they are web-based.
If you’re looking for the top free online video editors, you may be wondering why InVideo is one of the top choices. You may have seen a Facebook ad or heard from a friend about it, which made you curious about the quality of service it offers. It has a lot of features, but does it have everything you need for an online video editing software? That’s what you are going to find out as you read further on this article.
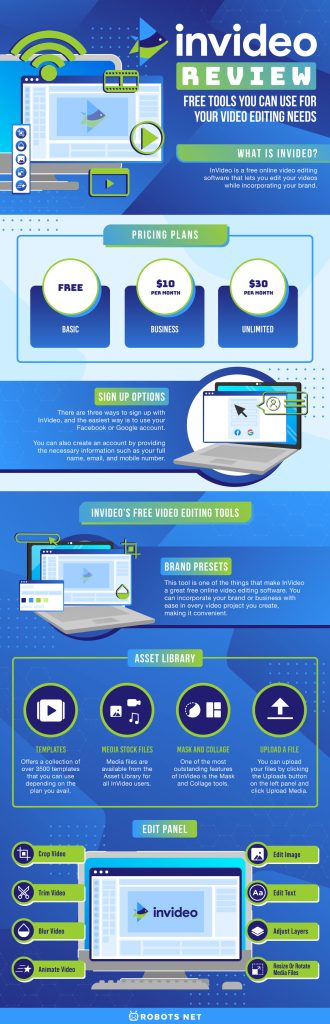
What is InVideo?
InVideo is a free online video editing software that lets you edit your videos while incorporating your brand. This is perfect for those who want to create video projects and increase the possibility of letting their brand known. It offers a lot of features you might find useful for. It is also easy to use, letting you finish your video project with exceptional quality in just a few minutes.
InVideo gives you a wide selection of stock files, templates, and tools that you’ll know more about later. Not everything comes for free, though, so you will need to upgrade your subscription to unlock more options. This brings us to the pricing plans you can choose from to enjoy premium features.
Pricing Plans
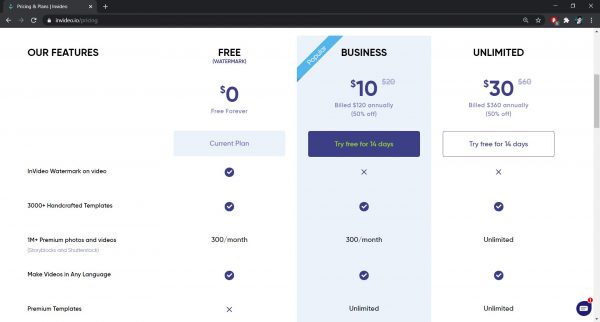
InVideo has three types of plans, but only the Business and Unlimited plans will ask you for payment. These two paid plans offer a free 14-day trial for you to have a glimpse of what it’s like to access all the features you need. If you’re not willing to spend money on a video editing software that you’re not sure of, you can use the Free plan. It has limitations, though, so you should know first how the free plan differs from the paid ones.
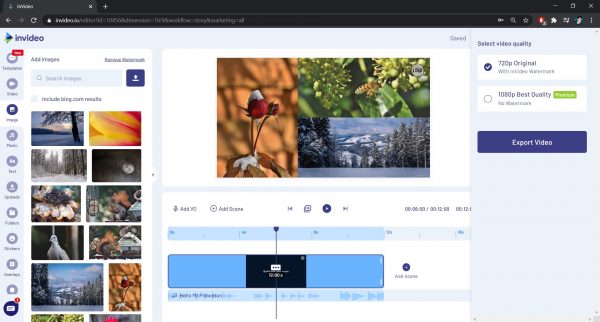
To start, the basic plan exports only in 720p video resolution while the two paid plans export in 1080p. It would also include a watermark that you can get rid of if you upgrade to any paid plan. You also cannot access the Premium templates unless you avail of a Business or Unlimited plan. These are just some of the limitations if you’re going to stick with the basic subscription.
There are features you can still use as a free plan user the same way as the paid plan users do. You can export up to 60 videos per month, which is equal to the maximum video export of Business plan users. You can also have an output video duration of up to 15 minutes, which is also the same as the two paid plans. Branding and Team Sharing are also available for all types of plans, which still makes the basic plan worth trying.
Sign Up Options
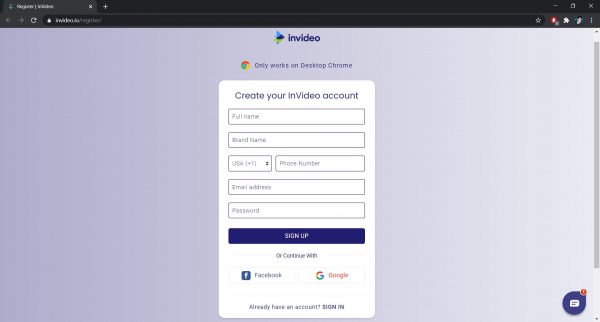
There are three ways to sign up with InVideo, and the easiest way is to use your Facebook or Google account. It would only require a few clicks and you’ll be good to proceed with editing. You can also create an account by providing the necessary information such as your full name, email, and mobile number.
InVideo would send you emails about your current projects, say, to remind you to finish it and ask how they could help. There are also instances that you will receive a call on the mobile number you provided to ask you some questions. It’s mostly about your brand or business and what you hope to achieve from InVideo. It will also send you an email if you missed their call and ask you about your business.
InVideo’s Free Video Editing Tools
InVideo offers various tools for free to all subscribers, but it gives limited access to the Free plan users. If you only availed of the free subscription, there are certain limitations on some features, especially with the use of assets. To give you a better picture, here are the things you can do with InVideo.
Brand Presets
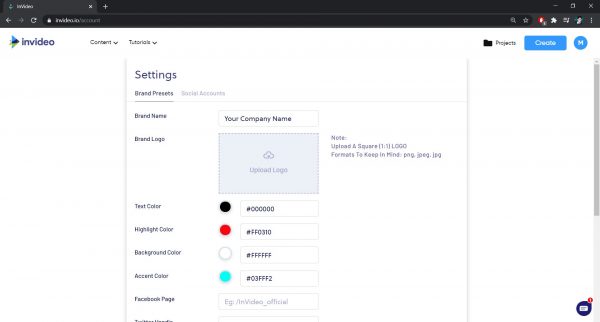
This tool is one of the things that make InVideo a great free online video editing software. You can incorporate your brand or business with ease in every video project you create, making it convenient. In fact, it will automatically pull in your brand presets as soon as you begin with your project. These brand presets include your brand name and logo as well as the color of your text, highlight, accent, and background. You can also set your handles in all your social media and even your YouTube channel.
Setting these brand elements would help you further establish your business. To set presets in InVideo, go to your profile and click Brand Presets. There you can upload your brand logo and enter your company name. You can also upload a start and end clip if you have, but you have to make sure that it fits in all dimensions.
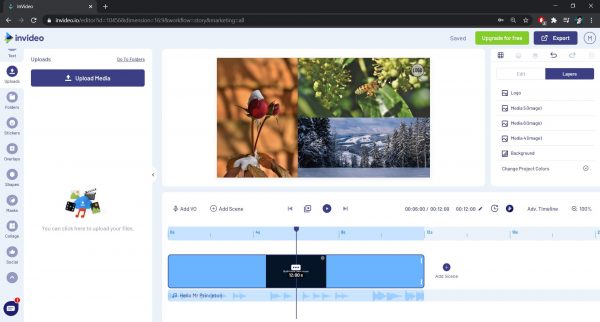
Asset Library
The Asset Library is at the left part of the screen that contains all the elements you need in editing. It includes all the media files from videos to stickers so you will not run out of things to put on your project. To know which you can use and how to add them, here are the things you can add to your video project.
Templates
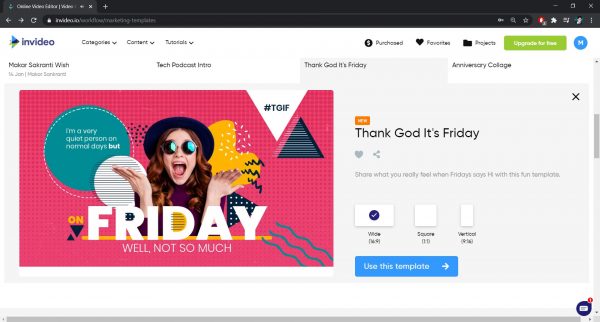
InVideo offers a collection of over 3500 templates that you can use depending on the plan you avail. Paid plan users will have access to all the video templates, while the free plan users have to pay for priced templates. You can check the categories for you to narrow down the selection of templates that fit your needs. You can also use any template as it is or you can customize it according to your preference.
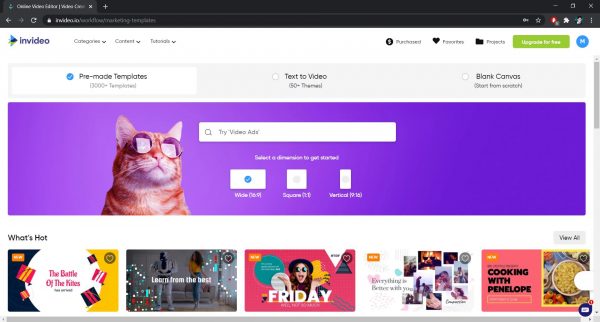
To edit using a template, you only need to pick the Pre-made Template option from the website. It will show you various templates so you have to choose which is best for your video project. Choose your preferred video dimension then click the Use This Template button. You’ll then go to the Advanced Editing screen, which will ask you to upload your brand logo if you haven’t yet. You can skip it by closing the pop-up.
If you don’t want to use any template, you can also start editing from scratch. All you need to do is click the Blank Canvas option on the website and choose your desired video dimension. After that, click the Make a Video option and start editing.
Media Stock Files

Aside from templates, there are also media files that are available from the Asset Library for all InVideo users. The stock videos, images, audios, and more are available for free, but the use of Premium assets has its limitations. Free and Business plan users can only use a maximum of 300 Premium Media per month. For Unlimited plan users, there is no usage limitation because, well, it’s “Unlimited” for a reason. You should only worry about this if you will not upload your files, but this won’t be much of a problem otherwise.
To add media files, click any option, say, video or text, from the left panel and pick what you need. You can drag and drop videos and images on the video project or simply click a file to add to the Scene. If you add a video, it will ask you if you want to trim your video before adding it to the project.
When adding a music file, you should click the plus button on your chosen audio and it will go straight to the timeline. You can also add text, stickers, shapes, and overlays to your project for more customization. These options are on the left panel as well, so you only need to select whatever you need.
Mask and Collage
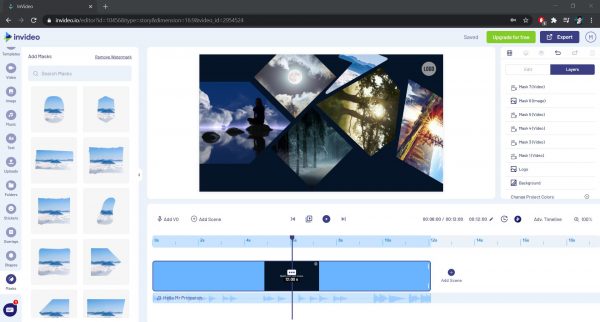
One of the most outstanding features of InVideo is the Mask and Collage tools, which would help you be more creative. It lets you make cooler videos as you can put together videos or images all at once and in a custom frame, too. Masking with InVideo allows you to assign a shape or any object available from the left panel to mask in the project. With this, you can have a video that only reveals the part where the mask is placed. Creating a collage, on the other hand, doesn’t need much of an explanation as it is easy to understand.
You can do both these things by clicking either Masks or Collage from the left panel. If you want to use the Mask tool, you can pick a mask that you want and resize it according to your preference. After that, drag and drop the media file, say a video or an image onto the mask. You may adjust the mask to assign which part of the media file you want to reveal.
You can also do the same thing with the Collage tool as long as your video files fit on the template. All you need to do is pick a collage and drag and drop your media files on each image from the collage. It will ask you if you like to replace it with the file you dropped or add it as a layer. Choose what you want to do and adjust it accordingly.
Upload a File
No one creates a video project only to edit stock files and not have an output with their clips. Video editing software would be useless if it would not allow you to upload your files. The good news is InVideo allows you to import your media files. While the free plan and the two paid plans have different upload limits, you’ll have nothing to worry about if you only have small-sized files.
Every file you upload to a project using a Free plan should have a size not greater than 200 MB. The two paid plans, on the other hand, can upload a single video with a file size of up to 800 MB. Although these are true, you can still upload another video as long as each file does not exceed the maximum file size. You should also note that each video you upload for all plans should only have a duration of up to 20 minutes. To resolve these issues, you can cut your video file to reduce its size and shorten the upload duration.
You can upload your files by clicking the Uploads button on the left panel and click Upload Media. Choose the file you want to upload and make sure the video does not exceed the size and duration limit. Once you add it to the scene, you will notice that the video you uploaded is a little blurry in the preview. Worry not, because InVideo only reduces its size while you’re editing it, but it will be fine once exported.
Edit Panel
The Edit Panel or the right panel is where all the editing tools are mostly located. It is where you can do all the adjustments on the media files from your video project. Here are the things you can do with the various tools from the Edit Panel.
Crop Video
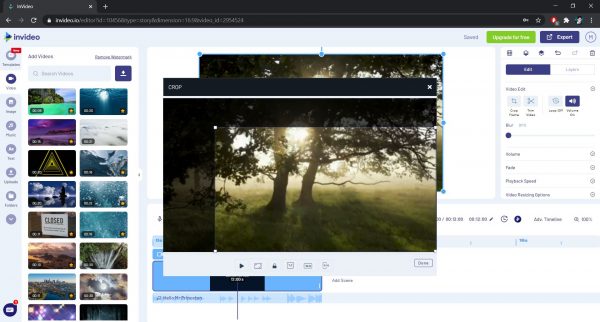
There are times that some would have a recorded video that has unnecessary elements on the side and corners on the frame. They might have recorded a video using their phone or accidentally covered a part of the lens with their finger. Maybe there’s someone included on the side of the frame that you want to get rid of. Cropping your video is the best tool to use, and InVideo lets you do this with ease.
All you need to do is select the media file that you want to crop and then click the Edit option from the right panel. It will show you different options to edit your file, but the cropping option lies under the Video Edit option. Once you select the Crop Frame tool, you can drag the ends of the video from the pop up to crop it. You should note, however, that you cannot crop freely as the file would keep its aspect ratio.
Trim Video
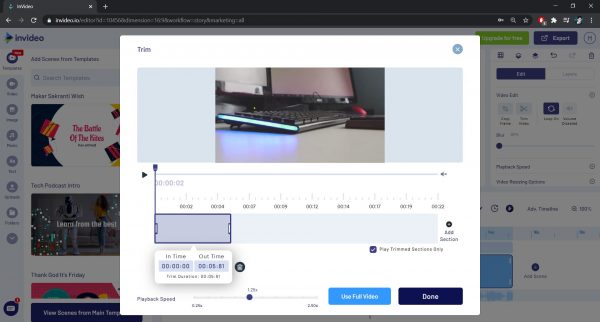
Although this function will pop up as soon as you add your video, there is a Trim tool for when you want to do it later. It is important to trim your video to exclude the parts that do not count at all. This is also an option if your video is too long and you want it to end in a specific part. What’s great about InVideo is it allows you to trim with precision, as it would show even the millisecond of the in and out time.
To trim your video, click the video clip and then the Edit option from the right panel. Hover over the Video Edit option and click the tool with a scissors icon to start trimming. A pop up will appear that will show you the in and out time as well as the duration of the video you are trimming. You can pull in either the start or end of the video clip to reduce its length. There is also an option to adjust the playback speed, which is another awesome feature.
Blur Video
The Blur tool may not be as needed often as other tools, but it is something that you might use once in a while. Say, you want to make your video as a background for text or to soften the video clip a little, you can use this tool. InVideo’s blur tool does not blur a specific part of the video, though, as it applies to the entire video. That said, you can’t blur someone’s face alone or censor a piece of information from your video clip.
For you to blur a video, select the clip and go to the Edit option from the Edit Panel. Click the Video Edit and increase or decrease the blur effect on your video according to your preference. It is worth noting that while you can undo the blur effect after applying, you cannot decrease it once you deselect the video. You can only increase the blur level when you select the video clip again.
Animate Video
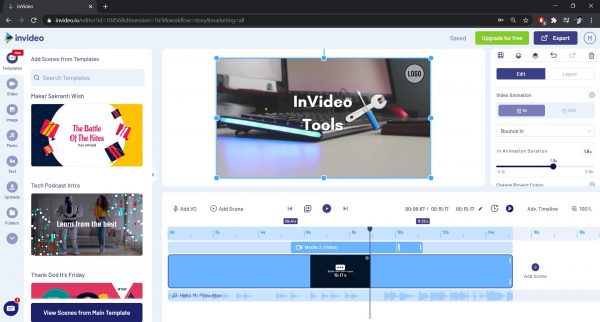
Another thing that makes InVideo exceptional is its Video Animation tool that allows you to be more creative with your film. This adds more impact to your video project since your clips wouldn’t only have a plain entrance and exit. You can choose how you want your videos to move in and out of the scene, say, Zoom, Bounce, Slide, and many more.
To animate your video, you only need to select your video clip and click the Edit option on the right panel. Look for the Video Animation option and choose the effect that best suits your video project. You can assign an animation for both In and Out of the clip as well as set the duration of the animation.
Although adding some video animation would indeed make your output better, you should remember not to overdo it. You should only use the animations that best fit the look of your video project.
Edit Image
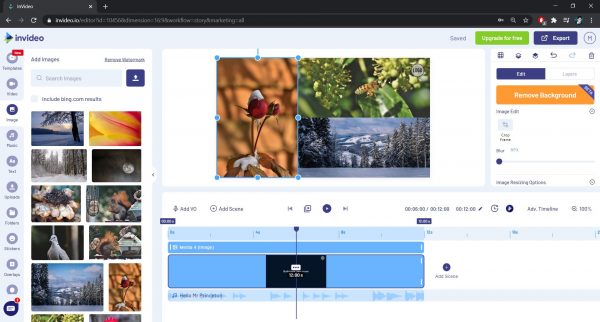
Since you can also add images to your video project, InVideo allows you to customize them, too. You can crop, blur, and set how long should it appear on your project. You can also add image animations the same as what you can do with your video clips. The significant thing about editing an image is it offers various filters that you cannot find when editing video clips.
To do these, select the image you want to edit and go to the Edit option from the right panel. You will see the Crop Frame and Blur tools under the Image Edit option, so choose the editing tool you need. Adjust the edges when cropping or increase the blur effect according to your preference. There are also Filters and Image Animation options where you’ll find the filters and animations you can apply to your image.
Another option from the right panel is the Remove Background tool that you can use if you get a paid plan. This lets you erase the background of the selected image, allowing you to overlay it on a different background. Although it’s a feature only for the paid users, there is still a limitation to its usage. The Business plan users can only remove the background of up to 20 images per month while Unlimited can edit up to 40 images per month.
Edit Text
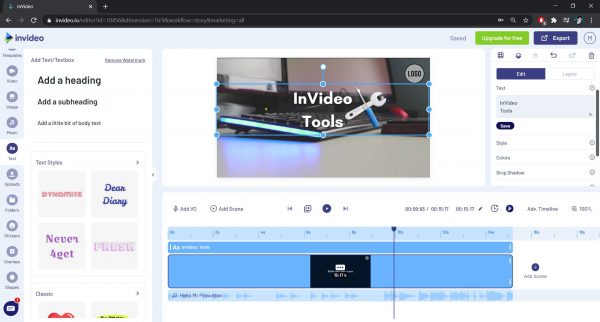
Aside from having different options to customize videos and images, you can also edit the text in various ways. You can edit the font, size, style, and color of the text you want to put on your video. It is also possible to include a textbox that you can change the color and opacity of, as a background of your text. You can also add a drop shadow that you can customize in different colors, but you can’t reposition as there is no option. InVideo also lets you animate your text as well as the textbox you added to the video project.
You can find all these tools under the Edit option from the right panel. To customize the font, size, and style of the text, select the text and make your desired adjustments under the Style option. You can also align your text to left, right, or center for a more pleasing look. If you want to change the color of either the text or textbox, go to the Colors option and adjust the color and the box’s opacity. You can also choose how you want the text and textbox to move in and out by going over to the Animation or Textbox Animation options.
If you want to upload your font, you can send it to InVideo and they will upload it for you. You should note, however, that this option is only applicable for the paid plan users.
Adjust Layers
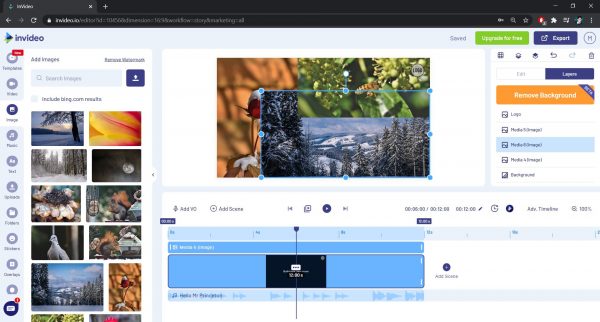
Another thing you can do through the Edit panel is adjusting the layers according to which goes in front or back. This is a useful tool when you are trying to overlay an element on another such as a sticker on a picture. You wouldn’t want that sticker to go at the back of the image, would you? It is also applicable for Picture in Picture, as you need to put the smaller clip in front of the full-sized video clip. This tool is one of the things you’ll always need when video editing, so you have to know how to do it.
To adjust the layers, go to the Layers option from the Edit Panel and select the file you want to move. You can choose however you want to move the file through the Back or Front options on the upper part of the Edit Panel. You can also simply drag the file over or under the media files on the Layers tool. There is also an option to lock media files to keep them in their position and state. With this, you cannot move or edit the locked file unless you unclick the lock icon.
Resize or Rotate Media Files
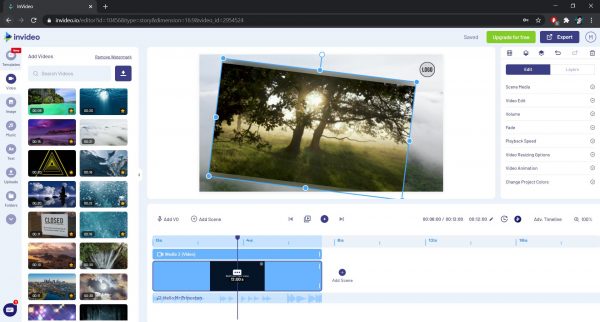
Another thing you can do to your videos, images, or any media file is Resize or Rotate them. Although this is not a tool that you can find from the Edit Panel, this still falls under the editing tools you can use. This can be helpful when you are trying to do a Picture in Picture output where one video overlays another. This can also help you when your video is saved vertically when it’s supposed to be horizontal.
To resize or rotate your video or image, select the media file from the Advance Editor screen. You can drag the ends to resize files according to your needs while maintaining their dimension. Rotating is also easy, as you only need to select the media file and hold the connected circle above the frame. While holding the circle, you can turn it clockwise or counterclockwise to rotate exactly the way you want it.
Timeline Controls
The Timeline is where you’ll see the Scenes that you put in as well as all the media files you added to your project. This is the part where you effectively arrange the sequence of the scenes in your video. To know more about the things you can do through the Editing Timeline, here are the functions it offers.
Add and Arrange Scenes
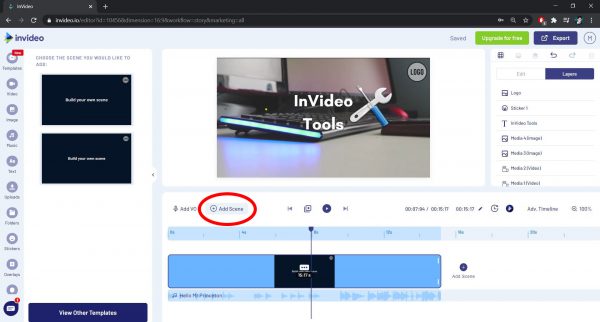
The most basic thing that you would want to do to your video project is to add and combine videos, of course. Your output would be useless if there’s nothing to see or if you wouldn’t arrange the videos properly. You should note that you have to add a scene first before adding media so you could add transition effects between two scenes.
From the Basic Timeline, you can click the Add Scene on the upper part or click the one on the right of the scenes. You can choose a scene from the tab that would appear on the left panel then click Add Scene. It will then go to your Timeline so you can add media files and start editing.
Adding scenes would also let you reorder your videos with ease, as you would only need to drag them to where you want to place them. If you want to rearrange media files from a single scene, select the scene and go to the Advanced Timeline. There you can see all the media from the selected scene that are not visible on the Basic Timeline. You can drag each file and arrange which goes first and last according to your desire.
Incorporate Voice Over
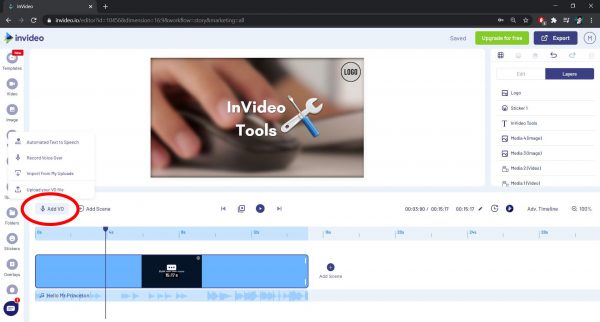
Another reason that makes InVideo a great free online video editing software is it lets you incorporate voice overs. This can come in handy if you are making video tutorials about, say, downloading Facebook videos and the like. This tool could also be useful when you want to make a video presentation about something that needs further explanation.
There are four options to incorporate voice overs on your scenes using InVideo. You can import from the ones you’ve already uploaded, upload a new one, record from the Editor, or automate text to speech. All you need to do is click the Add VO button from the upper part of the Timeline and choose the option you want to do. When you upload an audio file, you should note that MP3, WAV, OGG, and AAC are the only file formats accepted. If you want to record a voice-over, you must also allow your browser to record audio from the browser settings.
Preview Scenes
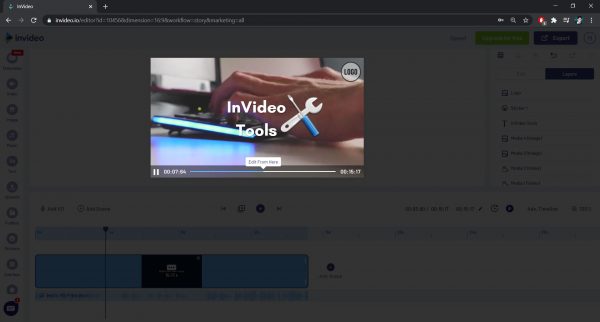
Another thing from the Editing Timeline is the Preview tool that lets you play the scenes or the entire video project. This is helpful when checking if the videos you edited applied the settings or effects you made with the media files. It also allows you to see if you missed something before exporting the project, allowing you to fix it. This will save so much time as you could see what the output would be like once you download it.
You can preview a specific scene by selecting one and clicking the Play Scene, the circle with a triangle icon. You can also preview the entire project by clicking the Play All Scene button beside Play Scene. While it plays, there is an option that says Edit From Here so you can edit on the part that you may have missed editing. It is worth noting that your preview might have a lower resolution, but it’s not something to worry about. It only happens due to external dependencies, but your final project will export with excellent quality and precision.
Article to Video

One of the things that make InVideo stand out is its Article to Video tool. This can also help you turn any article or text into informative videos that are engaging at the same time. You can browse through InVideo’s collection of templates for Article to Video so you can choose and create one easily.
Once you’ve chosen a template, you can go with the scripting process where you zero down on your text lines. If you already have all the text you need, you can copy and paste it on Option 1 and arrange accordingly. You can also paste your article’s URL on Option 2 and let InVideo fetch the data on the scraper. There is a third option when scripting which is to upload a media file, say, a recording of an interview and the likes. You can auto-suggest images or videos for the project or you can add your files.
After scripting, the next step is storyboarding where the script you made turns into scenes. From the storyboard tab, you can add, remove, duplicate, and reorder scenes. You can also change the scene type depending on the nature of the line from the scene you are working on. Be it a quote, question, story, or anything, InVideo can represent it the way you want to. You can then add or replace a media file by dragging and dropping it onto the scenes to set as a background for the script.
Once done, you can preview each scene by clicking the play button. If you want to edit more, you can click the Edit button which will direct you to the Advance Editor page.
What is Missing?

It may be true that InVideo offers a lot of great tools, but it still lacks some features that some online video editing software has. One of the tools that are missing is the Split tool, which is something that a user would need most of the time. It is important when you want to remove a part somewhere in the middle of a video and you want the rest to remain. Another feature that would have been useful is the Filters tool that you can apply for videos. It would have a better effect on the entire video project, but InVideo doesn’t have it yet.
It would also have been better if the Timeline is easier to use. The Basic Timeline cannot show all the elements at once, even when zoomed out. You can only see the media file you select unless you go to Advanced Timeline. The problem with this is it is harder to link video clips as you cannot see all files in order from the Basic Timeline.
There are also things that could be improved, especially when showing options from the Edit Panel. For example, InVideo has a great selection of fonts, but you cannot view it all since it extends underneath the Timeline. Sure, you can scroll down, but you will no longer see the ones on the bottom part. These may be minimal issues, but these can help a lot of users.
Conclusion
Although InVideo has a few things to improve, it is still worth exploring and using for your video projects. They still offer prominent features like templates and premium media files that you can use even with your free plan. You can also export your video project in HD, compared to other editing software that only exports in 480p resolution. It may have a watermark, but you can get rid of it by upgrading your plan. They also offer chat support for all users, so in case you get lost or have questions, you can send them a message.
Other than the missing tools and the watermark, there is nothing else to ask for from InVideo. If you want to try other free online video editors, you may consider exploring Clipchamp that offers more tools than InVideo. It doesn’t have a watermark when you export, but you can only have a video with 480p resolution. There are also other video editing software that you might want to check out, but please note that you should install it on your computer.