Introduction
When it comes to browsing the web, Google Chrome stands out as one of the most popular and user-friendly browsers for Mac users. However, as you navigate through various websites, your browsing history accumulates, storing a record of the sites you've visited, searches you've conducted, and files you've downloaded. While this feature can be convenient for revisiting previously viewed pages, there are times when you may want to clear this history for privacy or security reasons.
Whether you're looking to remove traces of a surprise gift purchase, maintain your privacy, or simply declutter your browsing experience, knowing how to delete your browsing history on Chrome for Mac is essential. By doing so, you can ensure that your online activities remain private and secure, without leaving a digital trail of your browsing habits.
In this guide, we'll walk you through the step-by-step process of clearing your browsing history on Chrome for Mac. By following these instructions, you'll be able to effectively remove your browsing history, cookies, cached images, and files, providing you with a clean slate for your future browsing sessions. So, let's dive in and explore how to maintain your privacy and keep your browsing history tidy on Chrome for Mac.
Step 1: Open Chrome and go to History
To begin the process of clearing your browsing history on Chrome for Mac, you'll first need to open the Chrome browser on your device. You can do this by locating the Chrome icon in your applications folder or by using the spotlight search feature. Once you've located the Chrome browser, simply click on the icon to launch the application.
After opening Chrome, you'll need to navigate to the History section to access your browsing history. To do this, look for the three-dot menu icon located in the top-right corner of the Chrome window. Click on this icon to reveal a dropdown menu, and then select the "History" option from the list. Alternatively, you can use the keyboard shortcut "Command + Y" to quickly access your browsing history.
Upon selecting the "History" option, a new tab will open, displaying your complete browsing history in chronological order. Here, you'll be able to see a detailed list of the websites you've visited, searches you've conducted, and files you've downloaded during your browsing sessions. This comprehensive view of your browsing history allows you to review and manage the specific items you wish to remove from your records.
By following these simple steps to open Chrome and access your browsing history, you've taken the first crucial step towards clearing your browsing history on Chrome for Mac. With the History tab now open, you're ready to proceed to the next step and begin the process of clearing your browsing data to maintain your privacy and keep your browsing history organized.
Step 2: Clear Browsing Data
Once you've accessed your browsing history in Chrome for Mac, the next step is to clear your browsing data. This process allows you to remove specific types of browsing information, such as your browsing history, cookies, cached images, and files. By clearing this data, you can effectively erase traces of your online activities, enhancing your privacy and security while using the Chrome browser.
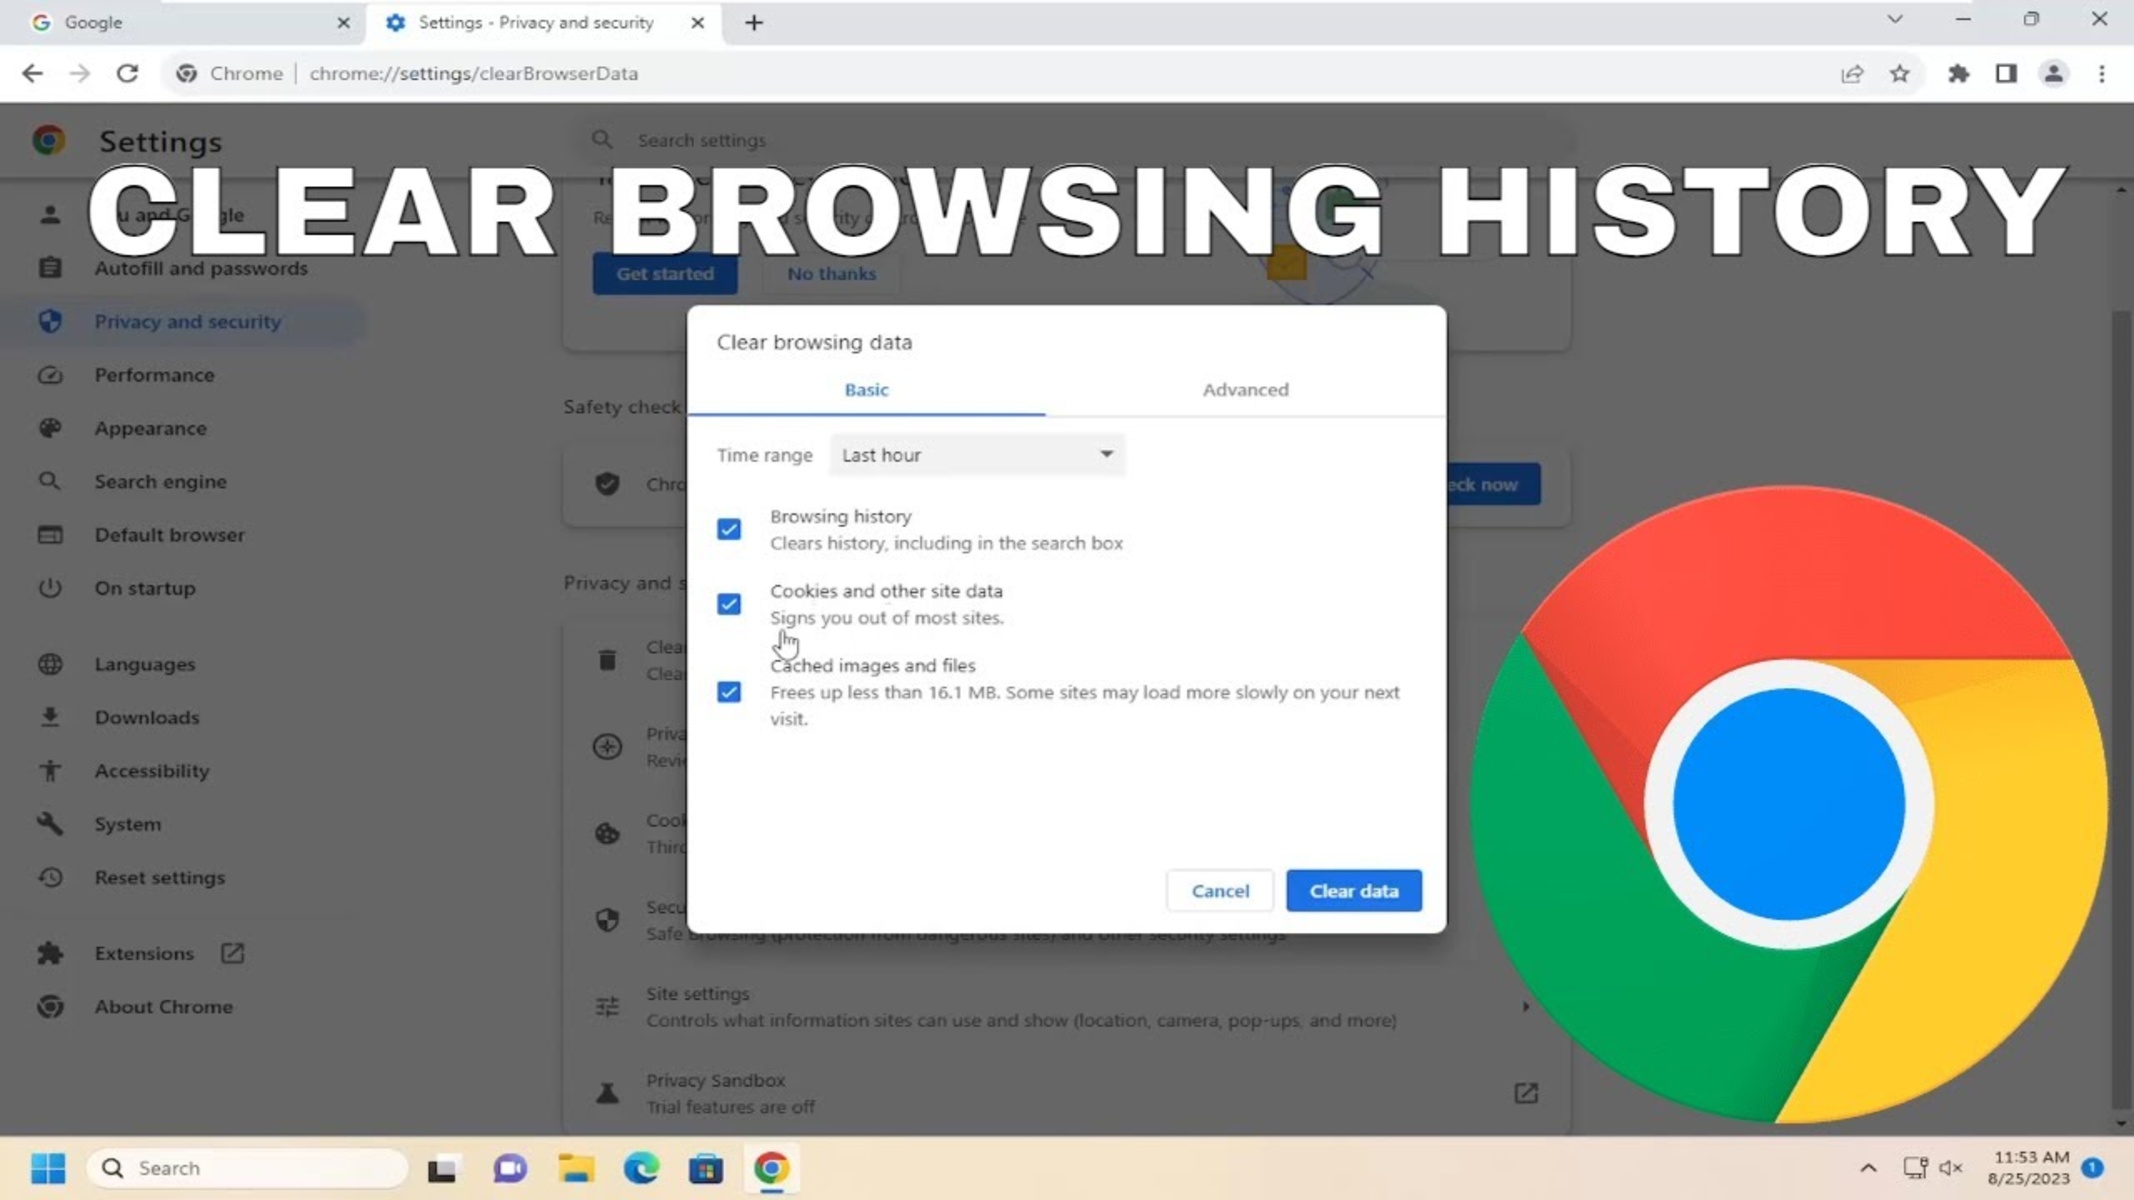
To initiate the clearing of your browsing data, look for the "Clear browsing data" option in the left-hand sidebar of the History tab. You can also access this feature by using the keyboard shortcut "Command + Shift + Delete." Clicking on this option will open a new window that provides you with various options for clearing your browsing data.
In the "Clear browsing data" window, you'll first be prompted to choose the time range for which you want to clear your browsing data. You can select from preset time ranges, such as the past hour, day, week, or month, or choose a custom time range to specify a particular period for which you want to clear your browsing data. This flexibility allows you to tailor the clearing process to your specific privacy and security needs.
After selecting the time range, you'll then have the option to choose the specific types of data you want to clear. These options include browsing history, download history, cookies and other site data, cached images and files, and more. By default, all these options are selected, but you have the flexibility to uncheck any specific data types that you prefer to retain.
Once you've chosen the time range and selected the types of data to clear, you can proceed by clicking the "Clear data" button. This action will initiate the clearing process, removing the selected browsing data from your Chrome browser. Depending on the amount of data being cleared, this process may take a few moments to complete.
By following these steps to clear your browsing data in Chrome for Mac, you can effectively manage your online privacy and maintain a clutter-free browsing experience. With your browsing data now cleared, you can enjoy a renewed sense of privacy and security as you continue to explore the web using the Chrome browser.
Step 3: Choose the Time Range
When it comes to clearing your browsing data on Chrome for Mac, selecting the appropriate time range is a crucial step in managing your browsing history effectively. Chrome offers a range of options that allow you to specify the period for which you want to clear your browsing data, providing you with the flexibility to tailor this process to your specific needs.
Upon accessing the "Clear browsing data" window, you'll be presented with several predefined time range options, including "the past hour," "the past 24 hours," "the past 7 days," and "the past 4 weeks." These preset time ranges are designed to offer quick and convenient options for clearing recent browsing data, allowing you to maintain privacy without impacting your entire browsing history.
In addition to the preset time ranges, Chrome also provides the option to select a custom time range, enabling you to specify a specific period for which you want to clear your browsing data. This level of customization empowers you to target a particular timeframe, whether it's a few days, weeks, or months, based on your privacy preferences and browsing habits.
The ability to choose the time range for clearing your browsing data is particularly beneficial in scenarios where you may want to remove specific browsing activities while retaining others. For example, if you wish to clear only the data from a recent browsing session or a specific timeframe, you can easily do so by selecting the corresponding time range option.
By offering a range of time-based clearing options, Chrome for Mac ensures that you have the control to manage your browsing history in a way that aligns with your privacy and security preferences. Whether you prefer to clear recent activities or remove data from a broader timeframe, the flexibility provided by the time range selection empowers you to maintain a clean and organized browsing history without compromising your overall browsing experience.
In summary, the ability to choose the time range for clearing your browsing data on Chrome for Mac reflects the browser's commitment to user privacy and data management. By offering both preset and custom time range options, Chrome ensures that you can maintain control over your browsing history, allowing you to enjoy a personalized and secure browsing experience.
Step 4: Select the Data to Clear
After choosing the time range for clearing your browsing data in Chrome for Mac, the next crucial step is to select the specific types of data that you want to clear. This step allows you to customize the clearing process based on your privacy preferences and browsing habits, ensuring that you have full control over the types of information removed from your browsing history.
When you access the "Clear browsing data" window, you'll notice a list of data types that you can choose to clear. These options include:
-
Browsing History: This option pertains to the list of websites you've visited during your browsing sessions. Clearing your browsing history removes the record of specific web pages you've accessed, providing you with a clean slate for future browsing activities.
-
Download History: If you've downloaded files from the internet, this option allows you to clear the record of those downloads from your browsing history. By selecting this option, you can remove any traces of downloaded files, ensuring that your download history remains private.
-
Cookies and Other Site Data: Cookies are small pieces of data stored by websites on your computer. They serve various purposes, including remembering login credentials and site preferences. However, if you prefer to clear this data for privacy reasons, selecting this option will remove cookies and other site data from your browsing history.
-
Cached Images and Files: When you visit websites, your browser stores copies of images and files to improve page loading speeds upon revisiting those sites. Clearing cached images and files removes these stored data, providing you with a fresh browsing experience.
-
Passwords: Chrome also provides the option to clear saved passwords. If you wish to remove the saved login credentials for various websites, you can select this option to ensure that your passwords are not stored within the browser.
-
Autofill Form Data: This option allows you to clear any saved form data, such as addresses and payment information, that Chrome uses to autofill fields on websites. Clearing this data can be beneficial for privacy and security purposes.
By selecting the specific types of data to clear, you can tailor the clearing process to align with your privacy preferences and browsing habits. This level of customization ensures that you have the flexibility to manage your browsing history effectively, removing only the data that you deem necessary while retaining information that is relevant to your browsing experience.
Once you've made your selections, you can proceed to the final step of the clearing process, initiating the removal of the chosen data from your Chrome browser. With the ability to select the data to clear, Chrome for Mac empowers you to maintain a personalized and secure browsing environment, ensuring that your privacy remains a top priority as you explore the web.
Step 5: Clear Browsing Data
After selecting the time range and specific types of data to clear, the final step in the process of managing your browsing history on Chrome for Mac is to clear the selected browsing data. This step initiates the removal of the chosen data types, providing you with a clean slate for your future browsing sessions.
Upon finalizing your selections in the "Clear browsing data" window, you can proceed by clicking the "Clear data" button. This action triggers the clearing process, prompting Chrome to remove the selected browsing history, cookies, cached images and files, download history, and other chosen data types from your browser.
As the clearing process commences, Chrome for Mac diligently works to erase the selected data from your browsing history. Depending on the volume of data being cleared, this process may take a few moments to complete. During this time, Chrome ensures that the removal of your browsing data is thorough and comprehensive, leaving no traces of the selected data types within the browser.
Once the clearing process is complete, you'll receive a confirmation message indicating that your browsing data has been successfully cleared. This confirmation serves as assurance that the selected data types, including your browsing history, cookies, cached images and files, and other chosen items, have been effectively removed from your Chrome browser.
With your browsing data now cleared, you can enjoy a renewed sense of privacy and security as you continue to explore the web using Chrome for Mac. The removal of your browsing history and other selected data types ensures that your online activities remain private, allowing you to browse the internet with confidence and peace of mind.
By following the step-by-step process to clear your browsing data on Chrome for Mac, you've taken proactive measures to manage your online privacy and maintain a clutter-free browsing experience. With your browsing history now organized and your privacy secured, you can navigate the web with the assurance that your digital footprint remains under your control.
In summary, the ability to clear browsing data on Chrome for Mac empowers you to maintain a personalized and secure browsing environment, ensuring that your privacy remains a top priority as you explore the web.