Introduction
When browsing the web, our browsers diligently keep track of the websites we visit, forming a digital trail of our online activities. While this can be convenient for revisiting favorite sites or recalling previously viewed content, it also means that our browsing history is stored and can potentially compromise our privacy. Whether you're looking to clear your browsing history for privacy reasons or simply to declutter your browser, knowing how to delete Chrome search history is a valuable skill.
Google Chrome, one of the most popular web browsers, offers a straightforward process for managing your browsing history. By following a few simple steps, you can effectively clear your search history, cookies, cached images, and files, ensuring a clean slate for your browsing activities. This not only safeguards your privacy but also helps optimize your browser's performance by removing unnecessary data.
In this guide, we will walk you through the step-by-step process of deleting your Chrome search history. Whether you're using Chrome on a desktop or mobile device, the methods for clearing your browsing data remain consistent. By the end of this tutorial, you will have a clear understanding of how to maintain your privacy and keep your browsing experience streamlined. So, let's dive in and learn how to take control of your Chrome search history.
Step 1: Open Chrome Browser
To begin the process of deleting your Chrome search history, the first step is to open the Chrome browser on your device. Whether you are using a desktop computer, laptop, or mobile device, launching the Chrome browser is the initial action required to access the necessary settings for managing your browsing data.
If you are using a desktop or laptop, simply locate the Chrome icon on your desktop or in your list of installed applications. Click on the icon to open the browser. Alternatively, you can use the search function on your computer to quickly find and launch Chrome.
For mobile users, navigate to your device's home screen or app drawer and tap on the Chrome icon to open the browser. If Chrome is not readily accessible, you can use the search feature on your device to locate and launch the browser.
Once the Chrome browser is open, you are ready to proceed to the next step in the process of clearing your search history. With the browser interface in front of you, you are one step closer to effectively managing your browsing data and maintaining your privacy.
By opening the Chrome browser, you have taken the crucial first step towards gaining control over your browsing history. With the browser now accessible, you are prepared to move on to the next steps in the process of clearing your search history and ensuring a clean and private browsing experience.
Step 2: Access the History Page
After opening the Chrome browser, the next step in clearing your search history is to access the History page. This page serves as a central hub for managing your browsing history, allowing you to view, search, and delete specific entries based on your preferences.
To access the History page, you can utilize the following methods:
Method 1: Using the Menu
-
Click on the three-dot menu icon located in the top-right corner of the Chrome browser window. This icon represents the Chrome menu and contains a range of options for customizing and managing your browsing experience.
-
From the dropdown menu that appears, hover your cursor over the "History" option. This action will reveal a secondary menu with additional history-related choices.
-
Select "History" from the secondary menu. This selection will redirect you to the History page, where you can view and manage your browsing history.
Method 2: Using the Keyboard Shortcut
-
Alternatively, you can access the History page using a keyboard shortcut. Simply press "Ctrl + H" on your keyboard if you are using a Windows or Linux operating system. For Mac users, the shortcut is "Command + Y."
-
Upon executing the keyboard shortcut, the History page will open in a new tab within the Chrome browser, providing you with immediate access to your browsing history.
Once you have successfully accessed the History page, you will be presented with a chronological list of websites you have visited, organized by date and time. This interface allows you to review your browsing activity and proceed with the next steps in clearing your search history.
By accessing the History page, you have unlocked the gateway to managing your browsing history effectively. This pivotal step sets the stage for the subsequent actions required to clear your search history and maintain your privacy within the Chrome browser.
Step 3: Clear Browsing Data
Once you have accessed the History page in the Chrome browser, the next crucial step in managing your browsing history is to clear your browsing data. This process allows you to remove specific types of data, including your browsing history, cookies, cached images, and files, ensuring a clean slate for your browsing activities.
To clear your browsing data in Chrome, follow these steps:
-
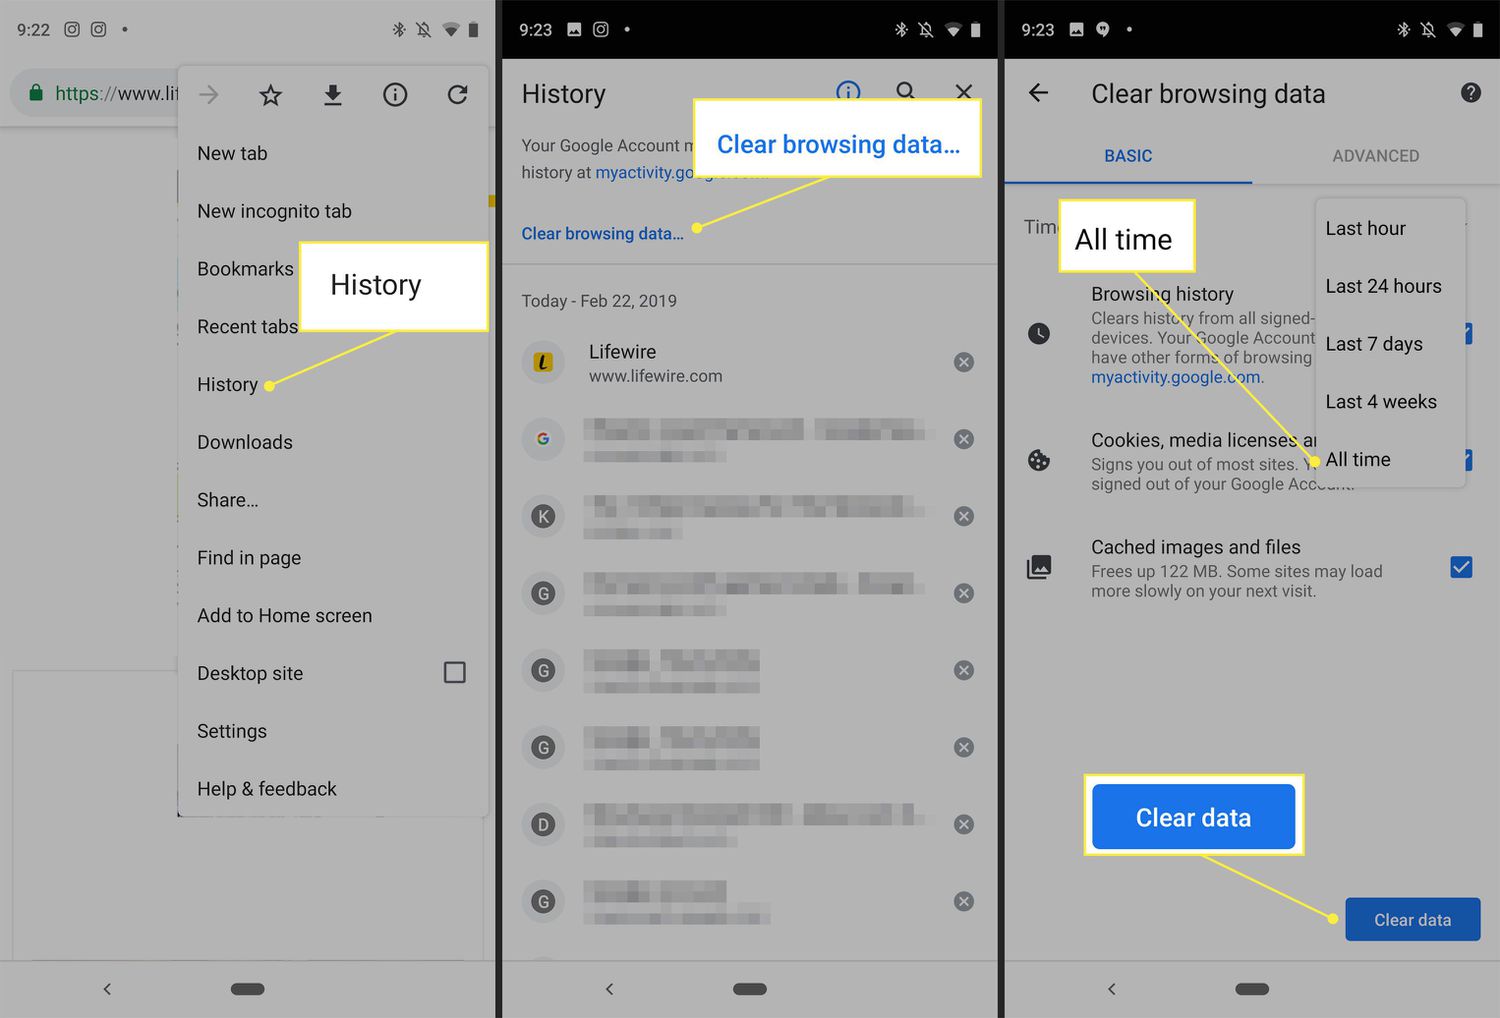
Click on the "Clear browsing data" option: Located on the left-hand side of the History page, you will find the "Clear browsing data" option. Click on this to initiate the process of clearing your browsing data.
-
Choose the time range: Upon clicking the "Clear browsing data" option, a dialog box will appear, presenting you with various options to customize the time range for which you want to clear your browsing data. You can select from preset time ranges such as "Last hour," "Last 24 hours," "Last 7 days," or "Last 4 weeks." Additionally, you have the flexibility to choose "All time" to clear your entire browsing history.
-
Select the data to clear: Under the "Advanced" tab within the dialog box, you can specify the types of data you want to clear. This includes options such as browsing history, download history, cookies and other site data, cached images and files, and more. By checking or unchecking these options, you can tailor the clearing process to suit your preferences.
-
Initiate the clearing process: Once you have configured your preferences for the time range and types of data to clear, click on the "Clear data" button. This action will prompt Chrome to begin clearing the selected browsing data based on your specified criteria.
By following these steps, you can effectively clear your browsing data in Chrome, ensuring that your browsing history, cookies, and cached files are removed according to your preferences. This process not only helps protect your privacy but also contributes to optimizing your browser's performance by eliminating unnecessary data.
Clearing your browsing data is a proactive measure to maintain a clean and private browsing experience. By regularly managing your browsing data, you can take control of your online privacy and ensure that your browsing activities remain secure and streamlined.
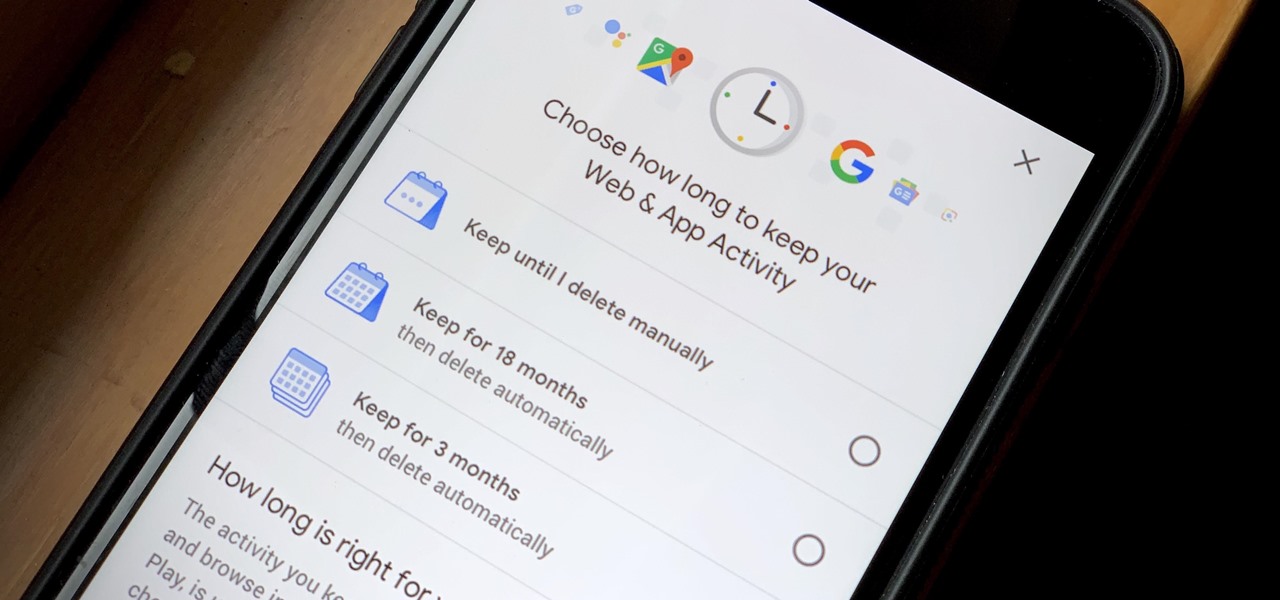
Step 4: Choose Time Range
When clearing your browsing data in Google Chrome, selecting the appropriate time range is a crucial step in tailoring the clearing process to your specific needs. Chrome offers a range of preset time intervals, allowing you to choose the duration for which you want to clear your browsing data. This level of customization empowers you to manage your browsing history effectively, whether you prefer to clear recent activity or eliminate data accumulated over an extended period.
Preset Time Ranges
Upon initiating the process of clearing your browsing data, Chrome presents several preset time range options for your convenience. These options include:
-
Last hour: This time range clears your browsing data for the past hour, making it ideal for swiftly removing recent activity without affecting older history.
-
Last 24 hours: Choosing this option clears your browsing data for the past 24 hours, providing a slightly broader scope than the last hour while still focusing on recent activity.
-
Last 7 days: Selecting this time range clears your browsing data for the past week, offering a comprehensive sweep of your recent browsing history.
-
Last 4 weeks: This option extends the time range to the past four weeks, allowing you to clear a month's worth of browsing data while retaining older history.
-
All time: Opting for this time range clears your entire browsing history, cookies, cached images, and files, providing a thorough reset of your browsing data.
Custom Time Range
In addition to the preset options, Chrome offers the flexibility to specify a custom time range for clearing your browsing data. This feature enables you to define a specific start and end date, giving you precise control over the duration for which you want to remove your browsing history and related data. Whether you need to clear activity from a particular week, month, or any other defined period, the custom time range option allows you to tailor the clearing process to your exact requirements.
Tailoring Your Preferences
The ability to choose a time range when clearing your browsing data in Chrome empowers you to manage your privacy and browsing history with precision. By selecting the most suitable time interval, you can ensure that your browsing data is cleared in a manner that aligns with your preferences and privacy needs. Whether you opt for a preset time range or define a custom period, Chrome's flexibility in time range selection enables you to maintain control over your browsing history and enjoy a personalized browsing experience.
By carefully considering and selecting the appropriate time range, you can effectively manage your browsing history and maintain your privacy within the Chrome browser. This level of control over your browsing data empowers you to curate your online experience according to your preferences, ensuring that your privacy remains safeguarded while using the Chrome browser.
Step 5: Select Data to Clear
Once you have chosen the appropriate time range for clearing your browsing data, the next crucial step is to select the specific types of data you want to clear. Google Chrome provides a range of options that allow you to tailor the clearing process to your preferences, ensuring that you can remove the desired data while retaining any information that is important to you.
When selecting the data to clear, Chrome offers the following customizable options:
Browsing History
This option allows you to clear the list of websites you have visited during the specified time range. By selecting this option, you can effectively remove any traces of your browsing activity, enhancing your privacy and ensuring that your browsing history remains confidential.
Download History
Choosing to clear your download history removes the record of files and content that you have downloaded while using the Chrome browser. This option is particularly useful for maintaining a clean record of your downloaded files and managing your browsing data comprehensively.
Cookies and Other Site Data
Cookies are small pieces of data that websites store on your device to remember your preferences and enhance your browsing experience. By clearing cookies and other site data, you can reset your browsing sessions, remove stored login information, and maintain control over the data that websites can access.
Cached Images and Files
Cached images and files are temporary data stored by websites to improve loading times and performance. Clearing this data ensures that your browser retrieves the latest versions of web content, contributing to a more streamlined and up-to-date browsing experience.
Site Settings
This option allows you to reset custom settings and permissions for specific websites. By clearing site settings, you can revoke any permissions granted to websites, such as access to your camera, microphone, or location, and start afresh with default settings.
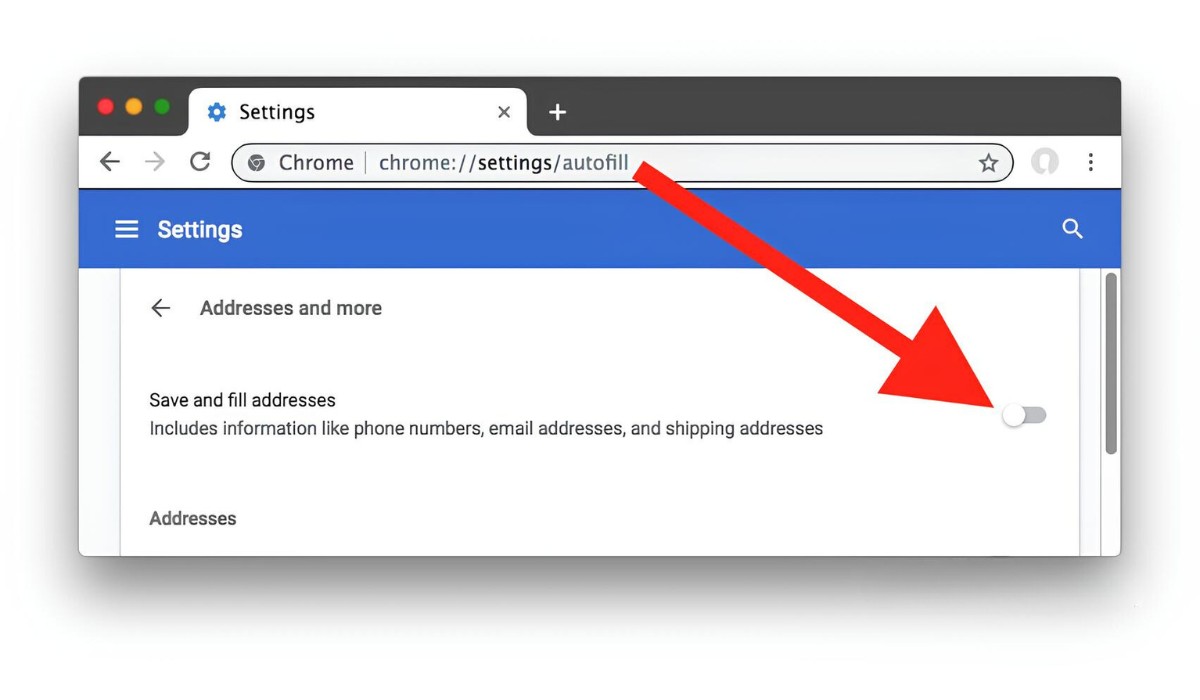
Autofill Form Data
If you have enabled autofill in Chrome to automatically populate forms and fields with saved information, clearing autofill form data removes this stored data. This action can be beneficial for managing your personal information and ensuring that sensitive data is not inadvertently populated in forms.
By carefully selecting the types of data to clear, you can customize the clearing process to align with your privacy preferences and browsing habits. This level of control empowers you to manage your browsing data effectively, ensuring that your privacy remains safeguarded while using the Chrome browser.
In summary, the ability to select specific types of data to clear provides you with the flexibility to tailor the clearing process to your individual needs. By customizing the data clearing options, you can maintain control over your browsing history, privacy, and personalized settings within the Chrome browser, contributing to a secure and personalized browsing experience.
Step 6: Clear Browsing Data
After customizing your time range and selecting the specific types of data to clear, the final step in the process of managing your browsing history in Google Chrome is to initiate the clearing process. This action effectively removes the selected browsing data based on your preferences, ensuring that your privacy is maintained and your browsing experience remains optimized.
Upon confirming your time range and data clearing preferences, you can proceed to clear your browsing data by following these simple steps:
-
Initiate the Clearing Process: Once you have configured your time range and selected the types of data to clear, locate and click on the "Clear data" button. This action serves as the trigger for Chrome to begin clearing the specified browsing data based on your customized criteria.
-
Confirmation Dialog: After clicking the "Clear data" button, Chrome may display a confirmation dialog to ensure that you intend to proceed with the data clearing process. This dialog serves as a final checkpoint to prevent accidental data removal and allows you to confirm your decision before the clearing process commences.
-
Clearing Progress: Upon confirming the data clearing action, Chrome will initiate the process of removing the selected browsing data. Depending on the volume of data being cleared and the types of data selected, the clearing process may take a few moments to complete. During this time, Chrome will display a progress indicator to keep you informed about the status of the clearing operation.
-
Completion Notification: Once the clearing process is successfully completed, Chrome will provide a notification or confirmation message to indicate that your browsing data has been cleared according to your specified preferences. This notification serves as assurance that the selected data, including browsing history, cookies, cached images, and files, has been effectively removed from your browsing environment.
By following these steps, you can seamlessly clear your browsing data in Google Chrome, ensuring that your privacy is maintained and your browsing experience remains streamlined. Regularly managing your browsing data in this manner allows you to take control of your online privacy and maintain a clean slate for your browsing activities.
With the completion of the clearing process, you have successfully managed your browsing history and maintained your privacy within the Chrome browser. By consistently applying these steps to clear your browsing data, you can enjoy a secure and personalized browsing experience while ensuring that your online activities remain private and optimized.