Introduction
Adding trusted sites to your Chrome browser can enhance your browsing experience by allowing specific websites to function seamlessly, without encountering unnecessary security restrictions. Whether you frequently visit a particular online platform for work, education, or leisure, designating it as a trusted site can streamline your interactions and minimize potential disruptions.
By following a few simple steps, you can customize your Chrome settings to recognize and prioritize trusted sites, thereby optimizing your online activities. This process involves accessing the browser's settings, navigating to the appropriate section, and adding the desired websites to the list of trusted sites. Once completed, your selected sites will enjoy a higher level of access and permissions within the Chrome browser, contributing to a smoother and more efficient browsing experience.
In the following sections, we will delve into the step-by-step process of adding trusted sites to Chrome, empowering you to tailor your browsing environment to suit your specific needs. Whether you are a professional seeking to streamline access to work-related platforms or an avid internet user aiming to enhance the functionality of your favorite websites, the ability to add trusted sites to Chrome can significantly improve your online interactions. Let's embark on this journey to optimize your browsing experience by customizing Chrome's trusted sites settings.
Step 1: Open Chrome Settings
To begin the process of adding trusted sites to Chrome, the first step is to access the browser's settings. This fundamental action serves as the gateway to customizing various aspects of Chrome, including security preferences and site permissions. Here's how to open Chrome settings:
-
Launch Chrome: Start by opening the Chrome browser on your desktop, laptop, or mobile device. The Chrome icon is typically located on the desktop or in the applications folder of your operating system.
-
Access the Menu: Once Chrome is open, look for the three vertical dots, also known as the "More" or "Customize and control Google Chrome" icon, located in the top-right corner of the browser window. Clicking on this icon will reveal a dropdown menu containing various options and features.
-
Select "Settings": Within the dropdown menu, locate and click on the "Settings" option. This action will redirect you to the Chrome settings interface, where you can explore and modify a wide range of browser preferences.
By following these simple steps, you can effortlessly access the settings menu in Chrome, setting the stage for the subsequent actions required to add trusted sites to the browser. Opening Chrome settings is the initial and pivotal step in the process, laying the foundation for a more personalized and tailored browsing experience.
This straightforward procedure allows users to gain control over their browsing environment, enabling them to fine-tune Chrome's behavior and permissions to align with their specific preferences and requirements. With the settings menu readily accessible, users can seamlessly proceed to the next steps in the process of adding trusted sites to Chrome, ultimately enhancing their online interactions and productivity.
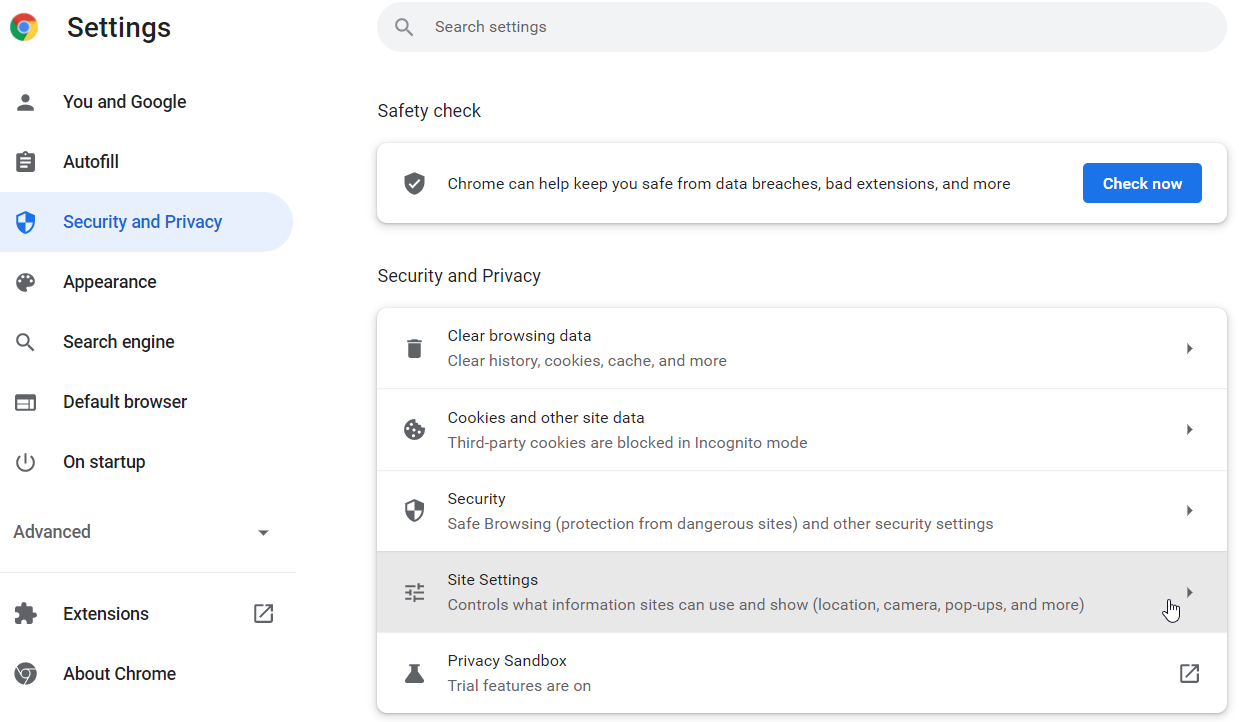
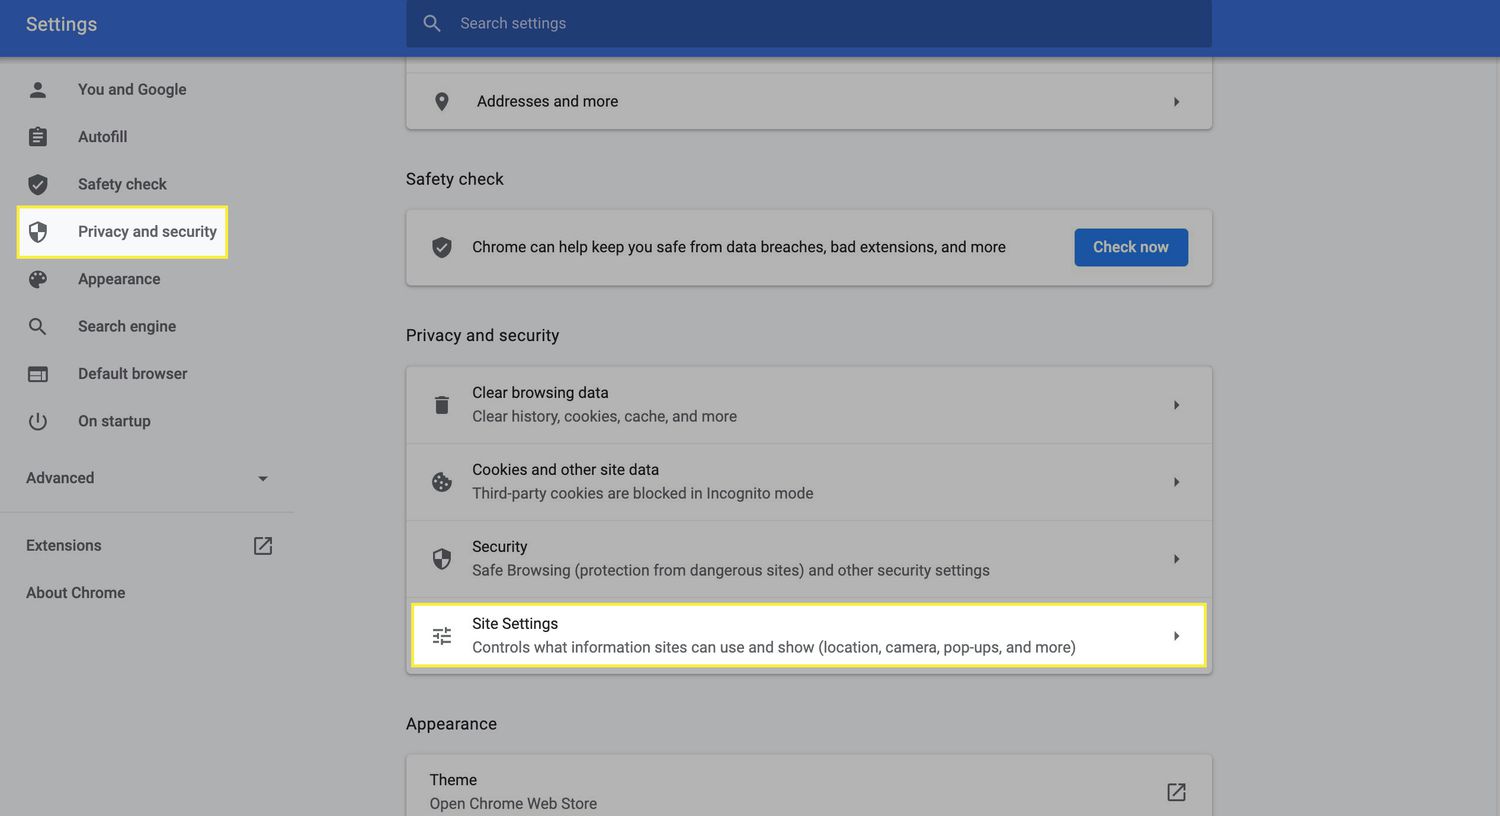
Step 2: Click on "Privacy and Security"
Upon accessing the Chrome settings interface, the next crucial step in the process of adding trusted sites involves navigating to the "Privacy and Security" section. This pivotal area within the browser's settings encompasses a range of essential features and preferences, including site permissions, security protocols, and content settings. By clicking on "Privacy and Security," users can delve into the granular aspects of Chrome's behavior, empowering them to customize their browsing experience to align with their unique requirements.
To initiate this step, follow the following instructions:
-
Locate "Privacy and Security": Within the Chrome settings interface, scroll down the left-hand navigation panel until you encounter the "Privacy and Security" option. This section is typically positioned below the "Appearance" and "Search engine" categories, reflecting its significance in shaping the browser's security and privacy parameters.
-
Click on "Privacy and Security": Once "Privacy and Security" is visible, proceed to click on this option to reveal its associated settings and subcategories. This action will transition the main settings window to display the various features and controls encompassed within the "Privacy and Security" section.
By clicking on "Privacy and Security," users gain access to a wealth of options and configurations that directly influence how Chrome interacts with websites, handles sensitive information, and manages security-related aspects. This pivotal step sets the stage for the subsequent actions required to add trusted sites to Chrome, as it positions users within the core area of the browser's settings where critical security and privacy decisions are made.
Navigating to the "Privacy and Security" section is instrumental in the process of adding trusted sites to Chrome, as it enables users to delve into the foundational elements that underpin the browser's security and permissions framework. By seamlessly transitioning to this section, users can progress towards the next steps with confidence, knowing that they are positioned within the heart of Chrome's security and privacy controls.
In summary, clicking on "Privacy and Security" within the Chrome settings interface serves as a pivotal maneuver that propels users deeper into the browser's security and privacy settings, laying the groundwork for the subsequent steps required to add trusted sites and customize the browsing experience to suit individual preferences and requirements.
Step 3: Select "Site Settings"
Upon navigating to the "Privacy and Security" section within the Chrome settings interface, the next pivotal step in the process of adding trusted sites involves selecting "Site Settings." This essential feature within Chrome's settings empowers users to exert granular control over site-specific permissions, content settings, and security configurations, thereby shaping their browsing environment to align with their unique preferences and requirements.
To initiate this step, follow the following instructions:
-
Locate "Site Settings": Within the "Privacy and Security" section, scroll down the list of options until you identify "Site Settings." This critical feature is positioned among the core elements that govern how Chrome interacts with websites, handles cookies, manages permissions, and enforces security protocols.
-
Click on "Site Settings": Once "Site Settings" is visible, proceed to click on this option to access its comprehensive array of controls and configurations. This action seamlessly transitions users to a dedicated interface where they can fine-tune site-specific preferences and security parameters.
By selecting "Site Settings," users gain access to a wealth of options that directly influence their interactions with individual websites, allowing them to customize permissions, manage cookies, control access to sensitive features such as camera and microphone, and configure security-related aspects on a per-site basis. This level of granularity empowers users to tailor their browsing experience to suit their specific needs, ensuring that trusted sites receive the necessary permissions and access while maintaining stringent controls for other platforms.
Navigating to the "Site Settings" section within Chrome's settings interface is instrumental in the process of adding trusted sites, as it positions users within the core area where site-specific permissions and security configurations are managed. This step serves as a bridge to the subsequent actions required to designate specific websites as trusted, enabling users to exert precise control over how Chrome interacts with individual online platforms.
In summary, selecting "Site Settings" within the Chrome settings interface marks a pivotal juncture that grants users access to a comprehensive suite of controls for managing site-specific permissions, content settings, and security configurations. This foundational step empowers users to customize their browsing environment with precision, setting the stage for the subsequent actions required to add trusted sites and optimize the overall browsing experience.
Step 4: Add Trusted Sites
Adding trusted sites to Chrome involves designating specific websites as trusted entities, allowing them to operate with elevated permissions and reduced security restrictions within the browser. This crucial step empowers users to customize their browsing experience, ensuring seamless interactions with their preferred online platforms while maintaining robust security measures for other websites.
To add trusted sites to Chrome, follow the subsequent instructions:
-
Access Site Permissions: Within the "Site Settings" section, locate and click on "Permissions" to reveal a range of site-specific controls. This interface enables users to manage permissions related to camera access, microphone access, notifications, and more.
-
Select "Add": Within the permissions interface, identify and click on the "Add" button to initiate the process of designating a website as a trusted entity. This action prompts a dialogue box where users can input the URL of the desired website.
-
Enter Website URL: In the dialogue box, input the complete URL of the website that you intend to designate as a trusted site. Ensure the accuracy of the URL to avoid any discrepancies in the trusted site designation process.
-
Confirm the Addition: After entering the website URL, click on the "Add" button to confirm the addition of the specified website to the list of trusted sites. This action signifies the completion of the process, granting the designated website elevated permissions and reduced security restrictions within Chrome.
By adding trusted sites to Chrome, users can streamline their interactions with specific online platforms, fostering a more efficient and tailored browsing experience. This feature is particularly beneficial for individuals who frequently engage with certain websites for work, education, or entertainment, as it minimizes unnecessary security prompts and restrictions, allowing for seamless functionality and enhanced productivity.
In summary, the process of adding trusted sites to Chrome empowers users to exert precise control over their browsing environment, ensuring that their preferred websites operate with elevated permissions and reduced security restrictions. By following the outlined steps, users can seamlessly designate trusted sites within Chrome, optimizing their online interactions and customizing the browser to suit their individual needs and preferences.
Step 5: Confirm the Changes
After adding trusted sites to Chrome, it is essential to confirm the changes to ensure that the designated websites are seamlessly integrated into the browser's trusted entities. This pivotal step serves as the final validation of the user's actions, solidifying the inclusion of specific websites as trusted entities within Chrome's security and permissions framework.
To confirm the changes made to the trusted sites list, follow these essential steps:
-
Review the Trusted Sites List: Upon adding websites to the trusted sites list, navigate back to the "Site Settings" section within Chrome's settings interface. Locate the "Permissions" or "Site permissions" option to access the comprehensive list of site-specific controls and configurations.
-
Verify the Added Sites: Within the permissions interface, review the list of websites that have been designated as trusted entities. Ensure that the URLs of the added sites are accurately displayed, confirming that the intended websites have been successfully included in the trusted sites list.
-
Test Site Functionality: Visit the designated trusted websites to assess their functionality within the Chrome browser. Verify that the added sites operate seamlessly, with reduced security prompts and enhanced permissions, reflecting their status as trusted entities within the browser's environment.
-
Ensure Seamless Interactions: Interact with the trusted sites to gauge their performance and functionality. Confirm that the designated websites exhibit smooth operation, minimal security interruptions, and optimized access to essential features, reflecting their elevated status as trusted entities within Chrome.
By confirming the changes made to the trusted sites list, users can validate the successful inclusion of specific websites as trusted entities within Chrome, ensuring a tailored and efficient browsing experience. This final step serves as a crucial checkpoint, allowing users to ascertain that their preferred websites operate with elevated permissions and reduced security restrictions, in alignment with their individual preferences and requirements.
In summary, confirming the changes to the trusted sites list within Chrome represents the culmination of the process of adding trusted sites, providing users with the assurance that their designated websites are seamlessly integrated into the browser's security and permissions framework. This step solidifies the tailored browsing experience, allowing users to interact with their preferred websites with enhanced functionality and minimized security interruptions, ultimately optimizing their online interactions within the Chrome browser.