Introduction
In the ever-evolving landscape of web browsing, the use of Adobe Flash has undergone significant changes. Once a ubiquitous technology for delivering multimedia content, Flash has gradually been phased out in favor of more modern and secure alternatives. However, there are still instances where users may need to enable Flash in their Chrome browser to access specific content or applications.
Enabling Flash in Chrome involves a few straightforward steps, and this guide will walk you through the process. Whether you're encountering a website that requires Flash for interactive elements or utilizing legacy applications that rely on this technology, understanding how to enable Flash in Chrome can be invaluable.
By following the steps outlined in this guide, you'll be able to navigate the Chrome browser's settings to enable Flash, manage its usage on specific websites, and ensure that you have the latest version of the Flash player installed. With these insights, you can harness the power of Flash when necessary while maintaining a secure and optimized browsing experience.
Now, let's delve into the step-by-step process of enabling Flash in Chrome, empowering you to access the content and applications you need without compromising on security or performance.
Step 1: Check if Flash is enabled in Chrome
Before delving into the process of enabling Flash in Chrome, it's essential to verify whether Flash is currently enabled in the browser settings. Chrome, in its default configuration, disables Flash by default due to its security implications and the prevalence of more modern web technologies. However, for certain websites or applications that still rely on Flash, it may be necessary to confirm its status.
To check if Flash is enabled in Chrome, follow these steps:
-
Access Chrome Settings: Open the Chrome browser on your computer and click on the three-dot menu icon located in the top-right corner of the window. From the dropdown menu, select "Settings" to access the browser's configuration options.
-
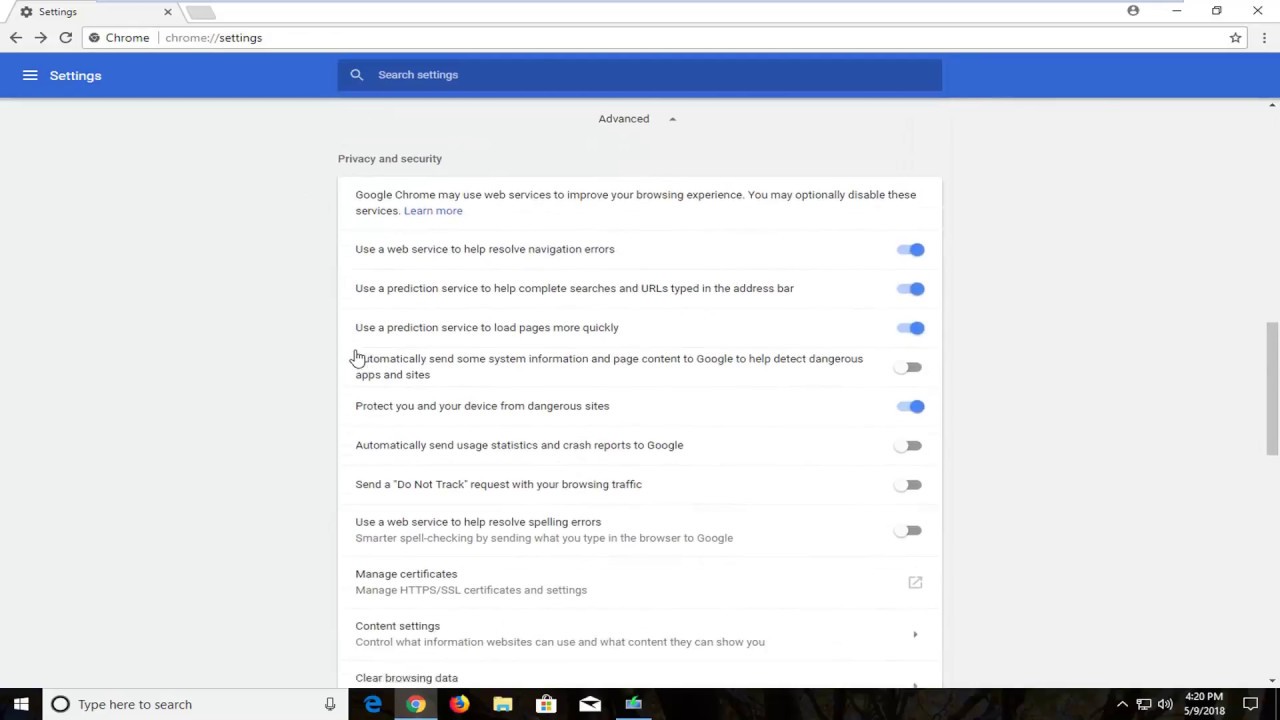
Navigate to Site Settings: Within the Settings menu, scroll down and click on "Privacy and security" in the left-hand navigation pane. Then, select "Site settings" to access a range of site-specific controls and permissions.
-
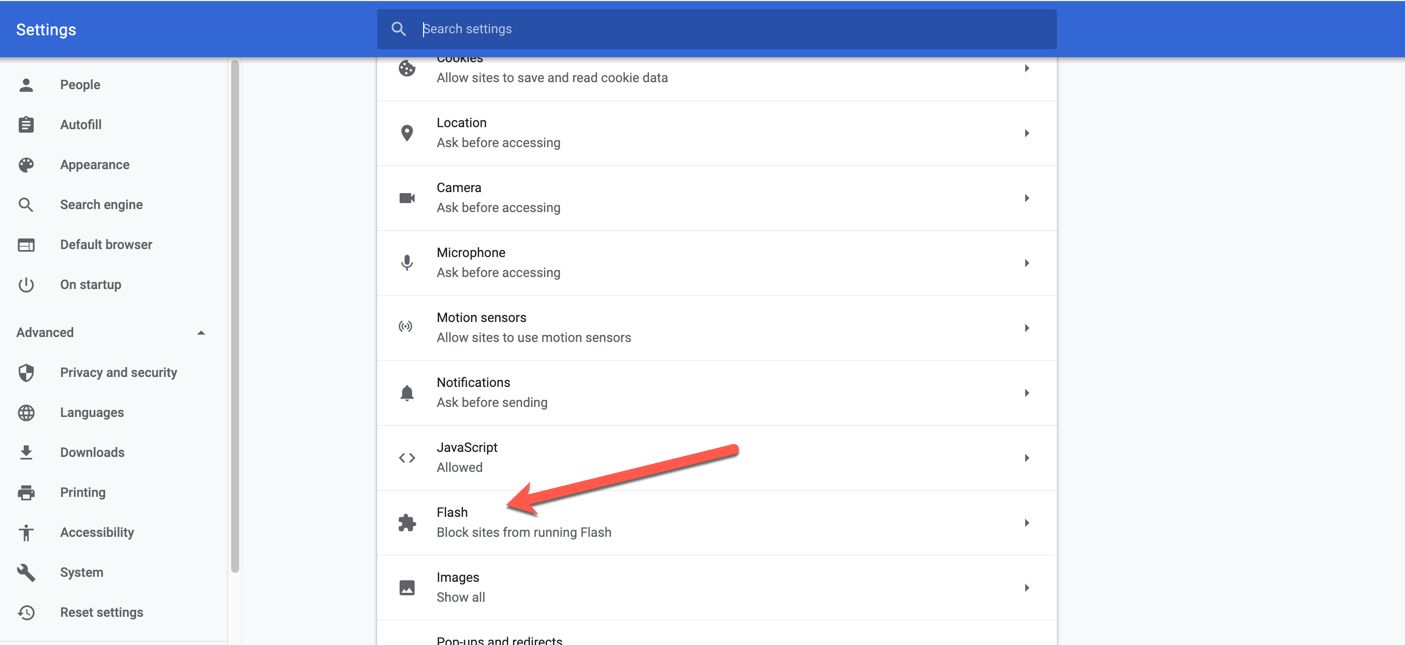
Locate Flash Settings: In the Site settings menu, scroll down to find the "Flash" option. Click on it to view the current status of Flash on your Chrome browser.
-
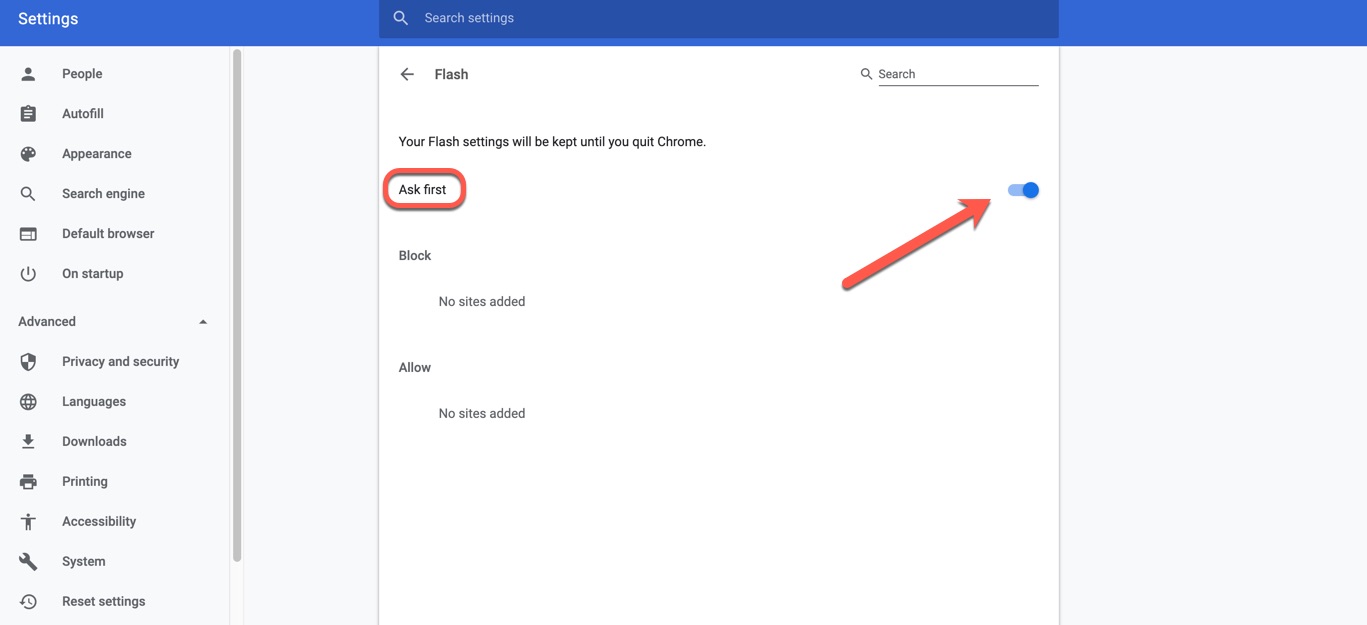
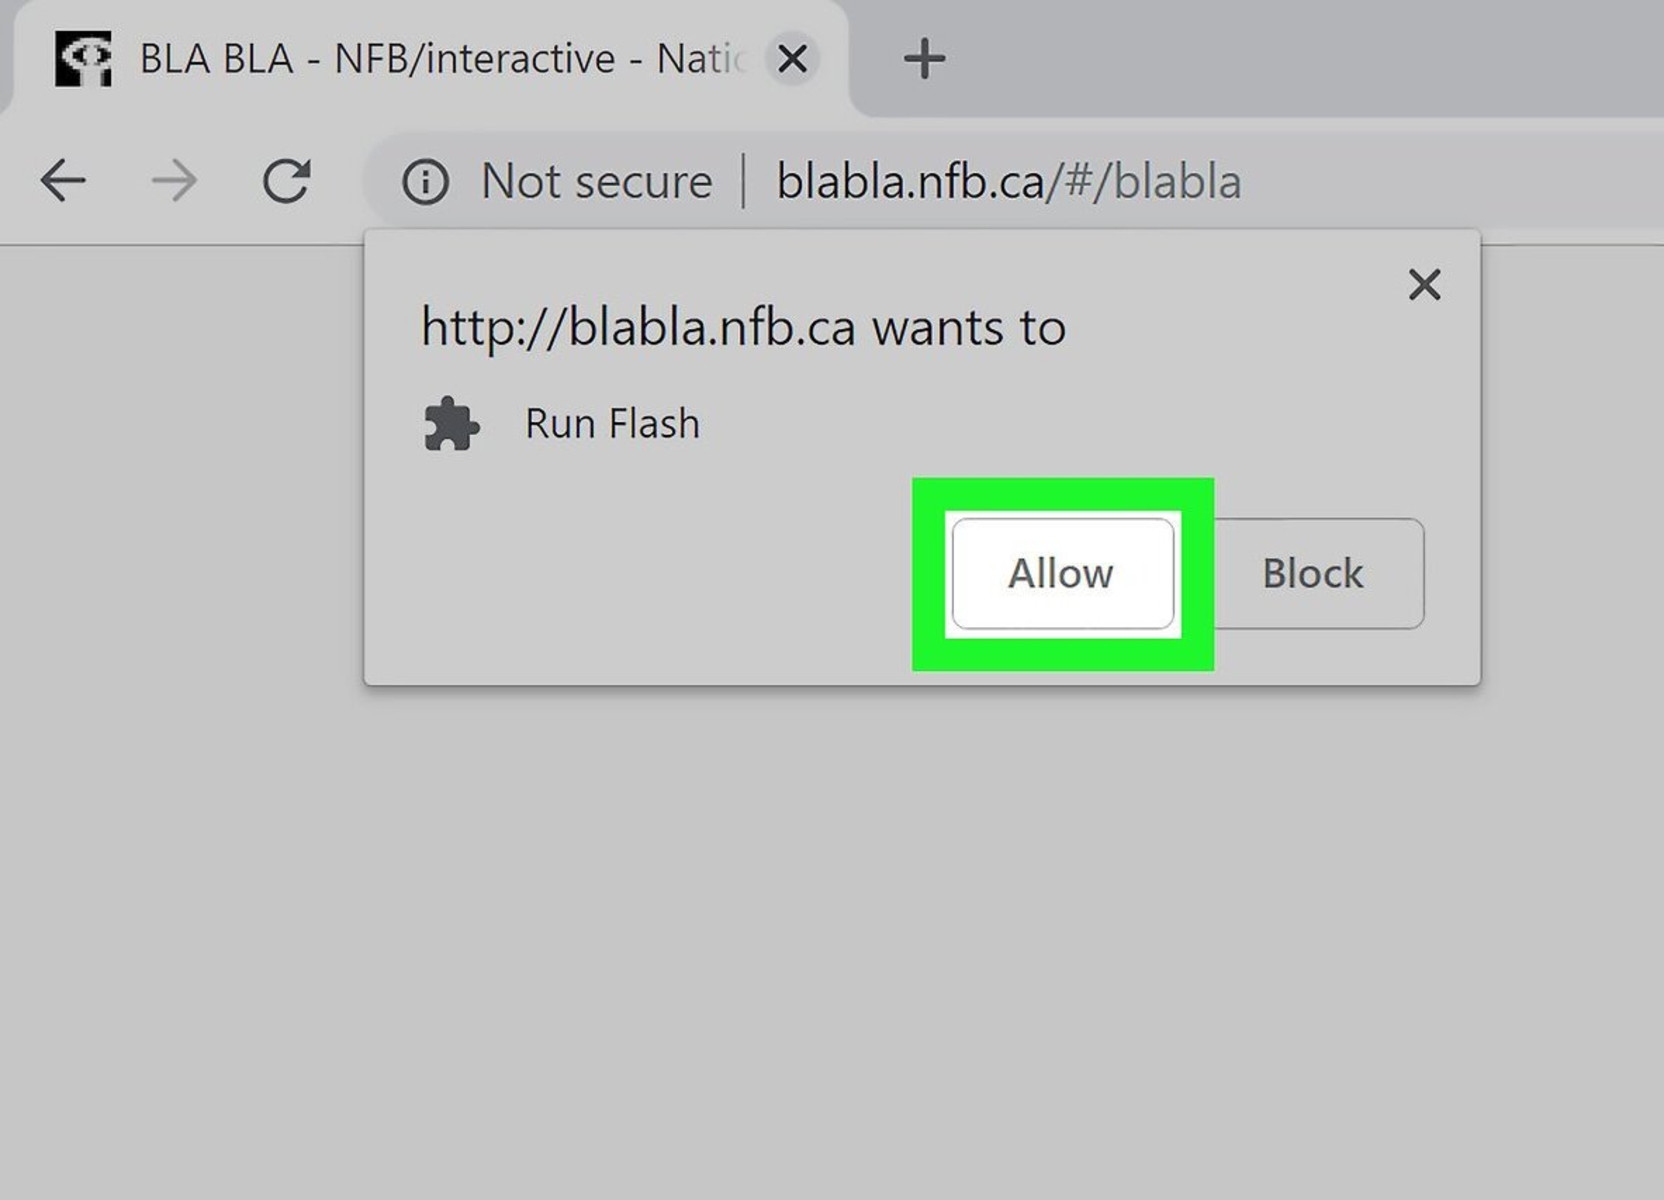
Verify Flash Status: Upon clicking the "Flash" option, you'll be able to see whether Flash is set to "Block sites from running Flash" or "Ask first." If Flash is set to "Ask first," it means that Chrome will prompt you to enable Flash when encountering content that requires it. If it's set to "Block sites from running Flash," Flash is currently disabled in Chrome.
By following these steps, you can quickly determine whether Flash is enabled in your Chrome browser. This initial check sets the stage for the subsequent steps, allowing you to proceed with enabling Flash or adjusting its settings as needed. Understanding the current status of Flash in Chrome is crucial for effectively managing its usage and ensuring compatibility with websites and applications that rely on this technology.
Step 2: Enable Flash in Chrome settings
Enabling Flash in Chrome settings involves navigating through the browser's configuration options to grant permission for Flash to run on specific websites. While Chrome has moved away from Flash as a default setting due to its security implications, there are instances where users may need to enable it for compatibility with certain content or applications.
To enable Flash in Chrome settings, follow these steps:
-
Access Chrome Settings: Open the Chrome browser on your computer and click on the three-dot menu icon located in the top-right corner of the window. From the dropdown menu, select "Settings" to access the browser's configuration options.
-
Navigate to Site Settings: Within the Settings menu, scroll down and click on "Privacy and security" in the left-hand navigation pane. Then, select "Site settings" to access a range of site-specific controls and permissions.
-
Locate Flash Settings: In the Site settings menu, scroll down to find the "Flash" option. Click on it to access the Flash settings for your Chrome browser.
-
Enable Flash: Upon clicking the "Flash" option, you'll see a toggle switch that allows you to enable Flash. Simply click on the toggle switch to turn it on, granting permission for Flash to run on websites that require it.
By following these steps, you can effectively enable Flash in Chrome settings, allowing you to harness the capabilities of this technology when necessary. It's important to exercise caution when enabling Flash, as it can pose security risks if not managed properly. Therefore, it's advisable to only enable Flash on trusted websites and applications where its usage is essential.
Enabling Flash in Chrome settings empowers you to access content and applications that rely on this technology while maintaining control over its usage. This level of flexibility ensures that you can leverage Flash when needed, without compromising the overall security and performance of your browsing experience.
Step 3: Allow Flash on specific websites
Enabling Flash on specific websites in Chrome allows you to customize the usage of this technology, granting permission for Flash to run only on designated sites while maintaining its default disabled state for others. This granular control ensures that you can access Flash-based content or applications on trusted websites while minimizing exposure to potential security risks associated with Flash.
To allow Flash on specific websites in Chrome, follow these steps:
-
Access Chrome Settings: Open the Chrome browser on your computer and click on the three-dot menu icon located in the top-right corner of the window. From the dropdown menu, select "Settings" to access the browser's configuration options.
-
Navigate to Site Settings: Within the Settings menu, scroll down and click on "Privacy and security" in the left-hand navigation pane. Then, select "Site settings" to access a range of site-specific controls and permissions.
-
Manage Flash Permissions: In the Site settings menu, locate and click on the "Flash" option to access the Flash settings for your Chrome browser.
-
Allow Flash on Specific Sites: Within the Flash settings, click on "Add" next to the "Allow" section. Enter the URL of the website for which you want to enable Flash and click "Add" to grant permission for Flash to run on that specific site.
By allowing Flash on specific websites, you can tailor its usage to meet your needs while maintaining a secure browsing environment. This approach ensures that Flash is only activated on trusted sites where its usage is essential, mitigating the potential risks associated with broader Flash enablement.
Customizing Flash permissions for specific websites empowers you to strike a balance between accessing Flash-based content or applications and safeguarding your browsing experience. This level of control aligns with Chrome's security-focused approach while accommodating the occasional necessity of utilizing Flash for specific online interactions.
By following these steps, you can effectively manage Flash permissions on a site-by-site basis, optimizing your browsing experience while minimizing exposure to potential security vulnerabilities associated with Flash.
Step 4: Update Flash player
Ensuring that you have the latest version of the Flash player installed is crucial for both security and performance reasons. Adobe, the developer of Flash, regularly releases updates to address vulnerabilities and improve compatibility with modern web standards. By keeping your Flash player up to date, you can mitigate the risk of potential security threats and ensure seamless functionality when interacting with Flash-based content or applications.
To update the Flash player on your Chrome browser, follow these steps:
-
Check Current Flash Player Version: Before proceeding with the update, it's essential to verify the current version of the Flash player installed on your system. To do this, visit the official Adobe Flash Player Help page (https://helpx.adobe.com/flash-player.html) using your Chrome browser. The page will automatically detect your operating system and provide information about the installed version of Flash player.
-
Download the Latest Version: If the Adobe Flash Player Help page indicates that you are not using the latest version, proceed to download the updated Flash player. Click on the provided download link to access the Adobe Flash Player download page. From there, follow the on-screen instructions to download the latest version of the Flash player for your operating system.
-
Install the Update: Once the updated Flash player installer is downloaded, locate the file on your computer and run the installation process. Follow the prompts to complete the installation, ensuring that you adhere to any recommended settings or preferences during the installation procedure.
-
Verify the Update: After installing the updated Flash player, revisit the Adobe Flash Player Help page to confirm that you are now using the latest version. The page should indicate that you have successfully updated your Flash player to the most recent release.
By following these steps, you can effectively update the Flash player on your Chrome browser, ensuring that you have the latest version installed. This proactive approach not only enhances the security of your browsing experience but also guarantees optimal compatibility with Flash-based content and applications.
Keeping the Flash player updated aligns with best practices for maintaining a secure and efficient browsing environment. By staying current with the latest Flash player releases, you can confidently engage with Flash content when necessary, knowing that you have taken proactive measures to safeguard your online interactions.
Conclusion
In conclusion, the process of enabling Flash in Chrome involves navigating through the browser's settings to grant permission for Flash to run on specific websites while ensuring that you have the latest version of the Flash player installed. While Flash has transitioned from being a default component of web browsing to a technology that requires deliberate activation, there are still instances where users may encounter content or applications that rely on Flash. By following the steps outlined in this guide, you can effectively manage Flash usage in Chrome, striking a balance between accessibility and security.
Enabling Flash in Chrome settings empowers users to customize the usage of this technology, granting permission for Flash to run on trusted websites while maintaining its default disabled state for others. This granular control ensures that you can access Flash-based content or applications on designated sites, minimizing exposure to potential security risks associated with Flash. By exercising caution and enabling Flash only when necessary, users can navigate the web with confidence, knowing that they have control over the utilization of this technology.
Furthermore, allowing Flash on specific websites in Chrome provides a tailored approach to managing Flash permissions, aligning with the browser's security-focused philosophy. By customizing Flash usage on a site-by-site basis, users can optimize their browsing experience while mitigating potential security vulnerabilities associated with broader Flash enablement. This level of control ensures that Flash is activated only where its usage is essential, enhancing both security and usability.
Additionally, updating the Flash player to the latest version is paramount for maintaining a secure and efficient browsing environment. By staying current with the latest Flash player releases, users can mitigate the risk of potential security threats and ensure seamless functionality when interacting with Flash-based content or applications. This proactive approach aligns with best practices for safeguarding online interactions, providing users with the confidence to engage with Flash content when necessary.
In essence, the process of enabling Flash in Chrome is not only about granting permission for its usage but also about exercising control and staying proactive in maintaining a secure browsing environment. By following the steps outlined in this guide and understanding the nuances of managing Flash in Chrome, users can navigate the web with confidence, accessing Flash-based content or applications when needed while prioritizing security and performance.