Introduction
Adobe Flash Player has long been an integral part of the online experience, enabling rich multimedia content and interactive applications across various websites. However, with the evolution of web technologies, many browsers have shifted away from supporting Flash due to its security vulnerabilities and performance issues. Despite this, there are instances where users may still need to enable Adobe Flash Player in their browsers to access specific content or applications.
In this guide, we will explore the process of turning on Adobe Flash Player in the popular web browser, Google Chrome. By following the steps outlined below, you can ensure that Adobe Flash Player is enabled and functioning properly, allowing you to access Flash-based content without any hitches.
So, whether you're trying to view interactive media, play browser-based games, or access legacy web applications that rely on Flash, this step-by-step tutorial will provide you with the necessary guidance to enable Adobe Flash Player in Chrome. Let's dive in and ensure that you can make the most of your browsing experience by activating Adobe Flash Player seamlessly.
Step 1: Check Adobe Flash Player Settings
Before enabling Adobe Flash Player in Chrome, it's essential to verify the current settings to ensure a smooth activation process. Here's how you can check the Adobe Flash Player settings in Chrome:
-
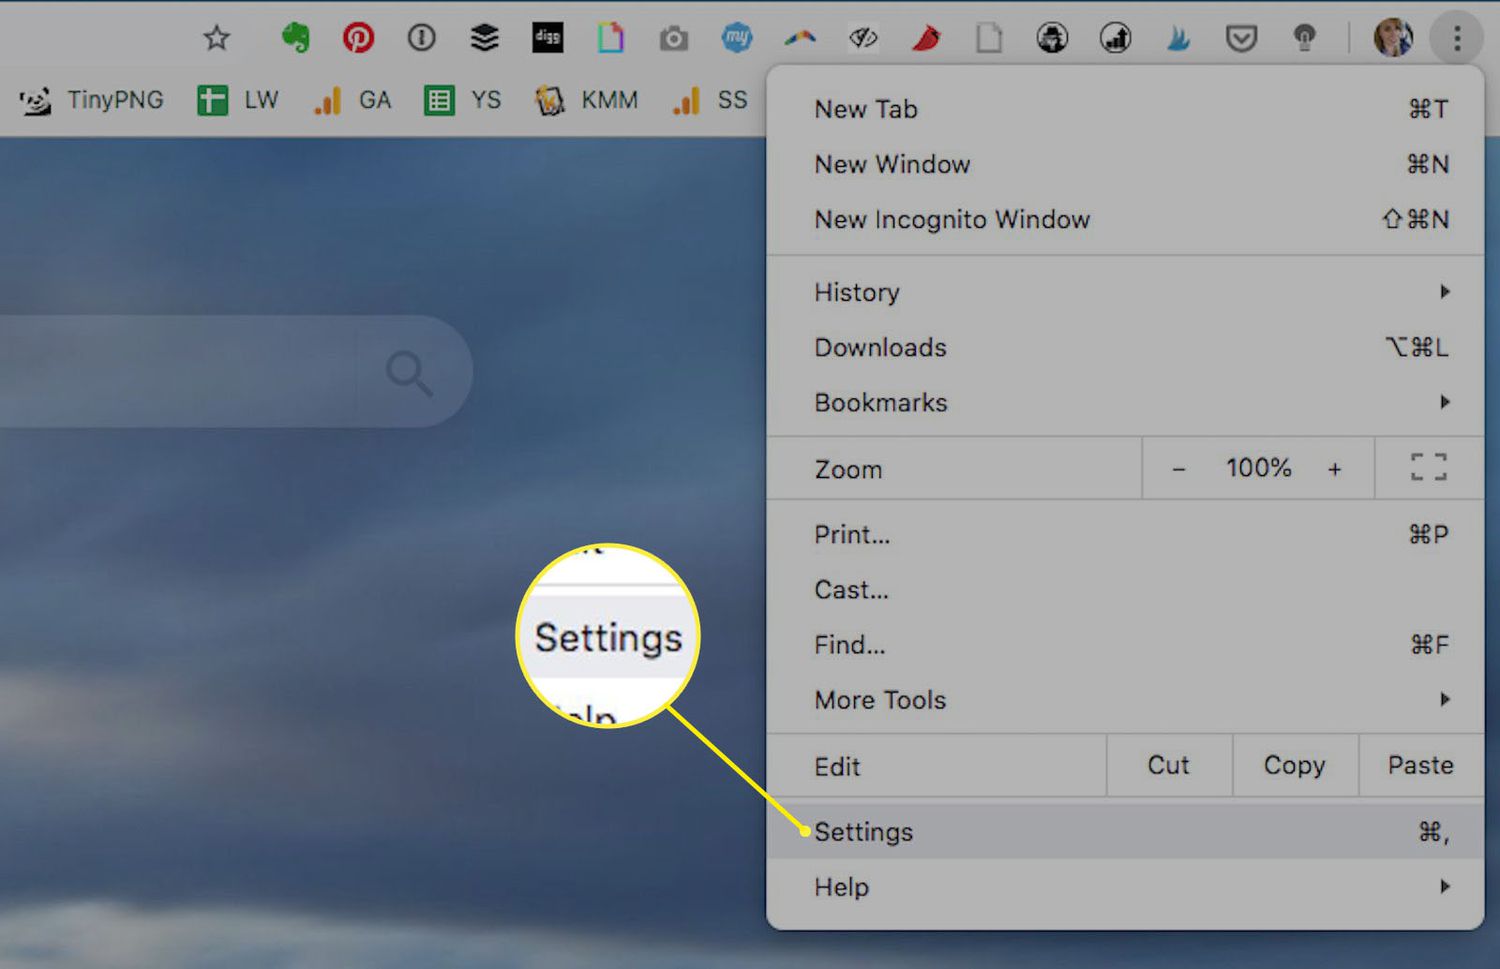
Access Chrome Settings: Open Google Chrome and click on the three-dot menu icon located in the top-right corner of the browser window. From the dropdown menu, select "Settings" to access the browser's configuration options.
-
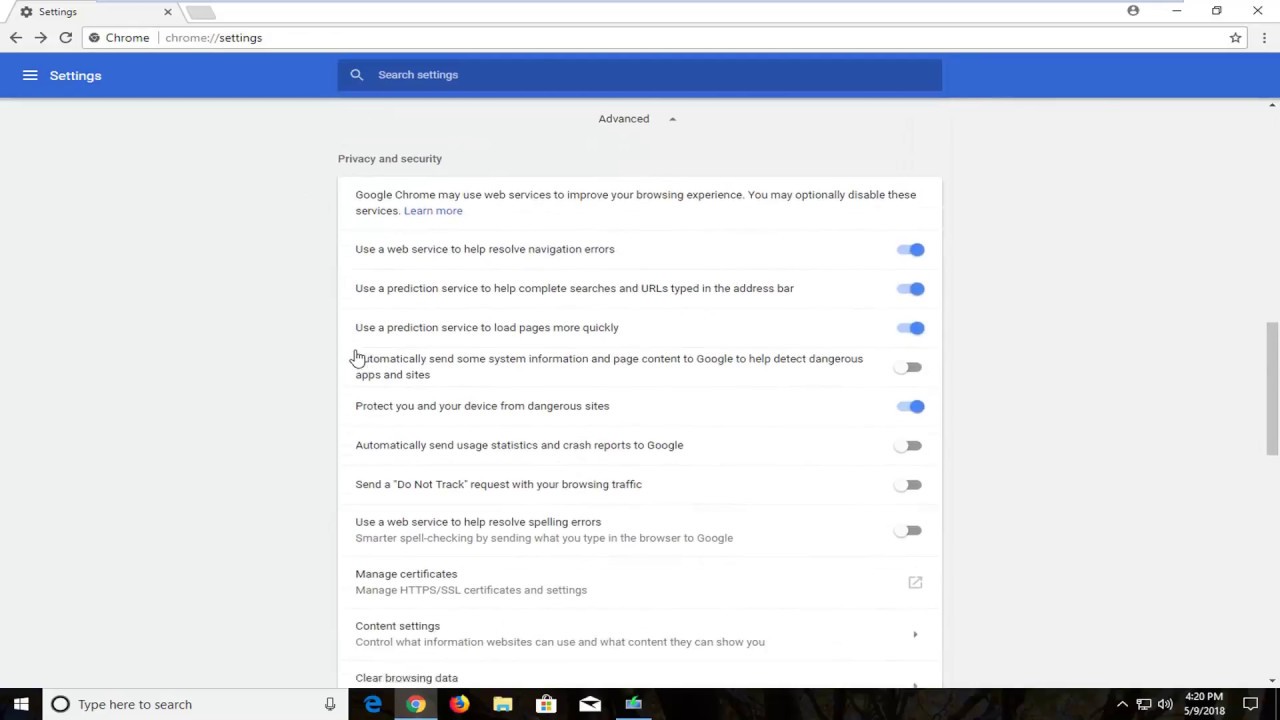
Navigate to Site Settings: Within the Settings menu, scroll down and click on "Privacy and security" in the left-hand sidebar. Then, select "Site settings" to manage the permissions and settings for individual websites.
-
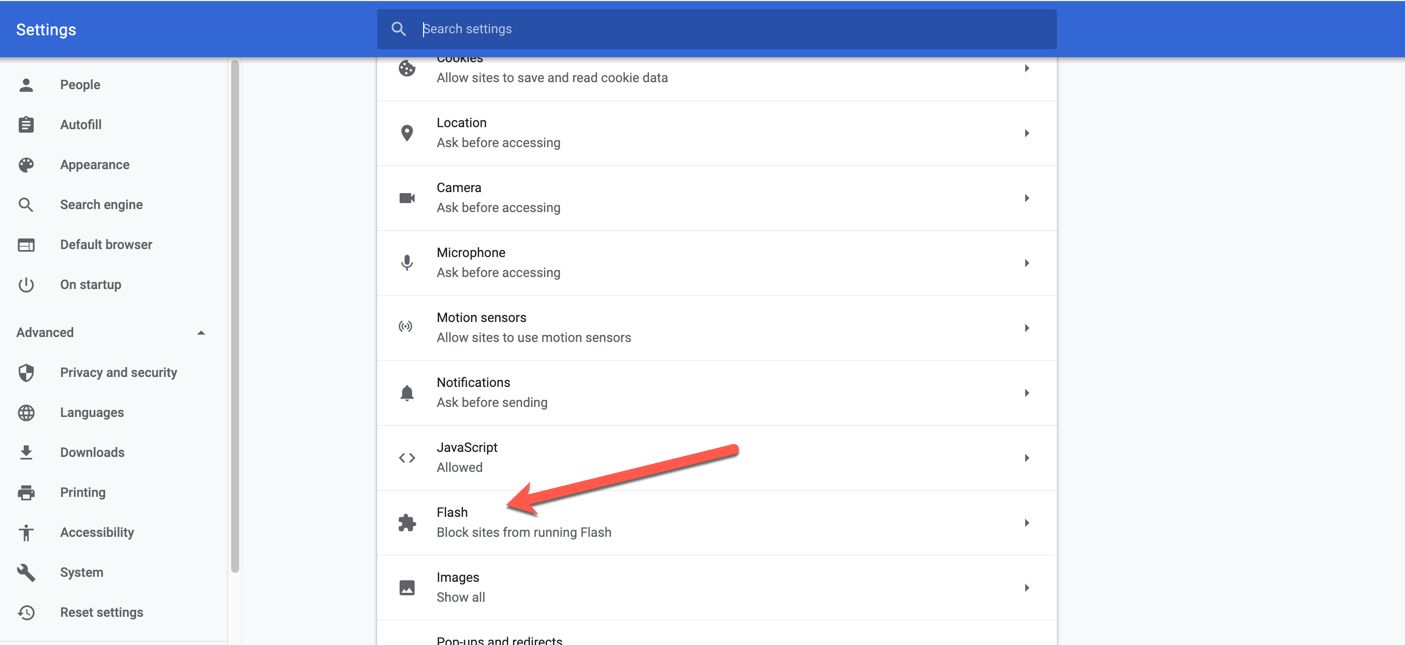
Locate Flash Settings: Under the "Site settings" section, scroll down to find the "Flash" option. Click on it to access the Flash settings for Chrome.
-
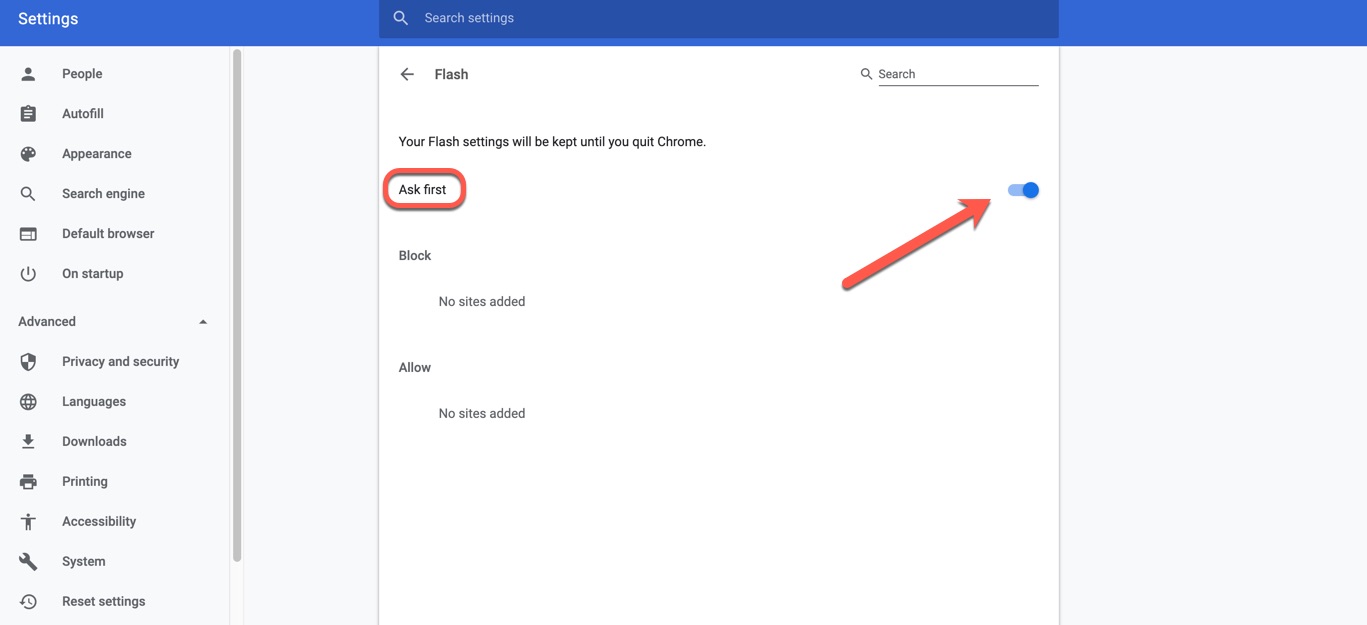
Review Flash Permissions: Once you're in the Flash settings, you can review the current permissions granted to websites for using Flash. Ensure that the toggle switch for "Block sites from running Flash" is turned off if you intend to enable Flash Player for specific websites.
-
Check Exceptions: Additionally, you can check the list of websites that have been granted permission to run Flash. This can be found under the "Allow" section within the Flash settings. Make sure that the websites you want to enable Flash for are listed here.
-
Adjust Settings as Needed: If you need to make changes to the Flash settings, such as allowing or blocking specific websites from running Flash, you can do so by clicking on the respective options and making the necessary adjustments.
By following these steps, you can effectively check the Adobe Flash Player settings in Chrome, ensuring that you have a clear understanding of the current permissions and configurations related to Flash content. This preliminary check sets the stage for the subsequent steps to enable Adobe Flash Player in Chrome seamlessly.
Step 2: Enable Adobe Flash Player in Chrome
Enabling Adobe Flash Player in Google Chrome involves navigating through the browser's settings to activate the plugin for specific websites. Follow these steps to ensure that Adobe Flash Player is enabled and ready to run within the Chrome browser:
-
Access Chrome Settings: After checking the Adobe Flash Player settings as outlined in Step 1, return to the Chrome browser window. Click on the three-dot menu icon in the top-right corner to open the dropdown menu, and then select "Settings" to proceed to the browser's configuration options.
-
Navigate to Content Settings: Within the Settings menu, locate and click on "Privacy and security" in the left-hand sidebar. From the expanded options, select "Site settings" to manage the permissions and content settings for individual websites.
-
Enable Flash Player: Under the "Site settings" section, scroll down and click on "Flash" to access the Flash settings for Chrome. Here, you will find the option to toggle the switch for "Block sites from running Flash." Ensure that this toggle switch is turned off to enable Adobe Flash Player for the websites of your choice.
-
Manage Exceptions: Additionally, you can manage the list of websites that have been granted permission to run Flash content. This can be found under the "Allow" section within the Flash settings. If a website you intend to enable Flash for is not listed, you can add it by clicking on "Add" and entering the site's URL.
-
Verify Flash Settings: Once you have made the necessary adjustments to enable Adobe Flash Player, it's important to verify the changes. Ensure that the websites for which you've enabled Flash are listed under the "Allow" section, indicating that they have permission to run Flash content.
-
Refresh or Restart Chrome: To ensure that the changes take effect, you may need to refresh the web pages or restart the Chrome browser. This step is crucial to ensure that Adobe Flash Player is fully enabled and operational for the designated websites.
By following these steps, you can effectively enable Adobe Flash Player in Google Chrome, allowing you to access Flash-based content on specific websites as needed. This process ensures that you have full control over the activation of Adobe Flash Player, enabling a seamless and secure browsing experience when interacting with Flash content.
Step 3: Verify Adobe Flash Player is Turned On
After enabling Adobe Flash Player in Google Chrome, it's crucial to verify that the activation process was successful. This step ensures that Adobe Flash Player is indeed turned on and ready to run Flash content on the designated websites. Here's how you can verify the status of Adobe Flash Player in Chrome:
-
Access Chrome Settings: Once you have completed the steps to enable Adobe Flash Player as outlined in Step 2, return to the Chrome browser window. Click on the three-dot menu icon in the top-right corner to open the dropdown menu, and then select "Settings" to access the browser's configuration options.
-
Navigate to Content Settings: Within the Settings menu, locate and click on "Privacy and security" in the left-hand sidebar. From the expanded options, select "Site settings" to manage the permissions and content settings for individual websites.
-
Verify Flash Settings: Under the "Site settings" section, scroll down and click on "Flash" to access the Flash settings for Chrome. Here, you can review the current status of Adobe Flash Player and ensure that it is turned on for the intended websites.
-
Check Flash Permissions: Within the Flash settings, you can verify the list of websites that have been granted permission to run Flash content. Ensure that the websites for which you've enabled Flash are listed under the "Allow" section, indicating that they have permission to utilize Adobe Flash Player.
-
Test Flash Content: To further confirm that Adobe Flash Player is turned on, you can visit a website or application that relies on Flash-based content. For example, you can access a Flash-based game or interactive multimedia content to verify that it loads and functions as expected without any Flash-related errors.
-
Ensure Smooth Functionality: As you interact with Flash content on the designated websites, pay attention to the performance and functionality. If Adobe Flash Player is turned on successfully, you should be able to seamlessly experience the intended Flash-based features without encountering any issues related to Flash activation.
By following these steps, you can effectively verify that Adobe Flash Player is turned on and operational within Google Chrome. This verification process ensures that the activation of Adobe Flash Player is successful, allowing you to access and interact with Flash-based content across the web. With Adobe Flash Player confirmed to be turned on, you can enjoy a seamless browsing experience when engaging with websites and applications that rely on Flash technology.
Conclusion
In conclusion, enabling Adobe Flash Player in Google Chrome is a straightforward process that empowers users to access Flash-based content on specific websites. By following the outlined steps to check, enable, and verify Adobe Flash Player settings, users can ensure a seamless and secure browsing experience when interacting with Flash content.
The initial step of checking the Adobe Flash Player settings in Chrome provides users with a clear understanding of the current permissions and configurations related to Flash content. This preliminary check sets the stage for the subsequent steps to enable Adobe Flash Player seamlessly. By reviewing the current permissions and managing website exceptions, users can gain insight into the existing Flash settings, laying the groundwork for the activation process.
Enabling Adobe Flash Player in Chrome involves navigating through the browser's settings to activate the plugin for specific websites. By accessing the Flash settings and toggling the switch to enable Flash content, users can take full control over the activation of Adobe Flash Player. Additionally, managing the list of websites with granted Flash permissions ensures that users can tailor the Flash activation to their specific browsing needs.
Once Adobe Flash Player is enabled, it is crucial to verify that the activation process was successful. By revisiting the Flash settings and checking the list of permitted websites, users can confirm that Adobe Flash Player is turned on and ready to run Flash content on the designated websites. Furthermore, testing Flash-based content and ensuring smooth functionality provides users with the confidence that Adobe Flash Player is fully operational within Google Chrome.
In essence, the process of turning on Adobe Flash Player in Chrome equips users with the ability to access and interact with Flash-based content as needed, while maintaining control over the activation of Flash technology. By following the steps outlined in this guide, users can navigate the evolving web landscape and continue to engage with legacy Flash content seamlessly, ensuring a rich and dynamic browsing experience.
As web technologies continue to advance, it is important for users to stay informed about the evolving support for Flash content across different browsers. While the use of Flash has declined in favor of more modern and secure web technologies, the ability to enable Adobe Flash Player in Chrome provides users with the flexibility to access legacy content that may still rely on Flash technology.
Ultimately, by understanding the process of turning on Adobe Flash Player in Chrome and verifying its activation, users can make informed decisions about accessing Flash-based content while embracing the advancements in web technology. This knowledge empowers users to navigate the digital landscape with confidence, ensuring a seamless and personalized browsing experience tailored to their specific needs.