Introduction
Google Chrome is a popular web browser known for its speed, simplicity, and user-friendly interface. It offers a wide range of features and customization options, including the ability to add trusted sites for a more secure browsing experience. By designating certain websites as trusted, you can ensure that Chrome provides a higher level of protection while accessing these sites, reducing the risk of encountering malicious content or potential security threats.
In this guide, we will walk you through the process of adding trusted sites in Google Chrome on a Windows 10 operating system. Whether you want to grant specific websites special permissions or enhance your browsing security, understanding how to add trusted sites in Chrome can be a valuable skill for optimizing your online experience. With just a few simple steps, you can customize your browser settings to reflect your preferences and ensure a safer and more efficient browsing environment.
So, let's dive into the step-by-step instructions to learn how to add trusted sites in Google Chrome on Windows 10. Whether you're a seasoned Chrome user or just getting started with this versatile browser, this guide will equip you with the knowledge to take control of your browsing security and tailor your Chrome experience to suit your needs.
Step 1: Open Google Chrome
To begin the process of adding trusted sites in Google Chrome on your Windows 10 system, you first need to launch the Chrome browser. Here's how you can do it:
-
Locate the Google Chrome Icon: Look for the Google Chrome icon on your desktop, taskbar, or in the Start menu. It typically features a circular design in vibrant colors, making it easily recognizable among your installed applications.
-
Double-Click the Icon: Once you've located the Google Chrome icon, simply double-click on it to open the browser. Alternatively, you can click on the icon once and then press the "Enter" key on your keyboard to launch Chrome.
-
Wait for Chrome to Load: After initiating the application, give it a few moments to load. Depending on your computer's speed and performance, Google Chrome should open swiftly, presenting you with its familiar interface and a blank tab ready for your next browsing adventure.
-
Verify the Browser Window: Once Chrome has launched, ensure that the browser window is fully visible on your screen. You should see the address bar at the top, the navigation buttons (back, forward, and refresh) on the left, and any extensions or bookmarks you've added for quick access.
By following these simple steps, you can easily open Google Chrome on your Windows 10 device, setting the stage for the subsequent actions required to add trusted sites and bolster your browsing security. With Chrome up and running, you're now ready to proceed to the next step and access the browser settings to begin customizing your trusted sites list.
Opening Google Chrome is the initial step in the process of adding trusted sites, and by familiarizing yourself with this straightforward action, you're well on your way to optimizing your browsing experience and enhancing your online security within the Chrome browser.
Step 2: Access Chrome Settings
Accessing the settings in Google Chrome is a pivotal step in the process of adding trusted sites. By navigating to the settings menu, you gain access to a plethora of customization options that allow you to tailor your browsing experience to your preferences. Here's a detailed guide on how to access Chrome settings on your Windows 10 device:
-
Locate the Three-Dot Menu: At the top-right corner of the Chrome window, you'll find a three-dot icon, which serves as the gateway to the browser's settings and customization features. This icon is a key element of the Chrome interface, providing quick access to a range of essential functions.
-
Click on the Three-Dot Icon: Once you've located the three-dot icon, click on it to reveal a dropdown menu. This menu contains various options for managing your Chrome settings, extensions, history, and more. By clicking on this icon, you initiate the process of accessing the settings menu, bringing you one step closer to adding trusted sites.
-
Select "Settings" from the Menu: Within the dropdown menu, you'll find the "Settings" option listed. Click on "Settings" to proceed to the dedicated settings page, where you can explore and modify a wide array of Chrome's features and preferences.
-
Navigate to the Settings Page: Upon selecting "Settings," you will be redirected to the main settings page within the Chrome browser. Here, you'll find a comprehensive overview of the available settings categories, including "Privacy and security," "Appearance," "Sync and Google services," and more.
-
Explore the Settings Categories: Take a moment to familiarize yourself with the various settings categories displayed on the left-hand side of the page. These categories encompass different aspects of the browser's functionality, allowing you to delve into specific areas of customization and security.
By following these steps, you can effortlessly access the settings menu in Google Chrome on your Windows 10 system. This marks a crucial stage in the process of adding trusted sites, as it sets the stage for configuring your browsing security and preferences. With the settings menu at your fingertips, you're now poised to proceed to the next step and begin the process of adding trusted sites to your Chrome browser.
Step 3: Add Trusted Sites
Adding trusted sites in Google Chrome empowers you to establish a secure browsing environment tailored to your specific needs. By designating certain websites as trusted, you can ensure that Chrome provides a higher level of protection while accessing these sites, reducing the risk of encountering malicious content or potential security threats. Here's a detailed guide on how to add trusted sites in Google Chrome on your Windows 10 system:
-
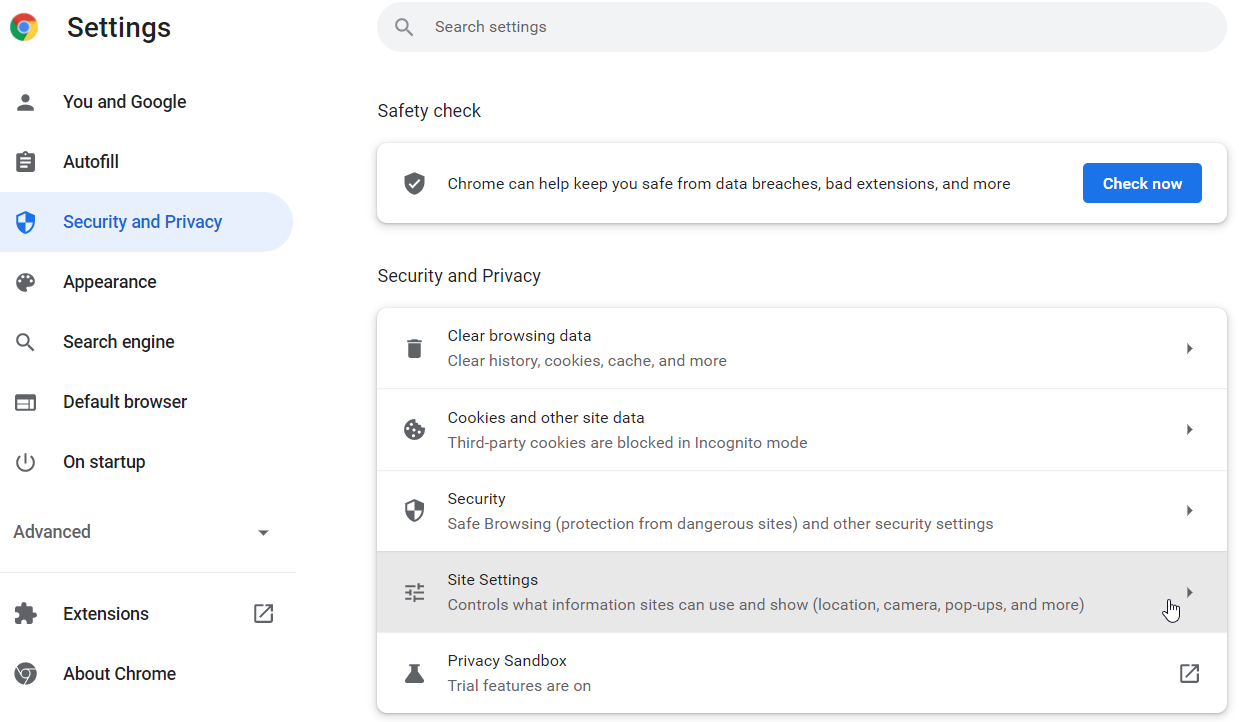
Navigate to the Security Section: Once you're in the Chrome settings menu, locate and click on the "Privacy and security" category on the left-hand side of the page. Within this section, you'll find the "Site settings" option, which is where you can manage permissions for individual websites.
-
Access Site Settings: Under the "Site settings" section, look for and click on the "Additional permissions" option. This will expand the menu to reveal more specific site permissions that you can customize according to your preferences.
-
Manage Trusted Sites: Within the "Additional permissions" menu, you'll find the "Trusted sites" option. Click on this to access the list of websites that you have designated as trusted within Google Chrome.
-
Add a Trusted Site: To add a new trusted site, click on the "Add" button within the "Trusted sites" section. This will prompt a dialog box where you can enter the URL of the website you wish to designate as trusted.
-
Enter the Website URL: In the dialog box, type or paste the URL of the website you want to add to your trusted sites list. Ensure that the URL is accurate and complete, as this will determine the specific website that Chrome will recognize as trusted.
-
Save the Trusted Site: After entering the website URL, click "Add" to save the trusted site. This action will add the specified website to your trusted sites list, allowing Chrome to apply special permissions and security settings when you visit the site in the future.
By following these steps, you can effectively add trusted sites in Google Chrome on your Windows 10 device, enhancing your browsing security and customizing your online experience to align with your preferences. With the ability to designate trusted sites, you gain greater control over your browsing environment, ensuring a safer and more personalized interaction with the websites you frequent.
Step 4: Save Changes
After adding trusted sites in Google Chrome on your Windows 10 system, it's crucial to save the changes to ensure that your preferences are applied and reflected in your browsing experience. Saving the changes solidifies the adjustments made to your trusted sites list, allowing Chrome to recognize and treat these designated websites with the specified level of trust and security. Here's a detailed guide on how to save the changes after adding trusted sites in Google Chrome:
-
Confirm the Trusted Sites: Before proceeding to save the changes, take a moment to review the list of trusted sites you've added. Ensure that the URLs are accurate and represent the websites you intend to designate as trusted within the Chrome browser. This verification step helps prevent any potential discrepancies in your trusted sites list.
-
Click 'Done' or 'Save': Once you've confirmed the trusted sites, look for the option to save the changes. In some cases, this may involve clicking a 'Done' button, 'Save' button, or a similar action that finalizes the modifications made to your trusted sites list. This step ensures that the added trusted sites are officially recognized and implemented within Chrome's security settings.
-
Verify the Saved Changes: After clicking 'Done' or 'Save', take a moment to verify that the changes have been successfully applied. You can do this by revisiting the trusted sites section within the Chrome settings and ensuring that the newly added websites are listed as trusted. This verification step provides peace of mind, confirming that your trusted sites list has been updated as intended.
-
Test the Trusted Sites: To further validate the saved changes, consider visiting the trusted sites you've added to observe how Chrome interacts with these websites. You may notice that certain security settings or permissions are applied specifically to the trusted sites, reflecting the adjustments you've made. Testing the trusted sites allows you to experience firsthand the impact of designating websites as trusted within the Chrome browser.
By following these steps, you can effectively save the changes after adding trusted sites in Google Chrome on your Windows 10 device. This finalizes the process of customizing your browsing security and preferences, ensuring that the added trusted sites receive the designated level of trust and protection within the Chrome browser. With the changes saved, you can enjoy a more tailored and secure browsing experience, with Chrome recognizing and accommodating your trusted sites according to your specifications.
Conclusion
In conclusion, mastering the process of adding trusted sites in Google Chrome on a Windows 10 operating system empowers users to take control of their browsing security and tailor their online experience to align with their preferences. By designating specific websites as trusted, individuals can enhance their protection against potential security threats and enjoy a more personalized interaction with the sites they frequent.
The journey of adding trusted sites begins with opening Google Chrome, a familiar and user-friendly browser known for its speed and versatility. Once the browser is launched, users can seamlessly access the settings menu, where a wealth of customization options awaits. Navigating to the security section and managing trusted sites within the site settings allows users to add, review, and modify their trusted sites list, ensuring that their browsing environment reflects their unique needs and preferences.
By following the step-by-step instructions outlined in this guide, users can confidently add trusted sites in Google Chrome, solidifying their browsing security and customizing their online interactions. The ability to add trusted sites not only enhances security but also streamlines the browsing experience, allowing for a seamless and personalized interaction with designated websites.
After adding trusted sites, saving the changes is a crucial step to ensure that the designated websites are officially recognized and treated with the specified level of trust and security within the Chrome browser. Verifying the saved changes and testing the trusted sites provides users with the assurance that their preferences have been successfully implemented, paving the way for a more secure and tailored browsing experience.
In essence, the process of adding trusted sites in Google Chrome on Windows 10 is a valuable skill that empowers users to customize their browsing security and preferences. By understanding and implementing this process, individuals can navigate the online landscape with confidence, knowing that their trusted sites receive the specialized attention and protection they deserve within the Chrome browser.