Introduction
Adding a Chrome shortcut to your desktop can be a convenient way to quickly access your favorite websites without having to open the browser and type in the URL every time. Whether it's a news website you visit daily, a productivity tool you rely on, or a social media platform you frequent, creating a desktop shortcut for it can streamline your online experience and save you valuable time.
By following a few simple steps, you can bring the web directly to your desktop, allowing for instant access with just a single click. This process is especially useful for websites that you visit frequently, as it eliminates the need to navigate through multiple tabs or bookmarks within your browser.
In this guide, we will walk through the process of adding a Chrome shortcut to your desktop, providing you with a clear and straightforward set of instructions. Whether you're a seasoned Chrome user or just getting started with the browser, this tutorial will equip you with the knowledge to effortlessly create desktop shortcuts for your preferred websites.
With the ability to customize the name and location of the shortcut, you can tailor the experience to suit your preferences and organizational style. This flexibility ensures that the shortcuts seamlessly integrate into your desktop environment, allowing for easy access and a clutter-free workspace.
By the end of this tutorial, you will have a collection of desktop shortcuts representing your most visited websites, providing a convenient and efficient way to navigate the web. Let's dive into the step-by-step process of adding a Chrome shortcut to your desktop and simplify your online routine.
Step 1: Open Chrome and Navigate to the Desired Website
To begin the process of adding a Chrome shortcut to your desktop, the first step is to launch the Google Chrome browser on your computer. You can do this by locating the Chrome icon on your desktop or by searching for it in your computer's applications or programs list.
Once Chrome is open, navigate to the website for which you want to create a desktop shortcut. This could be any website that you frequently visit, such as a news site, social media platform, online shopping destination, or a productivity tool. Simply type the URL of the website into the address bar at the top of the Chrome window and press "Enter" on your keyboard to load the site.
Alternatively, if you have the website bookmarked in Chrome, you can access it by clicking on the bookmarks bar or by using the bookmarks menu. This allows you to quickly locate and open the desired website without having to manually type the URL.
If the website you want to create a shortcut for is one that you visit regularly, it's a good idea to ensure that you are logged in to your account on that site. This will ensure that the shortcut opens the website in the state you typically use it, with your personalized settings and preferences already applied.
By following this initial step, you will have successfully opened the Chrome browser and navigated to the specific website for which you intend to create a desktop shortcut. This sets the stage for the subsequent steps in the process, allowing you to seamlessly progress towards adding the shortcut to your desktop for convenient and swift access to the website.
Step 2: Click on the Three Dots Menu
After navigating to the desired website in the Chrome browser, the next step in creating a desktop shortcut is to access the three dots menu, also known as the "More" menu, located in the top-right corner of the Chrome window. This menu icon consists of three vertically aligned dots and serves as a gateway to a range of browser functions and settings.
Clicking on the three dots menu reveals a dropdown list of options, including features such as history, downloads, settings, and more. This menu is a central hub for accessing various tools and functionalities within the Chrome browser, making it a pivotal element in customizing your browsing experience.
Upon clicking the three dots menu, a menu will expand, presenting a plethora of options to choose from. This menu is designed to provide users with quick access to essential browser features and settings, allowing for seamless navigation and control over their browsing environment.
The three dots menu is a versatile tool that empowers users to manage their browsing experience effectively. From accessing browser settings and extensions to managing bookmarks and history, this menu serves as a gateway to a multitude of functions, enhancing the overall usability of the Chrome browser.
By clicking on the three dots menu, you initiate the process of customizing your browsing experience, enabling you to access the specific option required to create a desktop shortcut for the website you are currently visiting. This pivotal step sets the stage for the subsequent actions that will lead to the seamless integration of the website shortcut onto your desktop, streamlining your access to the site with just a single click.
In summary, clicking on the three dots menu in the Chrome browser is a fundamental step in the process of creating a desktop shortcut for your preferred website. This action opens the door to a range of browser functionalities and settings, paving the way for a personalized and efficient browsing experience tailored to your specific needs and preferences.
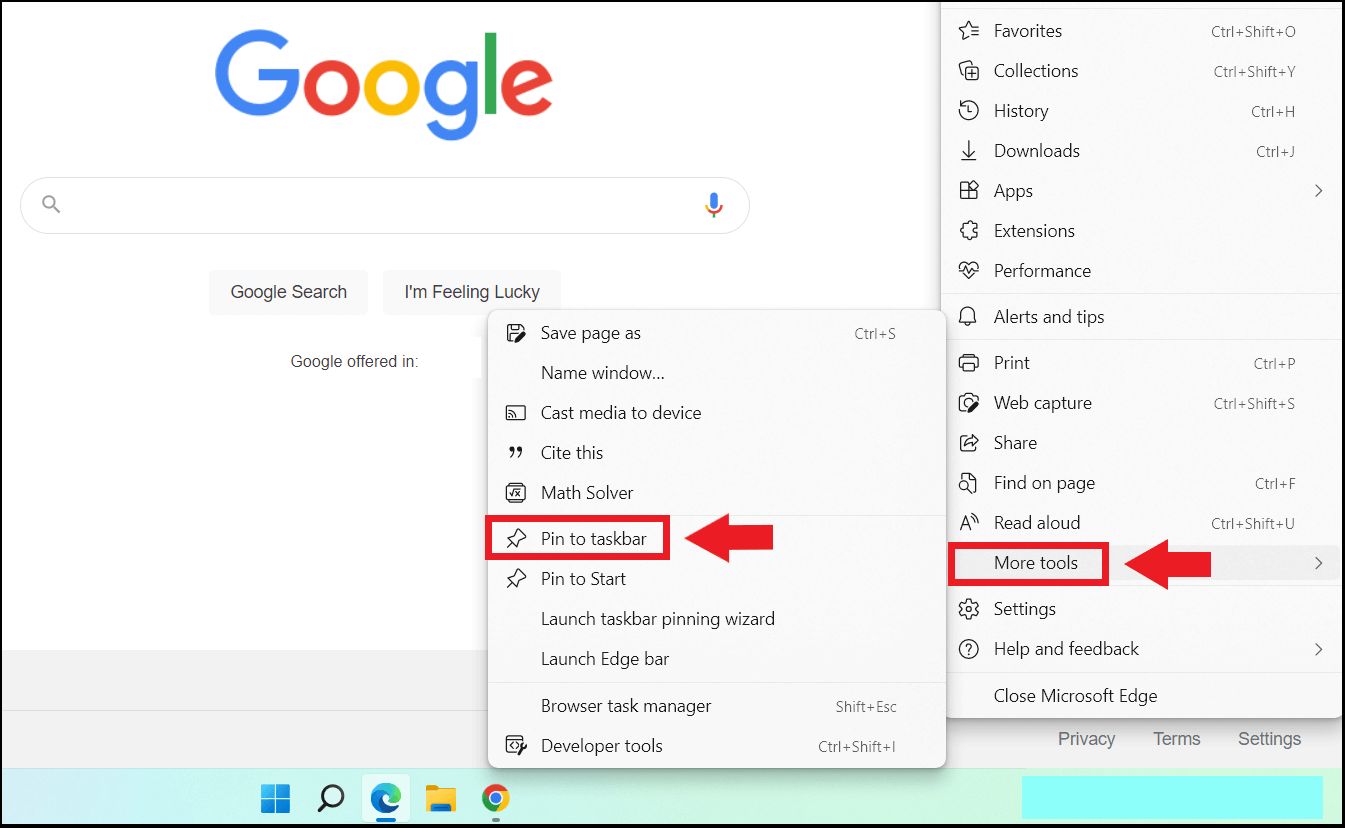
Step 3: Select "More Tools" and then "Create Shortcut"
Once you have accessed the three dots menu in the Chrome browser, the next crucial step in the process of creating a desktop shortcut for your desired website is to navigate to the "More Tools" option. This submenu houses a variety of additional tools and features that enable users to further customize and enhance their browsing experience.
Upon clicking on the three dots menu, you will notice the "More Tools" option located towards the middle of the dropdown list. Hovering your cursor over this option will reveal a secondary menu, presenting a selection of supplementary tools designed to augment your browsing capabilities. These tools encompass a wide array of functions, ranging from extensions and developer tools to the task manager and more.
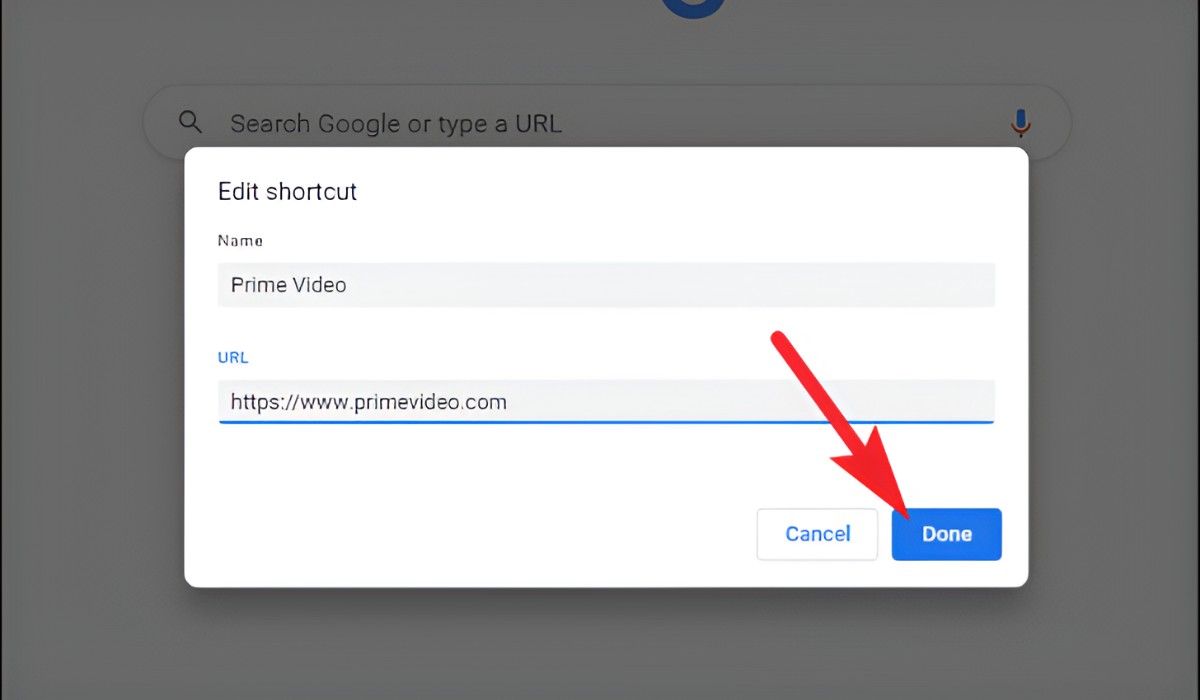
Within the "More Tools" submenu, you will find the "Create Shortcut" option, which serves as the gateway to generating a desktop shortcut for the website you are currently visiting. By selecting this option, you initiate the process of customizing the shortcut's name and choosing where it will be saved on your desktop.
Clicking on "Create Shortcut" triggers a prompt that allows you to name the shortcut according to your preference. This step empowers you to assign a recognizable and descriptive name to the shortcut, ensuring that it is easily identifiable amidst your desktop icons. Whether it's a succinct title that encapsulates the website's purpose or a personalized label that resonates with you, the naming process enables you to tailor the shortcut to align with your organizational style and browsing habits.
Following the naming stage, you are prompted to choose the location where the shortcut will be saved on your desktop. This flexibility allows you to strategically position the shortcut in a location that aligns with your desktop layout and accessibility preferences. Whether you prefer a prominent placement for frequently visited websites or a categorized arrangement for different types of shortcuts, this customization ensures that the shortcuts seamlessly integrate into your desktop environment, optimizing your browsing efficiency.
By navigating to the "More Tools" submenu and selecting "Create Shortcut," you embark on a pivotal stage in the process of creating a desktop shortcut for your preferred website. This step empowers you to personalize the shortcut's name and location, tailoring it to align with your browsing habits and organizational preferences. With the ability to customize these aspects, you can curate a collection of desktop shortcuts that streamline your access to the web, enhancing your overall browsing experience.
Step 4: Name the Shortcut and Choose Where to Save It
Upon selecting the "Create Shortcut" option in the Chrome browser, you are prompted to embark on a personalized journey of naming the shortcut and strategically choosing where it will be saved on your desktop. This pivotal stage in the process of creating a desktop shortcut empowers you to infuse the shortcut with a distinctive identity and seamlessly integrate it into your desktop environment.
The naming process presents an opportunity to assign a recognizable and descriptive title to the shortcut, ensuring that it resonates with its associated website and aligns with your browsing habits. Whether it's a succinct label that encapsulates the website's purpose or a personalized name that reflects your unique connection to the site, the naming stage allows for creative expression and customization. By choosing a name that resonates with you, the shortcut becomes more than just a link – it becomes a personalized portal to your digital destinations.
Following the naming stage, you are presented with the option to choose the location where the shortcut will be saved on your desktop. This strategic decision allows you to position the shortcut in a manner that harmonizes with your desktop layout and accessibility preferences. Whether you opt for a prominent placement for frequently visited websites, a categorized arrangement for different types of shortcuts, or a discreet location that complements your workflow, the customization ensures that the shortcuts seamlessly integrate into your desktop environment.
This flexibility in choosing the location of the shortcut empowers you to curate a desktop landscape that aligns with your organizational style and browsing habits. By strategically positioning the shortcuts, you can optimize your workflow and streamline your access to the web, enhancing your overall browsing experience.
In essence, the process of naming the shortcut and choosing where to save it on your desktop is a personalized endeavor that empowers you to infuse the shortcut with meaning and seamlessly integrate it into your digital workspace. By customizing the name and location of the shortcut, you curate a collection of desktop portals that reflect your browsing preferences and streamline your access to the web, enhancing your overall digital experience.
Step 5: Click "Create" to Add the Shortcut to Your Desktop
After customizing the name and location of the shortcut, the final step in the process of adding a Chrome shortcut to your desktop is to click "Create." This action solidifies the integration of the shortcut onto your desktop, providing you with swift and convenient access to the associated website with just a single click.
By clicking "Create," you initiate the process of adding the shortcut to your desktop, culminating in the seamless incorporation of the website portal into your digital workspace. This simple yet impactful action signifies the culmination of the customization process, transforming the virtual link into a tangible and easily accessible desktop icon.
Upon clicking "Create," the shortcut icon promptly appears on your desktop, representing the website for which it was created. This visual representation serves as a direct gateway to the associated website, offering a streamlined and efficient means of accessing the online destination without the need to open the browser and manually type the URL.
The addition of the shortcut to your desktop enhances your browsing experience by providing quick and direct access to your preferred websites. Whether it's a news site, social media platform, online shopping destination, or a productivity tool, the presence of these shortcuts on your desktop streamlines your digital routine, saving you valuable time and effort.
Furthermore, the ability to customize the name and location of the shortcut ensures that it seamlessly integrates into your desktop environment, aligning with your organizational style and accessibility preferences. This personalized approach to creating desktop shortcuts empowers you to curate a digital landscape that optimizes your workflow and enhances your overall browsing experience.
In essence, clicking "Create" to add the shortcut to your desktop marks the culmination of the process, resulting in the seamless integration of the website portal into your digital workspace. This final step empowers you to curate a collection of desktop shortcuts that reflect your browsing preferences, streamline your access to the web, and enhance your overall digital experience.