Introduction
Microsoft Teams is a powerful collaboration tool that allows users to communicate and collaborate effectively within an organization. One of the key features of Teams is the ability to record meetings or calls and generate transcripts. These transcripts can be incredibly valuable for various reasons, such as referencing important discussions, documenting decisions, or ensuring accessibility for individuals with hearing impairments.
In this article, we will guide you through the process of downloading a transcript from Microsoft Teams. Whether you are a student looking to review a lecture, a team member seeking to capture meeting minutes, or a project manager documenting a client call, having the ability to download and save a transcript can make your workflow more efficient and organized.
With just a few simple steps, you can access and download the transcript of a Teams meeting or call. We will walk you through the process, providing clear instructions along the way. So, let’s dive in and learn how to download a transcript from Teams!
Step 1: Open the Microsoft Teams app
The first step in downloading a transcript from Microsoft Teams is to open the Teams app on your device. Teams is available for desktop computers, smartphones, and tablets, making it accessible for users on different platforms.
If you are using a desktop computer, you can open the Teams app by clicking on the shortcut icon on your desktop or by searching for “Microsoft Teams” in the Start Menu. Once you locate the app, simply click on it to launch Teams.
For smartphone or tablet users, you can find the Teams app in your device’s app store. Search for “Microsoft Teams” and download the app if you haven’t already. After installing, tap on the Teams icon to open the app on your device.
Once you have successfully opened the Teams app, you will need to sign in using your Microsoft account credentials. If you are using a web browser version of Teams, simply visit the Teams website and sign in using your Microsoft account information.
By opening the Teams app and signing in, you gain access to all the collaboration and communication features offered by Teams, including the ability to record meetings and calls and download the corresponding transcripts. Now that you have successfully opened the Teams app, it’s time to move on to the next step.
Step 2: Join the meeting or call
Now that you have successfully opened the Microsoft Teams app, the next step is to join the meeting or call for which you would like to download the transcript.
If you have a scheduled meeting or call, you can easily join by navigating to the calendar section of the Teams app. Here, you will find a list of your upcoming meetings and calls. Locate the desired meeting or call and click on it to join.
If you don’t have a scheduled meeting or call, you can still initiate an impromptu session. In the Teams app, you will find a “Meet” icon in the left-hand sidebar. Click on it to start a new meeting or call. You can then invite participants by sharing the meeting link or adding them directly from your contact list.
Once you have joined the meeting or call, you will be able to see and hear the other participants, as well as any content being shared. Teams offers a variety of features to enhance collaboration during meetings, such as screen sharing, chat, and whiteboarding.
Make sure to enable the necessary permissions for recording the meeting or call if you are the organizer or have the appropriate permissions. This step is crucial as the availability of the transcript option is dependent on the recording settings.
Now that you have successfully joined the meeting or call, it’s time to proceed to the next step and access the meeting or call chat where the transcript option is available.
Step 3: Access the meeting or call chat
In order to download the transcript of a Microsoft Teams meeting or call, you need to access the chat associated with the specific meeting or call. The chat feature allows participants to exchange messages, share files, and collaborate during the session.
To access the meeting or call chat, look for the chat icon within the Teams app interface. It is typically located in the left-hand sidebar, along with other icons like calendar, files, and more. Click on the chat icon to open the chat section.
Once you have opened the chat section, you will see a list of ongoing chats and conversations. Look for the chat associated with the meeting or call you are currently in. If you have multiple chats open, you can use the search bar to find the specific chat by entering the meeting or call name or participants’ names.
Click on the chat to open it, and you will be able to view the messages exchanged during the meeting or call. The chat provides a record of the conversation, allowing you to easily reference any important information or discussions that took place.
It is important to note that the transcript option for a meeting or call will only be available if the meeting or call was recorded. If the recording was enabled, you will see a “Transcript” tab along with other tabs such as “Posts” and “Files” at the top of the chat.
By accessing the meeting or call chat and ensuring that a recording was made, you are ready to proceed to the next step and find the transcript option that will allow you to download the transcript.
Step 4: Find the transcript option
Once you have accessed the meeting or call chat in Microsoft Teams, the next step is to locate the transcript option. The transcript option allows you to generate and download the transcript of the meeting or call, capturing all the conversations and discussions that took place.
To find the transcript option, navigate to the “Transcript” tab within the chat. This tab is located at the top of the chat interface, alongside other tabs like “Posts” and “Files.” Click on the “Transcript” tab to access the transcript feature.
When you open the transcript tab, you will see the entire transcript of the meeting or call displayed on your screen. The transcript is organized chronologically, capturing the messages and interactions of all participants in the session.
If the meeting or call was lengthy, you may need to scroll through the transcript to find the specific parts you are interested in. You can use the scrollbar on the right-hand side of the transcript window to navigate through the content.
Microsoft Teams also provides options to search within the transcript. If you are looking for a particular keyword or phrase, you can use the search bar within the transcript tab to quickly find the relevant sections of the conversation.
By locating the transcript option and accessing the transcript of the meeting or call, you are one step away from downloading the transcript. In the next step, we will guide you through the process of downloading the transcript file onto your device.
Step 5: Download the transcript
After finding the transcript of the meeting or call in Microsoft Teams, the next step is to download the transcript onto your device. Downloading the transcript allows you to save it for future reference, share it with others, or incorporate it into your documentation or reports.
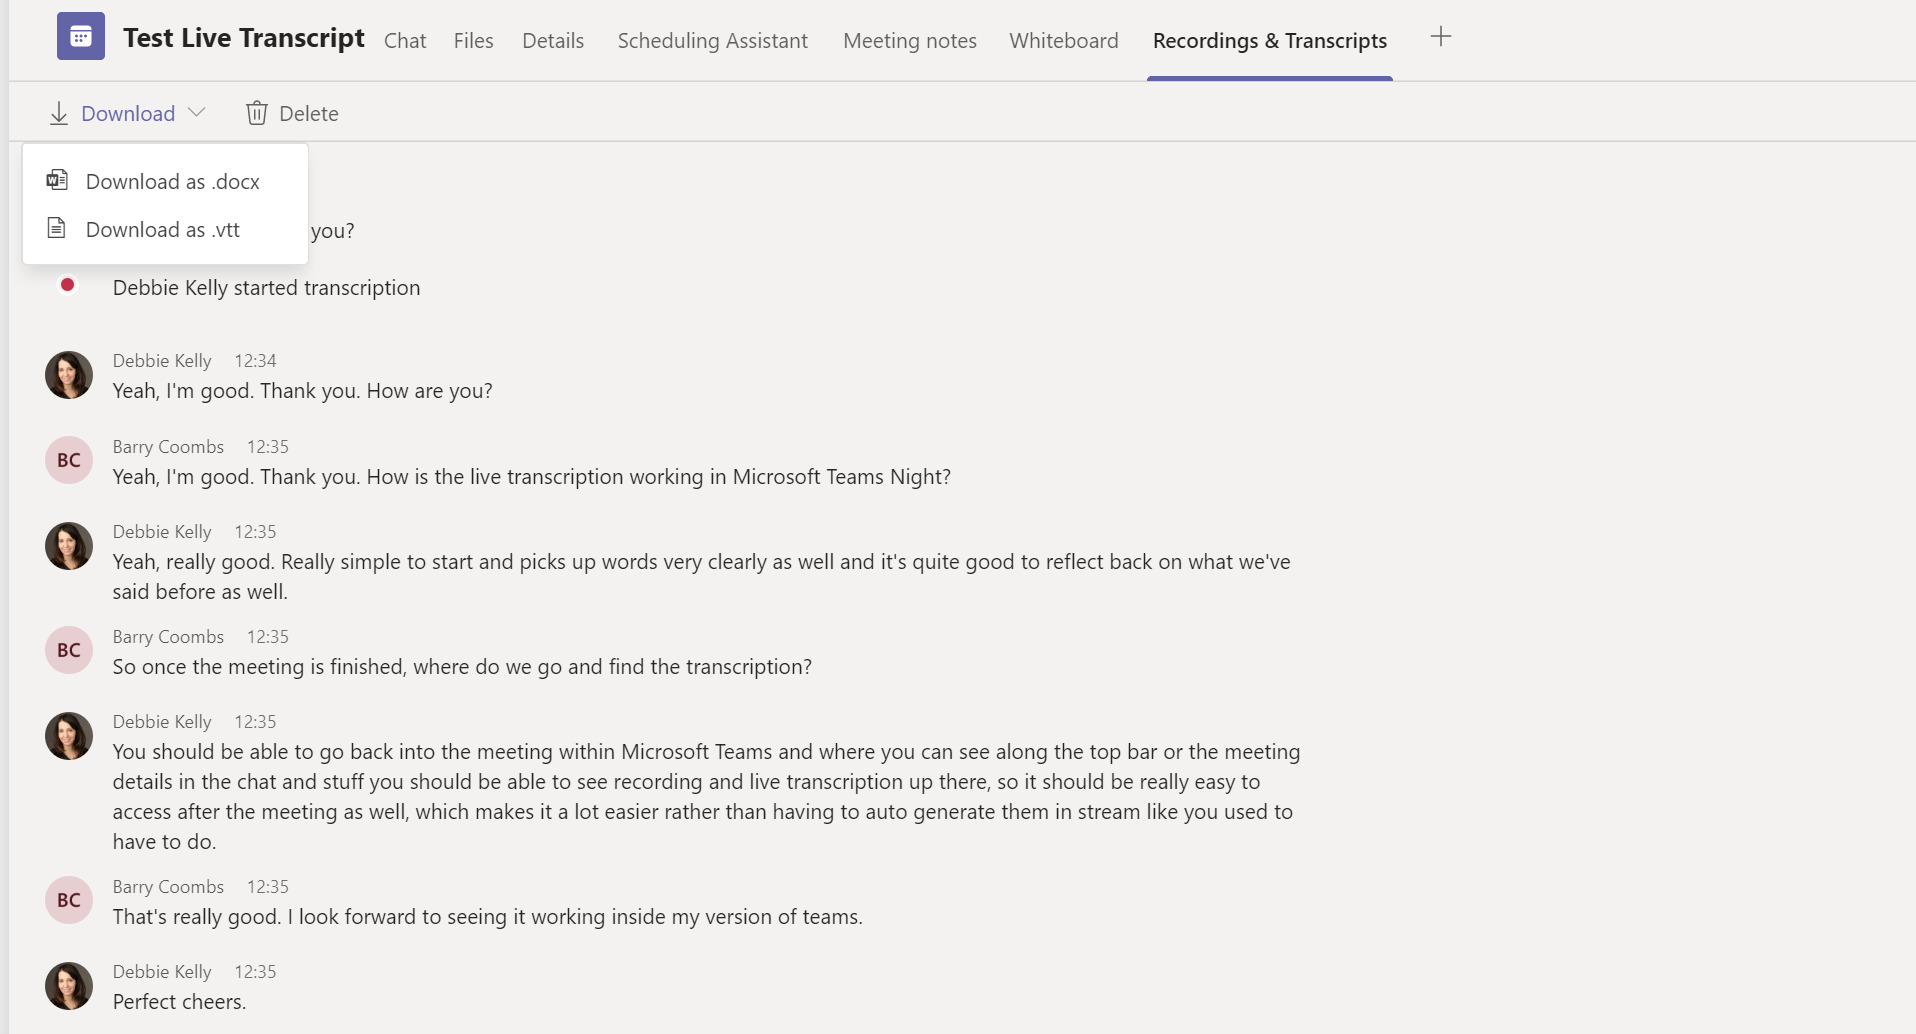
To download the transcript, look for the download option within the transcript tab. This option is typically represented by an icon or button that resembles a downward arrow or a file download symbol. Click on this icon or button to initiate the download process.
Once you click on the download option, a file will be generated containing the transcript of the meeting or call. The file format may vary depending on your Teams settings and preferences. Common file formats for transcripts include TXT, HTML, or DOCX.
Choose the location on your device where you would like to save the transcript file. You can select a specific folder or directory that is easily accessible and organized for future reference. Give the file a meaningful name that describes the meeting or call, making it easier to identify later on.
Depending on the length of the meeting or call and the amount of conversation captured in the transcript, the download process may take a few seconds to complete. Once the download is finished, you will have a saved copy of the transcript on your device.
It’s always a good practice to double-check the downloaded file to ensure that the transcript is complete and accurate. Open the file and review the content to ensure that all the messages and interactions are properly captured.
By successfully downloading the transcript, you have now secured a copy of the meeting or call transcript for your records and future use.
Step 6: Save the transcript file
Once you have downloaded the transcript file from Microsoft Teams, the final step is to save the file in a location that is easily accessible and organized for your convenience. Saving the transcript file allows you to easily retrieve it whenever you need to reference or share the transcript.
When saving the transcript file, consider choosing a descriptive and meaningful name that accurately represents the content of the meeting or call. This will make it easier for you to identify the specific transcript file in the future.
Decide on the location where you want to save the transcript file. Consider creating a dedicated folder or directory on your device or in your cloud storage platform specifically for storing meeting or call transcripts. This will help you keep all your transcripts organized and easily accessible.
If you prefer to save the transcript file on your local device, navigate to the desired folder or directory using your file explorer or finder. Right-click on the folder and select “Paste” or use the keyboard shortcut (Ctrl + V or Command + V) to paste the transcript file in the folder.
If you choose to save the transcript file in a cloud storage platform like OneDrive or SharePoint, navigate to the desired location within the platform and follow the instructions provided by the platform to upload the transcript file. This will ensure that the file is securely stored in the cloud and can be accessed from anywhere.
Remember to regularly back up your transcript files to prevent any data loss. You can create periodic backups by either copying the transcript files to an external storage device or syncing them to a secondary cloud storage platform.
By saving the transcript file in a well-organized manner, you can easily retrieve it whenever you need to refer back to the meeting or call details, share it with colleagues, or incorporate it into your documentation.
Conclusion
Downloading a transcript from Microsoft Teams allows you to capture and save the valuable conversations and discussions that take place during meetings or calls. Whether you are a student, a team member, or a project manager, having access to transcripts can enhance productivity, ensure accurate documentation, and improve collaboration within your organization.
In this article, we guided you through the step-by-step process of downloading a transcript from Microsoft Teams. We covered how to open the Teams app, join a meeting or call, access the meeting or call chat, find the transcript option, download the transcript, and save the transcript file.
Remember, it is essential to have the necessary permissions and settings enabled for recording meetings or calls in order to access and download the transcript. Be sure to double-check the availability of the transcript option within the chat tab.
By following these steps, you can effortlessly download and save transcripts, enabling you to refer back to important discussions, document decisions, and share information with others. The ability to download transcripts enhances communication, fosters collaboration, and contributes to a more efficient and organized workflow.
Make the most of Microsoft Teams’ powerful features and ensure that valuable information is captured and accessible by downloading and saving transcripts. Whether you need to review a lecture, keep meeting minutes, or document important client calls, the ability to download transcripts from Microsoft Teams is a valuable tool in your arsenal.