Introduction
Downloading your IRS transcript can be a useful way to obtain and review your tax-related information. Whether you need it for personal reference, applying for a loan, or for any other IRS-related matters, having access to your transcript online can save you time and effort. In this guide, we will explain the step-by-step process of how to download your IRS transcript.
Before we begin, it’s essential to understand what an IRS transcript is. It is a document that contains vital details about your tax return and financial history. It includes information like your filing status, income, deductions, and any potential tax liabilities or refunds. While it may not be a replacement for an actual copy of your tax return, an IRS transcript provides an overview of your tax-related information that the IRS holds on file.
By downloading your IRS transcript, you can easily access and review your tax information online. This can be helpful when you are preparing your tax return, need to verify information for a financial institution, or simply want a clear picture of your tax history. Now, let’s dive into the step-by-step process of downloading your IRS transcript.
Step 1: Gather the Required Information
The first step in downloading your IRS transcript is to gather the necessary information. Before visiting the IRS website, make sure you have the following details readily available:
1. Social Security Number (SSN): You will need to provide your SSN, which is a unique identifier that the IRS uses to track your tax records.
2. Date of Birth: Enter your correct date of birth to verify your identity and ensure that you have access to the relevant tax records.
3. Filing Status: Remember the filing status you used for the tax year you are interested in. This can be single, married filing jointly, married filing separately, head of household, or qualifying widow(er) with dependent child.
4. Mailing Address: Provide the mailing address you used when filing your tax return. Ensure that it matches the address on record with the IRS to avoid any potential verification issues.
5. Email Address: While not mandatory, providing your email address can be helpful if you want to receive notifications or electronic copies of your transcript in the future.
It is important to have this information readily available to streamline the process and ensure accuracy when accessing your IRS transcript.
Step 2: Visit the IRS Website
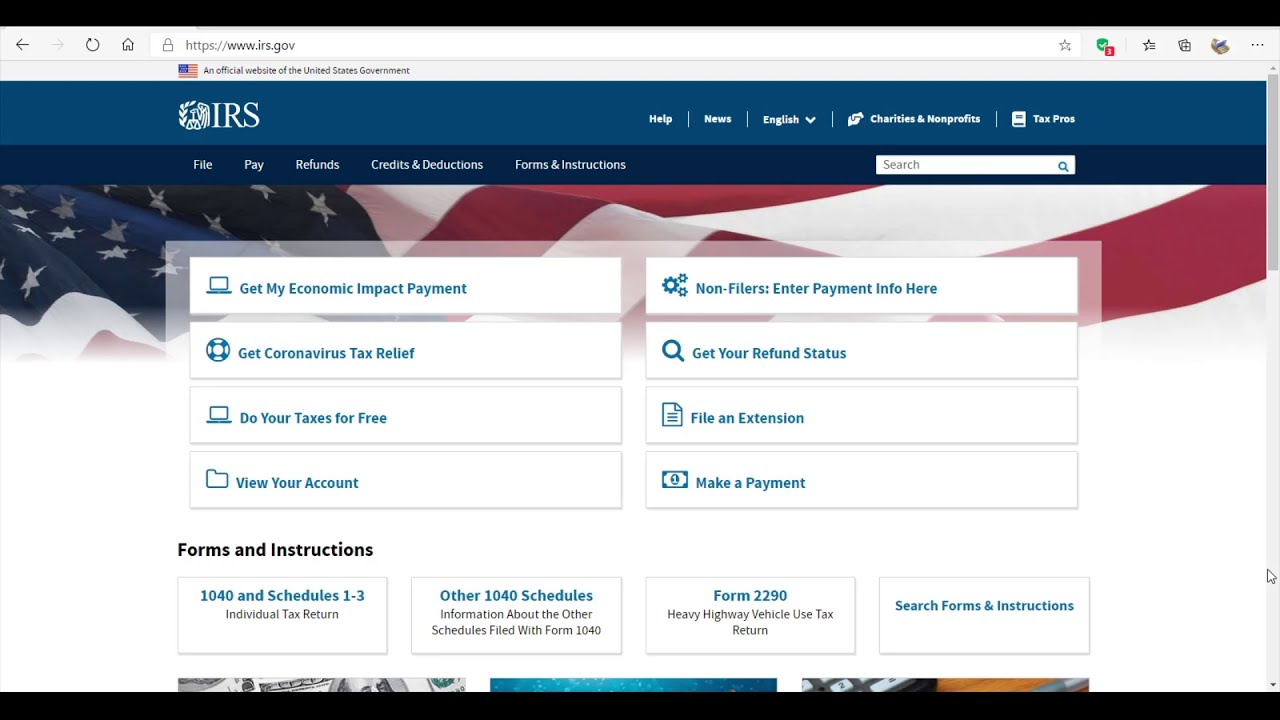
Once you have gathered all the necessary information, the next step is to visit the official website of the Internal Revenue Service (IRS). To access your IRS transcript, follow these simple instructions:
- Open your preferred internet browser and go to the IRS website at www.irs.gov.
- On the homepage, locate the search bar and type “Get Transcript.”
- Click on the search result that says “Get Transcript Online” to be redirected to the IRS Get Transcript page.
By landing on the Get Transcript page, you are one step closer to obtaining your IRS transcript quickly and conveniently.
It is important to note that the IRS website is the official platform for accessing your tax-related information. Be cautious of any third-party websites claiming to offer IRS transcript services, as they may not be trustworthy or secure.
Once you are on the correct page, you are now ready to proceed to the next step in the process.
Step 3: Choose the Transcript Type
After landing on the IRS Get Transcript page, you will have the option to choose the type of transcript you need. The IRS offers several different types of transcripts, each serving a specific purpose. Selecting the correct transcript type is crucial to ensure you obtain the necessary information. Here are the available options:
- Tax Return Transcript: This transcript provides a summary of your tax return information, including line items, deductions, and any adjustments made. It does not include any changes or amendments made after the original filing.
- Account Transcript: An account transcript provides a comprehensive overview of your tax account, including your payments, penalties, interest, and other relevant details. It does not include the actual line-by-line information from your tax return.
- Record of Account Transcript: This transcript combines both the tax return transcript and the account transcript, providing a more detailed record of your tax-related information.
- Wage and Income Transcript: This transcript shows the reported income and tax documents (e.g., W-2s, 1099s) associated with your Social Security Number. It is often used to verify income and ensure the accuracy of tax filing.
Choose the transcript type that best suits your needs based on the information you require. Keep in mind that if you are unsure which one to select, the tax return transcript is a good starting point as it provides a comprehensive summary of your tax return information.
Once you have decided on the appropriate transcript type, you are ready to proceed to the next step in the process.
Step 4: Provide Personal Verification
After selecting the desired transcript type, the next step is to provide personal verification to confirm your identity. The IRS takes data security and privacy seriously, and this step ensures that only authorized individuals can access the requested tax information. Follow these steps to verify your identity:
- Enter your Social Security Number (SSN) and date of birth in the designated fields. Double-check the information to ensure accuracy.
- Input your filing status for the tax year you are requesting the transcript for. Choose the same filing status you used when submitting your tax return.
- Provide the mailing address associated with your tax return. It is crucial to enter the address exactly as it appears on your tax documents or the IRS records.
- Complete the personal verification process by answering a series of security questions. These questions are based on your financial and personal history to ensure only you have access to the requested information.
It is vital to answer the security questions correctly. Incorrect answers may result in further verification requirements or difficulty accessing your transcript.
By verifying your personal information, you demonstrate that you are the rightful owner of the tax-related data you are requesting. Once you successfully complete the personal verification process, you can move on to the next step.
Step 5: Select Download Format
Once you have completed the personal verification process, you will be directed to the download format selection page. The IRS offers two primary formats for downloading your transcript:
- PDF Format: Selecting this option will allow you to download your transcript in a PDF file format. PDF files are easily accessible and can be viewed on most devices using compatible software or applications.
- HTML Format: Choosing this option will enable you to download your transcript in an HTML file format. HTML files can be viewed in web browsers, making it convenient for online viewing or printing.
Consider the purpose and convenience of use when selecting the download format. If you wish to save and retain a copy of your transcript on your device or computer, the PDF format is recommended. On the other hand, if you prefer to view the transcript online or print a hard copy immediately, the HTML format will suit your needs.
It is important to note that once you have selected the format, you will not be able to change it later. Hence, choose the appropriate format that aligns with your preferences and requirements.
After selecting the desired format, you are ready to proceed to the next step to download and save your IRS transcript.
Step 6: Download and Save the Transcript
Once you have chosen the preferred download format, the next step is to download and save your IRS transcript. Follow these straightforward instructions:
- Click the “Download” button next to the selected download format (PDF or HTML).
- Depending on your browser settings, a pop-up window may appear, asking you to choose where to save the file. Select the desired location on your device or computer.
- Once the download is complete, navigate to the location where you saved the file. If you chose the PDF format, the transcript will be in a PDF file. If you selected the HTML format, the transcript will be in an HTML file.
- Open the downloaded file to view your IRS transcript. Make sure to have the necessary software or applications installed on your device to access the respective file format.
Once you have successfully downloaded and saved your IRS transcript, you now have a digital copy readily available for your reference and use.
Remember to keep the downloaded transcript file in a secure location on your device or computer. Treat it with the same confidentiality as you would with any other sensitive financial information.
In the next step, we will cover the optional step of printing or emailing your IRS transcript if needed.
Step 7: Print or Email the Transcript (Optional)
After successfully downloading and saving your IRS transcript, you have the option to print a hard copy or email it if needed. This step is not mandatory but can be useful in certain situations. Here’s how you can proceed:
Print the Transcript:
- Open the downloaded transcript file on your computer or device.
- Click on the print icon or go to the “File” menu and select “Print.”
- Choose the printer you want to use and adjust any printing settings if necessary.
- Click “Print” to generate a physical copy of your IRS transcript.
Make sure you have a printer connected to your device and loaded with paper before initiating the printing process.
Email the Transcript:
- Open your email client or web-based email service.
- Create a new email message.
- Attach the downloaded IRS transcript file to the email.
- Enter the recipient’s email address and compose a message if desired.
- Click “Send” to email the transcript.
Ensure that you have the correct email address of the recipient and double-check the attached file before sending the email.
Printing or emailing the transcript allows you to have a physical copy or send it electronically to individuals or institutions that require this information. However, if you do not need a hard copy or intend to share the transcript, you can skip this optional step.
Now that you have completed the necessary steps, you have successfully downloaded and, if needed, printed or emailed your IRS transcript.
Conclusion
Downloading your IRS transcript is a straightforward process that allows you to access and review your tax-related information conveniently. By following the step-by-step guide outlined in this article, you can quickly obtain your IRS transcript online. Let’s recap the steps:
- Gather the required information, including your Social Security Number, date of birth, filing status, mailing address, and email address.
- Visit the official IRS website and navigate to the Get Transcript page.
- Choose the transcript type that best suits your needs.
- Provide personal verification by entering your SSN, date of birth, filing status, and mailing address, and answering security questions.
- Select the preferred download format, either PDF or HTML.
- Download and save the transcript in the chosen format to your device or computer.
- Optional: Print a hard copy or email the transcript if required.
Remember to keep your downloaded IRS transcript secure and treat it with confidentiality, just like any other sensitive financial information. Having a readily available IRS transcript can be helpful for various purposes, such as tax preparation, financial verification, or personal record keeping.
By following these steps, you can easily access your IRS transcript and have a clear understanding of your tax-related information. If you encounter any issues or have specific inquiries regarding your transcript, it is advisable to reach out to the Internal Revenue Service for further assistance.
Now that you have the knowledge and know-how, you are ready to download your IRS transcript and stay informed about your tax history.