Introduction
Zoom is a popular video conferencing platform that allows users to connect and collaborate with others remotely. With its wide range of features and functionalities, Zoom has become an essential tool for businesses, educational institutions, and individuals alike.
One of the key features that Zoom offers is the ability to enable transcription during meetings. This feature is particularly useful for individuals who are deaf or hard of hearing, as well as for those who prefer to have a written record of the discussions that take place during a meeting.
In this article, we will walk you through the process of enabling transcription in Zoom. Whether you want to provide greater accessibility for participants or simply have a detailed transcript of your meetings, enabling transcription in Zoom is a straightforward process that can greatly enhance your video conferencing experience.
Before we dive into the steps to enable transcription in Zoom, it is worth mentioning that this feature may not be available to all users, as it depends on the version of Zoom you are using. Make sure that you have the latest version of Zoom installed on your device to take advantage of this feature.
Now, let’s get started and learn how to enable transcription in Zoom!
Step 1: Update Zoom
The first step in enabling transcription in Zoom is to ensure that you have the latest version of the Zoom application installed on your device. Zoom regularly releases updates to improve functionality and add new features, so it’s important to keep your software up to date.
To update Zoom, follow these simple steps:
- Open the Zoom application on your computer or mobile device.
- Click on your profile picture in the top-right corner of the screen to open the menu.
- In the menu, click on “Check for Updates”.
- If an update is available, click on “Update” to download and install the latest version of Zoom.
- Once the update is complete, restart the Zoom application.
By ensuring that you have the most recent version of Zoom installed, you can take advantage of the latest features and improvements, including the ability to enable transcription in your meetings.
Note that updating Zoom may require administrative privileges on your computer. If you are using a work computer, you may need to contact your IT department for assistance with updating Zoom.
Now that you have updated Zoom to the latest version, you are ready to proceed to the next step: enabling transcription in your Zoom settings.
Step 2: Enable Transcription in your Zoom settings
Once you have updated Zoom to the latest version, you can now proceed to enable transcription in your Zoom settings. The transcription feature needs to be enabled at the account or group level before it can be used in meetings.
Here’s how you can enable transcription in your Zoom settings:
- Open the Zoom application on your computer or mobile device.
- Click on your profile picture in the top-right corner of the screen to open the menu.
- In the menu, click on “Settings” to access your Zoom settings.
- In the left sidebar of the settings window, click on “Recording”.
- Scroll down until you find the “Cloud recording” section.
- Make sure the “Cloud recording” setting is enabled. If it’s not enabled, toggle the switch to turn it on.
- Check the box next to “Audio transcript” to enable transcription.
- Click “Save” to save the changes.
Enabling transcription in your Zoom settings allows you to automatically generate transcripts for your recorded meetings. These transcripts are saved along with your recorded meetings in the Zoom cloud, making them easily accessible for future reference.
It’s important to note that enabling transcription might not immediately take effect, as the changes may need some time to propagate through the Zoom system. However, once enabled, you’ll be able to use the transcription feature in your meetings.
With transcription enabled in your Zoom settings, you can now proceed to the next step: starting a Zoom meeting.
Step 3: Start a Zoom Meeting
Now that you have enabled transcription in your Zoom settings, it’s time to start a Zoom meeting. Whether you’re hosting a meeting or joining one, the process to start a meeting is quite simple.
Here’s how you can start a Zoom meeting:
- Open the Zoom application on your computer or mobile device.
- If you are the host, click on the “New Meeting” button. If you are joining a meeting, click on the “Join” button and enter the Meeting ID provided by the host.
- Once the meeting has started, you will be taken to the meeting interface where you can see video and audio options.
- Before enabling live transcription, make sure you have a stable internet connection and a microphone.
Starting a Zoom meeting allows you to connect with other participants and begin your discussions. It is important to ensure that all participants have a clear understanding of the meeting agenda and any guidelines or expectations for the meeting.
Once the meeting has begun, you can proceed to enable live transcription to get real-time text transcription of the spoken words during the meeting. This can be particularly helpful for participants who are deaf or hard of hearing, or for those who prefer to read along as the conversation unfolds.
With the meeting started, it’s time to move on to the next step: enabling live transcription during the meeting.
Step 4: Enable Live Transcription during the Meeting
Enabling live transcription during a Zoom meeting allows participants to view real-time text transcription of the spoken words. This feature can greatly enhance accessibility and facilitate better communication during the meeting.
Here’s how you can enable live transcription during a Zoom meeting:
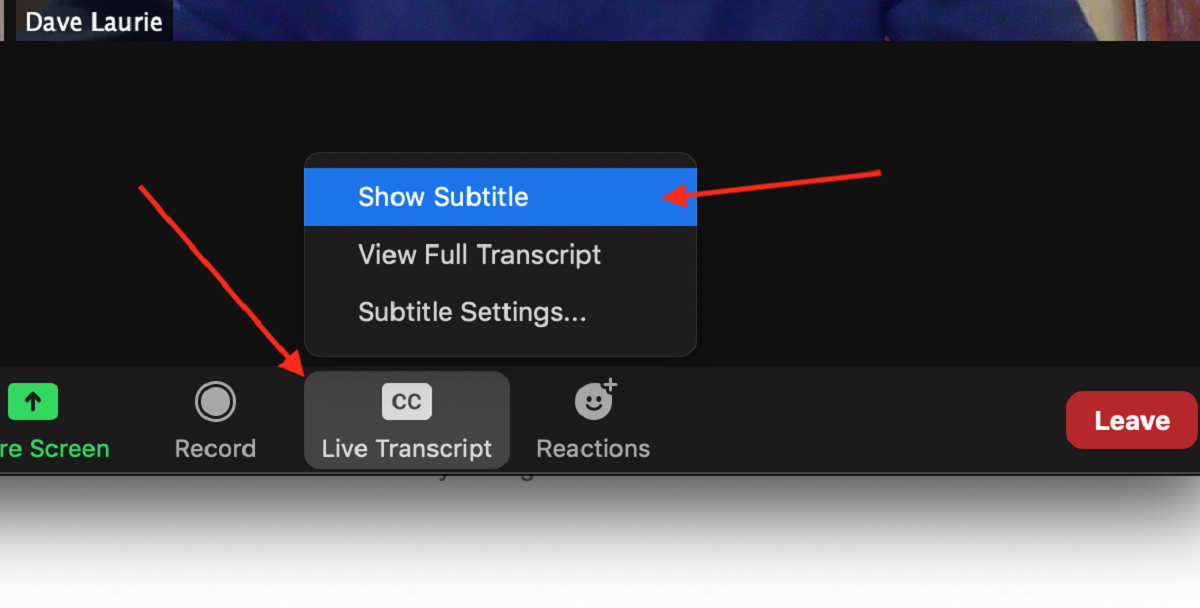
- Once you are in the Zoom meeting interface, look for the toolbar at the bottom of the screen.
- Click on the “Live Transcript” button located in the toolbar.
- A menu will appear with the option to enable/disable live transcription.
- Click on “Enable Auto-Transcription” to activate live transcription during the meeting.
Once live transcription is enabled, you will start seeing real-time captions at the bottom of the meeting screen as participants speak. The transcriptions are automatically generated by Zoom’s speech recognition technology.
It’s important to note that the accuracy of the transcription may vary based on factors such as background noise, speaker clarity, and internet connection. However, the live transcription feature can still provide valuable support in understanding the meeting discussions.
If you want to disable live transcription during the meeting, simply follow the same steps and click on “Disable Auto-Transcription” from the Live Transcript menu.
Enabling live transcription offers a range of benefits, including improved accessibility, better comprehension of discussions, and the ability to refer back to the transcriptions later on. With live transcription enabled, you can now move on to customizing your transcription settings, the next step in the process.
Step 5: Customize Transcription Settings
Customizing the transcription settings in Zoom allows you to personalize the transcription experience to better suit your needs and preferences. You can adjust various settings related to the appearance and behavior of the transcriptions during the meeting.
Here’s how you can customize the transcription settings in Zoom:
- While in a Zoom meeting, click on the “Live Transcript” button located in the toolbar at the bottom of the screen.
- In the Live Transcript menu, click on “Transcript Settings”.
- A new window will appear, displaying various settings that you can customize.
- Under the “Display” tab, you can choose to show or hide the transcript sidebar and adjust the size of the text.
- Under the “Accessibility” tab, you can modify settings related to accessibility features such as keyboard shortcuts and screen reader support.
- Under the “Advanced” tab, you can enable/disable options like Speaker Attribution, allowing you to see who is speaking in the transcript.
- Once you have made the desired changes, click on the “Apply” button to save the settings.
By customizing the transcription settings, you can make the transcriptions more visually appealing and optimize them for your specific needs. This can help improve the overall meeting experience and make it easier for participants to follow along.
Remember that the availability of certain customization options may depend on the version of Zoom you are using. If you do not see a specific setting in your Zoom settings, it may be because that feature is not available in your version.
Now that you have customized the transcription settings, you are ready to move on to the final step: downloading the transcription after the meeting.
Step 6: Download the Transcription after the Meeting
After the Zoom meeting has ended, you have the option to download the transcription for future reference or sharing. This allows you to have a written record of the meeting discussions and easily revisit important points or take notes.
Here’s how you can download the transcription after the meeting:
- Go to the Zoom website and sign in to your account.
- In the navigation menu on the left, click on “Recordings”.
- Select the meeting for which you want to download the transcription.
- Scroll down to the “Cloud Recordings” section and locate the meeting recording.
- Click on the recording to expand the details.
- Under the “Transcripts” section, click on the “Download” button next to the transcription file.
Once you click on the “Download” button, the transcription file will be saved to your device in a format compatible with your text editor or word processing software. You can then open the file to review the transcription and make any necessary edits or annotations.
It’s important to note that the availability of transcription downloads may depend on the version of Zoom you are using and the permissions set by your account administrator or host. If you do not see the option to download the transcription, it may be because it is not available or has not been enabled for your account or meeting.
Downloading the transcription provides you with a convenient way to refer back to the meeting discussions, extract key points, and share the transcript with others who may have missed the meeting. It can be particularly helpful for participants who need to review important details or for compliance and documentation purposes.
With the transcription downloaded, you have completed the final step in the process. You are now equipped with the knowledge to enable, use, and customize transcription in Zoom to enhance your meeting experience.
Conclusion
Enabling transcription in Zoom can greatly enhance the accessibility and effectiveness of your meetings. With the ability to automatically transcribe spoken words into text, participants who are deaf or hard of hearing can fully engage in the discussion, and everyone can benefit from having a written record of the meeting.
In this article, we have walked through the step-by-step process of enabling transcription in Zoom. From updating your Zoom application to customizing transcription settings and downloading transcriptions after the meeting, each step is crucial in maximizing the benefits of this feature.
By keeping your Zoom application updated, you ensure that you have access to the latest features and improvements, including transcription functionality. Enabling transcription in your Zoom settings and starting a meeting provide the foundation for utilizing this powerful tool.
Once the meeting is underway, enabling live transcription provides real-time text transcription of the spoken words, enhancing communication and accessibility. Customizing the transcription settings allows you to personalize the transcription experience to suit your preferences and optimize the visual display of the transcriptions.
Finally, downloading the transcriptions after the meeting gives you a permanent record of the discussions, making it easy to review important details and share the transcript with others who may benefit from it.
With transcription in Zoom, you can foster inclusivity, improve comprehension, and create a more productive and collaborative meeting environment. Whether for professional meetings, educational sessions, or personal discussions, transcription can revolutionize the way you communicate and engage with others.
So, take advantage of Zoom’s transcription feature and unlock the full potential of remote collaboration. Enable, customize, and utilize transcription in your Zoom meetings to create a more accessible and efficient virtual communication experience.